


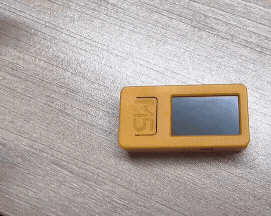
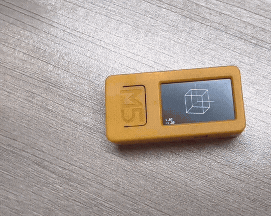
StickC-Plus2
SKU: K016-P2
Description
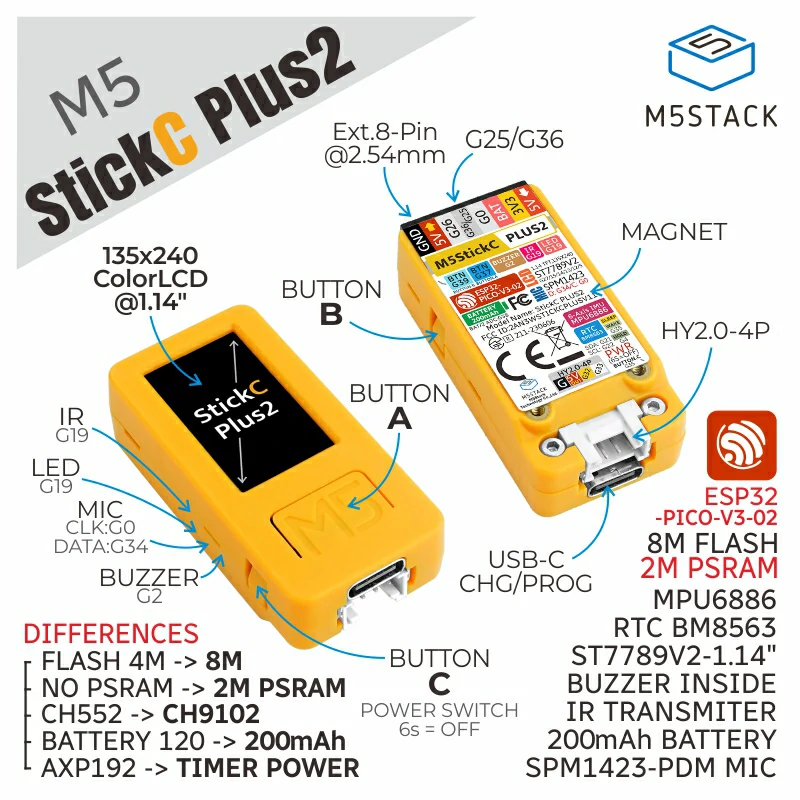
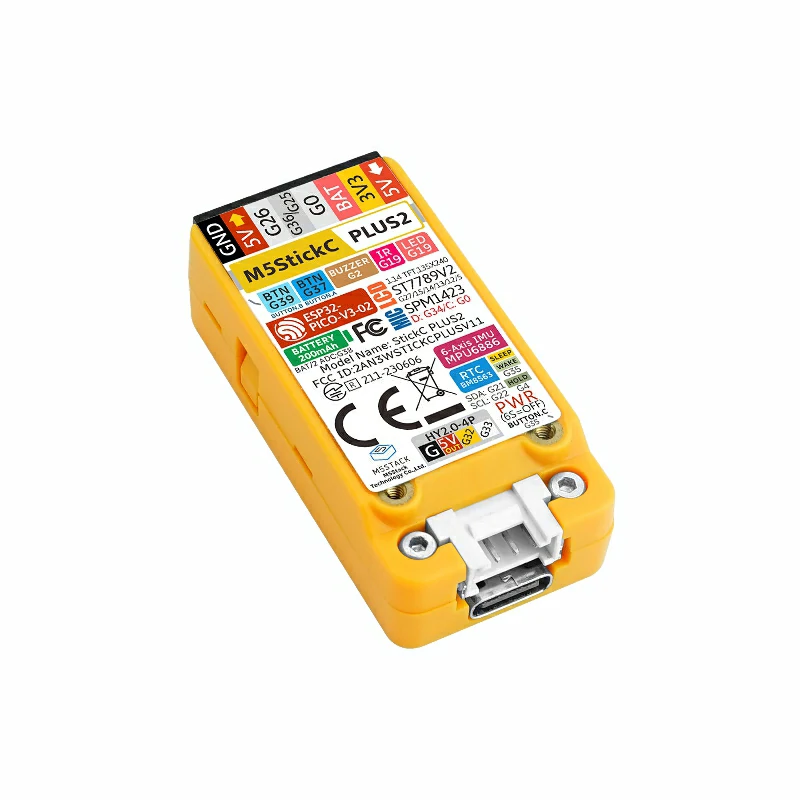
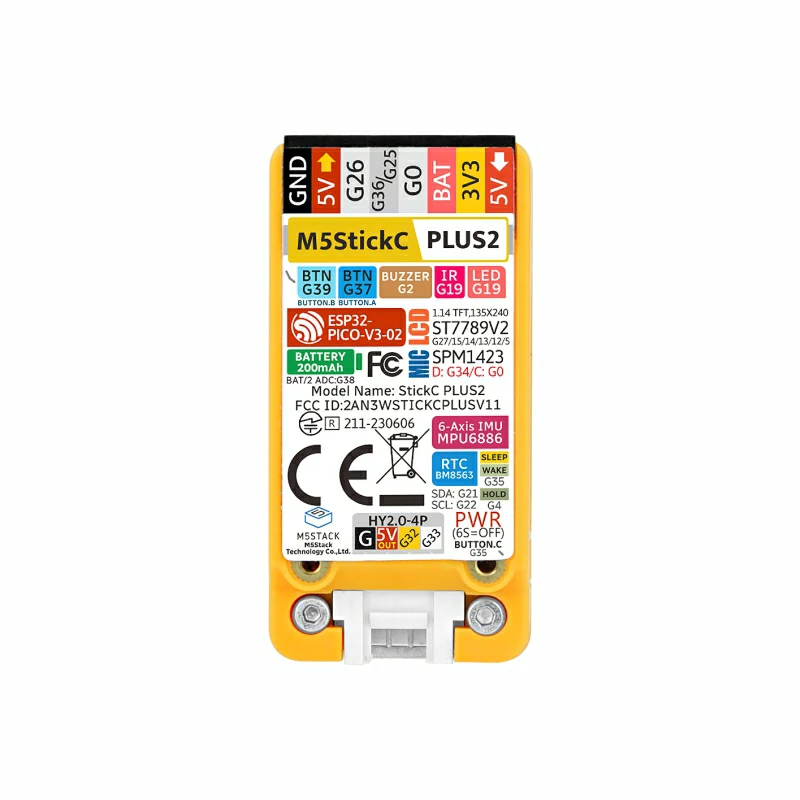
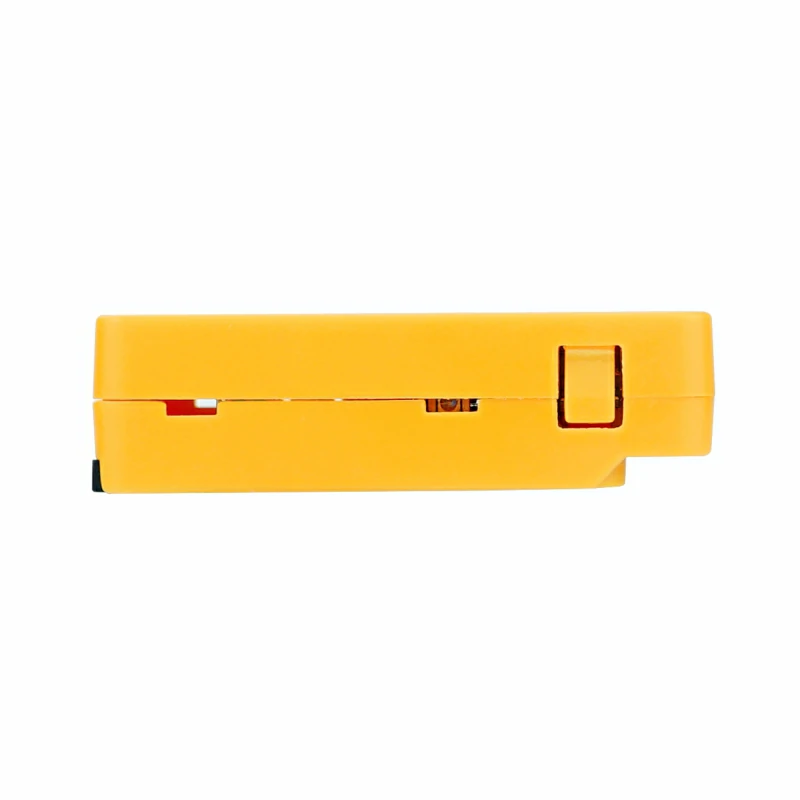
StickC-Plus2 is an iterative version of the StickC-Plus. Its main control uses the ESP32-PICO-V3-02 chip, which supports Wi-Fi. Inside its compact body, it integrates a variety of hardware resources, such as infrared, RTC, microphone, LED, IMU, buttons, and buzzer. It features a 1.14-inch TFT screen driven by ST7789V2 with a resolution of 135 x 240. The battery capacity has been increased to 200mAh, and it supports HAT and Unit series products.
This compact and exquisite development tool can unleash unlimited creative potential. StickC PLUS2 can help quickly build IoT product prototypes, greatly simplifying the entire development process. Even beginners who are just starting to learn programming can use it to build some interesting applications and apply them to real-life scenarios.
Tutorial


Note
First, disconnect the StickC-Plus2, power it off (hold the power button until the green light turns on, indicating it is powered off), and then reconnect the USB cable to power it on.
Features
- Based on ESP32-PICO-V3-02 development, supports Wi-Fi
- Built-in 3-axis accelerometer and 3-axis gyroscope
- Integrated infrared emitter
- Built-in RTC
- Integrated microphone
- User buttons, LCD (1.14 inch), power/reset button
- 200mAh lithium battery
- Expansion interface
- Integrated passive buzzer
- Wearable & mountable
- Development Platform
- UiFlow1
- UiFlow2
- Arduino IDE
- ESP-IDF
- PlatformIO
Includes
- 1 x StickC-Plus2
Applications
- Wearable devices
- IoT controllers
- STEM education
- DIY projects
- Smart home devices
Specifications
| Specification | Parameters |
|---|---|
| ESP32 | ESP32-PICO-V3-02 240MHz dual core, supports Wi-Fi, 2 MB PSRAM, 8 MB flash |
| PSRAM | 2 MB PSRAM |
| Flash | 8 MB flash |
| Input Voltage | 5V @ 500mA |
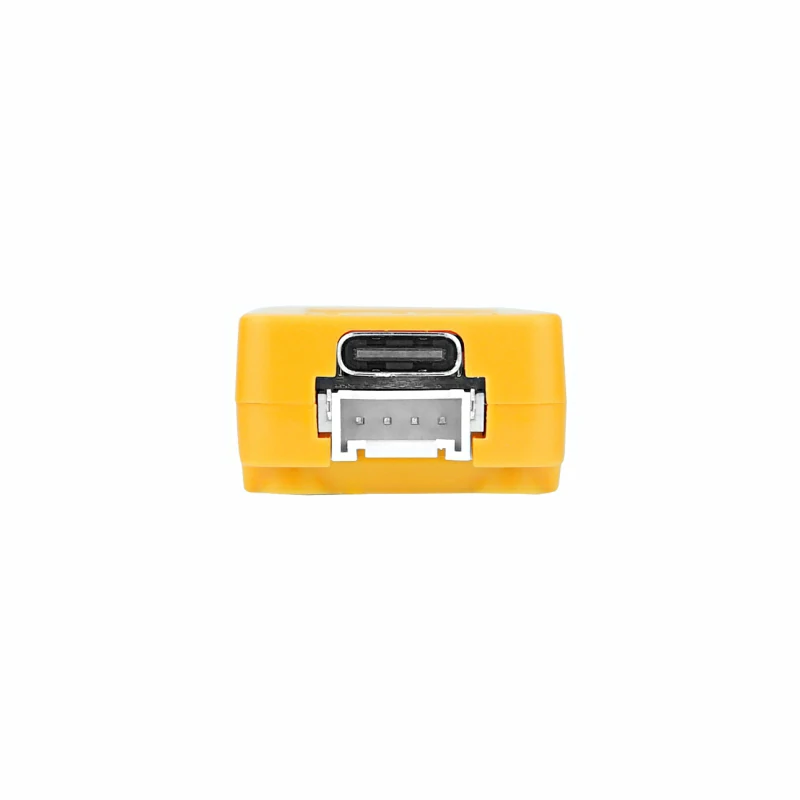
| Interface | TypeC x 1, GROVE (I2C+I/O+UART) x 1 |
| LCD Screen | 1.14 inch, 135*240 Colorful TFT LCD, ST7789v2 |
| Microphone | SPM1423 |
| Buttons | Custom buttons x 3 |
| LED | Green LED x 1 (non-programmable) (sleep status indicator) Red LED x 1 (shared with IR emitter control pin G19) |
| RTC | BM8563 |
| Buzzer | Onboard buzzer |
| IMU | MPU6886 |
| Antenna | 2.4G 3D antenna |
| External Pins | G0, G25/G26, G36, G32, G33 |
| Battery | 200mAh @ 3.7V, internal |
| Operating Temperature | 0 ~ 40°C |
| Housing Material | Plastic (PC) |
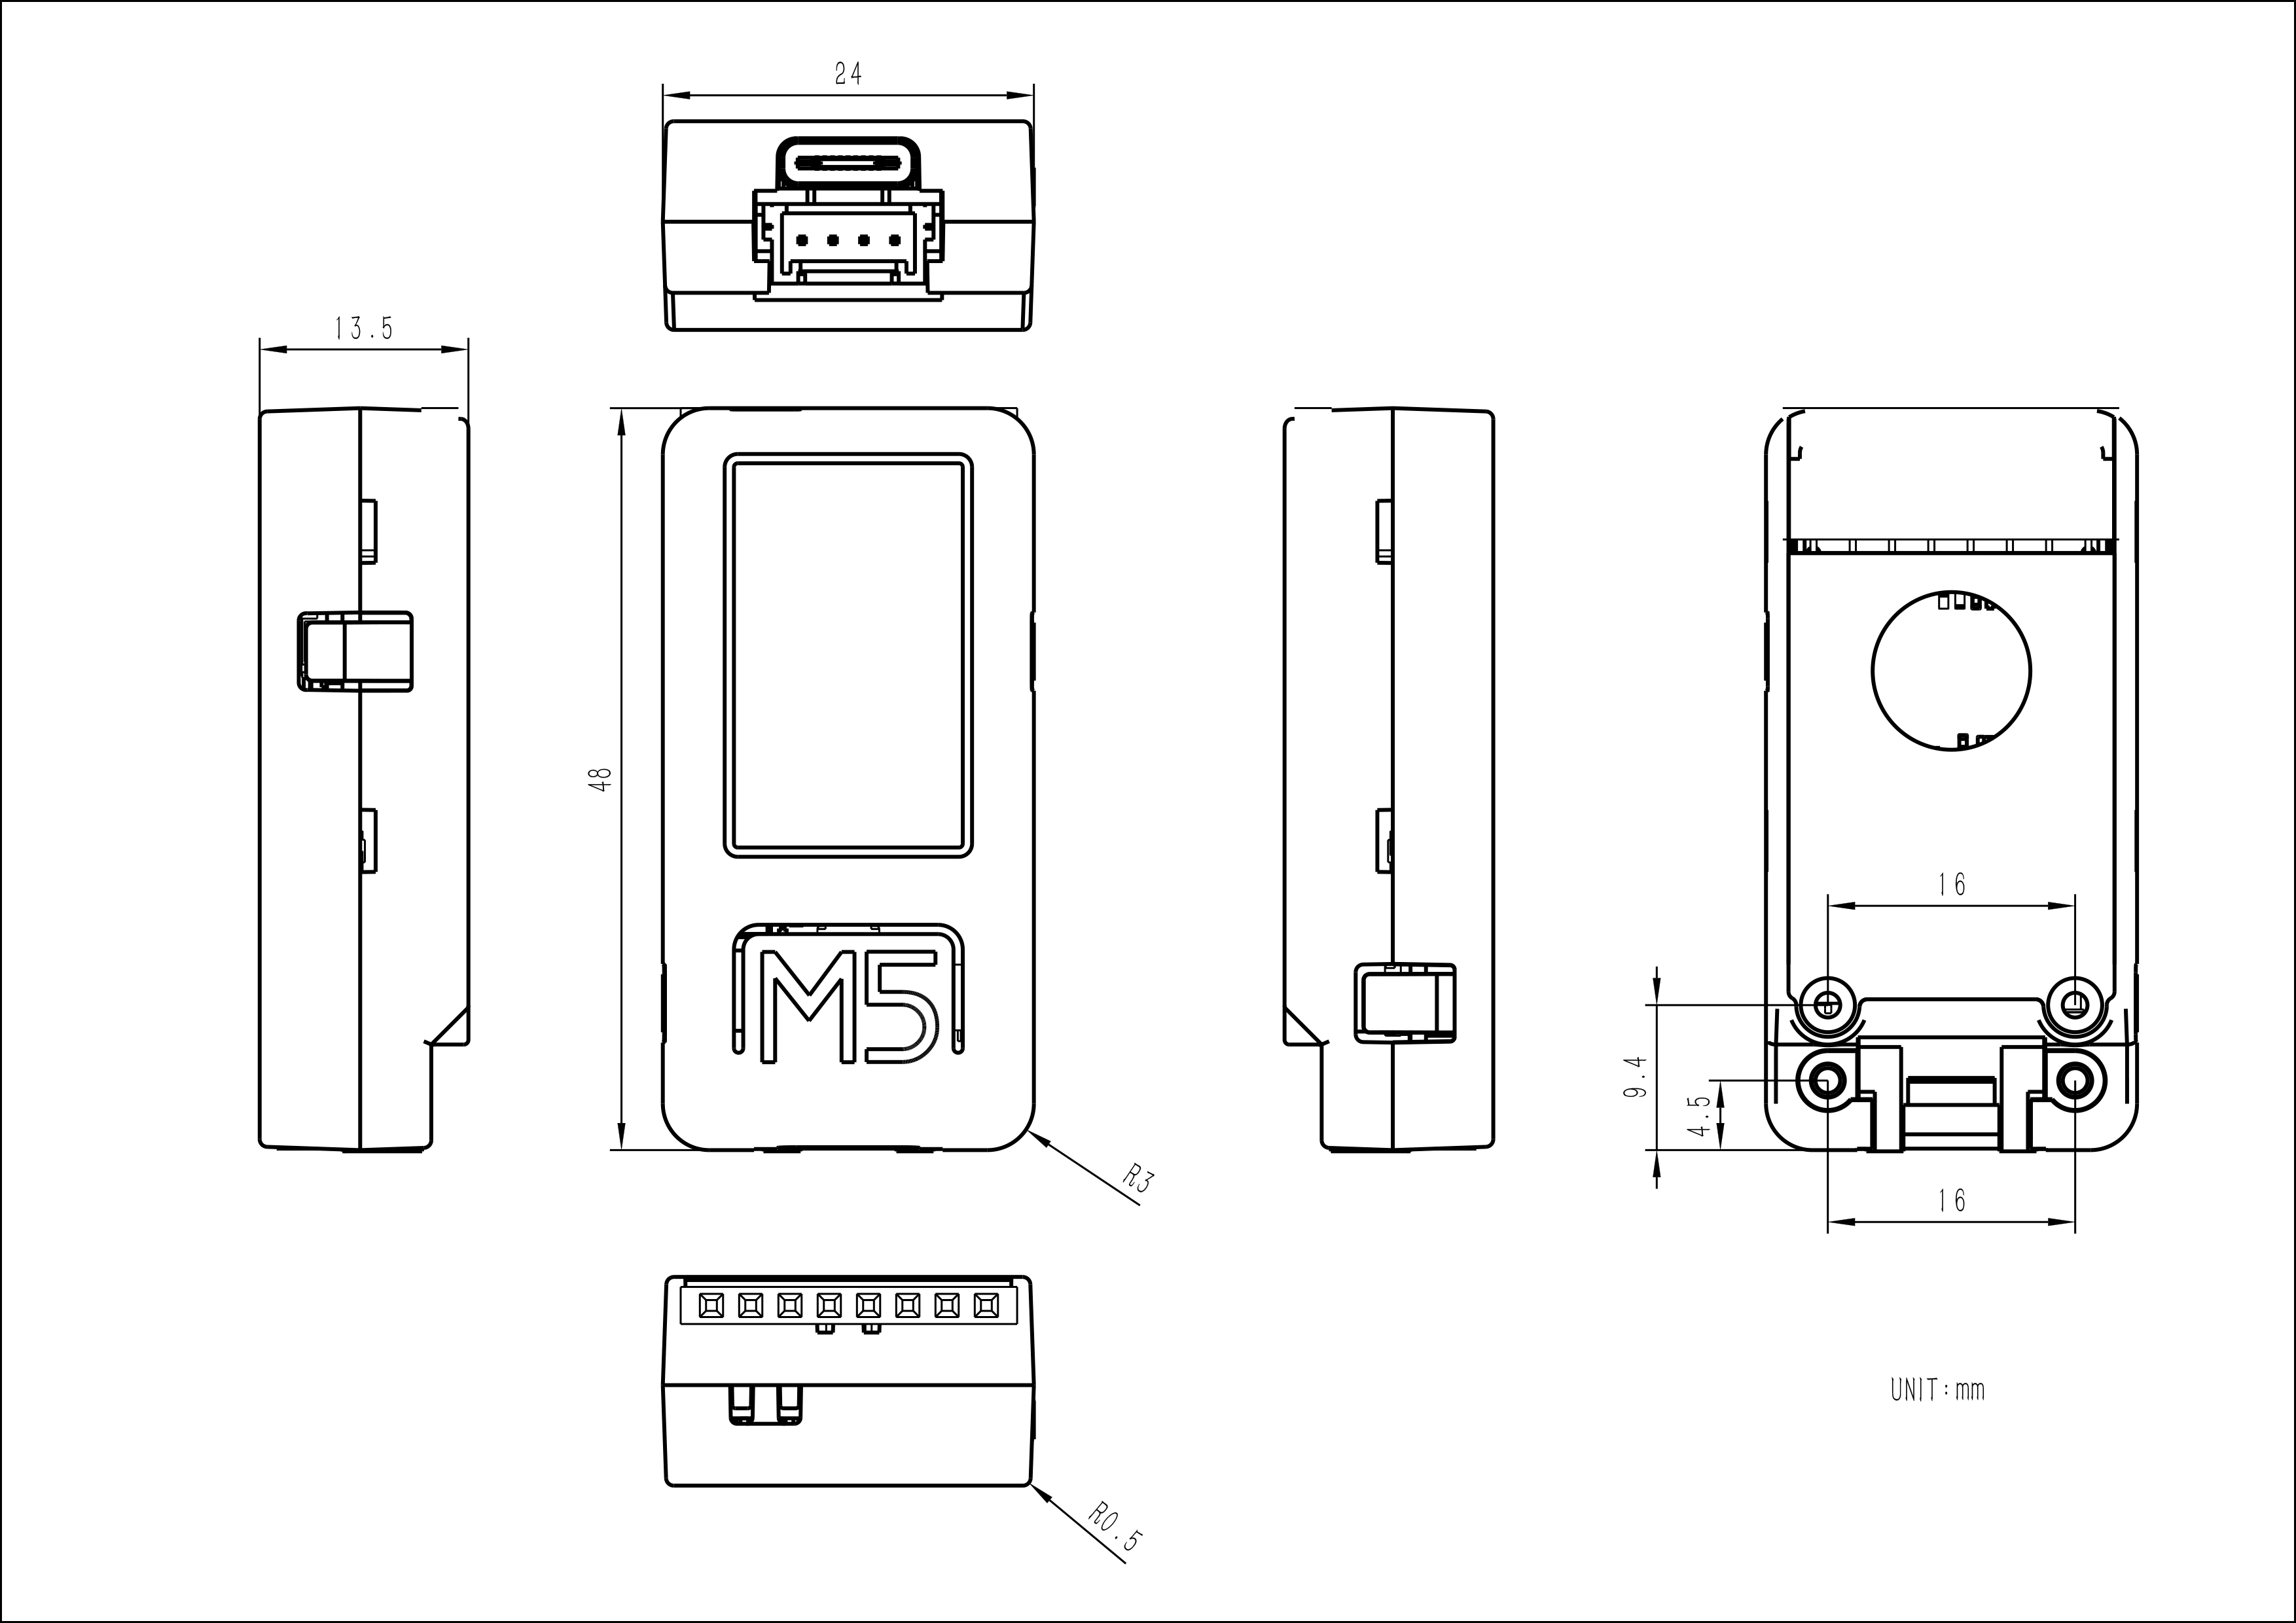
| Product Dimensions | 48.0 x 24.0 x 13.5mm |
| Product Weight | 17.2g |
| Package Dimensions | 104.4 x 65.0 x 18.0mm |
| Gross Weight | 26.3g |
Learn
Power On/Off
Press the "BUTTON C" button for more than 2 seconds, or wake up via the IRQ signal triggered by the RTC timer. After triggering the wake-up signal, the program initialization needs to set the hold(G4) pin to high (1) to maintain power, otherwise the device will re-enter the power-off state.
Power Off:
When there is no external USB power supply, press the "BUTTON C" button for more than 6 seconds. Or, when there is no external USB power supply, set HOLD(GPIO4)=0 in the program to power off. When connected to USB, press the "BUTTON C" button for more than 6 seconds to turn off the screen and enter sleep mode, but not power off.
Schematics
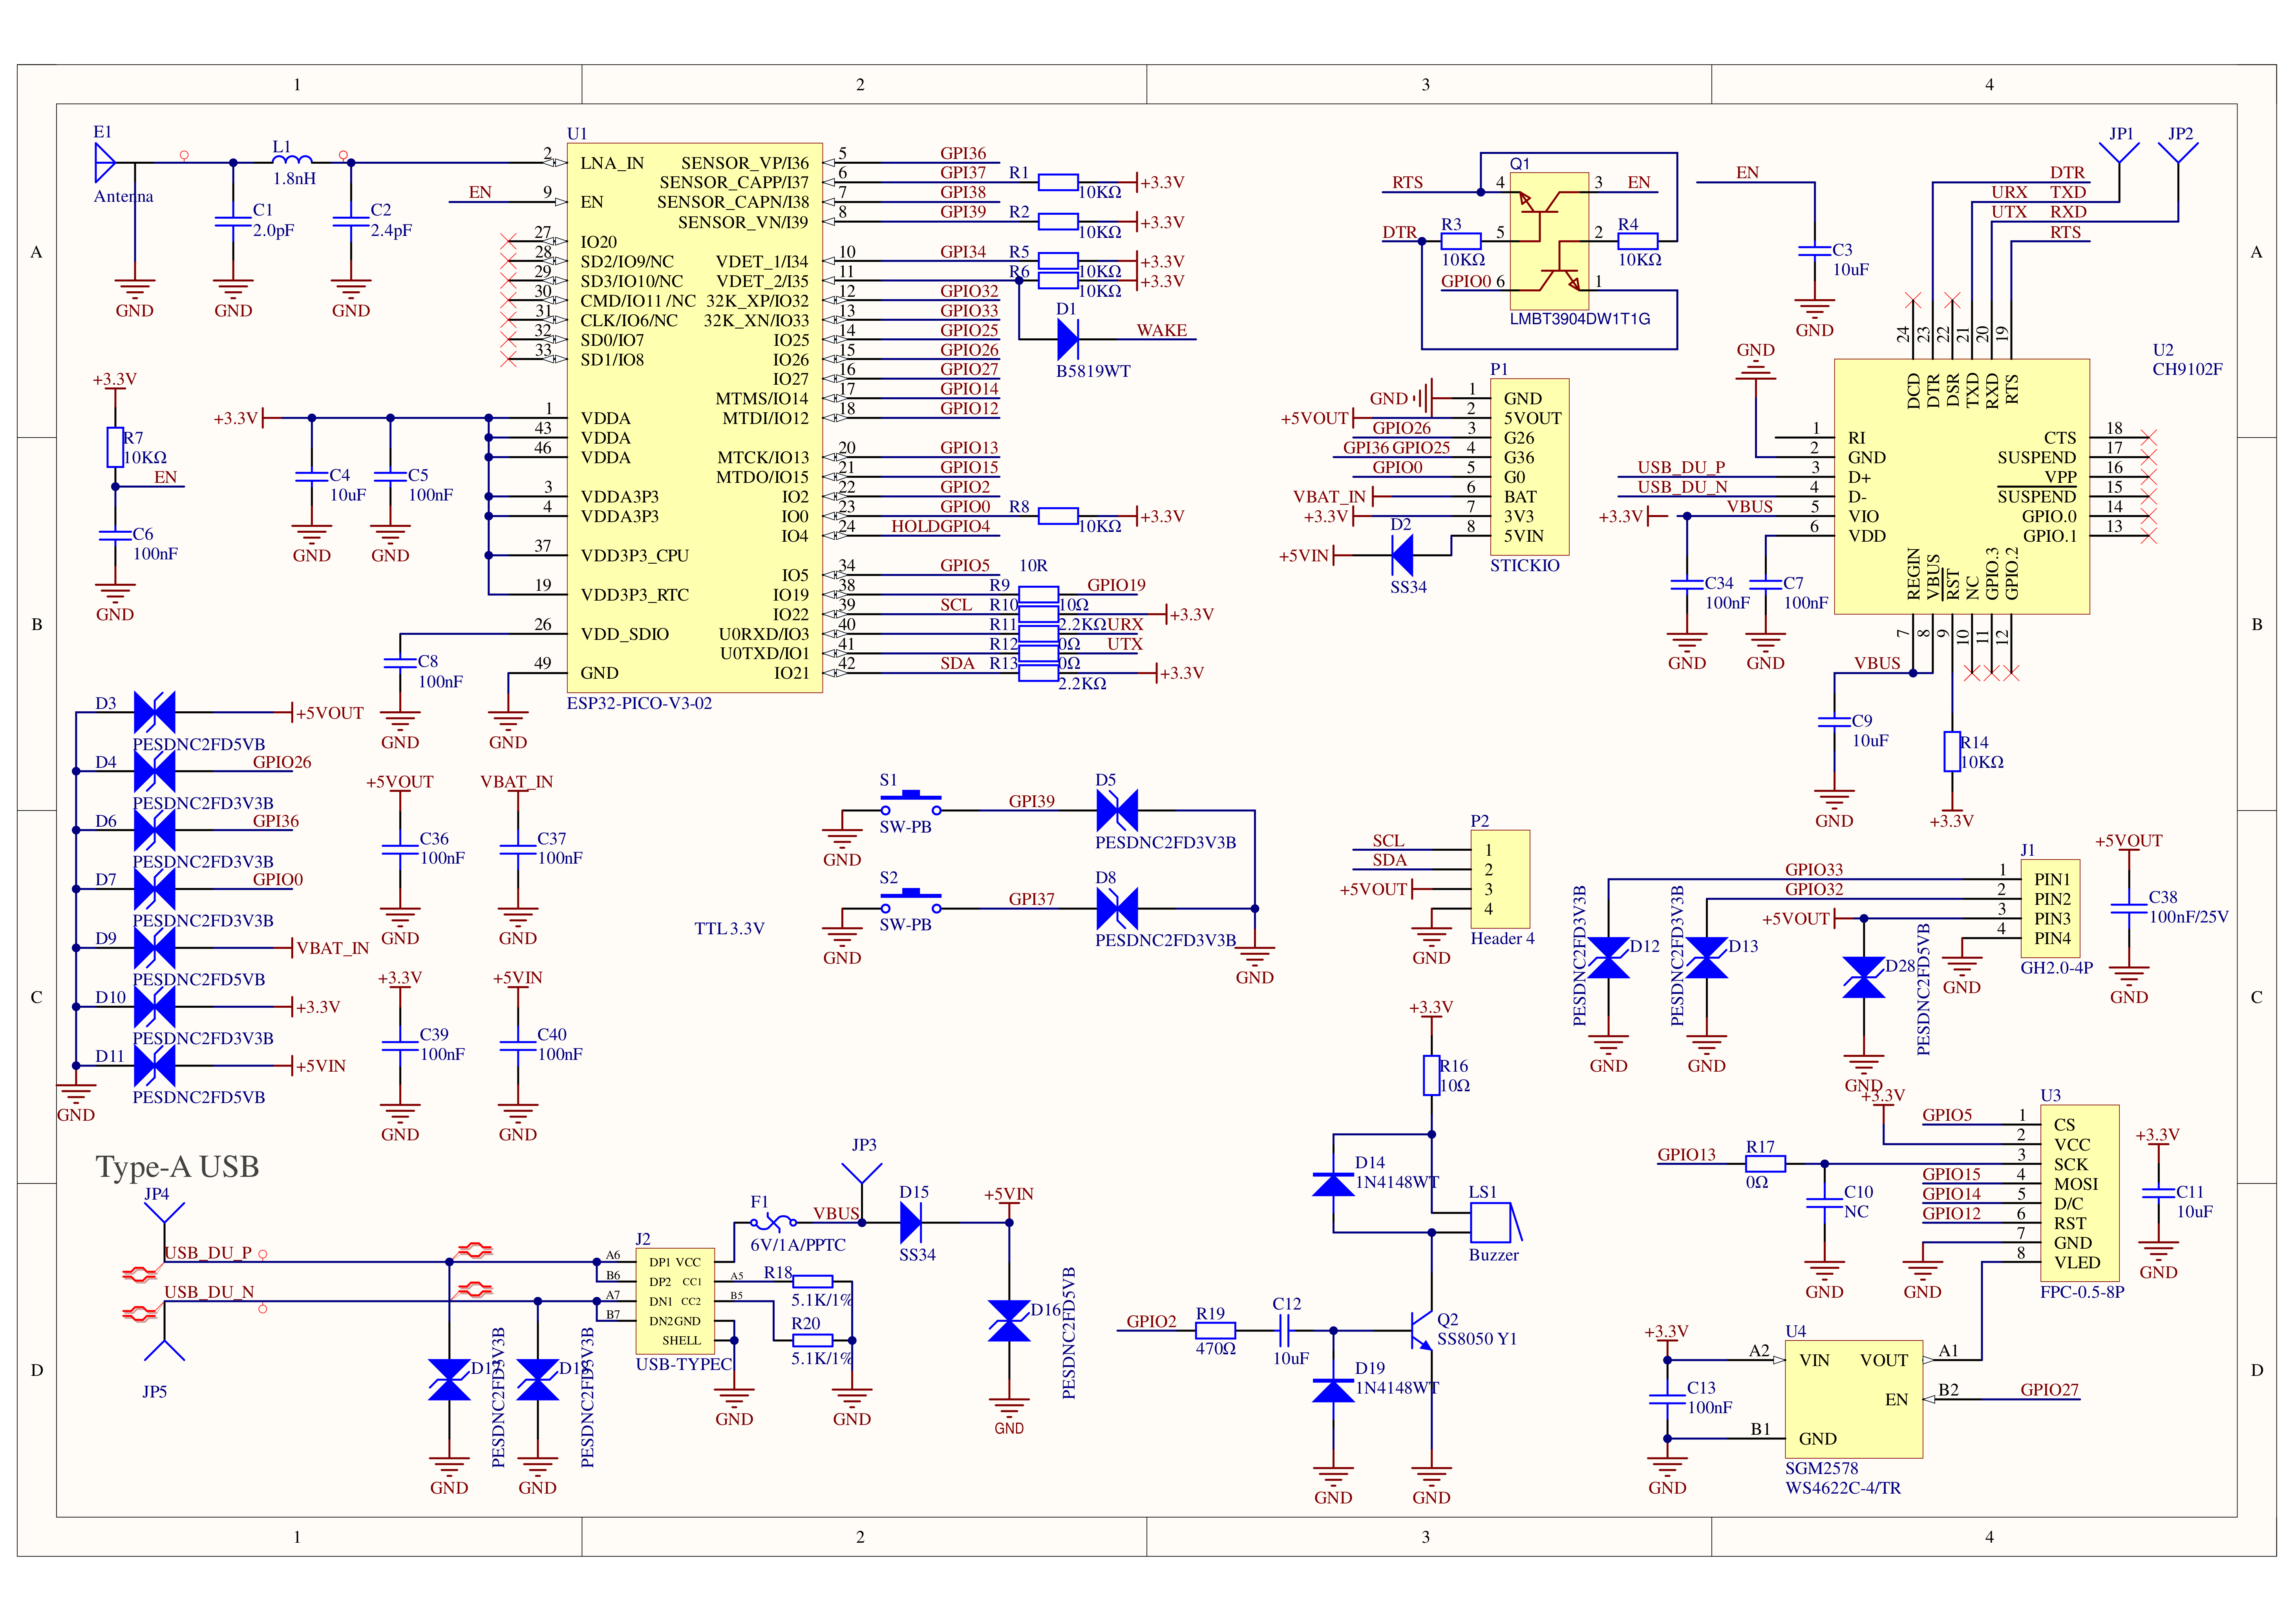

PinMap
Red LED & IR Emitter & Button A & Button B & Buzzer
| ESP32 Chip | GPIO19 | GPIO37 | GPIO39 | GPIO35 | GPIO2 |
|---|---|---|---|---|---|
| IR Emitter & Red LED | IR Emitter and Red LED pin | ||||
| Button A | Button A pin | ||||
| Button B | Button B pin | ||||
| Button C | Button C pin | ||||
| Passive Buzzer | Buzzer pin |
Color TFT Screen
Driver Chip: ST7789v2
Resolution: 135 x 240
| ESP32 Chip | G15 | G13 | G14 | G12 | G5 | G27 |
|---|---|---|---|---|---|---|
| TFT Screen | TFT_MOSI | TFT_CLK | TFT_DC | TFT_RST | TFT_CS | TFT_BL |
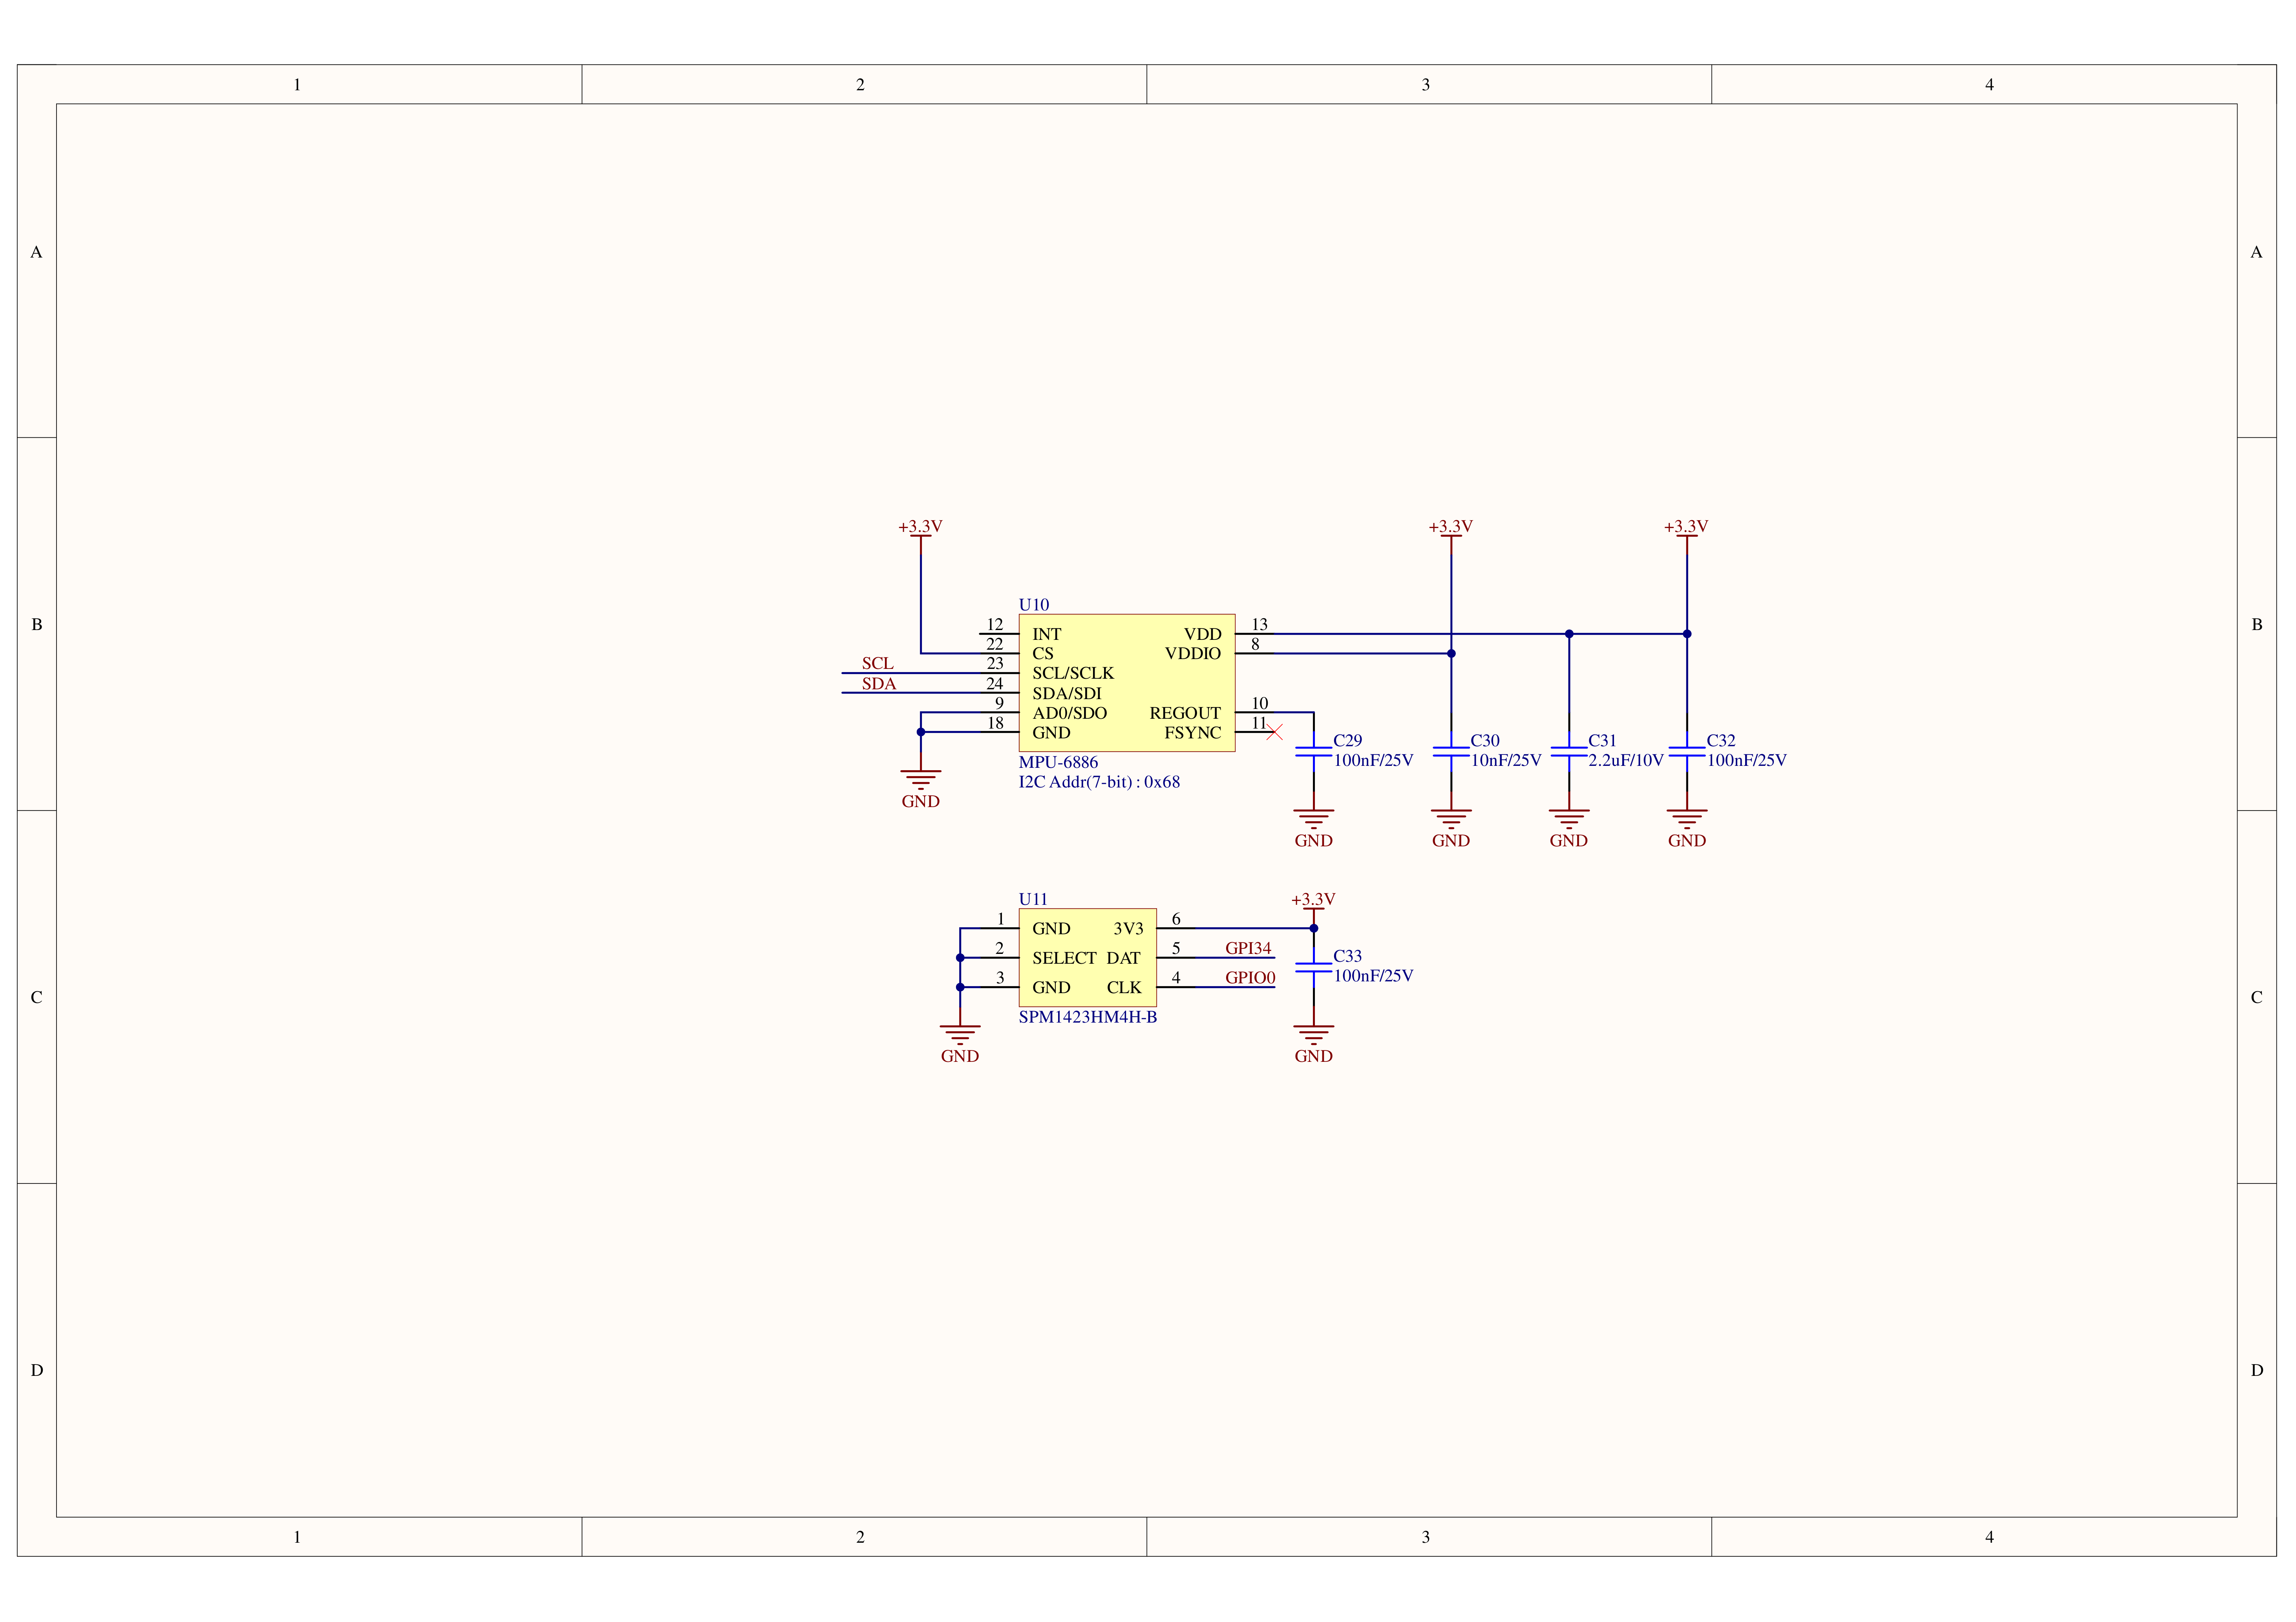
Microphone MIC (SPM1423)
| ESP32 Chip | G0 | G34 |
|---|---|---|
| Microphone MIC SPM1423 | CLK | DATA |
6-axis IMU (MPU6886) & RTC BM8563
| ESP32 Chip | G22 | G21 | G19 |
|---|---|---|---|
| 6-axis IMU | SCL | SDA | |
| BM8563 | SCL | SDA | |
| IR Emitter | TX | ||
| Red LED | TX |
HY2.0-4P
| HY2.0-4P | Black | Red | Yellow | White |
|---|---|---|---|---|
| PORT.CUSTOM | GND | 5V | G32 | G33 |
Datasheets
Softwares
Arduino
UiFlow1
UiFlow2
USB Driver
| Driver Name | Compatible Driver Chip | Download Link |
|---|---|---|
| CH9102_VCP_SER_Windows | CH9102 | Download |
| CH9102_VCP_SER_MacOS v1.7 | CH9102 | Download |
Easyloader
EasyLoader is a simple and fast program burner. It comes with a product-related example program. By following simple steps, you can burn it to the main control and perform a series of functional verifications.
| Easyloader | Download Link | Notes |
|---|---|---|
| FactoryTest for Windows | download | / |
Model Size
Video
- StickC-Plus2 Features Introduction
Version Change
| Release Date | Product Changes | Notes |
|---|---|---|
| / | Initial release | / |
| 2021.12 | Added sleep and wake-up functions, version changed to v1.1 | / |
| 2023.12 | Removed power management chip AXP192, main control chip changed from ESP32-PICO-D4 to ESP32-PICO-V3-02, different power on/off method | Version changed to v2 |
Product Comparison

Hardware Differences
| Product Name | SoC | Power Management | Battery Capacity | Memory | UART Chip | Body Color |
|---|---|---|---|---|---|---|
| StickC-Plus | ESP32-PICO-D4 | AXP192 | 120mAh | 520KB SRAM and 4MB Flash | CH522 | Orange Red |
| StickC-Plus2 | ESP32-PICO-V3-02 | 200mAh | 2MB PSRAM and 8 MB flash | CH9102 | Orange |
Pin Differences
| Product Name | IR | LED | TFT | BUTTON A | BUTTON B | BUTTON C (WAKE) | HOLD | Battery Voltage Detection |
|---|---|---|---|---|---|---|---|---|
| M5STICKC PLUS | G9 | G10 | MOSI(G15) CLK(G13) DC(G23) RST(G18) CS(G5) | G37 | G39 | Standard button, non-programmable | / | Read via AXP192 configuration |
| M5STICKC PLUS2 | G19 | G19 | MOSI(G15) CLK(G13) DC(G14) RST(G12) CS(G5) | G37 | G39 | G35 | G4 | G38 |
Power On/Off Differences
| Product Name | Power On | Power Off |
|---|---|---|
| StickC-Plus | Press the reset button (BUTTON C) for at least 2 seconds | Press the reset button (BUTTON C) for at least 6 seconds |
| StickC-Plus2 | Can be powered on by pressing the "BUTTON C" for more than 2 seconds, or by an RTC-timed IRQ signal. After the wake-up signal is triggered, the hold (G4) pin must be set high (1) during program initialization to maintain power, otherwise the device will shut off again. | Without external USB power, press the "BUTTON C" for more than 6 seconds. Alternatively, if not powered by USB, setting HOLD(GPIO4)=0 during program execution will completely power off the device. When connected to USB, pressing the "BUTTON C" for more than 6 seconds will turn off the display and put it into sleep mode, but will not fully power off the device. |
Since the StickC-Plus2 has removed the PMIC power management chip AXP192, the power on/off methods will be somewhat different. As mentioned at the beginning of the article, although the operations are largely similar, the supported firmware libraries will also differ, and both the Wi-Fi and infrared signal strengths have been improved compared to before.