

Linux & Edge AI
AI Pyramid
Hardware Control
Applications & Factory Features
LLM-8850 Card
Large Language Models
LLM630 Compute Kit
Module LLM
CoreMP135
CardputerZero Quick Start
This tutorial introduces the basics of using CardputerZero, including power and charging, USB modes, keyboard operation, expansion interfaces, application updates, and development and debugging, helping you get familiar with the device and complete the initial setup.
1. Power and Charging
- Power on: Slide the power switch to the right. The first startup may take longer than usual.
- Power off: Slide the power switch to the left. The system completes the shutdown process before cutting off power. After shutting down through software, such as the command line, you still need to slide the power switch to the left to disconnect power.
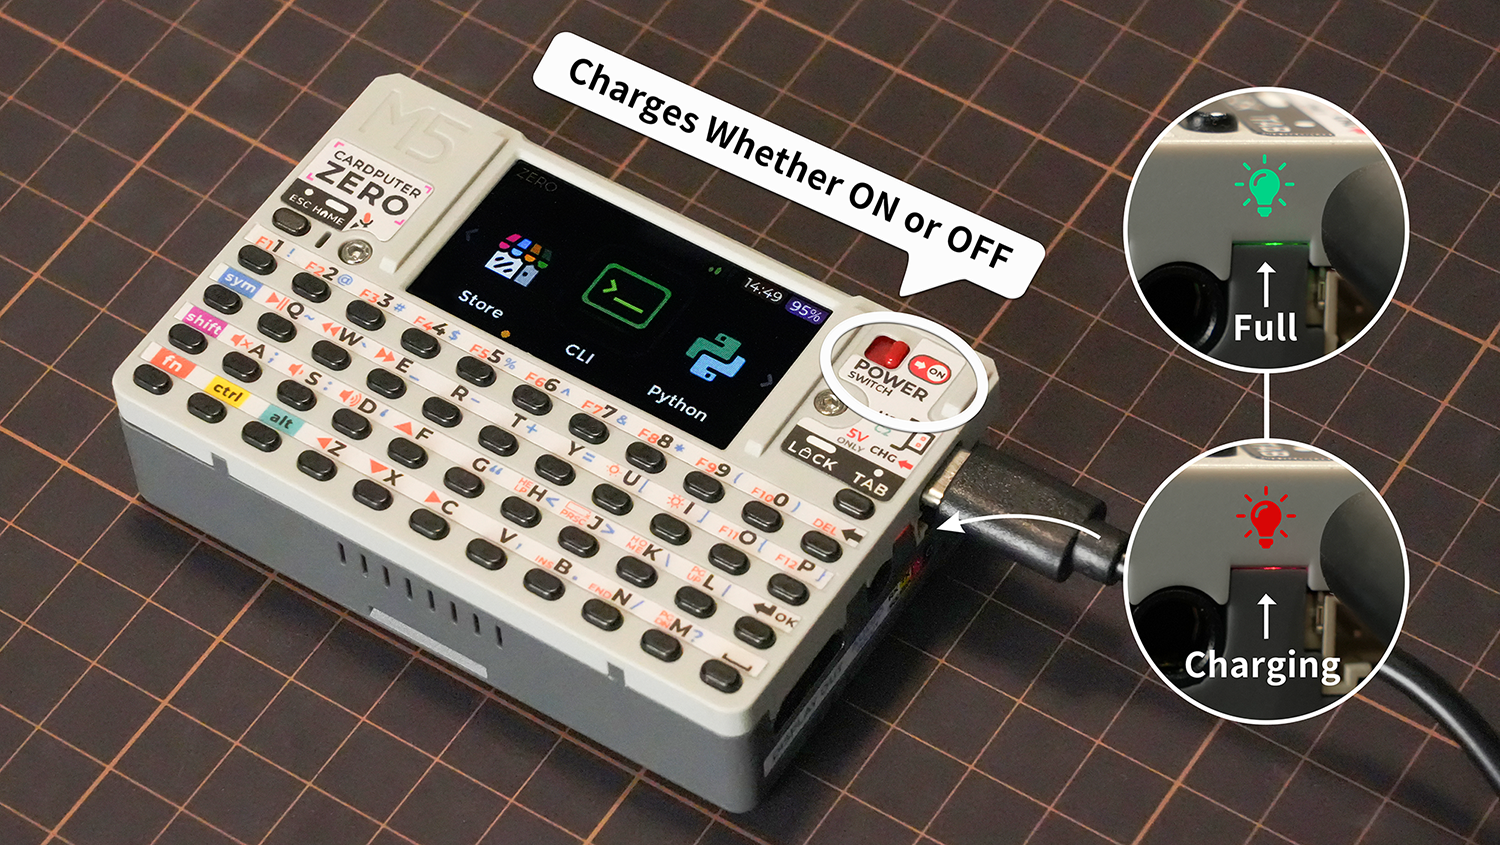
- Charging: Charge through the USB-C2 port. Charging is available whether the device is on or off and regardless of the USB Switch position. The indicator is red while charging and turns green when fully charged.
2. Keyboard Operation
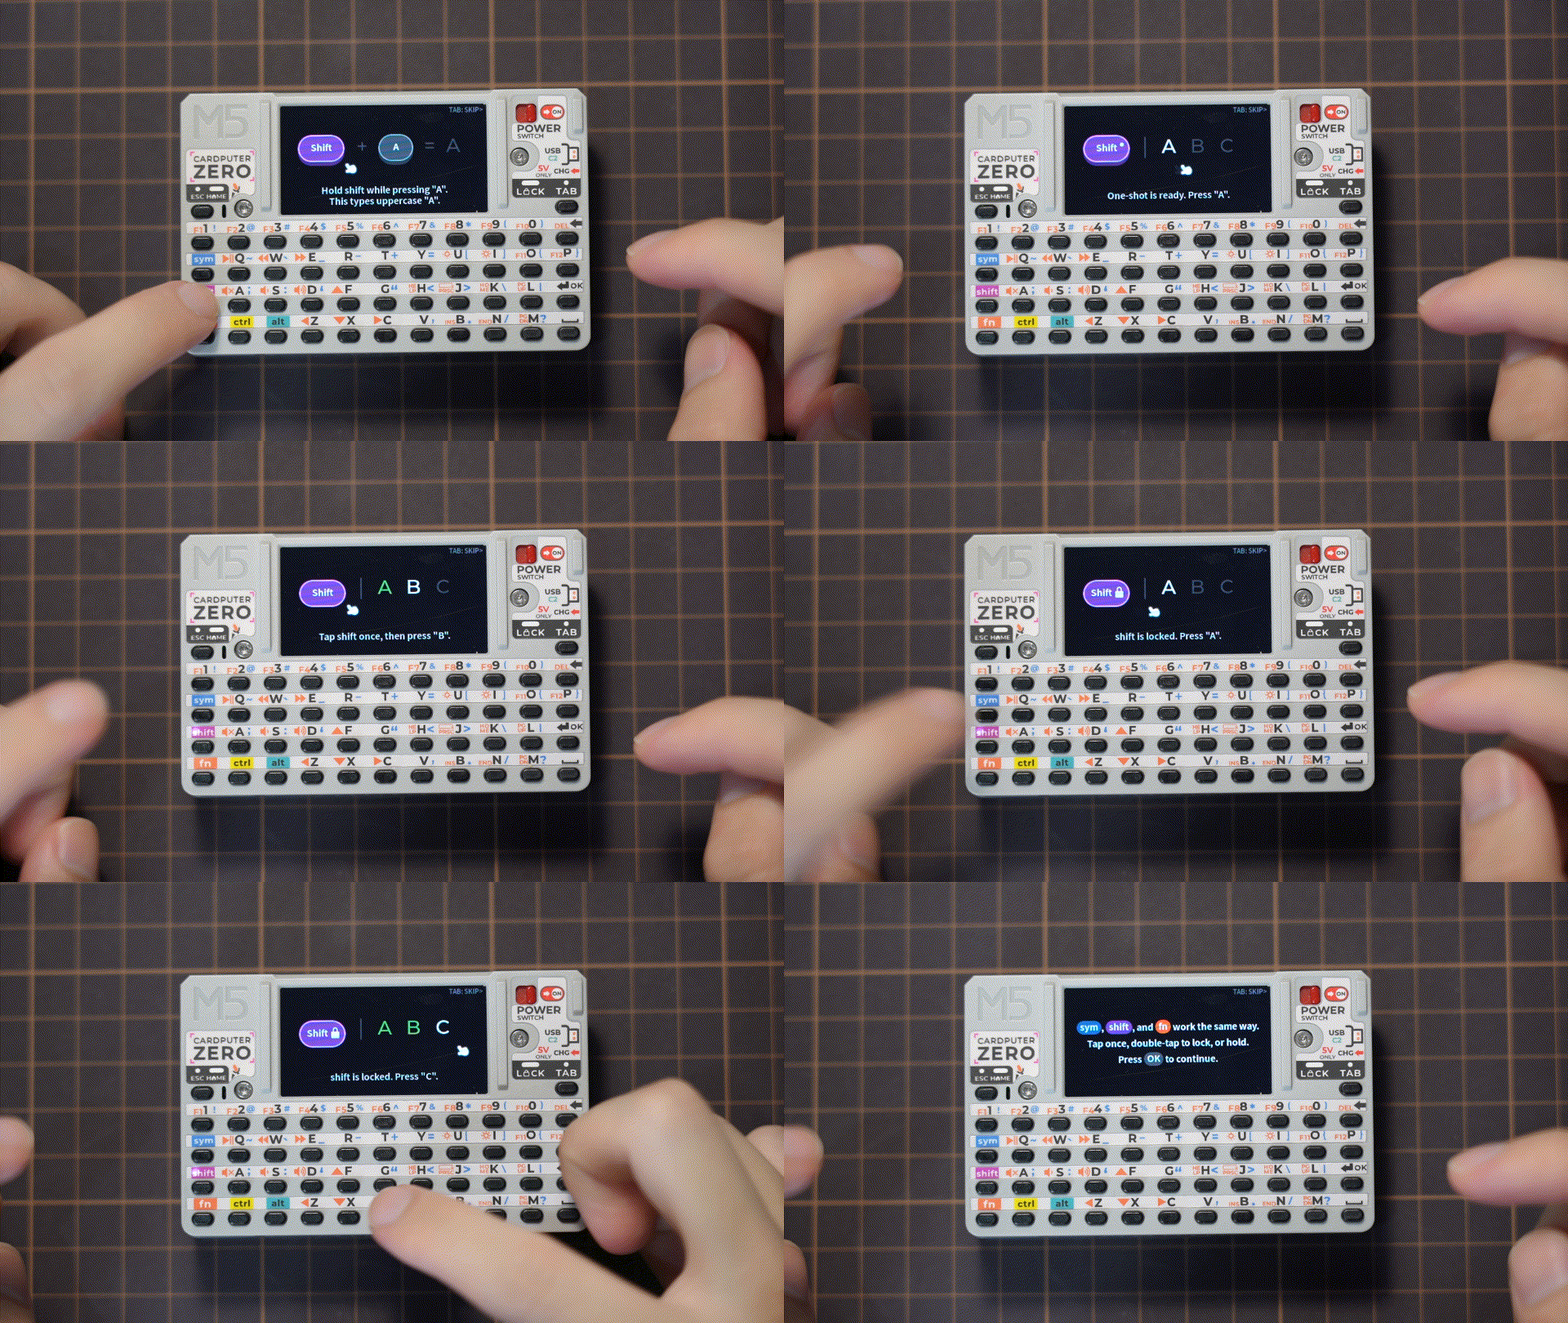
Use sym to enter the symbols marked in blue on the keyboard, shift to enter uppercase letters, and fn to activate the shortcuts marked in orange. These three modifier keys work as follows:
- Press and hold: The indicator stays on, and the modifier applies to other keys while held.
- Press once briefly: The indicator flashes slowly, and the modifier applies only to the next keypress.
- Press twice in succession: The indicator flashes rapidly, locking the modifier function. Press it again to unlock.
Common key operations:
- Direction keys: Hold
fn, then pressF/X/Z/C. Some screens that do not accept text input also support using these keys directly for navigation. - Confirm: Press OK / ENTER.
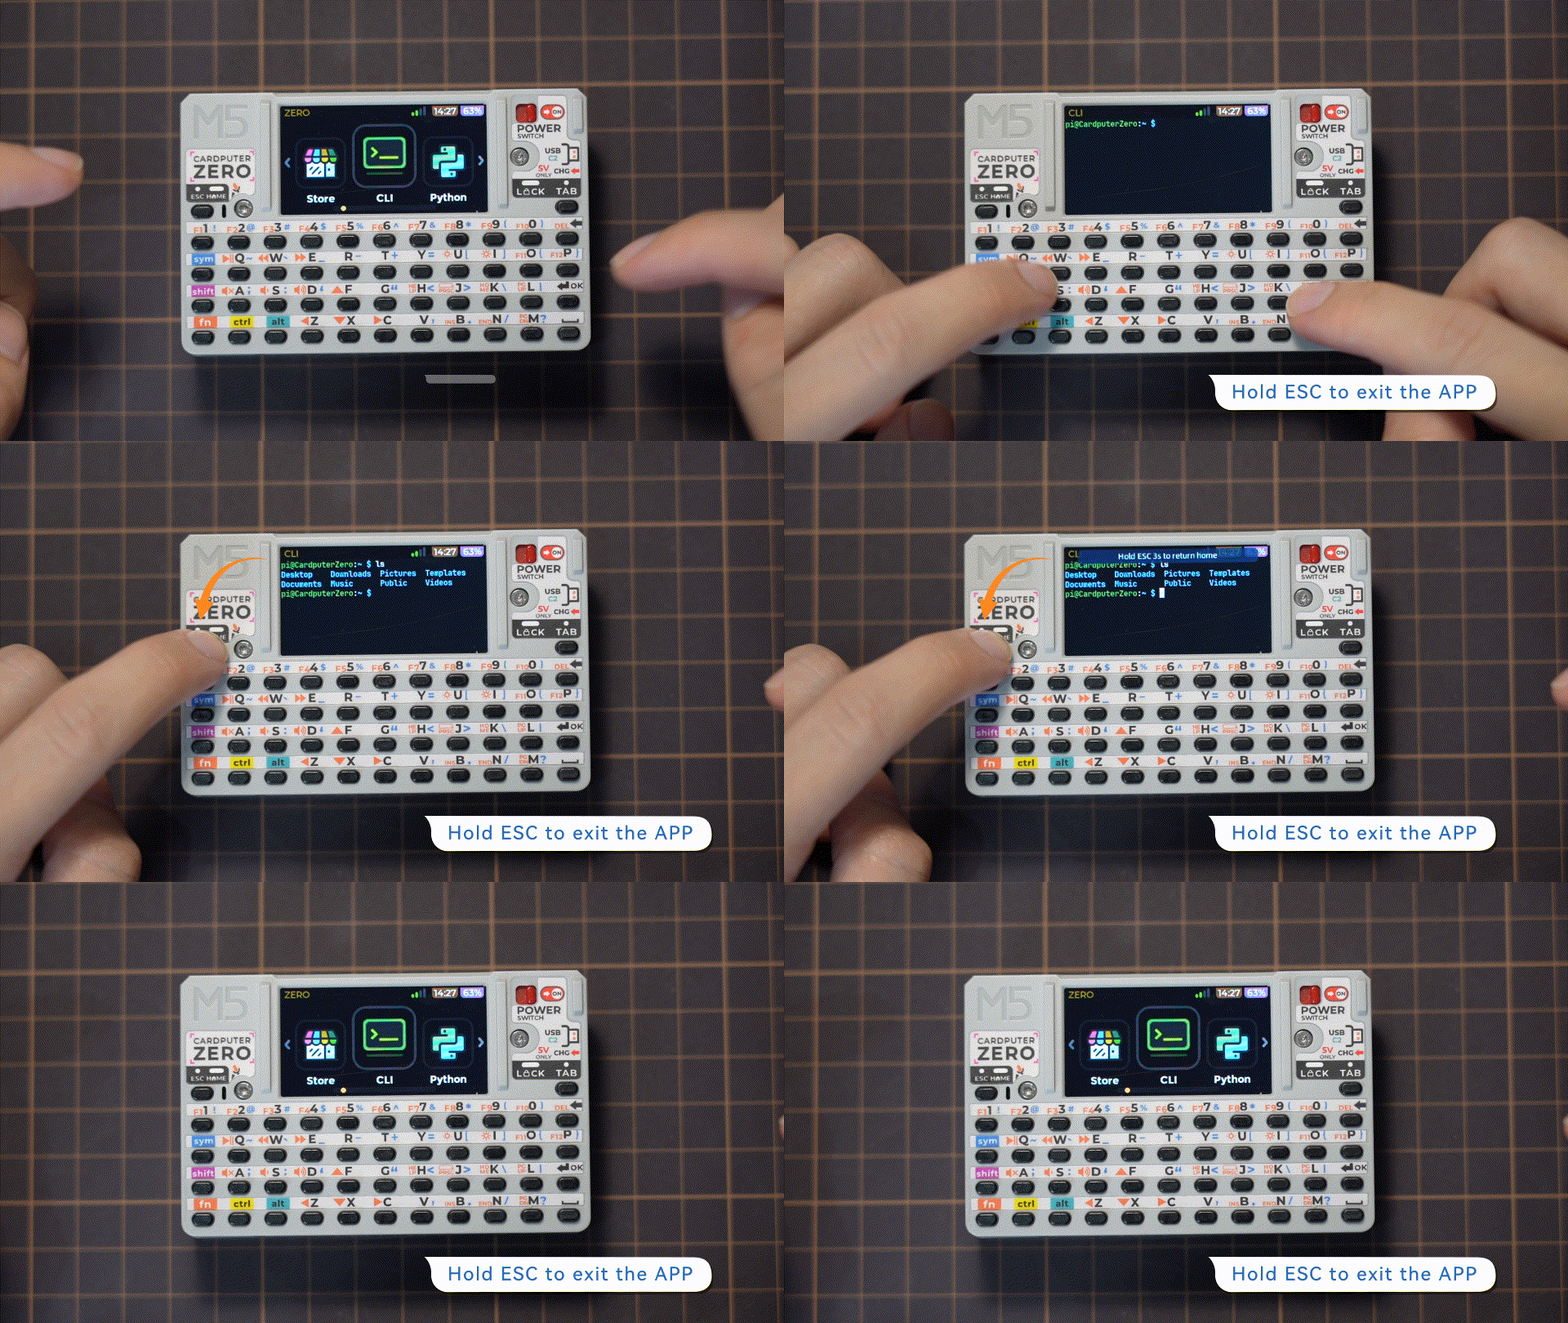
- Exit: Press and hold ESC to exit the current application and return to the HOME screen.
3. User Setup
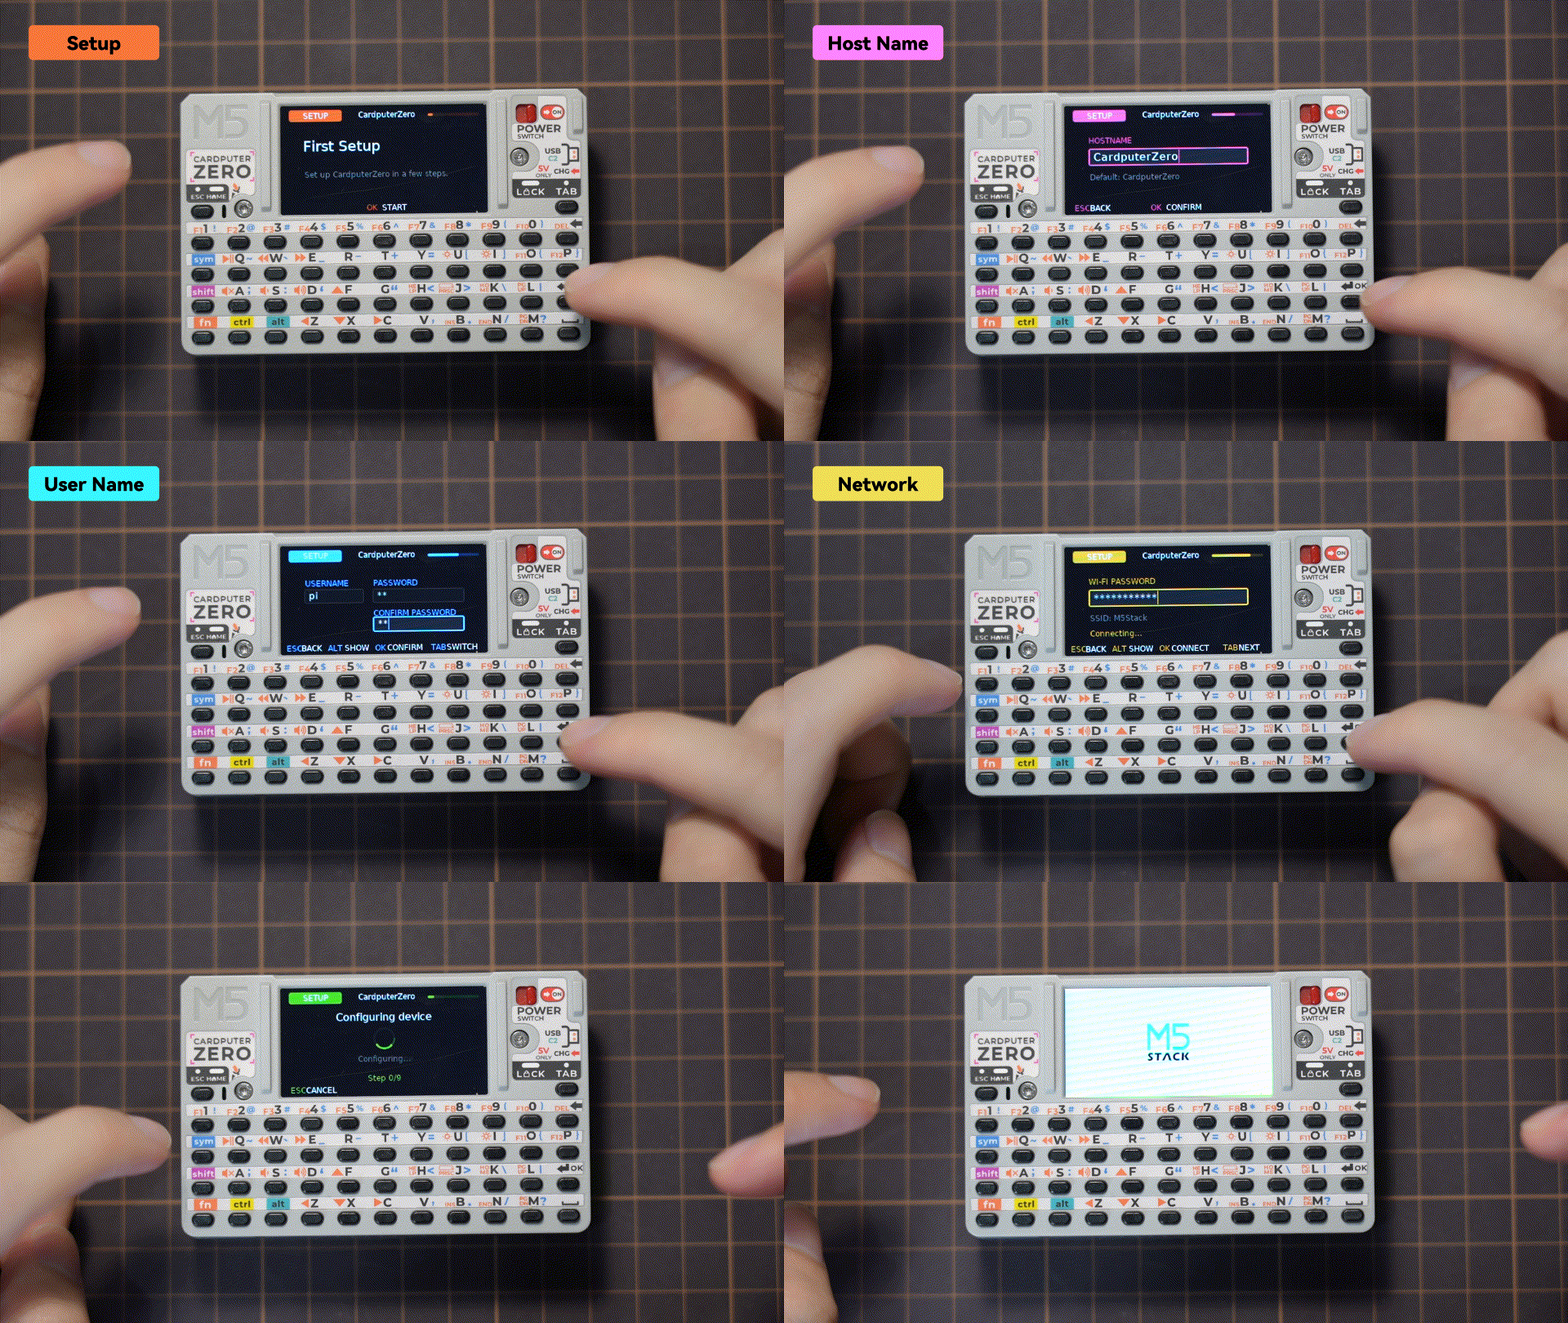
On the first startup, the device automatically opens the user setup wizard, which guides you through setting a username, configuring the network, enabling SSH, and other settings. Restart the device after completing setup for the settings to take effect. This step is skipped if user settings were configured when flashing the image.
4. Screen Lock
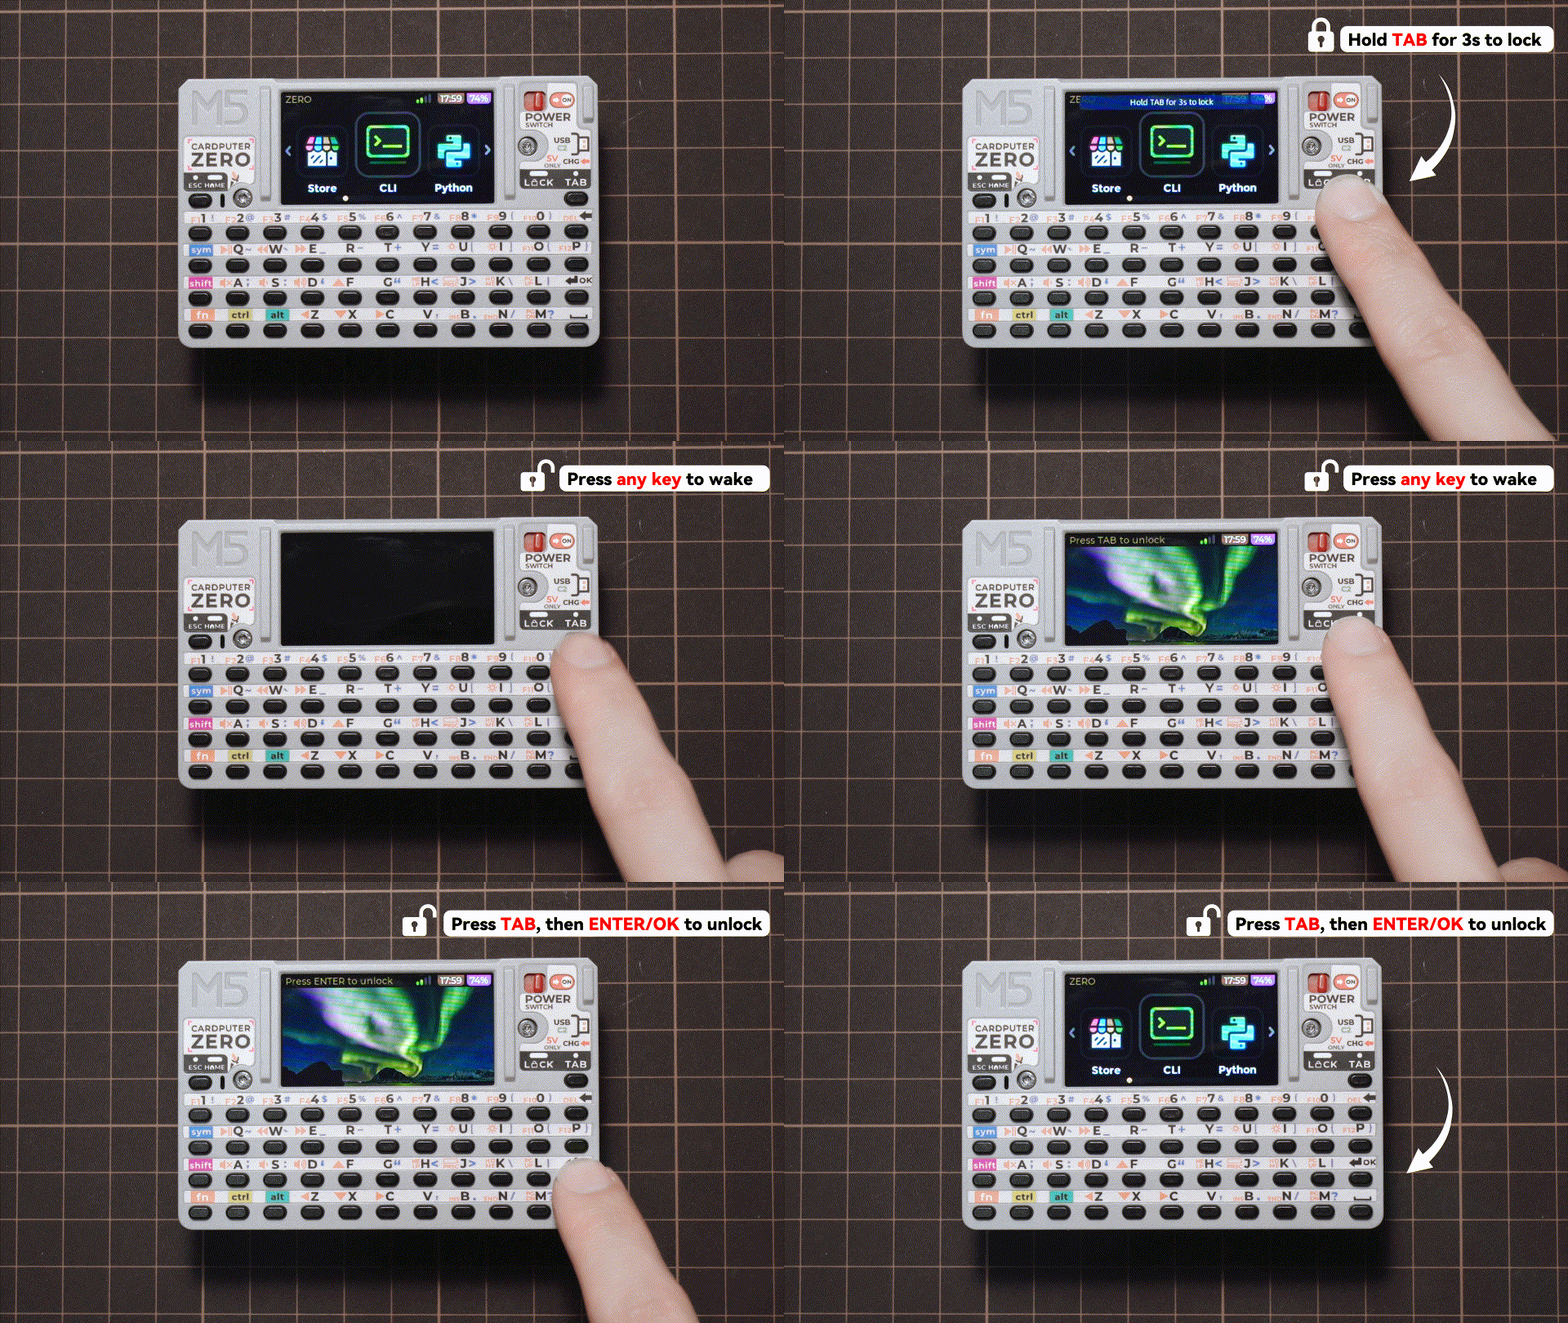
- Lock: Press and hold TAB on the HOME screen to lock it manually. On the HOME screen and in some applications, the screen locks automatically after 30 seconds of inactivity by default. Adjust the auto-lock delay in
Settings > Screen > DarkTime. - Unlock: Press any key to wake the screen, then press TAB followed by ENTER.
- Custom lock screen image: Access the device's filesystem through SSH or ADB and replace the following file with your own PNG image:
/usr/share/APPLaunch/share/images/lockscreen.pngNote: A resolution of 320 × 150 px is recommended for the lock screen image. The top 20 px of the screen is reserved for the navigation bar.
5. Built-in Applications
The device includes the following applications. GPS, LoRa, NFC, and SubG Chat require the corresponding Cap expansion modules.
| Application | Description |
|---|---|
| CLI | Open a command-line terminal and run system commands |
| Python | Open the Python 3 interactive interpreter (REPL) to enter and execute Python code |
| ZClaw | Lightweight AI personal assistant |
| SSH Client | Connect to remote devices through SSH |
| IP Panel | View the device's current IP address |
| Files | Browse and manage files |
| Camera | Camera application |
| Rec | Record audio |
| Music | Play music |
| Piano | Simulate playing a piano |
| Compass | View compass directions |
| IR Remote | Send infrared remote-control signals |
| IR Chat | Exchange messages through infrared communication |
| Calculator | Perform numerical calculations |
| Snake | Snake game |
| Tank | Tank battle game |
| Keyboard Guide | View instructions for using keyboard modifier keys |
| FactoryTest | Factory device function tests |
| GPS | View positioning coordinates; requires a Cap LoRa-1262 expansion module |
| LoRa | Configure LoRa communication parameters and send and receive messages; requires a Cap LoRa-1262 expansion module |
| NFC | NFC application; requires a Cap CC1101 expansion module |
| SubG Chat | Send and receive messages over Sub-1 GHz wireless communication; requires a Cap CC1101 expansion module |
| Settings | Adjust system settings |
| Store | Browse and download applications |
Press and hold ESC to exit the current application and return to the HOME screen.
6. Third-Party Applications
- In addition to the built-in applications, you can download more third-party applications from Store.
- To develop your own application and publish it in Store, see the CardputerZero Developer Guide.
7. USB 2.0 Interfaces
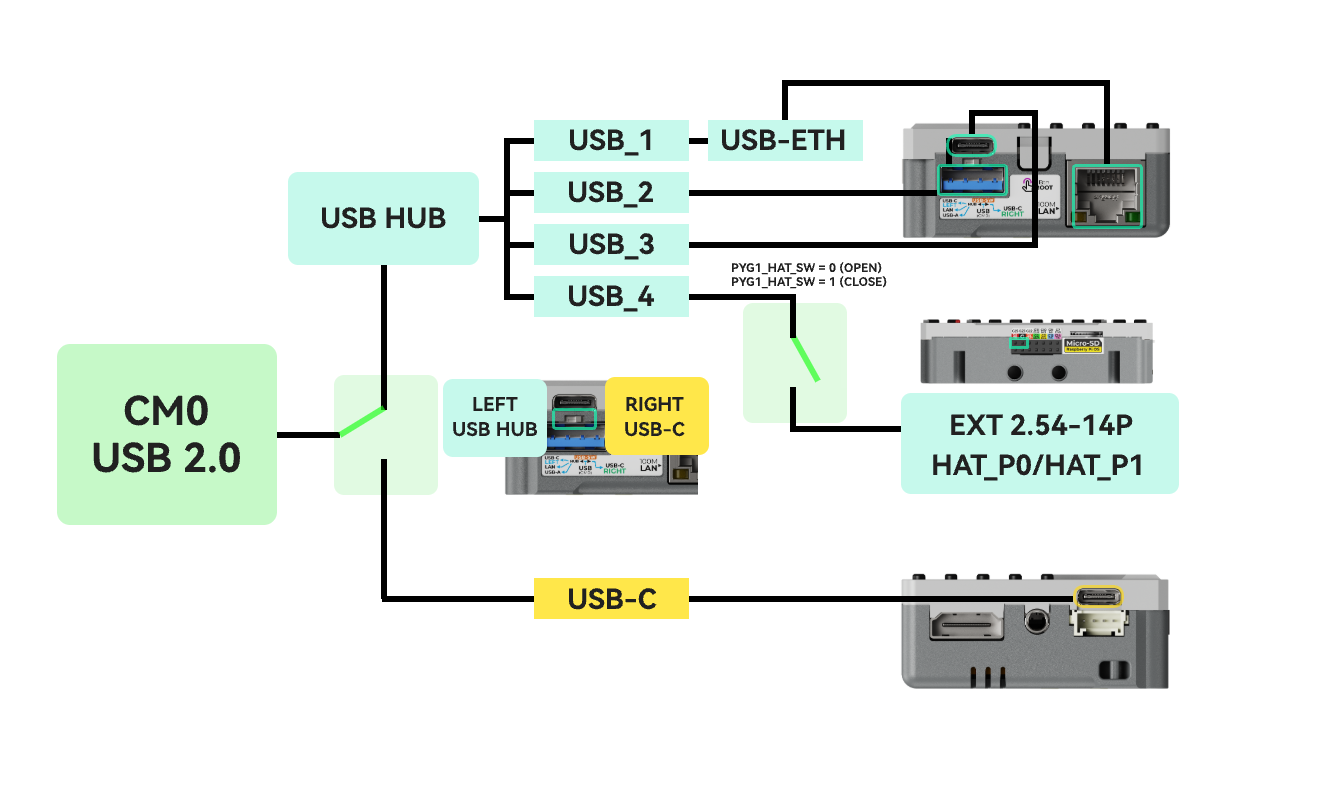
CardputerZero expands the CM0's USB interface through a USB Hub, providing USB-A, USB Type-C, HAT-P0/P1 USB, and Ethernet interfaces. Use the USB Switch on the left side of the device to change the operating mode:
- Slave mode (left / up): The CM0 connects to a host, such as a computer, through
USB-C2. CardputerZero operates as a USB device in this mode. - Host mode (right / down): The CM0 connects to the internal
USB Hub, which expands USB connectivity toUSB-A,USB-C1, andHAT-P0/P1on the top EXT interface. One channel provides Ethernet functionality through theUSB-ETHchip.
8. Expansion Interfaces
CardputerZero provides a Cap expansion interface (EXT 2.54-14P) on the top of the device. The pins marked D+* and D-* support function switching. They connect to the corresponding GPIOs by default and can be switched to USB functionality through software configuration as needed.
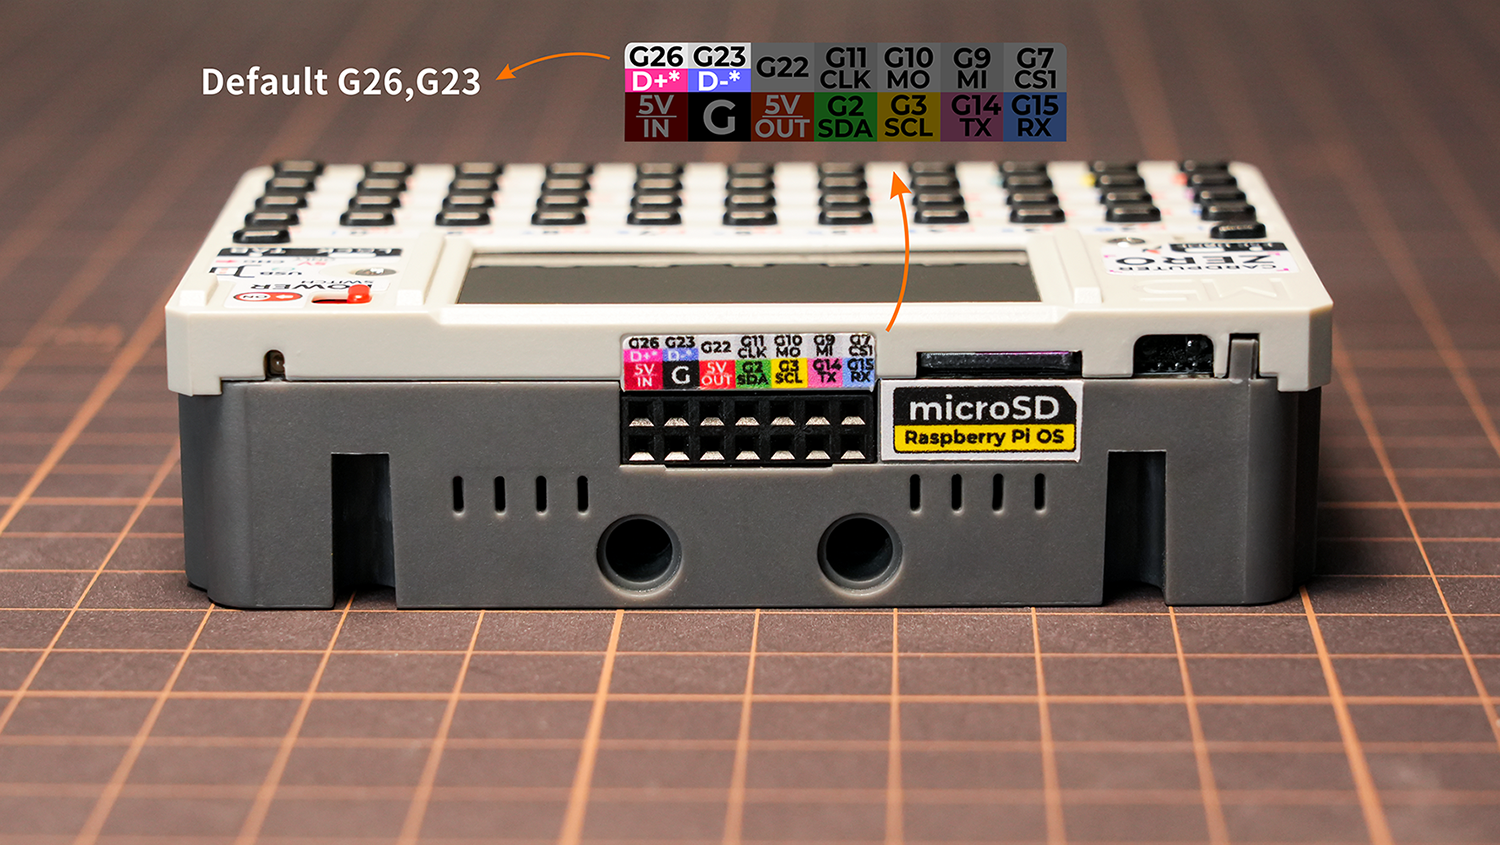
- The 5V outputs on the right-side Grove interface and the top EXT interface are disabled by default. Enable them in
Settings > ExtPort.
9. Development and Debugging
- SSH: After enabling SSH, connect using the device's IP address. View the IP address in IP Panel or Settings.
- ADB: Enable ADB in
Settings > Developer, set the USB Switch to Slave mode, and connect the device to your computer through USB-C2. For detailed instructions, see CardputerZero ADB Debugging.
10. Updates and Recovery
- Update the device's built-in application software in
Settings > System > Software. - To reinstall the system, use M5StackImager to obtain and flash the latest image.