


Product Guide
Linux PC
CardputerZero
AI Accelerator Card
LLM-8850 Card
Large Language Models
AI & Agent
Real-Time AI Voice Assistant
XiaoZhi Voice Assistant
AtomS3R-M12 Volcengine Kit
Offline Voice Recognition
Industrial Control
IoT Measuring Instruments
Air Quality
PowerHub
Module13.2 PPS
VAMeter
T-Lite
Display Devices
PaperColor
Ethernet Camera
PoECAM
Wi-Fi Camera
Unit CamS3/-5MP
AI Camera
LoRa & LoRaWAN
Motor Control
Restore Factory Firmware
DIP Switch Usage Guide
CoreMP135 development
This tutorial will be based on the M5Stack Linux application development framework programming control of peripheral hardware on the CoreMP135.
1.Preparation
- CoreMP135 device (complete buildroot/debian image burning, please refer to CoreMP135 image burning tutorial for this step)
- CoreMP135 power supply (DC 12V power supply or Type-C 5V input)
- CoreMP135 is connected to the network in the same network segment as the development environment computer through a network cable
2.Environment setup
Windows environment setup
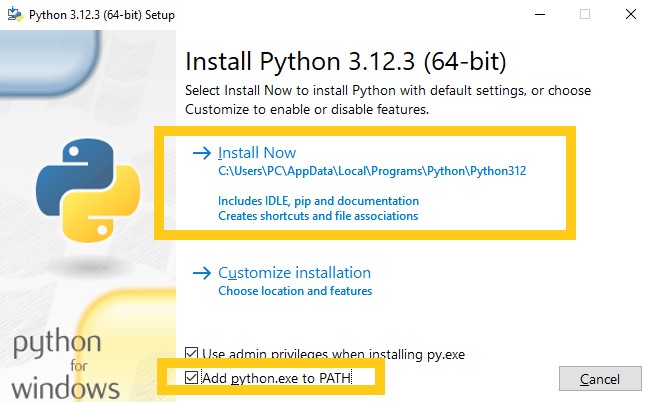
1.Visit https://www.python.org/, install python3, and during the installation process , check the Add Path option to add it to the environment variable.
2.Open the command line, enter the following instructions, and install the compilation and build tools and related dependencies through the pip management tool
pip install parse scons pexpect paramiko scp3.Get access to M5Stack_Linux_Libs Github to obtain the development framework and case source code, which can be obtained by downloading the zip package or through git clone.
git clone https://github.com/m5stack/M5Stack_Linux_Libs4.Click the link below to download the gcc-linaro-7.5.0-2019.12-i686-mingw32_arm-linux-gnueabihf cross-compilation tool chain for the Windows platform, save it to a custom working directory, and unzip it. (Note: Special characters are not allowed in the path)
Linux environment setup
1.Execute the following instructions to install related dependencies
sudo apt install make cmake
pip install parse scons pexpect paramiko scp2.Get access to M5Stack_Linux_Libs Github to obtain the development framework and case source code, which can be obtained by downloading the zip package or through git clone.
git clone https://github.com/m5stack/M5Stack_Linux_Libs3.Click the link below to download the gcc-linaro-7.5.0-2019.12-x86_64_arm-linux-gnueabihf cross-compilation tool chain for the Linux platform, save it to a custom working directory, and unzip it. (Note: Special characters are not allowed in the path)
4.Compile the case program
- Open the directory of the case program, open the command line interface, and enter the
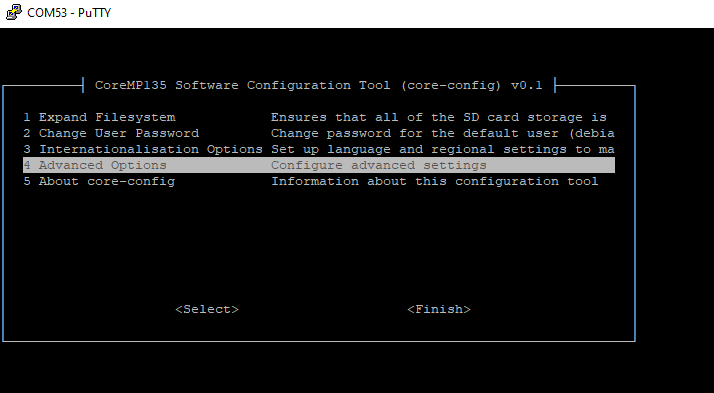
scons menuconfigcommand for compilation and configuration. (Note: For Windows users, if the cmd terminal opens the configuration interface and cannot move the cursor normally, please use powershell to access)
cd M5Stack_Linux_Libs/examples/lcd_hello_world
scons menuconfig2.Press Enter to enter Toolchain Configuration

3.Press Enter to open the configuration, fill in the absolute path of the cross-compilation tool chain and the prefix of the tool chain, and press Esc to exit saving.

4.Under the current case project, enter the following instructions to compile. After the compilation is completed, the executable file will be output to the dist directory of the current path.
scons -j45.Push case program
- Through the program push script in the development framework, the compiled program can be pushed to the user directory of CoreMP135 to facilitate debugging and running, thus avoiding the tedious operation of manually copying files to the SD card each time. Before that, we need to connect CoreMP135 to the same network segment as the current computer, and then check the device IP through the router background or log in through the serial port connection and use the
ifconfigcommand to obtain the IP address of the current device.

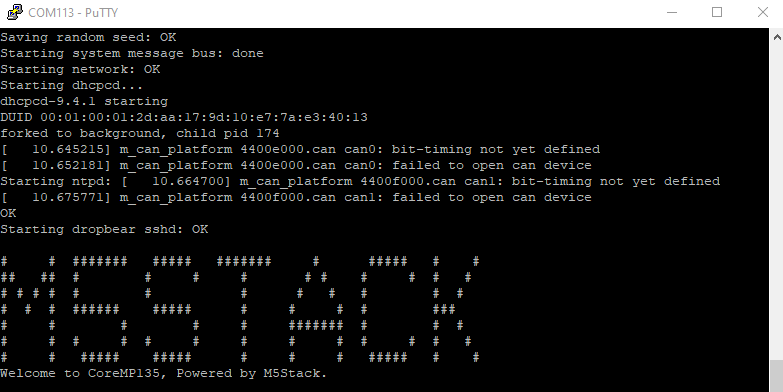
6.Serial port connection
- The USB of CoreMP135 will be enabled as the system log port by default. Users can use this interface to connect to the computer and use terminal tools such as putty or MobaXterm to access. The default baud rate is
115200bps. The following operations are based on putty. Please click the link below to download the putty installation package and follow the instructions to log in. The default username isroot, and the password isroot.


7.SSH access
- Connect the device to the same network segment as the current computer through a network cable. The computer can be accessed remotely through the command line ssh command. The default username is
root, and the password isroot.
ssh root@192.168.2.212


3.The setup.ini configuration file in the case project directory can be used to configure the IP address of the remote push device and the push directory, and modify it to the IP address and user information of the actual device.(If some examples do not contain this file, you need to create it manually and add the following configuration content)
[ssh]
local_file_path = dist
remote_file_path = /root
remote_host = 192.168.2.212
remote_port = 22
username = root
password = rootifconfig4.And execute the following scons push command to push.
scons push

#log
#scons: Reading SConscript files ...
#...
#push dist\lcd_hello_world /root/lcd_hello_world success!3.Go back to the command line terminal of CoreMP135, enter the directory where we just pushed the program, find the executable file sent, give the file execution permission, and then run it.
chmod +x lcd_hello_world
./lcd_hello_world
4.Since this case calls the screen driver, if you are using the default factory firmware of CoreMP135, you need to manually close the GUI process to prevent conflicts.
ps | grep "start_ui"

#239 root     /usr/local/m5stack/dist/core135_start_ui
#312 root     grep start_ui

kill 2398.Configure auto-start at boot
Edit the /etc/rc.local startup script file and add the startup instructions of our compiled program at the end of the file.
vi /etc/rc.localsleep 2
/root/lcd_hello_world &