UnitV2内置识别服务
准备工作
驱动安装
根据使用的操作系统的下载相应的SR9900驱动程序。
For Windows
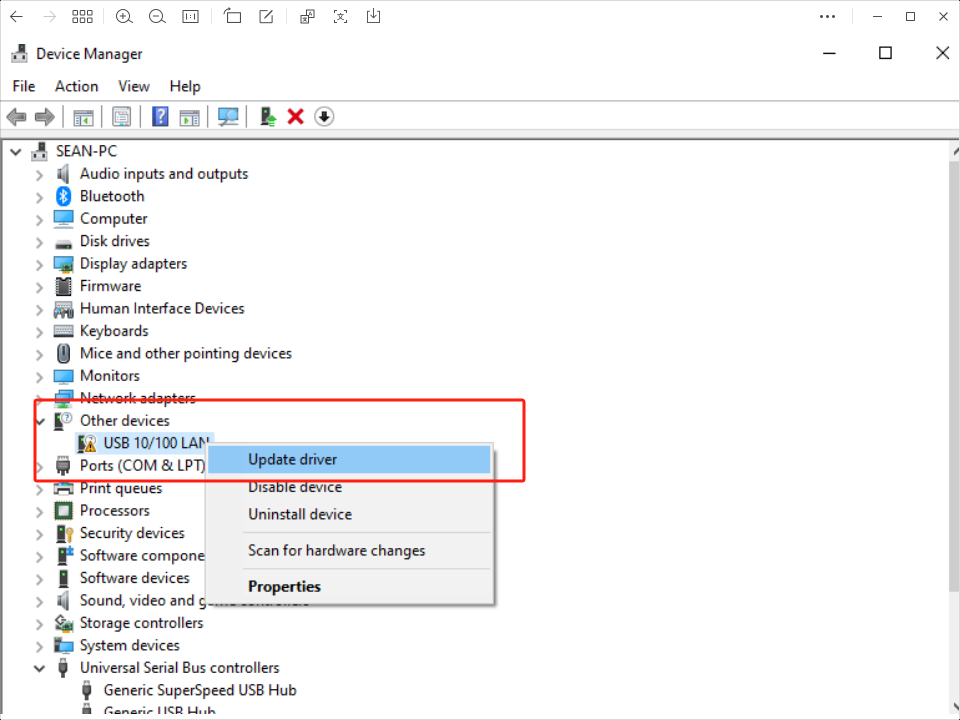
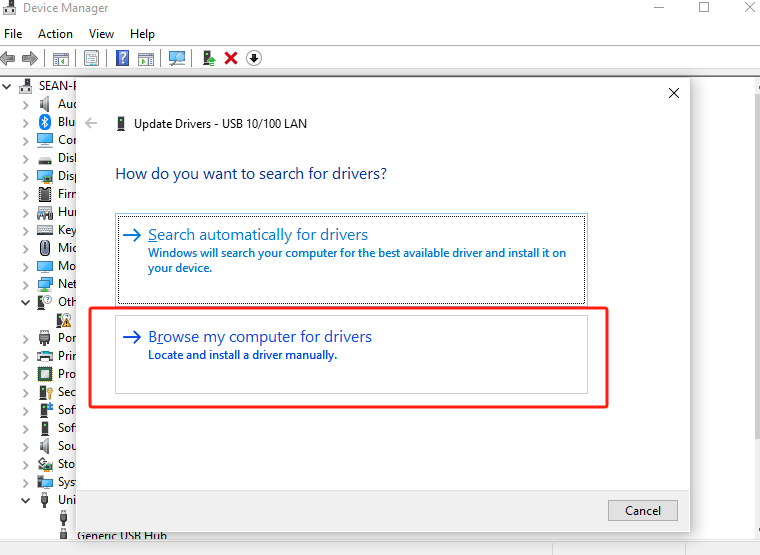
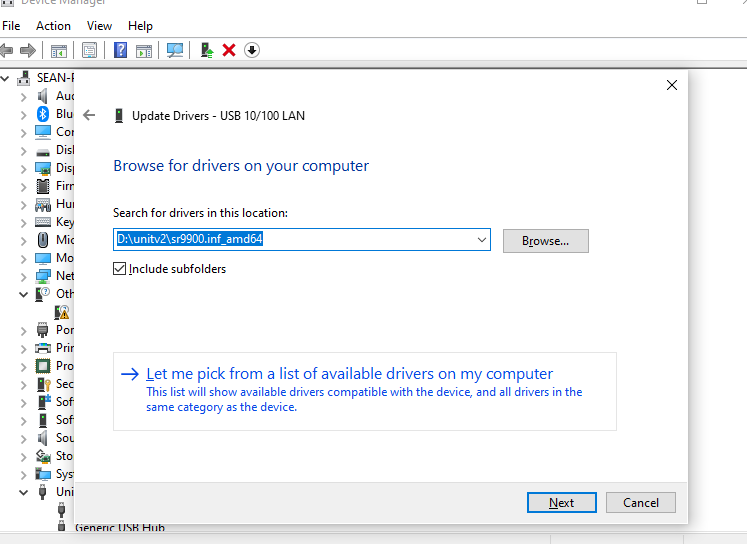
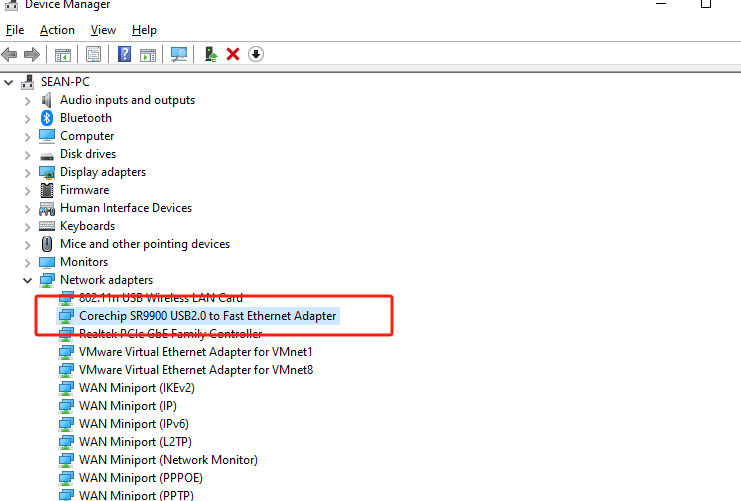
将驱动压缩包解压至桌面路径->进入设备管理器中选中当前未识别的设备(名称为USB 10/100 LAN或带有SR9900字符)->右键选择自定义更新->选中压缩包解压的路径->点击确认,等待更新完成。

For MacOS
解压驱动压缩包->双击打开SR9900_v1.x.pkg文件->根据提示点击下一步安装。(压缩包内包含了详细版本的驱动安装教程pdf)
- 安装完成后,若网卡无法正常启用,可以打开终端,使用下方命令重新启用网卡。
sudo ifconfig en10 down
sudo ifconfig en10 up连接设备
连接USB进行供电后,UnitV2将自动启动,电源指示灯将显示红色白色,启动完成后熄灭。UnitV2 内部集成由M5Stack开发的基础Ai识别应用,内置多种识别功能(如人脸识别,对象跟踪等常用功能),能够快速帮助用户构建Ai识别应用。通过以下两种连接方式,PC端/移动端能够通过浏览器访问域名unitv2.py或IP:10.254.239.1访问通过识别功能的预览网页。识别过程中,UnitV2将通过串口(底部HY2.0-4P接口)不断输出识别样本数据(JSON格式,UART: 115200bps 8N1)
Safari浏览器上存在部分的兼容性问题,推荐使用Chrome浏览器访问。Ethernet模式连接: UnitV2内置了一张有线网卡, 当你通过Type-C接口连接PC时,将自动与UnitV2建立起网络连接。AP模式连接: UnitV2启动后,将默认开启AP热点(SSID: M5UV2_XXX: PWD:12345678),用户可以通过WiFi接入与UnitV2建立起网络连接。
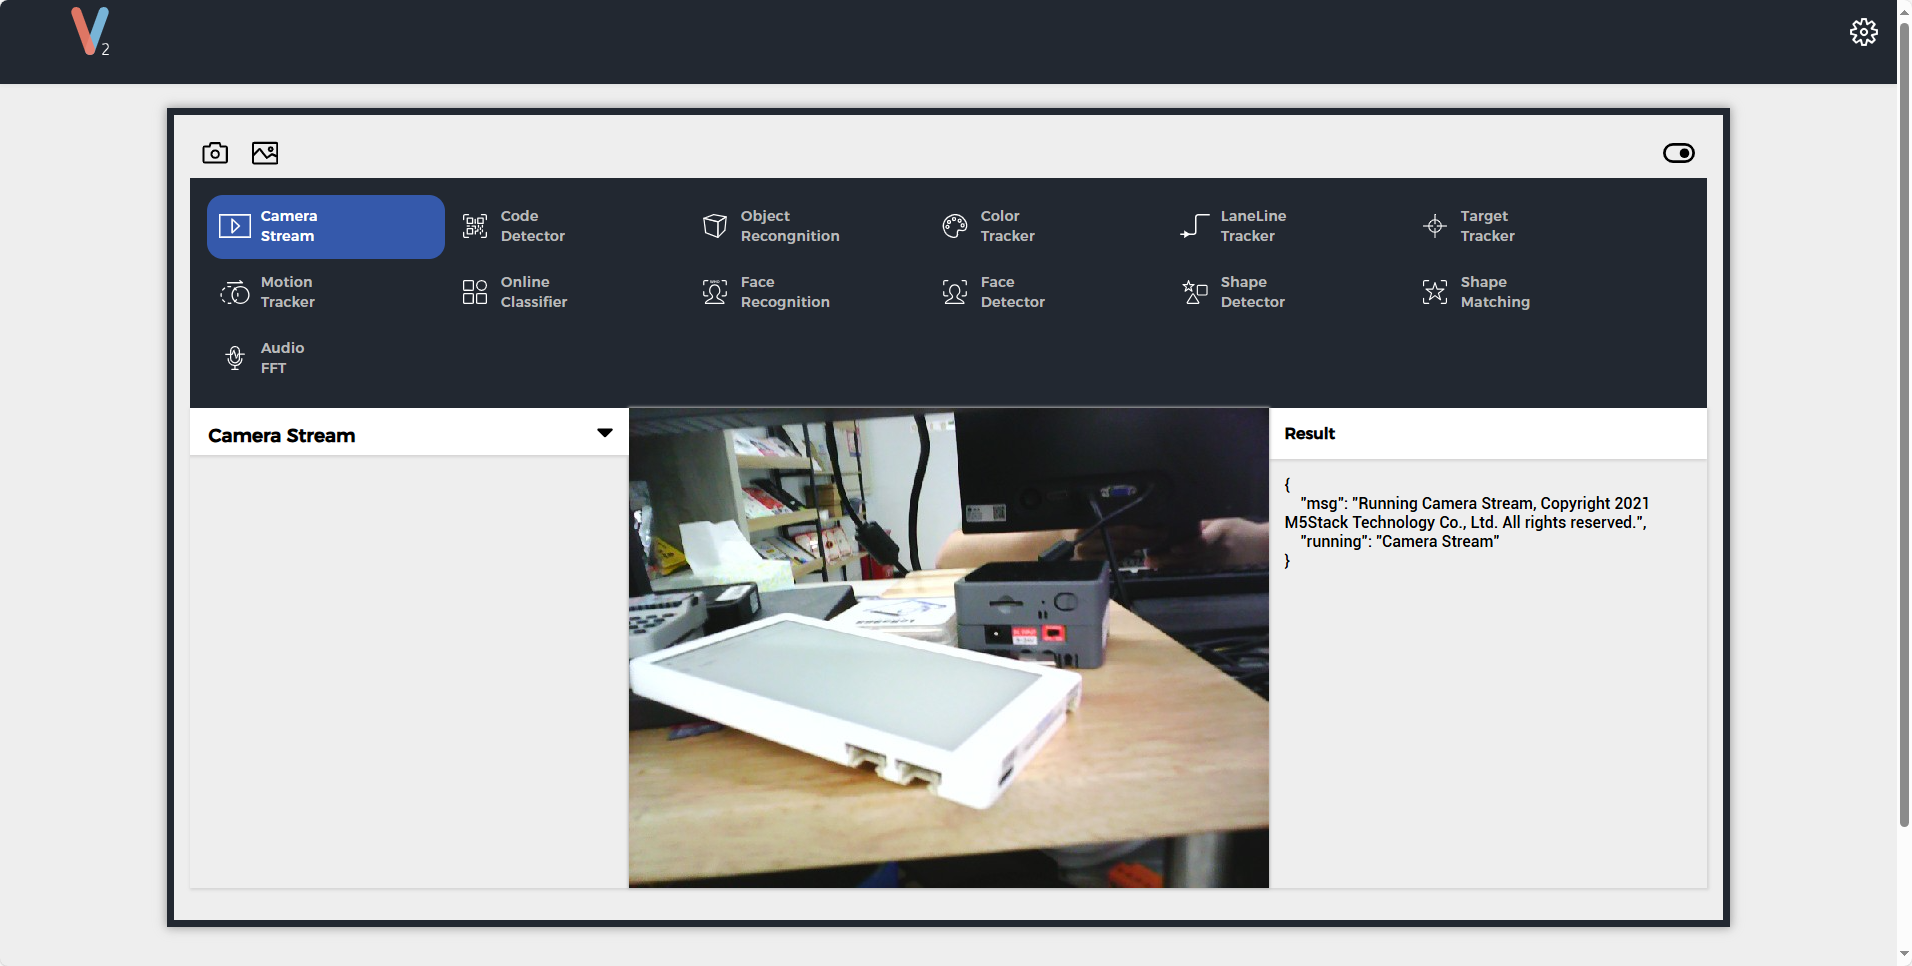

识别过程中,UnitV2将通过串口(底部HY2.0-4P接口)不断输出识别样本数据(JSON格式,UART:
115200bps 8N1)。
功能切换
通过点击功能页面的导航栏或通过设备的Serial接口发送JSON指令的方式切换不同的识别功能。 注意: 发送的指令字符串除了结尾处, 其他位置不允许插入换行符。
Function定义
Audio FFT
Code Detector
Face Detector
Lane Line Tracker
Motion Tracker
Shape Matching
Camera Stream
Online Classifier
Color Tracker
Face Recognition
Target Tracker
Shape Detector
Object Recognition功能切换指令
{
    "function":"Object Recognition",
    "args":[
        "yolo_20class"
    ]
} 功能响应
- 若功能切换成功,将收到回复
{
    "msg":"function switched to Object Recognition."
}- 若指定的功能不存在,将收到回复
{
    "error":"function Object Recognition not exist"
} - 若功能切换失败,将收到回复
{
    "error":"invalid function."
}Camera Stream
功能说明
480P实时视频预览
功能切换指令
{
    "function": "Camera Stream",
    "args": ""
}Code Detector
功能说明
识别画面中的二维码,返回二维码的坐标与内容。
功能切换指令
{
    "function": "Code Detector",
    "args": ""
}输出样例
{
    "running":"Code Detector",
    "num":2, // 二维码的数目
    "code":[
        {
            "prob": 0.987152, // 置信率
            "x":10, // 0 ~ 640
            "y":10, // 0 ~ 480
            "w":30,
            "h":30, // 二维码的边界框
            "type":"QR/DM/Maxi",  // include "Background", "QR/DM/Maxi", "SmallProgramCode", "PDF-417", "EAN", "Unknown"
            "content":"m5stack"
        },
        {
            "prob": 0.987152, // 置信率
            "x":10,
            "y":10,
            "w":30,
            "h":30, // 二维码的边界框
            "type":"QR/DM/Maxi",  // include "Background", "QR/DM/Maxi", "SmallProgramCode", "PDF-417", "EAN", "Unknown"
            "content":"m5stack"
        }
    ]
}Object Recognition
功能说明
基于YOLO Fastest与NanoDet的目标检测。支持V-Training。
- 训练自定义模型请查看教程UnitV2 V-Training
功能切换指令
//选择参数“nanodet_80class”切换至该功能
{
    "function": "Object Recognition",
    "args": ["nanodet_80class"]
}镜像默认内置了nanodet_80class, yolo_20classs模型, 可直接使用, 以下是模型所支持识别的对象
yolo_20class: [
    "aeroplane", "bicycle", "bird", "boat", "bottle", "bus", "car", "cat", "chair", "cow", "diningtable", "dog",
    "horse", "motorbike", "person", "pottedplant", "sheep", "sofa", "train", "tvmonitor"
]nanodet_80class: [
"person","bicycle","car","motorbike","aeroplane","bus","train","truck","boat","traffic light",
"fire hydrant","stop sign","parking meter","bench","bird","cat","dog","horse","sheep","cow",
"elephant","bear","zebra","giraffe","backpack","umbrella","handbag","tie","suitcase","frisbee",
"skis","snowboard","sports ball","kite","baseball bat","baseball glove","skateboard","surfboard",
"tennis racket","bottle","wine glass","cup","fork","knife","spoon","bowl","banana","apple",
"sandwich","orange","broccoli","carrot","hot dog","pizza","donut","cake","chair","sofa","pottedplant",
"bed","diningtable","toilet","tvmonitor","laptop","mouse","remote","keyboard","cell phone","microwave",
"oven","toaster","sink","refrigerator","book","clock","vase","scissors","teddy bear","hair drier","toothbrush"
]输出样例
{
    "num": 1,
    "obj": [
        {
            "prob": 0.938137174,
            "x": 179,
            "y": 186,
            "w": 330,
            "h": 273,
            "type": "person"
        }
    ],
    "running": "Object Recognition"
}
Color Tracker
功能说明
检测指定的颜色区域,返回颜色区域的坐标。
可以直接调整LAB阈值滑条可以滤除背景,得到感兴趣的颜色区域。也可以在画面直接框出感兴趣的颜色区域,系统将自动计算出目标区域占比最多的颜色并将背景滤除,你可以在计算的基础上进一步调整滑条取得更好的过滤效果。点击"To Mask Mode"按钮将会切换至Mask模式,在该模式下你可以直接看到滤除效果。再点击"To RGB Mode" 按钮将会切换回RGB模式。
- LAB 阈值被映射至0~255
- LAB中的L代表亮度,通常不设置此阈值(0~255),表示忽略亮度带来的影响。但是这将会导致算法无法区分黑色和白色,请注意。
- 算法只会返回最大的目标
功能切换指令
{
    "function": "Color Tracker",
    "args": ""
}- 指定LAB阈值
// * LAB阈值映射为0~255
{
    "config":"Color Tracker",
    "l_min":0, // 0 ~ 255
    "l_max":0, // 0 ~ 255
    "a_min":0, // 0 ~ 255
    "a_max":0, // 0 ~ 255
    "b_min":0, // 0 ~ 255
    "b_max":0 // 0 ~ 255
} - LAB阈值配置响应
{
    "running":"Color Tracker",
    "msg":"Data updated."
}- 指定ROI(自动计算阈值)
{
    "config":"Color Tracker",
    "x":0, // 0 ~ 640
    "y":0, // 0 ~ 480
    "w":30,
    "h":30,
}- ROI配置响应
// * va与vb指的是ROI内的色彩离散程度,若离散度较高则追踪效果较差。
{
    "running":"Color Tracker",
    "a_cal":0.0,
    "b_cal":0.0, // 计算阈值
    "va":0.0,
    "vb":0.0, // 颜色分散率
    "l_min":0, // 固定值 0
    "l_max":255, // 固定值 255
    "a_min":0, // a_cal - (10 + (int)(va / 2.0f))
    "a_max":0, // a_cal + (10 + (int)(va / 2.0f))
    "b_min":0, // b_cal - (10 + (int)(vb / 2.0f))
    "b_max":0  // b_cal + (10 + (int)(vb / 2.0f))
} 输出样例
{
    "running":"Color Tracker",
    "cx": 0, // 中心 X 轴坐标
    "cy": 0, // 中心 Y 轴坐标
    "r": 0, // 半径
    "mx": 0, // moment x position
    "my": 0 // moment y position
}Lane Line Tracker
功能说明
检测画面中的道路线,将其拟合成直线,返回直线角度与坐标。
- 可以直接调整LAB阈值滑条可以滤除背景,得到感兴趣的颜色区域。也可以在画面直接框出感兴趣的颜色区域,系统将自动计算出目标区域占比最多的颜色并将背景滤除,你可以在计算的基础上进一步调整滑条取得更好的过滤效果。点击"To Mask Mode"按钮将会切换至Mask模式,在该模式下你可以直接看到滤除效果。再点击"To RGB Mode" 按钮将会切换回RGB模式。
功能切换指令
{
    "function": "Lane Line Tracker",
    "args": ""
}
- 配置LAB阈值与ROI的方式与Color Tracker方式一致仅需将配置指令中的config修改为
"config":Lane Line Tracker"即可。
输出样例
{
    "running":"Lane Line Tracker",
    "x":0,
    "y":0, // 拟合线的基点
    "k":0  // 拟合线斜率
} Target Tracker
功能说明
在画面上选中目标并追踪,使用的是MOSSE算法。只需要在画面上框出感兴趣的目标即可实现追踪。
功能切换指令
{
    "function": "Target Tracker",
    "args": ""
}
- 指定ROI
{
    "config":"Target Tracker",
    "x":0, // 0 ~ 640
    "y":0, // 0 ~ 480
    "w":30,
    "h":30,
}- ROI配置响应
{
    "msg":"ROI Updated.",
    "running":"Target Tracker",
} 输出样例
{
    "running":"Target Tracker",
    "x":0,//0~640
    "y":0,//0~480
    "w":0,
    "h":0
} Motion Tracker
功能说明
检测并追踪移动的目标,返回目标的坐标与角度。点击 'Set as background' 按钮确定背景。该算法可以适应缓慢变化的背景。
功能切换指令
{
    "function": "Motion Tracker",
    "args": ""
}- 设置背景指令
// 发送这条指令将会确定背景
{
    "config":"Motion Tracker",
    "operation":"update"
} - 设置背景指令响应
{
    "running":"Motion Tracker",
    "msg":"Background updated."
}输出样例
{
    "running":"Motion Tracker",
    "num":2,
    "roi":[
        {
            "x":0,
            "y":0,
            "w":0,
            "h":0,
            "angle":0.0,
            "area":0
        },
        {
            "x":0,
            "y":0,
            "w":0,
            "h":0,
            "angle":0.0,
            "area":0
        }
    ]
} Online Classifier
功能说明
这个功能可以实时训练并分类绿色目标框内的物体,训练得到的特征值可以被保存在设备上供下次使用。
- 1.点击
Reset按钮清除已有的类别,并进入训练模式。 - 2.点击
+按钮创建新的类别。 - 3.选中想要训练的类别。
- 4.将要训练的物体放在绿色目标框内。
- 5.点击
Train按钮完成一次训练。 - 6。改变物体的角度重复训练,直到你认为达到了预期效果。
- 7.点击
save&run按钮将训练结果保存在设备上,并退出训练模式,进行物体识别分类。
功能切换指令
{
    "function": "Online Classifier",
    "args": ""
}
- 设备进入训练模式
//这条指令将使设备进入训练模式,并提取一次特征存储到指定的分类下。若class_id不存在,则会创建这个类。
{
    "config":"Online Classifier",
    "operation":"train",
    "class_id":1, // Integer (0 ~ N), class的ID
    "class":"class_1" // String, class的名字
}- 进入训练模式响应
{
    "running":"Online Classifier",
    "msg":"Training [class name] [num of training] times"
}- 保存并开始识别
{
    "config":"Online Classifier",
    "operation":"saverun",
}- 保存识别指令响应
{
    "running":"Online Classifier",
    "msg":"Save and run."
}- 这条指令将会使设备进入训练模式并清除所有的分类。
{
    "config":"Online Classifier",
    "operation":"reset",
} - 清除指令响应
{
    "running":"Online Classifier",
    "msg":" Please take a picture."
}输出样例
{
    "running":"Online Classifier",
    "class_num":2, // 识别出的class数目
    "best_match":"class_1", // 最佳匹配class
    "best_score":0.83838, // 最佳匹配分数
    "class":[ // 每一个class的分数
        {
            "name":"class_1",
            "score":0.83838
        },
        {
            "name":"class_2",
            "score":0.66244
        }
    ]
}Face Recognition
功能说明
检测并识别人脸。
- 1.点击Reset按钮可以清除全部已有的面孔。
- 2.点击+按钮创建新的面孔。
- 3.选中要训练的面孔。
- 4.看向摄像头,确保要训练的面孔处于合适的位置。
- 5.点击Train按钮。
- 6.训练时,当边界框为黄色代表正在训练,这时你可以缓慢转动头部来采样不同的角度,取得更好的识别效果。
- 7.若边界框变为红色代表已经丢失目标,通常是因为面孔变化幅度太大,请调整面孔位置直到面孔被重新找到。
- 8.当你认为达到预期效果后点击Stop,现在设备已经能够识别这个面孔。
- 9.点击Save按钮将特征数据保存到设备上以供下次使用。
功能切换指令
{
    "function": "Face Recognition",
    "args": ""
}- 创建新的人脸识别信息
//若要创建一个新的面孔,请按顺序提供face_id (0 ~ N)。
{
    "config":"Face Recognition",
    "operation":"train",
    "face_id":1, // Integer (0 ~ N), 面孔的ID
    "name":"tom" // String, 面孔的名字
}
//举例,目前已经有了3个面孔(0~2),要创建新的面孔,需要将id指定为3。- 创建成功
{
    "running":" Face Recognition ",
    "msg":"Training tom"
}- 创建失败
{
    "running":"Face Recognition",
    "msg":"Invalid face id"
}
{
"config":" Face Recognition ",
"operation":" stoptrain",
}{
"running":"Face Recognition",
"msg":"Exit training mode."
}- Save&Run
{
    "config":" Face Recognition ",
    "operation":"saverun",
}
{
"running":"Face Recognition",
"msg":"Faces saved."
}- 删除全部的面孔。
{
    "config":"Face Recognition",
    "operation":"reset",
}
{
"running":"Face Recognition",
"msg":"Reset success"
}输出样例
- Training Mode
{
    "running":"Face Recognition",
    "status":"training", // training(培训) or missing(丢失)
    "x":0,
    "y":0,
    "w":0,
    "h":0, //  面部识别边界框
    "prob":0, // 检测置信率
    "name":0,
}- Normal Mode 匹配得分>0.5
{
    "running":"Face Recognition",
    "num":1, // 识别出面部的数目
    "face":[
        {
            "x":0, // 0 ~ 320
            "y":0, // 0 ~ 240
            "w":30,
            "h":30, // 面部识别边界框
            "prob":0, // 检测置信率
            "match_prob":0.8, // 匹配置信率
            "name": "tom",
            "mark":[ // landmarks
                {
                    "x":0,
                    "y":0
                },
                {
                    "x":0,
                    "y":0
                },
                {
                    "x":0,
                    "y":0
                },
                {
                    "x":0,
                    "y":0
                },
                {
                    "x":0,
                    "y":0
                },
            ]
        },
    ]
} - Normal Mode 匹配得分<=0.5
{
    "running":"Face Recognition",
    "num":1, //  识别出面部的数目
    "face":[
        {
            "x":0, // 0 ~ 320
            "y":0, // 0 ~ 240
            "w":30,
            "h":30, // 面部识别边界框
            "prob":0, // 置信率
            "name": "unidentified",
            "mark":[ // landmarks
                {
                    "x":0,
                    "y":0
                },
                {
                    "x":0,
                    "y":0
                },
                {
                    "x":0,
                    "y":0
                },
                {
                    "x":0,
                    "y":0
                },
                {
                    "x":0,
                    "y":0
                },
            ]
        },
    ]
} Face Detector
功能说明
检测画面中的人脸并给出5点landmark。
功能切换指令
{
    "function": "Face Detector",
    "args": ""
}输出样例
{
    "running":"Face Detector",
    "num":1, //  识别出面部的数目
    "face":[
        {
            "x":0,
            "y":0,
            "w":30,
            "h":30, // 面部识别边界框
            "prob":0, // 置信率
            "mark":[ // landmark
                {
                    "x":0,
                    "y":0
                },
                {
                    "x":0,
                    "y":0
                },
                {
                    "x":0,
                    "y":0
                },
                {
                    "x":0,
                    "y":0
                },
                {
                    "x":0,
                    "y":0
                }
            ]
        }
    ]
}Shape Detector
功能说明
检测画面中的形状并计算其面积。能够识别正方形、长方形、三角形、五边形、圆形。点击 'Set as background' 按钮确定背景。该算法可以适应缓慢变化的背景。
功能切换指令
{
    "function": "Shape Detector",
    "args": ""
}- 配置当前画面为背景
{
    "config":"Shape Detector",
    "operation":"update"
}
{
"running":"Shape Detector",
"msg":"Background updated."
}输出样例
{
    "running":"Shape Detector",
    "num":2,
    "shape":[
        {
            "name":"Rectangle", // "unidentified", "triangle", "square", "rectangle", "pentagon", "circle"
            "x":0,
            "y":0,
            "w":0,
            "h":0,
            "angle":0.0, // 可在形状为正方形或矩形时使用
            "area":0
        },
        {
            "name":"Rectangle", // "unidentified", "triangle", "square", "rectangle", "pentagon", "circle"
            "x":0,
            "y":0,
            "w":0,
            "h":0,
            "angle":0.0, // 可在形状为正方形或矩形时使用
            "area":0
        }
    ]
} Shape Matching
功能说明
匹配给定的任意形状(但是形状最好不要含有曲线),上传的形状会被转换为特征数据被保存在设备上以供下次使用。
- 1.点击add按钮添加一个形状,你需要上传一张如下图所示的形状模板图片(png格式,形状为黑色背景为白色),文件名将会是形状的名字。
- 2.点击reset按钮可以清除全部已经上传的形状。
- 3.点击
Set as background按钮确定背景。该算法可以适应缓慢变化的背景。
功能切换指令
{
    "function": "Shape Matching",
    "args": ""
}输出样例
// 这里返回的shape就是上传的模板的文件名,请注意若置信率低于30%则会被标识为unidentified。
{
    "running":"Shape Matching",
    "num":2,
    "shape":[
        {
            "name":"arrow", // 您的自定义形状名称,当置信率小于30时无法识别
            "max_score":83, // 置信率评分,如果形状不明,就没有
            "x":0,
            "y":0,
            "w":0,
            "h":0,
            "area":0
        },
        {
            "name":"unidentified", // 您的自定义形状名称,当信心分数小于30时无法识别
            "x":0,
            "y":0,
            "w":0,
            "h":0,
            "area":0
        },
    ]
} Audio FFT
通过设备上的麦克风捕获音频,进行实时FFT(快速傅里叶变换)并绘制出时间-频率图。下方的绿色图表是音频的RMS,表示当前的响度。
- 麦克风响应截止频率为10KHz左右。
功能切换指令
None
输出样例
None
模型调用
通过Python脚本调用内部模型
from json.decoder import JSONDecodeError
import subprocess
import json
import base64
import serial
import time
from datetime import datetime
from PIL import Image
import os
import io

uart_grove = serial.Serial('/dev/ttyS0', 115200, timeout=0.1)
reconizer = subprocess.Popen(['/home/m5stack/payload/bin/object_recognition', '/home/m5stack/payload/uploads/models/nanodet_80class'],
                             stdin=subprocess.PIPE, stdout=subprocess.PIPE, stderr=subprocess.PIPE)

reconizer.stdin.write("_{\"stream\":1}\r\n".encode('utf-8'))
reconizer.stdin.flush()

img = b''

while True:
    today = datetime.now()
    path = str(today.strftime("%Y_%m_%d") + "/")
    newpath = "/media/sdcard/" + path

    line = reconizer.stdout.readline().decode('utf-8').strip()
    if not line:
        break  # Process finished or empty line

    try:
        doc = json.loads(line)
        if 'img' in doc:
            byte_data = base64.b64decode(doc["img"])
            img = bytes(byte_data)
        elif 'num' in doc:
            for obj in doc['obj']:
                uart_grove.write(str(obj['type'] + '\n').encode('utf-8'))
                if obj['type'] == "aeroplane":
                    print('aeroplane ' + today.strftime("%Y_%m_%d_%H_%M_%S"))
                    if os.path.exists(newpath):
                        image_path = newpath + today.strftime("%Y_%m_%d_%H_%M_%S") + ".jpg"
                        img = Image.open(io.BytesIO(byte_data))
                        img.save(image_path, 'jpeg')
                    else:
                        os.mkdir(newpath)
                        image_path = newpath + today.strftime("%Y_%m_%d_%H_%M_%S") + ".jpg"
                        img = Image.open(io.BytesIO(byte_data))
                        img.save(image_path, 'jpeg')
                    time.sleep(1)
                else:
                    print('Not detect '+ today.strftime("%Y_%m_%d_%H_%M_%S"))
    except JSONDecodeError as e:
        print("Error: Invalid JSON string")
        print("JSONDecodeError:", str(e))
