


产品上手指引
Linux PC
CardputerZero
AI 加速卡
LLM-8850 Card
AI 智能体
实时 AI 语音助手
火山引擎语音助手
工业控制
Ethernet 摄像头
PoECAM
Wi-Fi 摄像头
Unit CamS3/-5MP
AI 摄像头
LoRa & LoRaWAN
电机驱动
恢复出厂固件教程
拨码开关&引脚切换
CoreMP135 Buildroot
1.下载源码
1.访问Github下载CoreMP135源码, 本项目使用buildroot externel的方式编译, 与buildroot源码分别独立。
git clone https://github.com/m5stack/CoreMP135_buildroot.git
git clone https://github.com/m5stack/CoreMP135_buildroot-external-st.git2.将两个工程放在同级目录下
├── CoreMP135_buildroot
├── CoreMP135_buildroot-external-st2.编译源码
1.进入CoreMP135_buildroot目录执行以下指令。
m5stack_coremp135_defconfig(内核版本6.1)和m5stack_coremp135_515_defconfig(内核版本5.15)。默认出厂固件均使用5.15内核版本, 若是用于编译驱动使用,请使用对应的版本。make BR2_EXTERNAL=../CoreMP135_buildroot-external-st/ m5stack_coremp135_515_defconfig
make -j42.编译完成后, 在output/images目录可以获取生成的sdcard.img镜像文件。
3.编译驱动
1.CoreMP135的buildroot工程中将屏幕驱动等内容通过补丁方式加入到了源码工程,内核中已经整机上所有外设的驱动.后续的开发中,你可能会需要使用到自己开发的模块,下面以hello_world驱动举例进行编译, 你可以通过以下方式编译,并安装到设备中.
外部模块编译方式
1.创建一个hello_world_driver文件夹, 并包含以下文件Makefile, hello_world_driver.c
//hello_world_driver.c
#include <linux/init.h>
#include <linux/module.h>

MODULE_LICENSE("GPL");
MODULE_AUTHOR("Your Name");
MODULE_DESCRIPTION("A simple hello world kernel module");

static int __init hello_world_init(void)
{
    printk(KERN_INFO "Hello, world!\n");
    return 0;
}

static void __exit hello_world_exit(void)
{
    printk(KERN_INFO "Goodbye, world!\n");
}

module_init(hello_world_init);
module_exit(hello_world_exit);
2.将Makefile文件中的内核地址指向buildroot目录中的linux内核路径, 工具链指向buildroot中使用的工具链路径。注意:请按照你实际工程路径修改
//Makefile
KERN_DIR := /home/sean/workspace/mp135/release/Core135_buildroot/output/build/linux-custom
CROSS_COMPILE := /home/sean/workspace/mp135/release/Core135_buildroot/output/host/bin/arm-none-linux-gnueabihf-
MODULE_NAME := hello_world_driver
PWD := $(shell pwd)


obj-m := $(MODULE_NAME).o

default:
    $(MAKE) ARCH=arm -C $(KERN_DIR) CROSS_COMPILE=$(CROSS_COMPILE) M=$(PWD) modules

clean:
    $(MAKE) ARCH=arm -C $(KERN_DIR) CROSS_COMPILE=$(CROSS_COMPILE) M=$(PWD) clean
3.运行以下指令进行模块编译, 将会输出模块.ko文件
make4.编译USB网卡驱动
1.CoreMP135在使用USB无线网卡进行网络连接前,我们需要编译对应的网卡驱动并将驱动.ko文件和网卡固件放置到系统中,确保网卡能被正常识别和驱动。本教程将基于MT7601U的USB网卡案例说明编译和使用过程。
2.完成上一步的内核编译工作后, 访问linux内核目录Core135_buildroot/output/build/linux-custom, 使用以下指令并打开配置页面。
make ARCH=arm menuconfig路径Device Drivers->Network device support->Wireless LAN 启用对应的网卡驱动。(例如本教程中使用到了基于MT7601U的网卡)
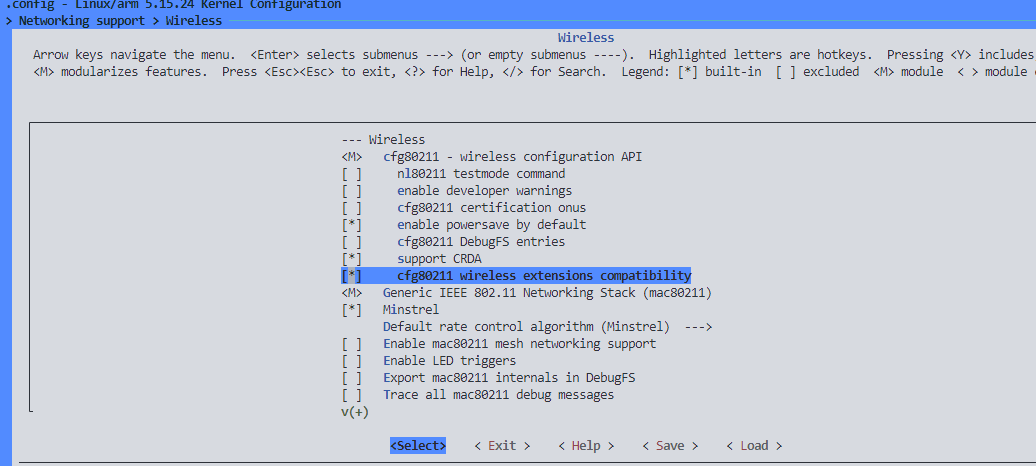
路径Networking support->Wireless, 启用 cfg80211 - wireless configuration API、cfg80211 wireless extensions compatibility、Generic IEEE 802.11 Networking Stack。
编译驱动使用的内核版本需要与机子运行的内核版本保持一致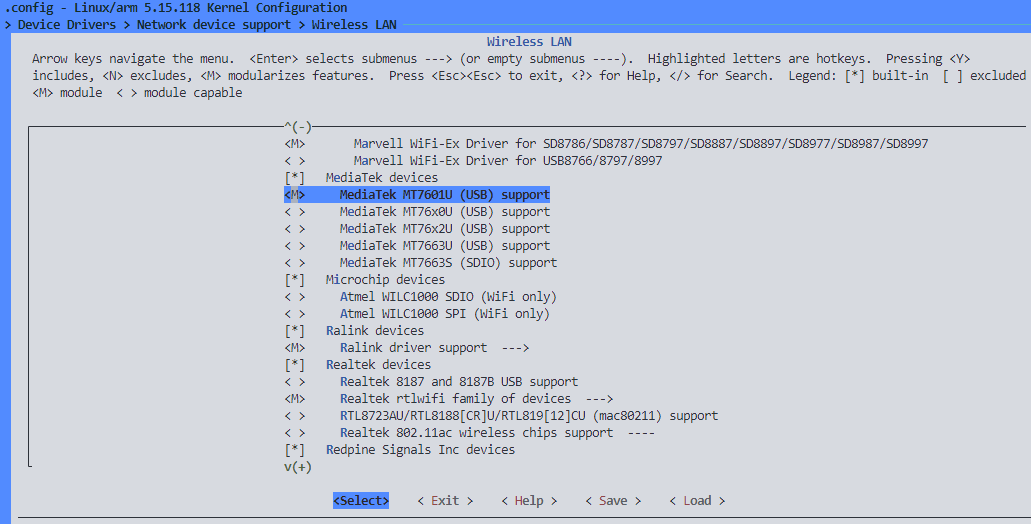
3.启用并保存对应的网卡驱动后,回到buildroot根目录使用指令make linux-rebuild重新编译linux内核和驱动部分。完成编译后,可以在Core135_buildroot/output/target/lib/modules/$version/kernel/drivers/net/wireless中获取驱动.ko文件。
make linux-rebuild4.通过网卡官方资源网站或联系供应商获取USB网卡的固件文件, 并将其放置到CoreMP135的文件系统路径/lib/firmware/中。(一般该路径在内核编译选项menuconfig中可以指定, 也可以通过源码查看实际调用的文件名称, 需要保持固件文件名称与配置选项一致, 否则无法正常加载, 加载异常的时候可以通过dmesg指令查看报错日志分析问题)。例如该案例中则需要放置固件文件到/lib/firmware/mt7601u.bin路径下。
5.将是之前编译好的网卡驱动.ko文件放置到/lib/modules/$version/kernel/driver/net/wireless/中。
scp -r ./lib/modules/5.15.118/kernel/drivers/net/wireless/mediatek root@192.168.2.52:/lib/modules/5.15.118/kernel/drivers/net/wireless/6.运行depmod -a更新驱动依赖关系, 然后使用modprobe mt7601u(驱动名)进行驱动加载。完成驱动加载后, 插入USB网卡, 查看当前可用网卡是否正常识别。然后就可以使用nmtui(debian镜像), wpa_supplicant(buildroot镜像)进行网络连接了。相关指令可以参考网络配置章节。
depmod -a
modprobe mt7601uifconfig -a