

Product Guide
Linux PC
AI Accelerator Card
LLM-8850 Card
Large Language Models
AI & Agent
Real-Time AI Voice Assistant
XiaoZhi Voice Assistant
AtomS3R-M12 Volcengine Kit
Offline Voice Recognition
Industrial Control
IoT Measuring Instruments
Air Quality
PowerHub
Module13.2 PPS
VAMeter
T-Lite
Input & Output Devices
Ethernet Camera
PoECAM
Wi-Fi Camera
Unit CamS3/-5MP
AI Camera
LoRa & LoRaWAN
Motor Control
Restore Factory Firmware
DIP Switch Usage Guide
UnitV2 Built-in Recognition Service
Preparation
Driver Installation
Download the appropriate SR9900 driver according to the operating system used.
For Windows
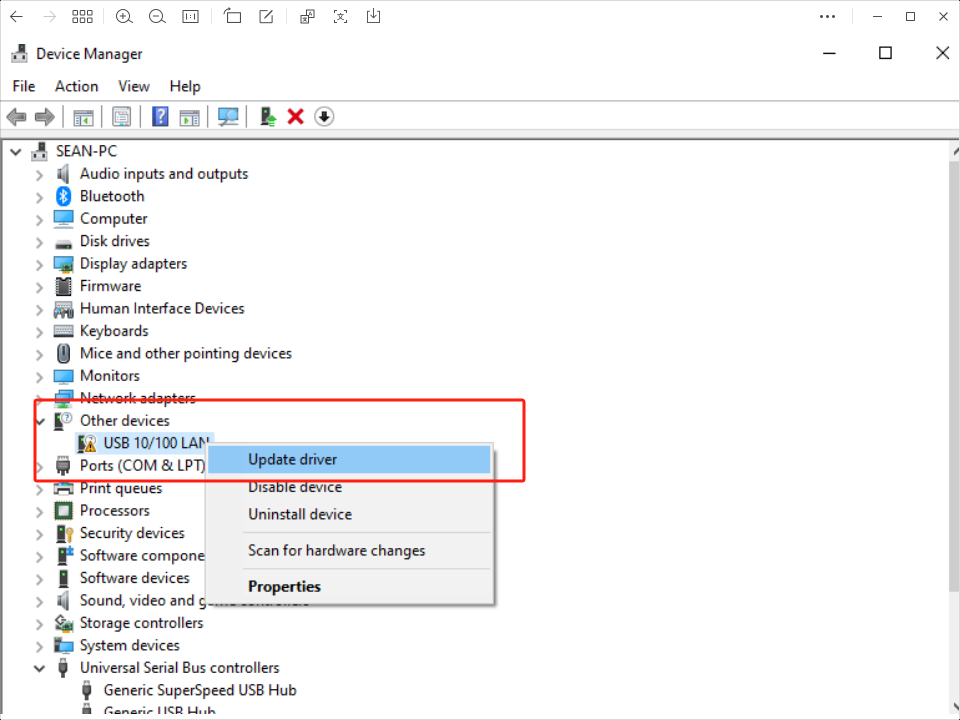
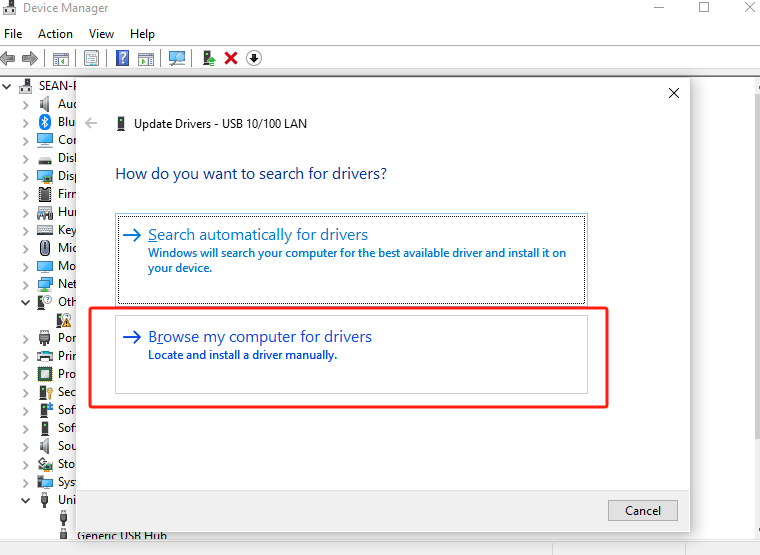
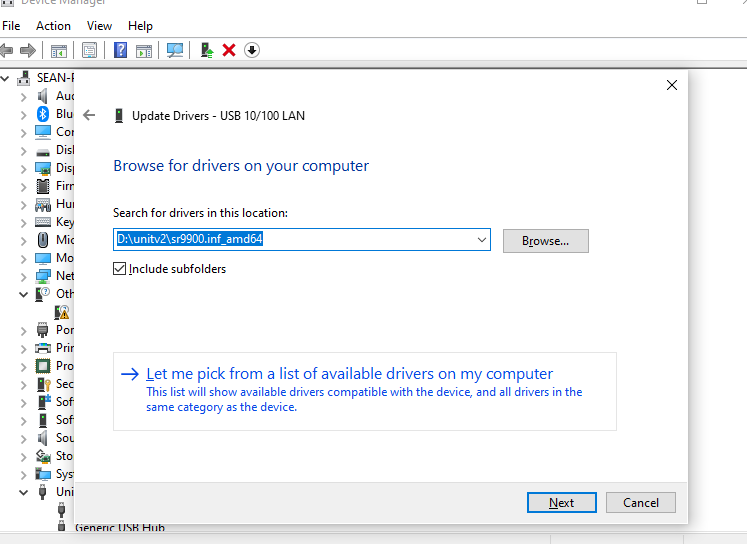
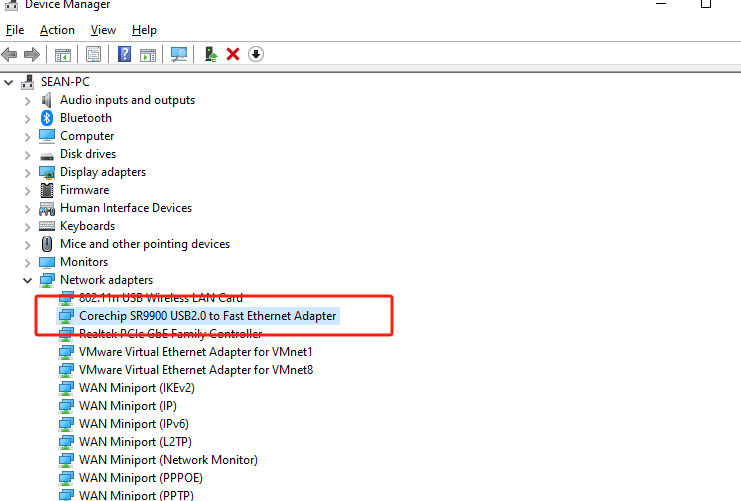
Extract the driver zip package to the desktop path -> Go to the device manager and select the currently unrecognized device (with the name of USB 10/100 LAN or with the character SR9900) -> Right-click and select Customize Update -> Select the path where the zip package is extracted -> Click on Confirm and wait for the update to complete.

For MacOS
Unzip the driver zip package -> double click to open the SR9900_v1.x.pkg file -> click Next to install according to the prompts. (The package contains a detailed version of the driver installation tutorial pdf)
- After the installation is completed, if the card can not be enabled normally, you can open the terminal, use the following command to re-enable the card.
sudo ifconfig en10 down
sudo ifconfig en10 upConnecting the Device
After connecting to USB for power supply, UnitV2 will start up automatically, the power indicator will show red and white color, and turn off when the startup is completed.UnitV2 integrates the basic AI recognition application developed by M5Stack internally, and has built-in various recognition functions (e.g. face recognition, object tracking, and other commonly used functions), which can help users to build an AI recognition application quickly. Through the following two connections, PC/mobile users can access the preview web page of the recognition function through the browser to the domain name unitv2.py or IP:10.254.239.1. During the identification process, UnitV2 will continuously output the identification sample data (in JSON format, UART: 115200bps 8N1) through the serial port (HY2.0-4P connector at the bottom).
Safari browser, we recommend Chrome for access.Ethernet Mode Connection: UnitV2 has a built-in wired network card, when you connect your PC through the Type-C port, it will automatically establish a network connection with UnitV2.AP Mode Connection: When UnitV2 starts up, it will turn onAP Hotspot(SSID: M5UV2_XXX: PWD:12345678)by default, users can establish network connection with UnitV2 through WiFi access.

During the identification process, UnitV2 will continuously output the identification sample data (JSON format, UART:
115200bps 8N1) through the serial port (bottom HY2.0-4P interface).
Function switching
Toggle between different recognition functions by clicking on the navigation bar of the function page or by sending a JSON command through the device's Serial interface. Note: It is not allowed to insert line breaks in the command string except at the end.
Function Define
Audio FFT
Code Detector
Face Detector
Lane Line Tracker
Motion Tracker
Shape Matching
Camera Stream
Online Classifier
Color Tracker
Face Recognition
Target Tracker
Shape Detector
Object RecognitionFunction switching commands
{
  "function": "Object Recognition",
  "args": ["yolo_20class"]
}Response
- If the function switch is successful, you will receive a reply.
{
  "msg": "function switched to Object Recognition."
}- If the specified function does not exist, a reply will be received.
{
  "error": "function Object Recognition not exist"
}- If the function switch fails, you will receive a reply.
{
  "error": "invalid function."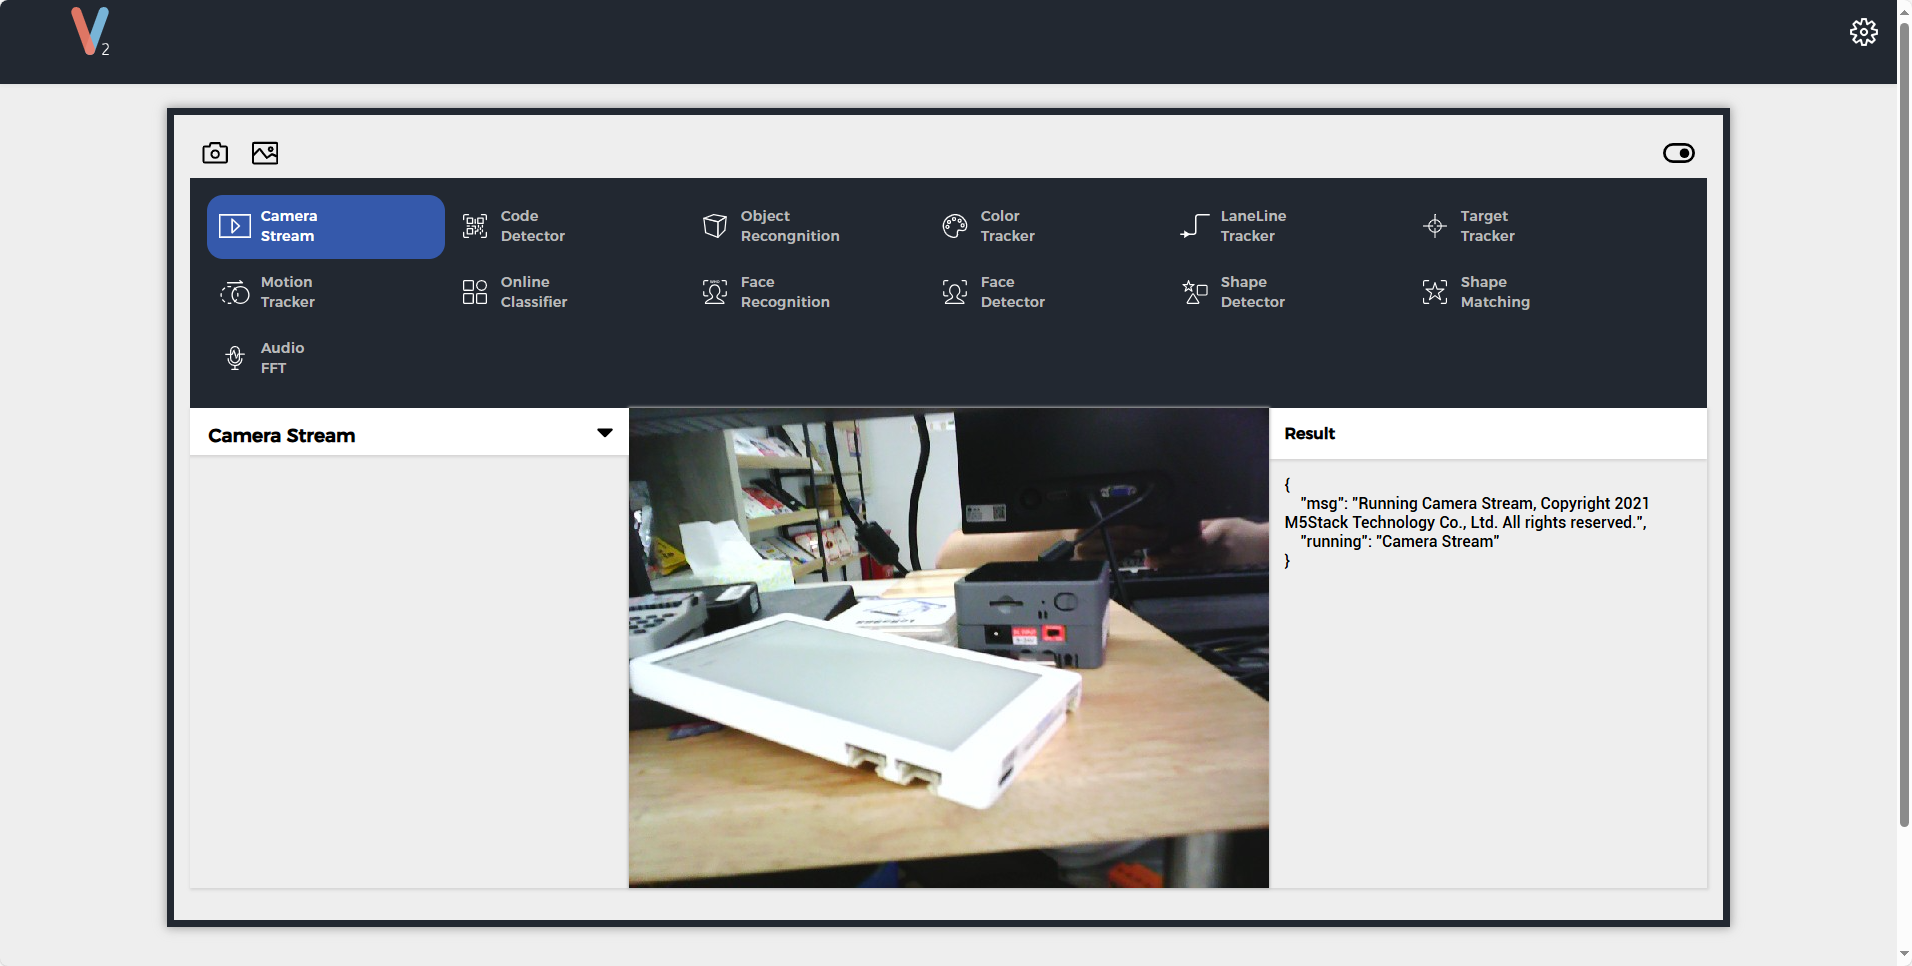
}Camera Stream
Functional Description
480P real-time video preview
Function switching commands
{
  "function": "Camera Stream",
  "args": ""
}Code Detector
Functional Description
Recognize the QR code in the screen and return the coordinates and content of the QR code.
Function switching commands
{
  "function": "Code Detector",
  "args": ""
}Sample output
{
  "running": "Code Detector",
  "num": 2, // Number of QR codes
  "code": [
    {
      "prob": 0.987152, // confidence level (math.)
      "x": 10, // 0 ~ 640
      "y": 10, // 0 ~ 480
      "w": 30,
      "h": 30, // Bounding boxes for QR codes
      "type": "QR/DM/Maxi", // include "Background", "QR/DM/Maxi", "SmallProgramCode", "PDF-417", "EAN", "Unknown"
      "content": "m5stack"
    },
    {
      "prob": 0.987152, // confidence level (math.)
      "x": 10,
      "y": 10,
      "w": 30,
      "h": 30, // Bounding boxes for QR codes
      "type": "QR/DM/Maxi", // include "Background", "QR/DM/Maxi", "SmallProgramCode", "PDF-417", "EAN", "Unknown"
      "content": "m5stack"
    }
  ]
}Object Recognition
Functional Description
Target detection based on YOLO Fastest and NanoDet. Support V-Training.
- To train a custom model check out the tutorial UnitV2 V-Training
Function switching commands
//Select the parameter "nanodet_80class" to switch to this function.
{
  "function": "Object Recognition",
  "args": ["nanodet_80class"]
}By default, the mirror has built-in nanodet_80class, yolo_20classes models, which can be used directly, and the following objects are supported by the model
yolo_20class: [
    "aeroplane", "bicycle", "bird", "boat", "bottle", "bus", "car", "cat", "chair", "cow", "diningtable", "dog",
    "horse", "motorbike", "person", "pottedplant", "sheep", "sofa", "train", "tvmonitor"
]nanodet_80class: [
"person","bicycle","car","motorbike","aeroplane","bus","train","truck","boat","traffic light",
"fire hydrant","stop sign","parking meter","bench","bird","cat","dog","horse","sheep","cow",
"elephant","bear","zebra","giraffe","backpack","umbrella","handbag","tie","suitcase","frisbee",
"skis","snowboard","sports ball","kite","baseball bat","baseball glove","skateboard","surfboard",
"tennis racket","bottle","wine glass","cup","fork","knife","spoon","bowl","banana","apple",
"sandwich","orange","broccoli","carrot","hot dog","pizza","donut","cake","chair","sofa","pottedplant",
"bed","diningtable","toilet","tvmonitor","laptop","mouse","remote","keyboard","cell phone","microwave",
"oven","toaster","sink","refrigerator","book","clock","vase","scissors","teddy bear","hair drier","toothbrush"
]Sample output
{
  "num": 1,
  "obj": [
    {
      "prob": 0.938137174,
      "x": 179,
      "y": 186,
      "w": 330,
      "h": 273,
      "type": "person"
    }
  ],
  "running": "Object Recognition"
}Color Tracker
Functional Description
Detect the specified color region and return the coordinates of the color region.
You can directly adjust the LAB threshold slider to filter out the background and get the color area of interest. You can also directly frame the color area of interest in the screen, the system will automatically calculate the target area of the largest proportion of the color and filter out the background, you can further adjust the slider bar on the basis of the calculation to achieve better filtering results. Click "To Mask Mode" button will switch to Mask mode, in this mode you can directly see the filtering effect. Clicking the "To RGB Mode" button will switch back to RGB mode.
About CIELAB Color Space - LAB Threshold is mapped to 0~255 - The L in LAB stands for Luminance, usually this threshold (0~255) is not set to ignore the effect of luminance. However, this will cause the algorithm to not be able to distinguish between black and white, please note. - The algorithm will only return the largest target
Function switching commands
{
  "function": "Color Tracker",
  "args": ""
}- Designated LAB value
// * LAB thresholds are mapped to 0~255
{
  "config": "Color Tracker",
  "l_min": 0, // 0 ~ 255
  "l_max": 0, // 0 ~ 255
  "a_min": 0, // 0 ~ 255
  "a_max": 0, // 0 ~ 255
  "b_min": 0, // 0 ~ 255
  "b_max": 0 // 0 ~ 255
}- LAB Threshold Configuration Response
{
  "running": "Color Tracker",
  "msg": "Data updated."
}- Specify ROI (automatic calculation of thresholds)
{
  "config": "Color Tracker",
  "x": 0, // 0 ~ 640
  "y": 0, // 0 ~ 480
  "w": 30,
  "h": 30
}- ROI Configuration Response
// * va and vb refers to the degree of color dispersion within the ROI, if the dispersion is high, the tracking effect is poor.
{
  "running": "Color Tracker",
  "a_cal": 0.0,
  "b_cal": 0.0, // Calculation Threshold
  "va": 0.0,
  "vb": 0.0, // Color dispersion rate
  "l_min": 0, // Fixed value 0
  "l_max": 255, // Fixed value 255
  "a_min": 0, // a_cal - (10 + (int)(va / 2.0f))
  "a_max": 0, // a_cal + (10 + (int)(va / 2.0f))
  "b_min": 0, // b_cal - (10 + (int)(vb / 2.0f))
  "b_max": 0 // b_cal + (10 + (int)(vb / 2.0f))
}Sample output
{
  "running": "Color Tracker",
  "cx": 0, // Center X-axis coordinates
  "cy": 0, // Center Y-axis coordinates
  "r": 0, // radius
  "mx": 0, // moment x position
  "my": 0 // moment y position
}Lane Line Tracker
Functional Description
Detect the road line in the screen, fit it to a straight line, and return the angle and coordinates of the line.
- You can directly adjust the LAB threshold slider to filter out the background and get the color area of interest. You can also directly frame the color area of interest in the screen, the system will automatically calculate the target area of the most color and filter out the background, you can further adjust the slider bar on the basis of the calculation to achieve better filtering results. Click "To Mask Mode" button will switch to Mask mode, in this mode you can directly see the filtering effect. Clicking the "To RGB Mode" button will switch back to RGB mode.
Function switching commands
{
  "function": "Lane Line Tracker",
  "args": ""
}- The way to configure LAB threshold and ROI is the same as the Color Tracker way just change the config in the configuration command to
"config":Lane Line Tracker".
Sample output
{
  "running": "Lane Line Tracker",
  "x": 0,
  "y": 0, // Base point of the fitted line
  "k": 0 // Slope of the fitted line
}Target Tracker
Functional Description
The MOSSE algorithm is used to select a target on the screen and track it. Tracking is done by simply framing the target of interest on the screen.
Function switching commands
{
  "function": "Target Tracker",
  "args": ""
}Sample output
{
  "running": "Target Tracker",
  "x": 0, //0~640
  "y": 0, //0~480
  "w": 0,
  "h": 0
}Motion Tracker
Functional Description
Detects and tracks a moving target, returning the target's coordinates and angle. Click the 'Set as background' button to determine the background. The algorithm can be adapted to slowly changing backgrounds.
Function switching commands
{
  "function": "Motion Tracker",
  "args": ""
}- Setting background commands
{
  "config": "Motion Tracker",
  "operation": "update"
}- Setting the background command response
{
  "running": "Motion Tracker",
  "msg": "Background updated."
}Sample output
{
  "running": "Motion Tracker",
  "num": 2,
  "roi": [
    {
      "x": 0,
      "y": 0,
      "w": 0,
      "h": 0,
      "angle": 0.0,
      "area": 0
    },
    {
      "x": 0,
      "y": 0,
      "w": 0,
      "h": 0,
      "angle": 0.0,
      "area": 0
    }
  ]
}Online Classifier
Functional Description
This function can train and categorize the objects in the green target box in real time, and the trained feature values can be saved on the device for next time use.
- Click the
Resetbutton to clear the existing categories and enter the training mode.
- Click the
- Click the
+button to create a new category.
- Click the
- Select the category you want to train.
- Place the object to be trained in the green target box.
- Click the
Trainbutton to complete a training session.
- Click the
- Repeat the training by changing the angle of the object until you think you have achieved the desired result.
- Click the
save&runbutton to save the training results on the device and exit the training mode for object recognition and classification.*
- Click the
Function switching commands
{
  "function": "Online Classifier",
  "args": ""
}- Device enters training mode
//This instruction will put the device into training mode and extract the features once to store them under the specified class. If class_id does not exist, the class will be created.
{
  "config": "Online Classifier",
  "operation": "train",
  "class_id": 1, // Integer (0 ~ N), class ID
  "class": "class_1" // String, class
}- Enter training mode response
{
  "running": "Online Classifier",
  "msg": "Training [class name] [num of training] times"
}- Save and start recognizing
{
  "config": "Online Classifier",
  "operation": "saverun"
}- Save Recognition Command Response
{
  "running": "Online Classifier",
  "msg": "Save and run."
}- This command will put the device into training mode and clear all classifications.
{
  "config": "Online Classifier",
  "operation": "reset"
}- Clear Command Response
{
  "running": "Online Classifier",
  "msg": " Please take a picture."
}Sample output
{
  "running": "Online Classifier",
  "class_num": 2, // Number of classes identified
  "best_match": "class_1", // Best match class
  "best_score": 0.83838, // Best Match Score
  "class": [
    // Scores for each class
    {
      "name": "class_1",
      "score": 0.83838
    },
    {
      "name": "class_2",
      "score": 0.66244
    }
  ]
}Face Recognition
Functional Description
Detect and recognize faces.
- 1.Click the Reset button to clear all existing faces.
- 2.Click the + button to create a new face.
- 3.Select the faces to be trained.
- 4.Look into the camera and make sure the faces to be trained are in the right place.
- 5.Click the Train button.
- 6.During training, when the bounding box is yellow for training, you can slowly rotate your head to sample different angles for better recognition.
- 7.If the bounding box turns red, the target has been lost, usually because the face has changed too much, adjust the face position until the face is found again.
- 8.When you think you have achieved the desired result click Stop, the device is now able to recognize the face.
- 9.Click the Save button to save the feature data to the device for next use.
Function switching commands
{
  "function": "Face Recognition",
  "args": ""
}- Creating new face recognition information
//To create a new face, provide the face_id in order (0 ~ N).
{
  "config": "Face Recognition",
  "operation": "train",
  "face_id": 1, // Integer (0 ~ N), face ID
  "name": "tom" // String, Names of faces
}


//For example, there are already 3 faces (0~2), to create a new face, you need to specify the id as 3.- Created successfully
{
  "running": " Face Recognition ",
  "msg": "Training tom"
}- Creation Failed
{
  "running": "Face Recognition",
  "msg": "Invalid face id"
}
{
"config": " Face Recognition ",
"operation": " stoptrain"
}{
"running": "Face Recognition",
"msg": "Exit training mode."
}- Save&Run
{
  "config": " Face Recognition ",
  "operation": "saverun"
}
{
"running": "Face Recognition",
"msg": "Faces saved."
}- Delete all faces.
{
  "config": "Face Recognition",
  "operation": "reset"
}
{
"running": "Face Recognition",
"msg": "Reset success"
}Sample output
- Training Mode
{
  "running": "Face Recognition",
  "status": "training", // training or missing
  "x": 0,
  "y": 0,
  "w": 0,
  "h": 0, //  Facial recognition bounding box
  "prob": 0, // Detection confidence rate
  "name": 0
}- Normal Mode Match Score > 0.5
{
  "running": "Face Recognition",
  "num": 1,
  "face": [
    {
      "x": 0, // 0 ~ 320
      "y": 0, // 0 ~ 240
      "w": 30,
      "h": 30, // Facial recognition bounding box
      "prob": 0, // Detection confidence rate
      "match_prob": 0.8, // Matching Confidence Rate
      "name": "tom",
      "mark": [
        // landmarks
        {
          "x": 0,
          "y": 0
        },
        {
          "x": 0,
          "y": 0
        },
        {
          "x": 0,
          "y": 0
        },
        {
          "x": 0,
          "y": 0
        },
        {
          "x": 0,
          "y": 0
        }
      ]
    }
  ]
}- Normal Mode Match Score <=0.5
{
  "running": "Face Recognition",
  "num": 1, //  Number of faces recognized
  "face": [
    {
      "x": 0, // 0 ~ 320
      "y": 0, // 0 ~ 240
      "w": 30,
      "h": 30, // Facial recognition bounding box
      "prob": 0, // confidence level (math.)
      "name": "unidentified",
      "mark": [
        // landmarks
        {
          "x": 0,
          "y": 0
        },
        {
          "x": 0,
          "y": 0
        },
        {
          "x": 0,
          "y": 0
        },
        {
          "x": 0,
          "y": 0
        },
        {
          "x": 0,
          "y": 0
        }
      ]
    }
  ]
}Face Detector
Functional Description
Detects the face in the frame and gives a 5-point landmark.
Function switching commands
{
  "function": "Face Detector",
  "args": ""
}Sample output
{
  "running": "Face Detector",
  "num": 1, //  Number of faces recognized
  "face": [
    {
      "x": 0,
      "y": 0,
      "w": 30,
      "h": 30, // Facial recognition bounding box
      "prob": 0, // confidence level (math.)
      "mark": [
        // landmark
        {
          "x": 0,
          "y": 0
        },
        {
          "x": 0,
          "y": 0
        },
        {
          "x": 0,
          "y": 0
        },
        {
          "x": 0,
          "y": 0
        },
        {
          "x": 0,
          "y": 0
        }
      ]
    }
  ]
}Shape Detector
Functional Description
Detect shapes in a picture and calculate their area. Can recognize square, rectangle, triangle, pentagon, circle. Click the 'Set as background' button to determine the background. The algorithm can adapt to slowly changing backgrounds.
Function switching commands
{
  "function": "Shape Detector",
  "args": ""
}- Configure the current screen as the background
{
  "config": "Shape Detector",
  "operation": "update"
}
{
"running": "Shape Detector",
"msg": "Background updated."
}Sample output
{
  "running": "Shape Detector",
  "num": 2,
  "shape": [
    {
      "name": "Rectangle", // "unidentified", "triangle", "square", "rectangle", "pentagon", "circle"
      "x": 0,
      "y": 0,
      "w": 0,
      "h": 0,
      "angle": 0.0, // Can be used when the shape is square or rectangular
      "area": 0
    },
    {
      "name": "Rectangle", // "unidentified", "triangle", "square", "rectangle", "pentagon", "circle"
      "x": 0,
      "y": 0,
      "w": 0,
      "h": 0,
      "angle": 0.0, // Can be used when the shape is square or rectangular
      "area": 0
    }
  ]
}Shape Matching
Functional Description
Match any given shape (but the shape should preferably not contain curves), and the uploaded shape will be converted to feature data and saved on the device for next time use.
- 1.Click the add button to add a shape, you need to upload an image of the shape template as shown below (in png format, the shape is black with a white background), the filename will be the name of the shape.
- 2.Click the RESET button to clear all the uploaded shapes.
- 3.Click the
Set as backgroundbutton to determine the background. The algorithm adapts to slowly changing backgrounds.
Function switching commands
{
    "function": "Shape Matching",
    "args": ""
}Sample output
// The shape returned here is the filename of the uploaded template, please note that if the confidence rate is lower than 30%, it will be labeled as unidentified.
{
  "running": "Shape Matching",
  "num": 2,
  "shape": [
    {
      "name": "arrow", // Your customized shape name cannot be recognized when the confidence rate is less than 30
      "max_score": 83, // Confidence score, if shape is unknown, no
      "x": 0,
      "y": 0,
      "w": 0,
      "h": 0,
      "area": 0
    },
    {
      "name": "unidentified", // Your customized shape name is not recognized when the confidence score is less than 30.
      "x": 0,
      "y": 0,
      "w": 0,
      "h": 0,
      "area": 0
    }
  ]
}Audio FFT
The audio is captured through the microphone on the device, a real-time FFT (Fast Fourier Transform) is performed and a time-frequency graph is plotted. The green graph below is the RMS of the audio, indicating the current loudness.
- The microphone response cutoff frequency is around 10KHz.
Function switching commands
None
Sample output
None
Model Script
Calling internal models via Python scripts
from json.decoder import JSONDecodeError
import subprocess
import json
import base64
import serial
import time
from datetime import datetime
from PIL import Image
import os
import io

uart_grove = serial.Serial('/dev/ttyS0', 115200, timeout=0.1)
reconizer = subprocess.Popen(['/home/m5stack/payload/bin/object_recognition', '/home/m5stack/payload/uploads/models/nanodet_80class'],
                             stdin=subprocess.PIPE, stdout=subprocess.PIPE, stderr=subprocess.PIPE)

reconizer.stdin.write("_{\"stream\":1}\r\n".encode('utf-8'))
reconizer.stdin.flush()

img = b''

while True:
    today = datetime.now()
    path = str(today.strftime("%Y_%m_%d") + "/")
    newpath = "/media/sdcard/" + path

    line = reconizer.stdout.readline().decode('utf-8').strip()
    if not line:
        break  # Process finished or empty line

    try:
        doc = json.loads(line)
        if 'img' in doc:
            byte_data = base64.b64decode(doc["img"])
            img = bytes(byte_data)
        elif 'num' in doc:
            for obj in doc['obj']:
                uart_grove.write(str(obj['type'] + '\n').encode('utf-8'))
                if obj['type'] == "aeroplane":
                    print('aeroplane ' + today.strftime("%Y_%m_%d_%H_%M_%S"))
                    if os.path.exists(newpath):
                        image_path = newpath + today.strftime("%Y_%m_%d_%H_%M_%S") + ".jpg"
                        img = Image.open(io.BytesIO(byte_data))
                        img.save(image_path, 'jpeg')
                    else:
                        os.mkdir(newpath)
                        image_path = newpath + today.strftime("%Y_%m_%d_%H_%M_%S") + ".jpg"
                        img = Image.open(io.BytesIO(byte_data))
                        img.save(image_path, 'jpeg')
                    time.sleep(1)
                else:
                    print('Not detect '+ today.strftime("%Y_%m_%d_%H_%M_%S"))
    except JSONDecodeError as e:
        print("Error: Invalid JSON string")
        print("JSONDecodeError:", str(e))