

Product Guide
Linux PC
CardputerZero
AI Accelerator Card
LLM-8850 Card
Large Language Models
AI & Agent
Real-Time AI Voice Assistant
XiaoZhi Voice Assistant
AtomS3R-M12 Volcengine Kit
Offline Voice Recognition
Industrial Control
IoT Measuring Instruments
Air Quality
PowerHub
Module13.2 PPS
VAMeter
T-Lite
Input & Output Devices
Ethernet Camera
PoECAM
Wi-Fi Camera
Unit CamS3/-5MP
AI Camera
LoRa & LoRaWAN
Motor Control
Restore Factory Firmware
DIP Switch Usage Guide
TimerCAM/Unit CAM - UIFlow
Feature Description
Use the device to connect the TimerCAM/Unit CAM through the GROVE interface to achieve command control of the camera's UART transmission of images and preview them on the M5CORE screen, or configure a timed shooting and upload to the cloud function (returning a fixed HTTP API).
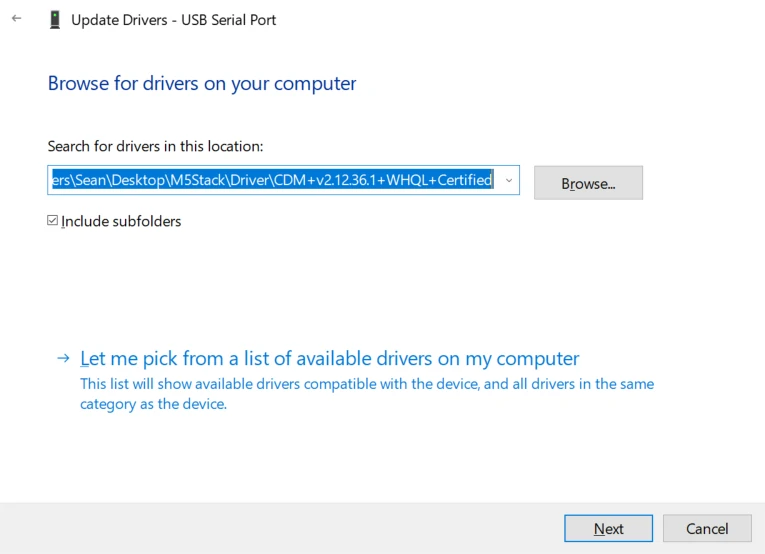
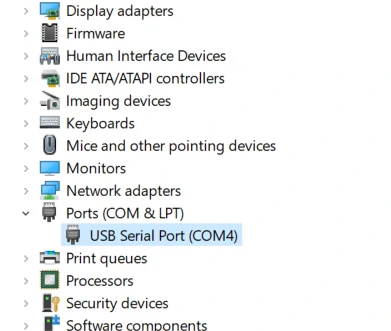
Driver Installation
1500000 bps / 750000 bps / 500000 bps / 250000 bps / 115200 bps
M5Stack or USB Serial. Windows recommends using the driver files directly in the device manager for installation (custom update). The executable file installation method may not work properly.) Click here to download the FTDI driver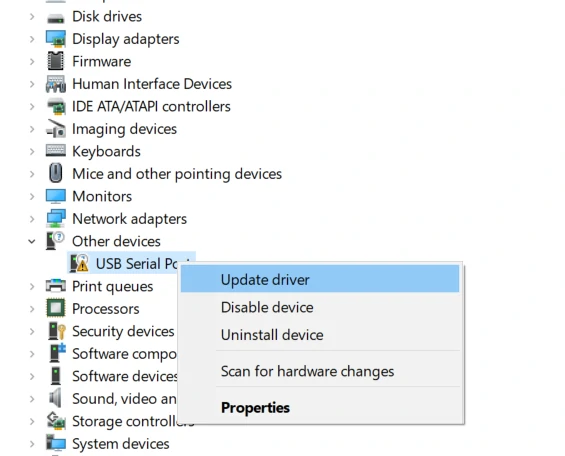
For MacOS users, before installation, please check System Preferences -> Security & Privacy -> General -> Allow apps downloaded from: -> App Store and identified developers option.
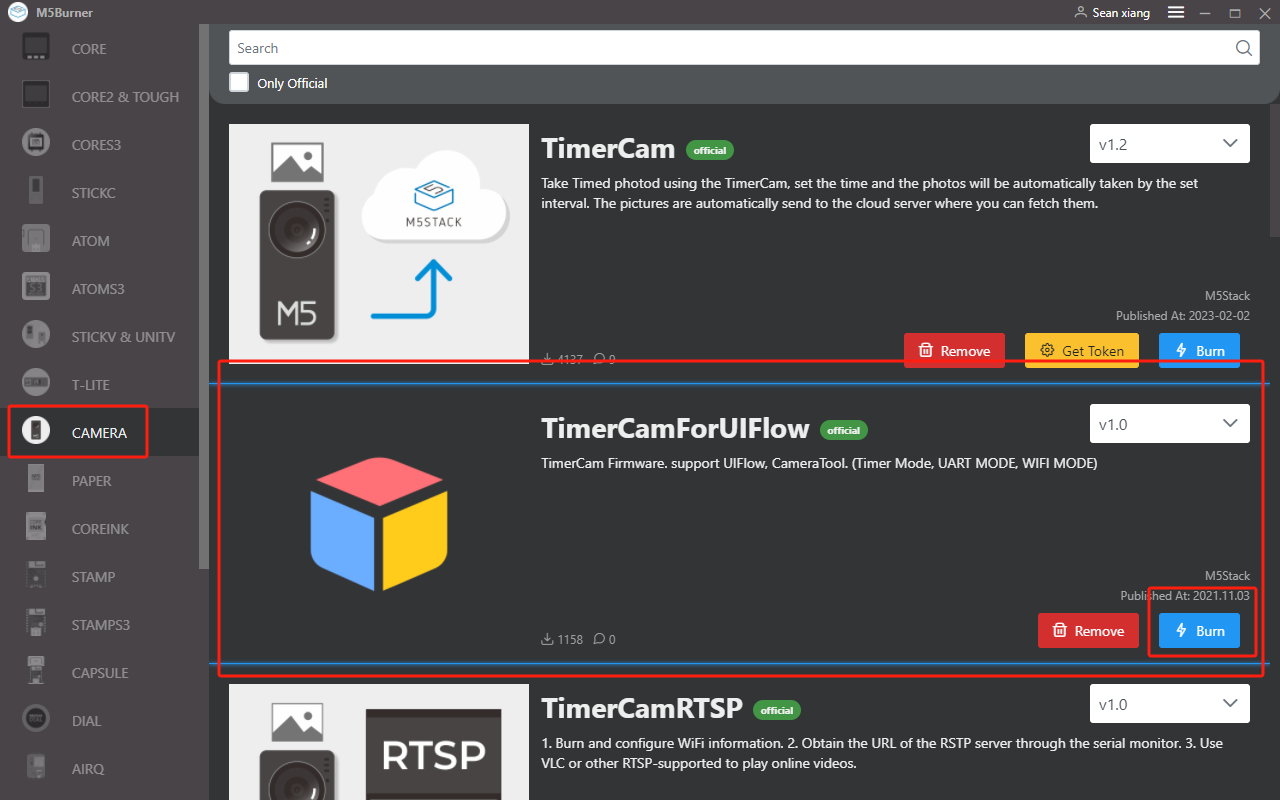
Download the Firmware Burning Tool
Please download the M5Burner firmware burning tool according to your operating system. Unzip and open the application.
| Software Version | Download Link |
|---|---|
| M5Burner_Windows | Download |
| M5Burner_MacOS | Download |
| M5Burner_Linux | Download |
Firmware
Work Mode
UIFlow supports configuring the camera to switch between UART and Wi-Fi working modes. The Wi-Fi mode supports timed shooting and automatically uploading images to the M5 cloud and returning an image call interface (URL). In UART mode, it supports users "to obtain image frames through UART communication with other main control devices" and modifying image parameters. The following will use the main control CORE as an example, connect UnitCAM, and obtain image data.
Example
Operation instructions for the example:
Button A activates the WiFi connection mode, connects to the specified WiFi, and the camera takes pictures and uploads them to the M5 cloud every 5 seconds. Button B obtains the camera Token and creates a QR code using the cloud image URL generated by this Token.
Button C activates the UART connection mode, sets the image size to 320 x 240, and starts an image display thread to continuously refresh the image to the screen.

from m5stack import *
from m5ui import *
from uiflow import *
import unit

setScreenColor(0x222222)
timercam_0 = unit.get(unit.UNITCAM, unit.PORTB)
unitcam_0 = unit.get(unit.UNITCAM, unit.PORTB)
timercam_token = None

def buttonA_wasPressed():
  global timercam_token
  timercam_0.set_wifi('xxxxx', 'xxxxx')
  timercam_0.set_upload_time(5)
  timercam_0.set_mode(timercam_0.CLOUD_MODE)
  pass
btnA.wasPressed(buttonA_wasPressed)

def buttonB_wasPressed():
  global timercam_token
  timercam_token = timercam_0.get_token()
  if timercam_token:
    lcd.qrcode(('camera.m5stack.com/timer-cam/image?tok=' + timercam_0.get_token()), x=72, y=32, width=176, version=6)
  pass
btnB.wasPressed(buttonB_wasPressed)

def buttonC_wasPressed():
  global timercam_token
  timercam_0.set_show(True)
  timercam_0.set_image_size(timercam_0.SIZE_320_240)
  timercam_0.set_mode(timercam_0.UART_MODE)
  pass
btnC.wasPressed(buttonC_wasPressed)
API

timercam_0.set_wifi('ssid', 'password')- Configure the camera to connect to a specific WiFi network.

timercam_0.set_upload_time(5)- Configure the interval for the camera to upload images to the cloud.

timercam_0.set_upload_time(5)- Get the camera's Token.
'camera.m5stack.com/timer-cam/image?tok=' + timercam_0.get_token()- Get the camera's cloud image URL.

timercam_0.set_mode(timercam_0.UART_MODE)
timercam_0.set_mode(timercam_0.CLOUD_MODE)- Switch between UART/CLOUD modes.

timercam_0.set_image_size(timercam_0.SIZE_320_240)- Set the camera's image return size.

timercam_0.set_position(0, 0)- Set the image display position.
timercam_0.set_led_brightness(1024)- Set the brightness of the camera's onboard LED:
- 0-1024