

Arduino Quick Start
2. Devices & Examples
3. M5Unified
4. M5GFX
5. Extensions
Unit
Atomic
Tab5
IoT
Accessories
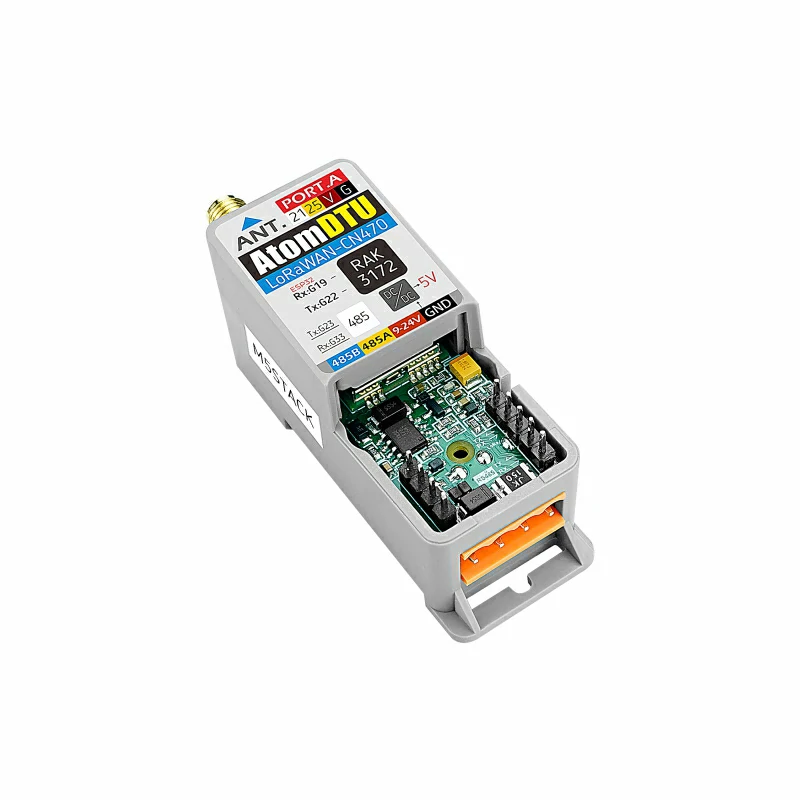
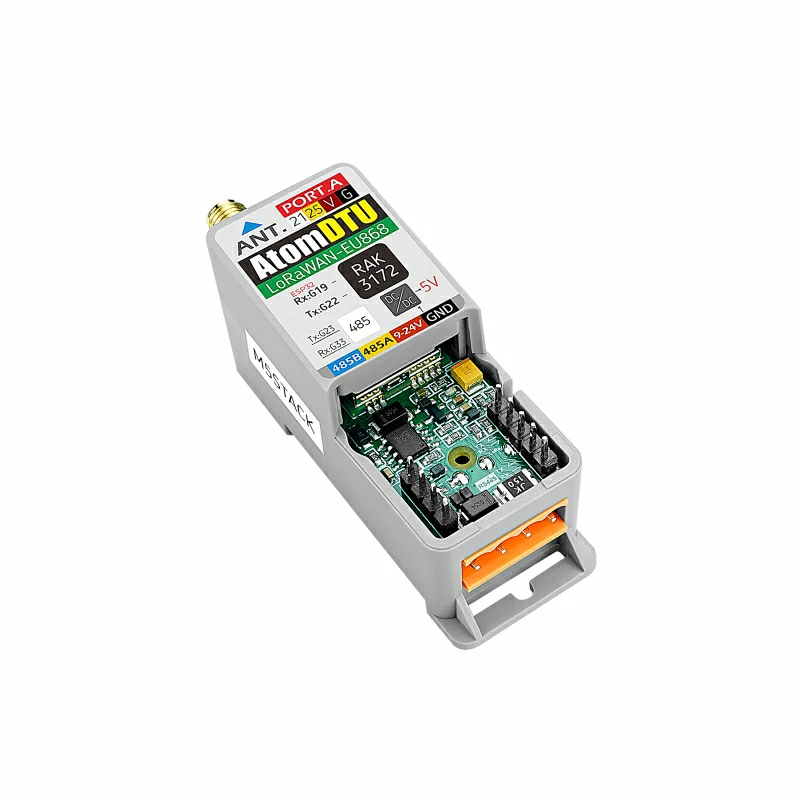
Atom DTU LoRaWAN Series Arduino Tutorial
1. Preparations
- Environment Setup: Refer to Arduino IDE Getting Started Tutorial to install the IDE, then install the board manager and required libraries for your specific development board.
- Libraries Used:
- Hardware Required:


2. LoRa P2P
The LoRa P2P communication mode allows multiple LoRa devices to communicate directly. This mode transmits data packets directly based on LoRa modulation technology, enabling you to fully customize the frame contents and build your own private network. It is well suited for scenarios requiring high real-time performance, relatively short communication ranges, and no complex network management.
LoRa TX/RX Example
Configure the matching communication parameters on each device. Devices must share the same LoRa settings to communicate. When using different Atom controllers, please refer to the macros below to assign the correct TX/RX pins for initialization.
#include <M5Unified.h>
#include "rak3172_p2p.hpp"

#define LORA_CONFIG_PRLEN 8
#define LORA_CONFIG_PWR   22
#define LORA_FREQ         868E6  // 868E6 equals to 868*10^6, which is the frequency 868M(Hz). It can be modified to 915 or 470 accordingly.
#define LORA_CR           0      // (4/5=0, 4/6=1, 4/7=2, 4/8=3)
#define LORA_SF           7      // (6, 7, 8, 9, 10, 11, 12)
#define LORA_BW           500    // (125, 250, 500)

#define ATOM_LORA_RX 19
#define ATOM_LORA_TX 22

#define ATOMS3_LORA_RX 6
#define ATOMS3_LORA_TX 5

RAK3172P2P lora;

void LoRaLoopTask(void* arg) {
  while (1) {
    lora.update();
    vTaskDelay(5);
  }
}

void setup() {
  M5.begin();
  Serial.begin(115200);
  Serial.println("LoRa Init...");
  //  The second and third parameters in the next line should start with `ATOM` or `ATOMS3` according to the device actually used.
  while (!lora.init(&Serial2, ATOMS3_LORA_RX, ATOMS3_LORA_TX, RAK3172_BPS_115200)) {
    delay(1000);
  }

  lora.setMode(P2P_RX_MODE, 0);
  if (lora.config(LORA_FREQ, LORA_SF, LORA_BW, LORA_CR, LORA_CONFIG_PRLEN, LORA_CONFIG_PWR)) {
    Serial.println("LoRa config success");
  } else {
    Serial.println("LoRa config failed");
  }
  lora.setMode(P2P_TX_RX_MODE);
  xTaskCreate(LoRaLoopTask, "LoRaLoopTask", 1024 * 10, NULL, 2, NULL);
}

void loop() {
  M5.update();
  if (M5.BtnA.wasPressed()) {
    if (lora.print("Hello!")) {
      Serial.println("Send success");
    }
  }

  if (lora.available()) {
    std::vector<p2p_frame_t> frames = lora.read();
    for (int i = 0; i < frames.size(); i++) {
      Serial.print("RSSI: ");
      Serial.print(frames[i].rssi);
      Serial.print(" SNR: ");
      Serial.print(frames[i].snr);
      Serial.print(" LEN: ");
      Serial.print(frames[i].len);
      Serial.print(" Payload: ");
      for (uint8_t j = 0; j < frames[i].len; j++) {
        Serial.printf("%02X", frames[i].payload[j]);
      }
      Serial.println();
    }
    lora.flush();
  }
}After flashing this example, open the serial monitor to view logs. Press the center button on the AtomS3R to send data.
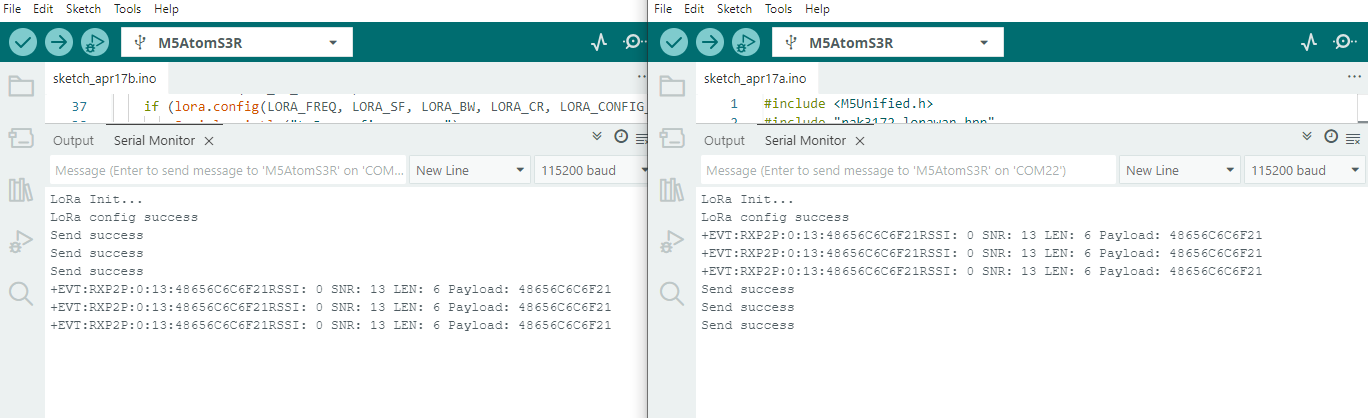
"48656C6C6F21" seen in the serial monitor is the ASCII encoding of "Hello!".
3. LoRaWAN
In LoRaWAN communication mode, devices must connect through a LoRaWAN gateway to exchange data. Thanks to frequency hopping technology, this access method can manage more devices simultaneously and offers a level of data security. Before use, ensure that there is a public LoRaWAN gateway available in your area; otherwise, you can deploy your own gateway.
Communication Keys
- Refer to TTN - Device Setup Guide to create a node for your device’s frequency band and obtain the necessary keys. These include DevEUI, AppEUI, and AppKey. Different joining modes (OTAA / ABP) use different key sets. These keys are required to access the LoRaWAN network.
- According to your device’s frequency band and the LoRaWAN gateway’s listening band, configure the corresponding subnet mask and device class (Class A–C). For an introduction to LoRaWAN and device configuration, refer to TTN - LoRaWAN Docs.
- Fill the keys obtained from TTN or other LoRaWAN servers (e.g., Chirpstack) into the example code, configure the join mode and frequency band, then compile and flash the program to your device.
OTAA Network Join
OTAA network join requires the use of DevEUI, AppEUI, and AppKey parameters.
#include <M5Unified.h>
#include "rak3172_lorawan.hpp"

#define DEVEUI "****************"
#define APPEUI "****************"
#define APPKEY "********************************"

// get or set the channel mask to close or open the channel (only for US915, AU915, CN470)
#define CHANNEL_MASK "0000"

#define ATOM_LORA_RX 19
#define ATOM_LORA_TX 22

#define ATOMS3_LORA_RX 6
#define ATOMS3_LORA_TX 5

RAK3172LoRaWAN lorawan;
bool isJoin = false;

void joinCallback(bool status)
{
    isJoin = status;
    if (status) {
        Serial.println("[LoRaWAN] Join network successful!");
        Serial.println("Device EUI: " + String(DEVEUI));
    } else {
        Serial.println("[LoRaWAN] Join network failed!");
    }
}

void sendCallback()
{
    Serial.println("[LoRaWAN] Uplink confirmed by server");
}

void errorCallback(char* error)
{
    Serial.print("[LoRaWAN] Error: ");
    Serial.println(error);
}

void LoRaWANLoopTask(void* arg)
{
    while (1) {
        lorawan.update();
        vTaskDelay(5);
    }
}

void setup()
{
    M5.begin();
    Serial.begin(115200);
    Serial.println("[Init] Initializing LoRaWAN module...");
    while (!lorawan.init(&Serial2, ATOMS3_LORA_RX, ATOMS3_LORA_TX, RAK3172_BPS_115200)) {
        Serial.println("[Init] Failed to initialize module, retrying...");
        delay(1000);
    }
    Serial.println("Device Init OK");
    Serial.println("[Config] Setting band to EU868...");
    while (!lorawan.setBAND(EU868, CHANNEL_MASK)) {
        Serial.println(" failed, retrying...");
        delay(1000);
    }
    Serial.println("[Config] Setting OTAA parameters...");
    while (!lorawan.setOTAA(DEVEUI, APPEUI, APPKEY)) {
        Serial.println(" failed, retrying...");
        delay(1000);
    }
    Serial.println("[Config] Setting device mode to CLASS_C...");
    while (!lorawan.setMode(CLASS_C)) {
        Serial.println(" failed, retrying...");
        delay(1000);
    }
    Serial.println("[Config] Setting data rate to DR4...");
    while (!lorawan.setDR(4)) {
        Serial.println(" failed, retrying...");
        delay(1000);
    }
    Serial.println("[Config] Setting Link check...");
    while (!lorawan.setLinkCheck(ALLWAYS_LINKCHECK)) {
        delay(1000);
    }

    lorawan.onSend(sendCallback);
    lorawan.onJoin(joinCallback);
    lorawan.onError(errorCallback);
    xTaskCreate(LoRaWANLoopTask, "LoRaWANLoopTask", 1024 * 10, NULL, 5, NULL);

    Serial.println("[Info] Attempting to join the network...");
    if (lorawan.join(true, false, 10, 10)) {
        Serial.println("Start Join...");
    } else {
        Serial.println("Join Fail");
    }
}

void loop()
{
    M5.update();
    if (M5.BtnA.wasReleased()) {
        if (isJoin) {
            String data = "UPlink LoRaWAN Frame: " + String(millis());
            if (lorawan.send(data)) {
                Serial.println("Send Successful");
            } else {
                Serial.println("Send fail");
            }
        } else {
            Serial.println("LoRaWAN not joined");
        }
    }
    if (lorawan.available()) {
        std::vector<lorawan_frame_t> frames = lorawan.read();
        for (int i = 0; i < frames.size(); i++) {
            Serial.print("RSSI: ");
            Serial.println(frames[i].rssi);
            Serial.print("SNR: ");
            Serial.println(frames[i].snr);
            Serial.print("LEN: ");
            Serial.println(frames[i].len);
            Serial.print("PORT: ");
            Serial.println(frames[i].port);
            Serial.print("UNITCAST: ");
            Serial.println(frames[i].unicast);
            Serial.print("Payload: ");
            for (uint8_t j = 0; j < frames[i].len; j++) {
                Serial.printf("%02X", frames[i].payload[j]);
            }
            Serial.println();
        }
        lorawan.flush();
    }
    if (Serial.available()) {
        String ch = Serial.readString();
        lorawan.sendCommand(ch);
    }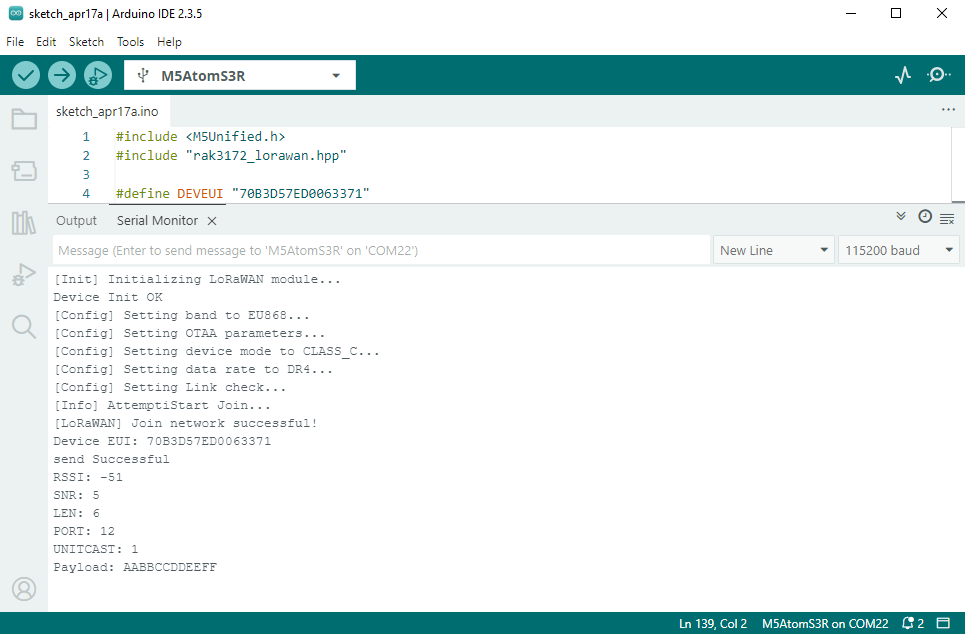
}After flashing the example, open the serial monitor to view logs. Once the join is successful, press the center button on the AtomS3R to send data.
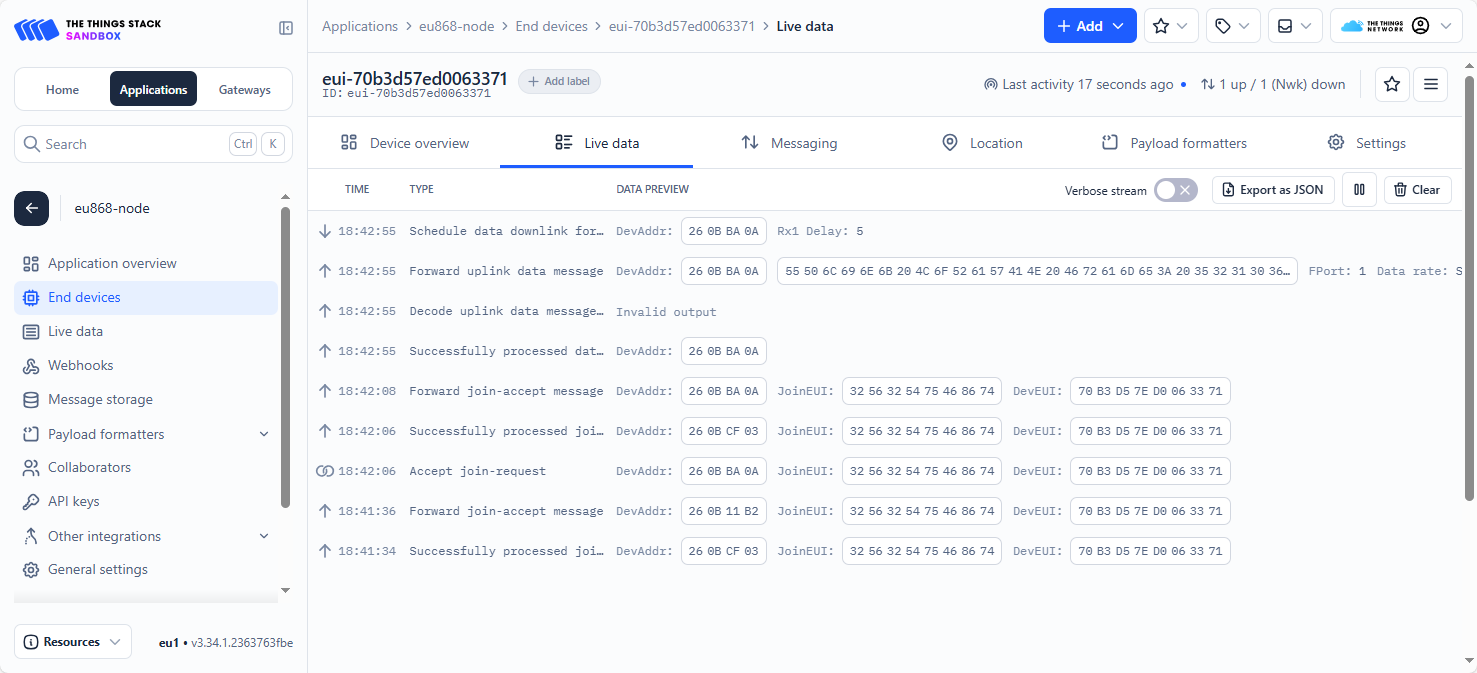
On the corresponding device page in TTN, you can view the current uplink and downlink data logs.
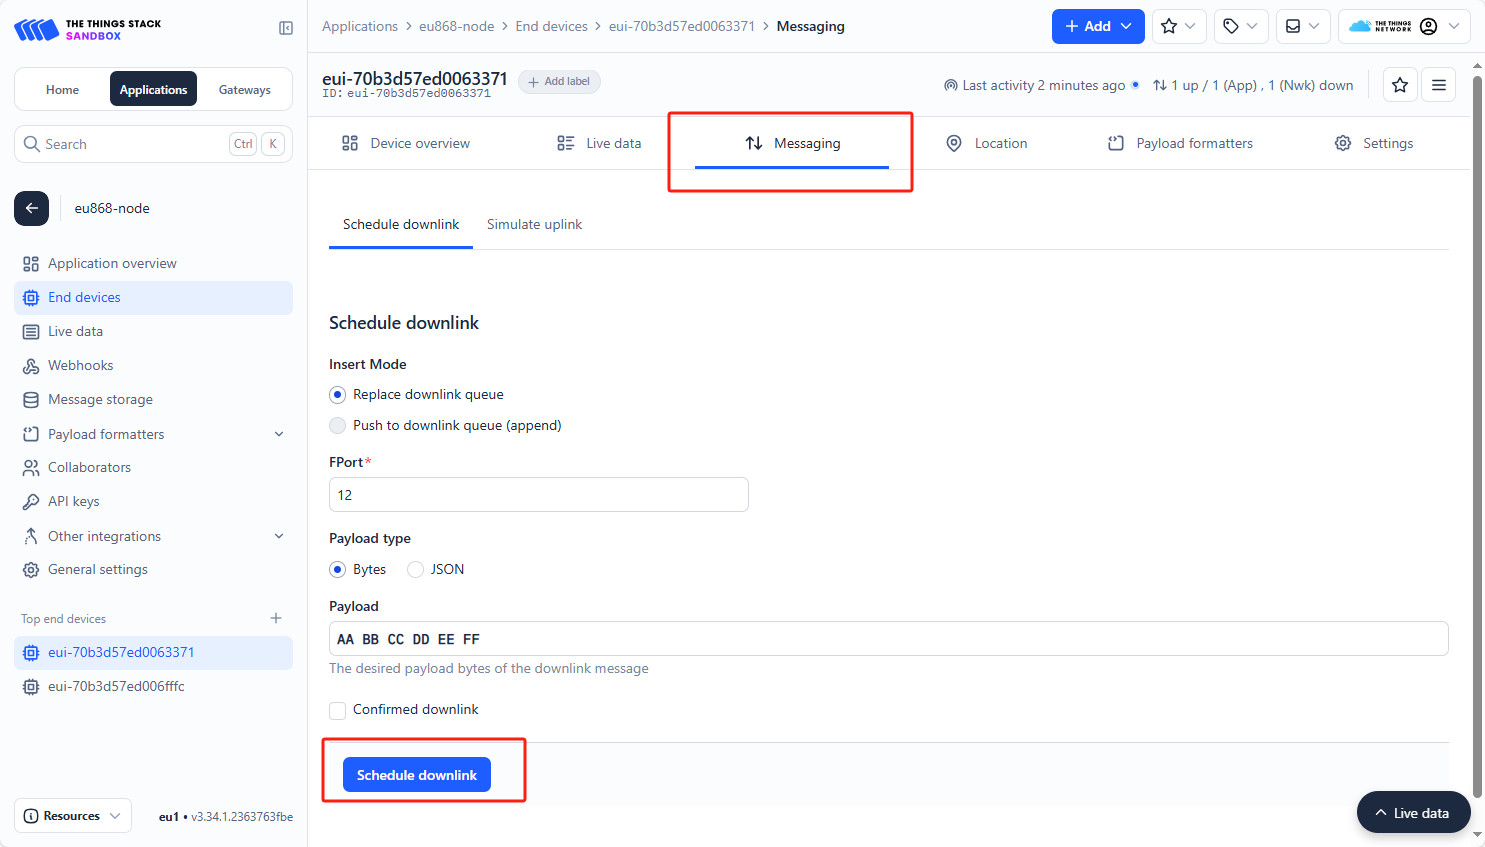
Switch to the Messaging page to send downlink data.
ABP Network Join
ABP network join requires the use of DevAddr, AppSkey, and NwkSkey parameters. There is no need to perform a join process; once the key information is initialized, you can start sending data.
#include <M5Unified.h>
#include "rak3172_lorawan.hpp"

#define DEVADDR "***********"             // Device Address
#define APPSKEY "**********************"  // Application Session Key
#define NWKSKEY "**********************"  // Network Session Key

// get or set the channel mask to close or open the channel (only for US915, AU915, CN470)
#define CHANNEL_MASK "0000"

#define ATOM_LORA_RX 19
#define ATOM_LORA_TX 22

#define ATOMS3_LORA_RX 6
#define ATOMS3_LORA_TX 5

RAK3172LoRaWAN lorawan;

void errorCallback(char* error)
{
    Serial.print("[LoRaWAN] Error: ");
    Serial.println(error);
}

void LoRaWANLoopTask(void* arg)
{
    while (1) {
        lorawan.update();
        vTaskDelay(5);
    }
}

void setup()
{
    M5.begin();
    Serial.begin(115200);
    Serial.println("[Init] Initializing LoRaWAN module...");
    while (!lorawan.init(&Serial2, ATOMS3_LORA_RX, ATOMS3_LORA_TX, RAK3172_BPS_115200)) {
        Serial.println("[Init] Failed to initialize module, retrying...");
        delay(1000);
    }
    Serial.println("Device Init OK");
    Serial.println("[Config] Setting band to EU868...");
    while (!lorawan.setBAND(EU868, CHANNEL_MASK)) {
        Serial.println(" failed, retrying...");
        delay(1000);
    }
    Serial.println("[Config] Setting ABP parameters...");
    while (!lorawan.setABP(DEVADDR, NWKSKEY, APPSKEY)) {
        Serial.println(" failed, retrying...");
        delay(1000);
    }
    Serial.println("[Config] Setting device mode to CLASS_C...");
    while (!lorawan.setMode(CLASS_C)) {
        Serial.println(" failed, retrying...");
        delay(1000);
    }
    Serial.println("[Config] Setting data rate to DR4...");
    while (!lorawan.setDR(4)) {
        Serial.println(" failed, retrying...");
        delay(1000);
    }
    Serial.println("[Config] Setting Link check...");
    while (!lorawan.setLinkCheck(ALLWAYS_LINKCHECK)) {
        delay(1000);
    }

    lorawan.onError(errorCallback);
    xTaskCreate(LoRaWANLoopTask, "LoRaWANLoopTask", 1024 * 10, NULL, 5, NULL);
}

void loop()
{
    M5.update();
    if (M5.BtnA.wasReleased()) {
        String data = "UPlink LoRaWAN Frame: " + String(millis());
        if (lorawan.send(data)) {
            Serial.println("Send Successful");
        } else {
            Serial.println("Send fail");
        }
    }

    if (lorawan.available()) {
        std::vector<lorawan_frame_t> frames = lorawan.read();
        for (int i = 0; i < frames.size(); i++) {
            Serial.print("RSSI: ");
            Serial.println(frames[i].rssi);
            Serial.print("SNR: ");
            Serial.println(frames[i].snr);
            Serial.print("LEN: ");
            Serial.println(frames[i].len);
            Serial.print("PORT: ");
            Serial.println(frames[i].port);
            Serial.print("UNITCAST: ");
            Serial.println(frames[i].unicast);
            Serial.print("Payload: ");
            for (uint8_t j = 0; j < frames[i].len; j++) {
                Serial.printf("%02X", frames[i].payload[j]);
            }
            Serial.println();
        }
        lorawan.flush();
    }
    if (Serial.available()) {
        String ch = Serial.readString();
        lorawan.sendCommand(ch);
    }
}CayenneLPP
CayenneLPP is an optimized sensor data format. When using TTN or Chirpstack to upload data, the default data retrieved from the console or API is usually Base64 encoded and not very readable. CayenneLPP supports various basic sensor types, and when collecting environmental data via LoRaWAN, its format is easy to parse. Therefore, it is recommended to use CayenneLPP for processing related data. Simply select the CayenneLPP decoder on the node configuration page in the console to view sensor data more intuitively. For examples and more information, refer to: