


Arduino入門
2. デバイス&サンプル
3. M5Unified
4. M5GFX
5. 拡張モジュール&サンプル
Unit
Base
Cap
IoT
アクセサリー
Module GPS v2.0/v2.1 Arduino 使用チュートリアル
1. 準備作業
1. 環境設定: Arduino IDE 入門チュートリアル のインストールを完了し、使用する開発ボードに応じたボード管理と必要なライブラリをインストールしてください。
2. 使用するライブラリ:
3. 使用するハードウェア製品:

TinyGPSPlus ライブラリのインストール
Arduino ライブラリマネージャで提供される TinyGPSPlus バージョンは古く、完全な互換性がないため、TinyGPSPlus - M5Stack Github にアクセスして手動でダウンロードし、Arduino ライブラリフォルダにインストールしてください。
#> ライブラリフォルダパス
#> ライブラリフォルダパス
2. サンプルプログラム
- 1. 実際の接続デバイスに合わせてプログラム内の IO 情報を修正してください。このチュートリアルでは CoreS3 と Module GPS v2.0/v2.1 をスタック接続しており、対応する M5-Bus バス IO は
G18(RX)、G17(TX)です。
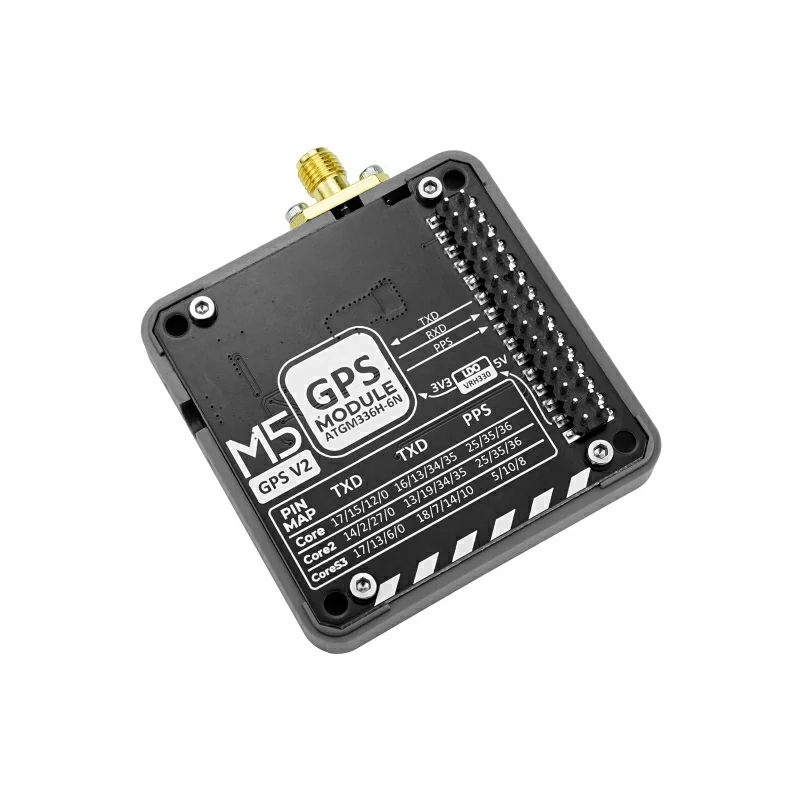
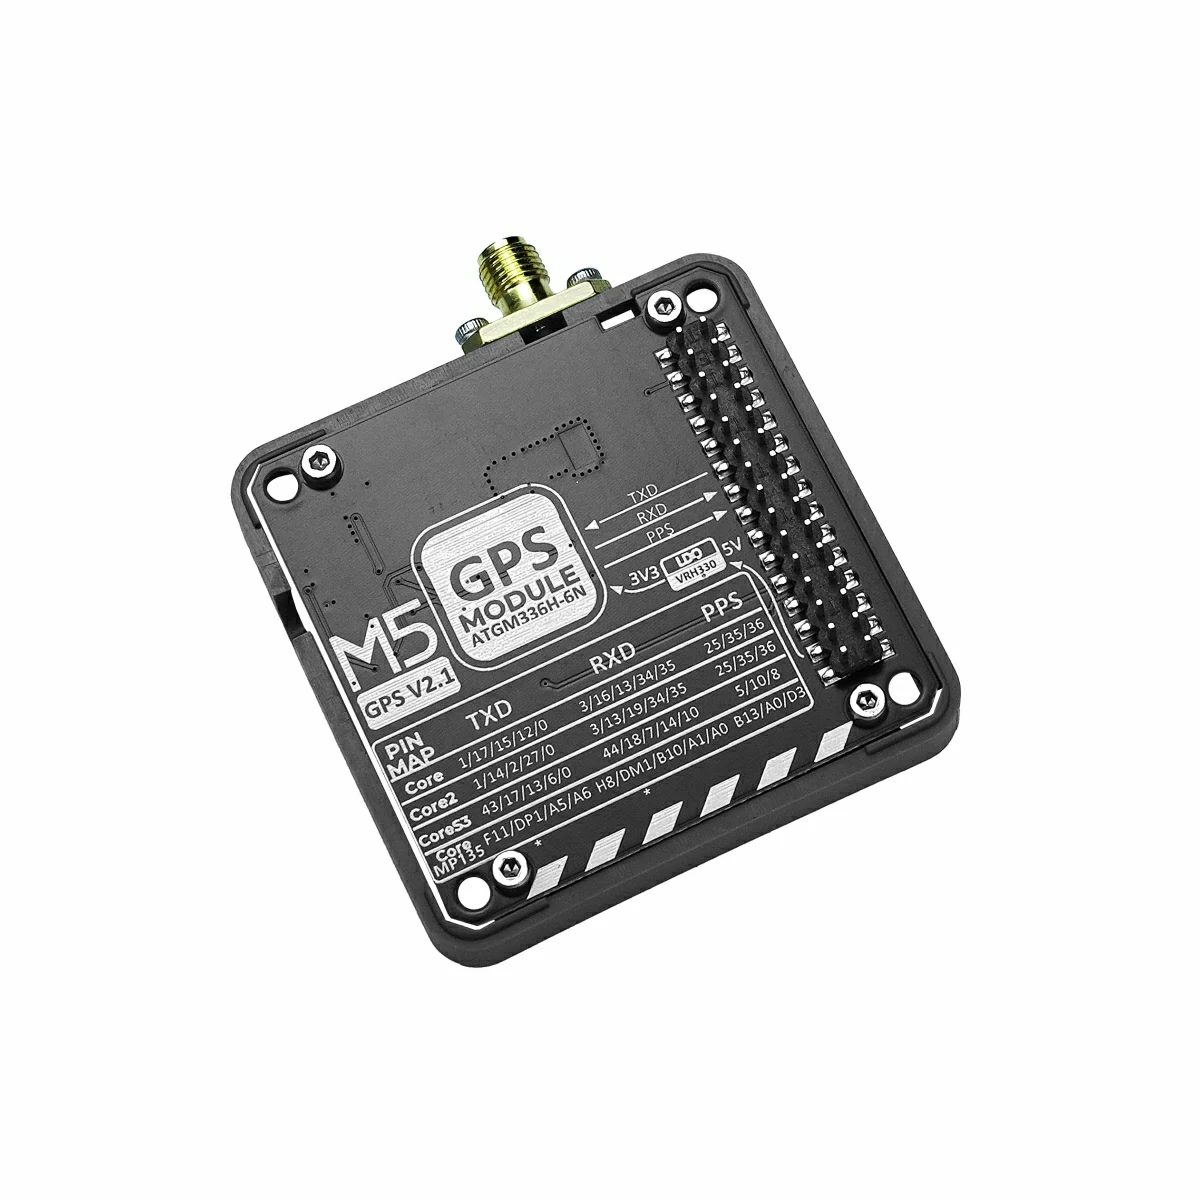
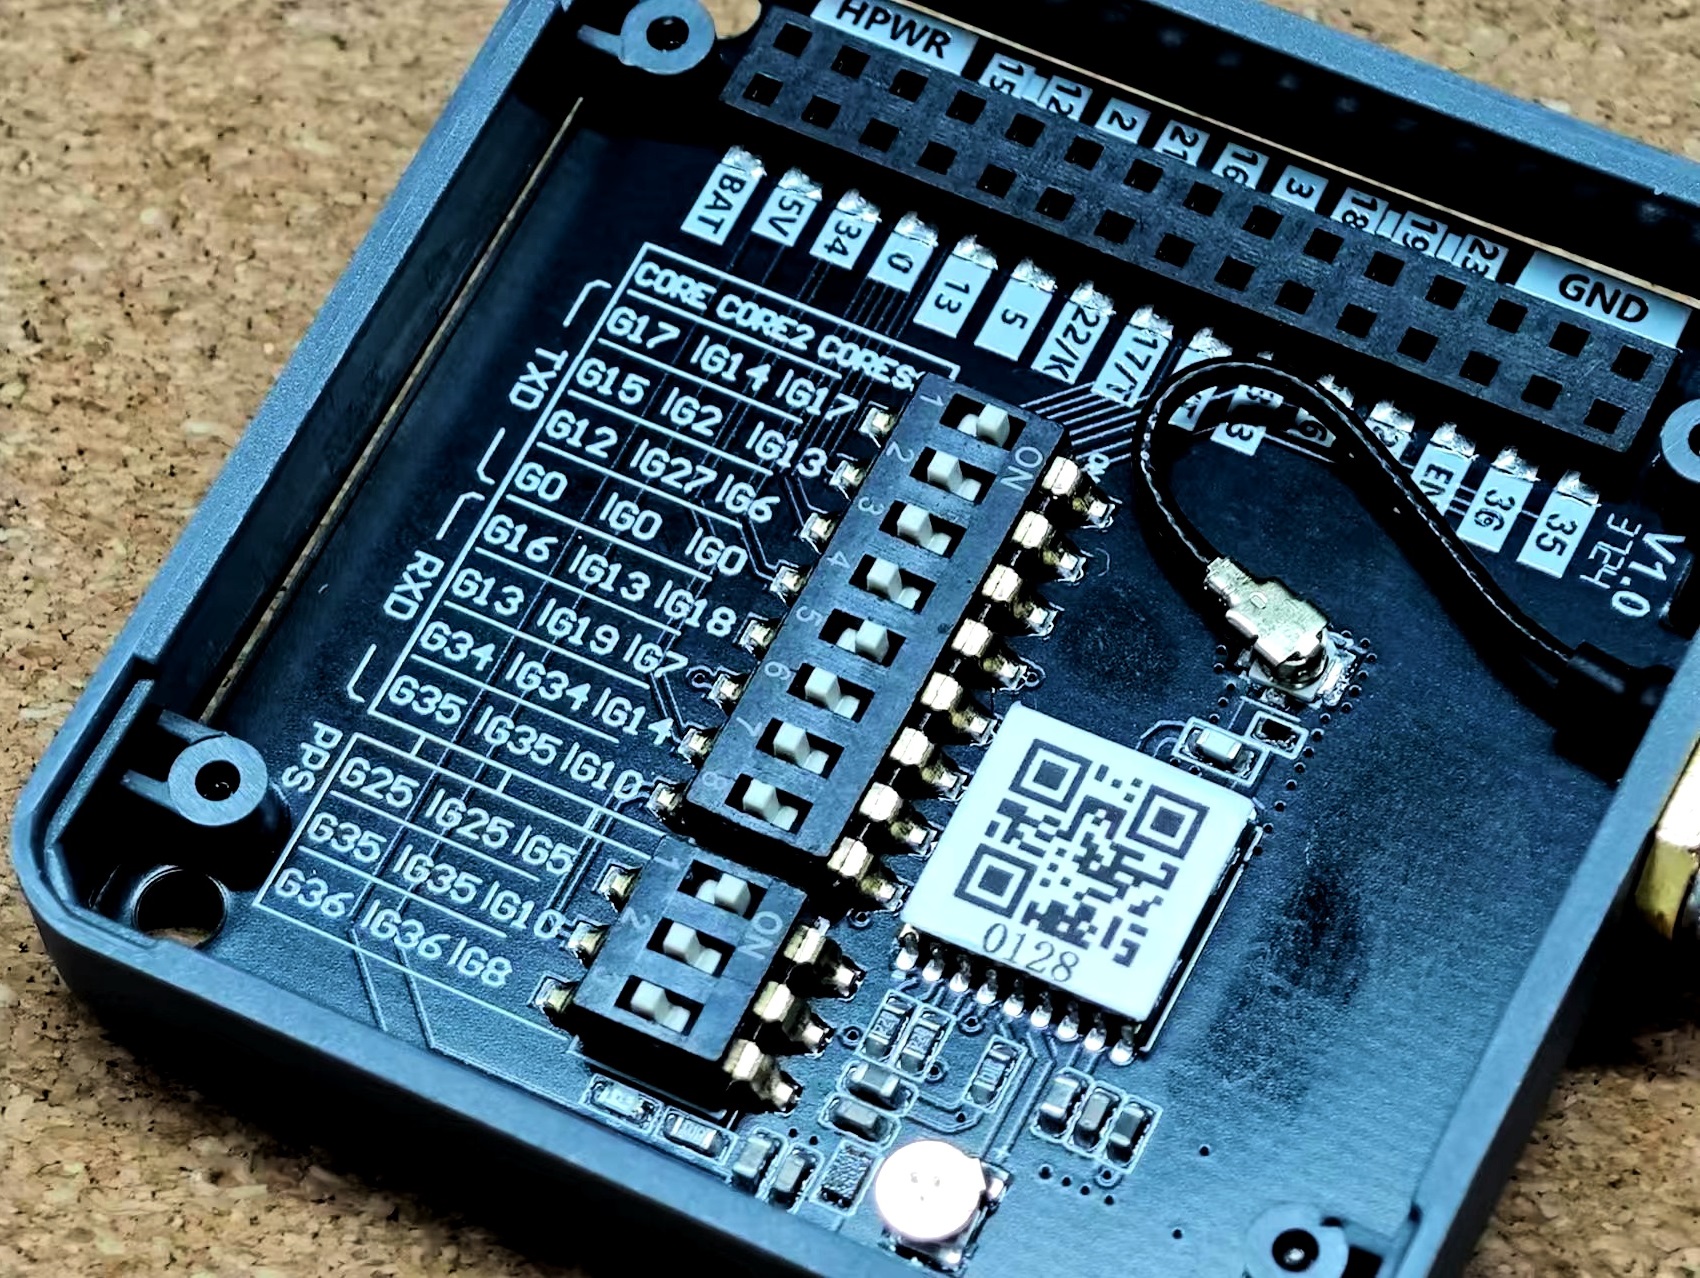
Module GPS v2.0/v2.1 はまた、底面の DIP スイッチでピン接続を切り替えることができ、用途に応じて切り替え可能です。下図左が Module GPS v2.0、右が Module GPS v2.1 で、黄色枠部分が v2.1 で追加された選択可能ピンです。

- 2. TinyGPSPlus の
UnitGPSExampleサンプルプログラムを参考に、UART 初期化ピン設定を修正してください。ここでは M5Unified と M5GFX を基に座標表示機能を追加しています。

cpp
1 2 3 4 5 6 7 8 9 10 11 12 13 14 15 16 17 18 19 20 21 22 23 24 25 26 27 28 29 30 31 32 33 34 35 36 37 38 39 40 41 42 43 44 45 46 47 48 49 50 51 52 53 54 55 56 57 58 59 60 61 62 63 64 65 66 67 68 69 70 71 72 73 74 75 76 77 78 79 80 81 82 83 84 85 86 87 88 89 90 91 92 93 94 95 96 97 98 99 100 101 102 103 104 105 106 107 108
/*
 *SPDX-FileCopyrightText: 2024 M5Stack Technology CO LTD
 *
 *SPDX-License-Identifier: MIT
 */

#include "M5Unified.h"
#include "M5GFX.h"
#include "MultipleSatellite.h"

static const int RXPin = 18, TXPin = 17;
static const uint32_t GPSBaud = 115200;
MultipleSatellite gps(Serial1, GPSBaud, SERIAL_8N1, RXPin, TXPin);

void displayInfo();

void setup()
{
    M5.begin();
    Serial.begin(115200);
    gps.begin();
    gps.setSystemBootMode(BOOT_FACTORY_START);
    Serial.println(F("DeviceExample.ino"));
    Serial.println(F("A simple demonstration of TinyGPSPlus with an attached GPS module"));
    Serial.print(F("Testing TinyGPSPlus library v. "));
    Serial.println(TinyGPSPlus::libraryVersion());
    Serial.println(F("by Mikal Hart"));
    Serial.println();
    String version = gps.getGNSSVersion();
    Serial.printf("GNSS SW=%s\r\n", version.c_str());
    delay(1000);
    // Set satellite mode
    gps.setSatelliteMode(SATELLITE_MODE_GPS);
    M5.Display.setFont(&fonts::FreeMonoBold12pt7b);
}
void loop()
{
    // Update data
    gps.updateGPS();
    displayInfo();
    delay(10);
}

void displayInfo()
{
    Serial.print(F("Location: "));
    Serial.printf("satellites:%d\n", gps.satellites.value());
    if (gps.location.isUpdated()) {
        Serial.print(gps.location.lat(), 6);
        Serial.print(F(","));
        Serial.print(gps.location.lng(), 6);
        Serial.print(F("\n"));

        M5.Display.fillRect(0, 0, 320, 60, BLACK);
        M5.Display.setCursor(0, 0);
        M5.Display.printf("Location: \nLat: %f\nlng: %f\n", gps.location.lat(), gps.location.lng());

    } else {
        M5.Display.fillRect(0, 0, 320, 60, BLACK);
        M5.Display.setCursor(0, 0);
        M5.Display.print("Location: \n");
        M5.Display.print("Lat: ---------\n");
        M5.Display.print("lng: ---------\n");
        Serial.print(F("INVALID\n"));
    }

    Serial.print(F("  Date/Time: "));
    if (gps.date.isUpdated()) {
        Serial.print(gps.date.month());
        Serial.print(F("/"));
        Serial.print(gps.date.day());
        Serial.print(F("/"));
        Serial.print(gps.date.year());

        M5.Display.fillRect(0, 100, 320, 60, BLACK);
        M5.Display.setCursor(0, 100);
        M5.Display.printf("Date/Time: %d/%d/%d\n", gps.date.month(), gps.date.day(), gps.date.year());

    } else {
        Serial.print(F("INVALID"));
    }

    Serial.print(F(" "));
    if (gps.time.isUpdated()) {
        if (gps.time.hour() < 10) Serial.print(F("0"));
        Serial.print(gps.time.hour());
        Serial.print(F(":"));
        if (gps.time.minute() < 10) Serial.print(F("0"));
        Serial.print(gps.time.minute());
        Serial.print(F(":"));
        if (gps.time.second() < 10) Serial.print(F("0"));
        Serial.print(gps.time.second());
        Serial.print(F("."));
        if (gps.time.centisecond() < 10) Serial.print(F("0"));
        Serial.print(gps.time.centisecond());

        M5.Display.fillRect(0, 160, 320, 60, BLACK);
        M5.Display.setCursor(0, 160);
        M5.Display.printf("Time: %d:%d:%d.%d\n", gps.time.hour(), gps.time.minute(), gps.time.second(),
                          gps.time.centisecond());

    } else {
        Serial.print(F("INVALID"));
    }

    Serial.println();
    delay(1000);
}3. コンパイルとアップロード
- 1. ダウンロードモード:デバイスごとにプログラム書き込み前にはダウンロードモードにする必要があります。使用するメインデバイスによって手順が異なります。詳細は Arduino IDE 入門チュートリアル ページ下部のデバイス別書き込みチュートリアル一覧を参照してください。
- CoreS3 の場合、リセットボタンを長押し(約 2 秒)し、内部の緑色 LED が点灯したらボタンを離します。これでデバイスはダウンロードモードに入り、書き込み待機状態になります。
.gif)
- 2. デバイスポートを選択し、Arduino IDE 左上のコンパイル&アップロードボタンをクリックして、プログラムがコンパイルされデバイスにアップロードされるまで待ちます。

4. 衛星測位
付属の外部アンテナを接続し、アンテナを窓際や屋外の開けた場所に設置すると、デバイスが衛星を探索し座標を取得できるようになります。
