


Arduino Quick Start
2. Devices & Examples
3. M5Unified
4. M5GFX
5. Extensions
Unit
Atomic
Tab5
IoT
Accessories
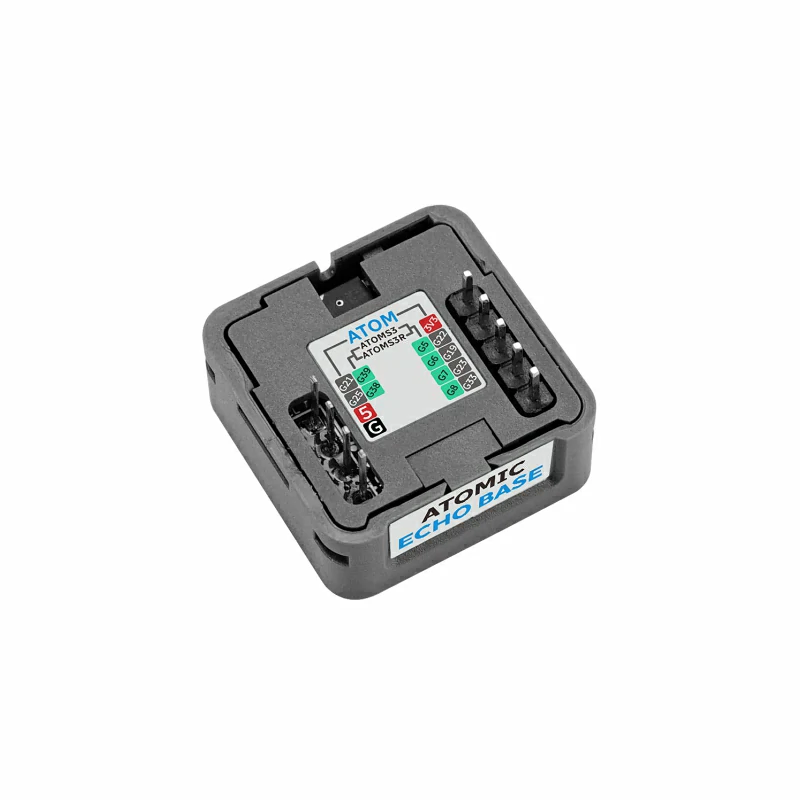
Atomic Voice Base Arduino Tutorial
1. Preparation
1.Environment Setup: Refer to the Arduino IDE Quick Start Tutorial to complete the IDE installation. Install the corresponding board management and required driver libraries based on the development board you are using.
2.Libraries:
3.Hardwares:


2. Example
Refer to the RecordPlay example program in M5Atomic-EchoBase. Modify the IO information in the program according to the devices you are actually connecting. In this tutorial, the main control device used is AtomS3R, and the IO configuration is consistent with AtomS3.


Initialization
// Initialize the EchoBase with ATOMS3 pinmap.
echobase.init(16000 /*Sample Rate*/, 38 /*I2C SDA*/, 39 /*I2C SCL*/, 7 /*I2S DIN*/, 6 /*I2S WS*/, 5 /*I2S DOUT*/,
              8 /*I2S BCK*/, Wire);

echobase.setSpeakerVolume(50);             // Set speaker volume to 50%.
echobase.setMicGain(ES8311_MIC_GAIN_6DB); // Set microphone gain to 6dB.Recording and Playback
// Recording
echobase.setMute(true);
delay(10);
echobase.record(buffer, RECORD_SIZE);  // Record audio into buffer.
delay(100);

// Playing
echobase.setMute(false);
delay(10);
echobase.play(buffer, RECORD_SIZE);  // Play audio from buffer.
delay(100);Complete Program
Based on M5Unified and M5GFX, add basic display and button operations to implement recording when a button is pressed and automatically playing back the recording once completed.
/*
 * SPDX-FileCopyrightText: 2024 M5Stack Technology CO LTD
 *
 * SPDX-License-Identifier: MIT
 */

#include "M5Unified.h"
#include <Arduino.h>
#include <M5EchoBase.h>

#define RECORD_SIZE (1024 * 96)  // Define the size of the record buffer to 96KB.

M5EchoBase echobase(I2S_NUM_0);    // Create an instance of the M5EchoBase class.
static uint8_t *buffer = nullptr;  // Pointer to hold the audio buffer.

void setup()
{
    M5.begin();
    M5.Display.setFont(&fonts::FreeMonoBold9pt7b);
    Serial.begin(115200);

    // Initialize the EchoBase with ATOMS3 pinmap.
    echobase.init(16000 /*Sample Rate*/, 38 /*I2C SDA*/, 39 /*I2C SCL*/, 7 /*I2S DIN*/, 6 /*I2S WS*/, 5 /*I2S DOUT*/,
                  8 /*I2S BCK*/, Wire);

    // Initialize the EchoBase with ATOM pinmap.
    // echobase.init(16000 /*Sample Rate*/, 25 /*I2C SDA*/, 21 /*I2C SCL*/, 23 /*I2S DIN*/, 19 /*I2S WS*/, 22 /*I2S
    // DOUT*/, 33 /*I2S BCK*/, Wire);

    echobase.setSpeakerVolume(50);             // Set speaker volume to 50%.
    echobase.setMicGain(ES8311_MIC_GAIN_6DB);  // Set microphone gain to 6dB.

    buffer = (uint8_t *)malloc(RECORD_SIZE);  // Allocate memory for the record buffer.
    // Check if memory allocation was successful.
    if (buffer == nullptr) {
        // If memory allocation fails, enter an infinite loop.
        while (true) {
            M5.Display.println("Failed to allocate memory :(");
            Serial.println("Failed to allocate memory :(");
            delay(1000);
        }
    }

    Serial.println("EchoBase ready, start recording and playing!");
    M5.Display.println("Click! For Record and Play");
}

void loop()
{
    M5.update();
    if (M5.BtnA.wasClicked()) {
        M5.Display.fillScreen(BLACK);
        M5.Display.setCursor(0, 0);
        M5.Display.println("Recording");
        // Recording
        echobase.setMute(true);
        delay(10);
        echobase.record(buffer, RECORD_SIZE);  // Record audio into buffer.
        delay(100);

        M5.Display.println("Playing");
        // Playing
        echobase.setMute(false);
        delay(10);
        echobase.play(buffer, RECORD_SIZE);  // Play audio from buffer.
        delay(100);
        M5.Display.println("Done");
    }
}3. Compile and Upload
1.Download Mode: Different devices may require entering download mode before flashing the program. The steps to enter download mode may vary depending on the main control device. Refer to the device programming download tutorial list at the bottom of the Arduino IDE Quick Start Tutorial page to see the specific operation methods.
To enter download mode on AtomS3R, press and hold the reset button (for about 2 seconds) until the internal green LED lights up, then release. The device is now in download mode and ready for flashing.

- 2.Select the device port and click the compile and upload button in the top left corner of the Arduino IDE. Wait for the program to compile and upload to the device.

4. Recording and Playback

