Product Guide
Linux PC
AI Accelerator Card
LLM-8850 Card
Large Language Models
AI & Agent
Real-Time AI Voice Assistant
XiaoZhi Voice Assistant
AtomS3R-M12 Volcengine Kit
Offline Voice Recognition
Industrial Control
IoT Measuring Instruments
Air Quality
PowerHub
Module13.2 PPS
VAMeter
T-Lite
Input & Output Devices
Ethernet Camera
PoECAM
Wi-Fi Camera
Unit CamS3/-5MP
AI Camera
LoRa & LoRaWAN
Motor Control
Restore Factory Firmware
DIP Switch Usage Guide
Quick Experience
Model Benchmark
After completing the first two steps, the model benchmarking tool axcl_run_model can be used. This tool has many parameters, which can be viewed with axcl_run_model --help. If you are interested in its implementation mechanism, you can check the source code in the corresponding sample directory. This tool, along with other cv & llm sample, is provided in source code form to help users understand how to use the API.
For example, to test the running speed of a model, use a command like axcl_run_model -m your_model.axmodel -r 10, where -m specifies the model to run, and -r specifies the number of repetitions, allowing for a simple test of the model's speed.
Obtain the model:
wget https://m5stack.oss-cn-shenzhen.aliyuncs.com/resource/linux/ax8850_card/yolo11s.axmodelTest:
axcl_run_model -m yolo11s.axmodel -r 10The execution result is as follows:
m5stack@raspberrypi5:~ $ axcl_run_model -m yolo11s.axmodel -r 10
   Run AxModel:
         model: yolo11s.axmodel
          type: 3 Core
          vnpu: Disable
        warmup: 1
        repeat: 10
         batch: { auto: 1 }
    axclrt ver: 1.0.0
   pulsar2 ver: 3.2 99cf147d
      tool ver: 0.0.1
      cmm size: 10488066 Bytes
  ------------------------------------------------------
  min =   3.391 ms   max =   3.414 ms   avg =   3.402 ms
------------------------------------------------------From the above example, in addition to indicating the model running time, it also shows the toolchain version, model type, and other related information.
CV Example
sudo apt install zip- Get the Demo:
wget https://m5stack.oss-cn-shenzhen.aliyuncs.com/resource/linux/ax8850_card/cv_demo.zip- Unzip the Demo:
unzip cv_demo.zip- Enter the directory:
cd cv_demoClassification Model
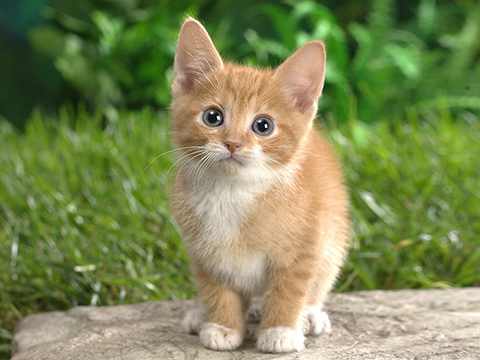
Using the imagenet dataset’s imagenet_cat.jpg as the classification target, after sample execution, the output will be as follows (note that the model and input image should be adjusted according to the actual situation):
Execution command:
./axcl_sample_classification -m mobilenetv2.axmodel -i cat.jpgResult:
m5stack@raspberrypi5:~/cv_demo $ ./axcl_sample_classification -m mobilenetv2.axmodel -i cat.jpg
axcl initializing...
axcl inited.
Select axcl device{index: 0} as {1}.
axclrt Engine inited.
--------------------------------------
model file : mobilenetv2.axmodel
image file : cat.jpg
img height : 224
img width  : 224
--------------------------------------
282:  9.8%,  tiger cat
285:  9.8%,  Egyptian cat
283:  9.5%,  Persian cat
281:  9.4%,  tabby, tabby cat
463:  7.5%,  bucket, pail
--------------------------------------Detection Model
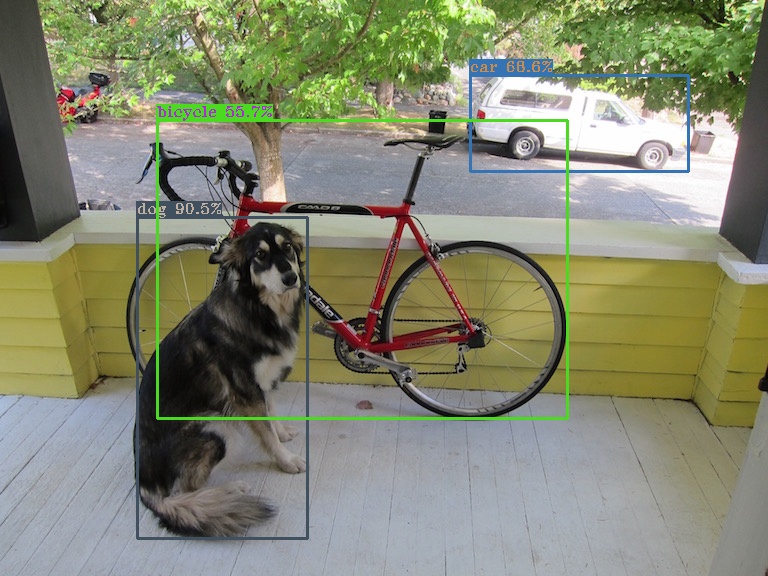
Using the PASCAL VOC dataset’s voc_dog.jpg as the detection target, after sample execution, the output will be as follows (note that the model and input image should be adjusted according to the actual situation):
Execution command:
./axcl_sample_yolov5s -m yolov5s.axmodel -i dog.jpgResult:
m5stack@raspberrypi5:~/cv_demo $ ./axcl_sample_yolov5s -m yolov5s.axmodel -i dog.jpg
axcl initializing...
axcl inited.
Select axcl device{index: 0} as {1}.
axclrt Engine inited.
--------------------------------------
model file : yolov5s.axmodel
image file : dog.jpg
img height : 640
img width  : 640
--------------------------------------
post process cost time:0.61 ms
--------------------------------------
Repeat 1 times, avg time 8.10 ms, max_time 8.10 ms, min_time 8.10 ms
--------------------------------------
16:  91%, [ 138,  218,  310,  541], dog
 2:  69%, [ 470,   76,  690,  173], car
1: 56%, [ 158, 120, 569, 420], bicycleIt can be seen that 3 objects were detected and their class ID, confidence, and coordinates were provided. In the sample execution directory, a detection result named yolov5s_out.jpg will be saved, which can be opened with an image viewer to preview the output.