Product Guide
Linux PC
CardputerZero
AI Accelerator Card
LLM-8850 Card
Large Language Models
AI & Agent
Real-Time AI Voice Assistant
XiaoZhi Voice Assistant
AtomS3R-M12 Volcengine Kit
Offline Voice Recognition
Industrial Control
IoT Measuring Instruments
Air Quality
PowerHub
Module13.2 PPS
VAMeter
T-Lite
Input & Output Devices
Ethernet Camera
PoECAM
Wi-Fi Camera
Unit CamS3/-5MP
AI Camera
LoRa & LoRaWAN
Motor Control
Restore Factory Firmware
DIP Switch Usage Guide
PowerHub Factory Firmware User Guide
PowerHub is a programmable controller that integrates multiple power management channels. Its factory firmware offers rich features, allowing users to control each interface’s power on/off via physical buttons. It can connect to the EZData server over Wi-Fi, enabling easy interface control, voltage / current monitoring, and scheduled task configuration through the mobile app or web page.
1.Buttons and Indicator Lights
- Buttons
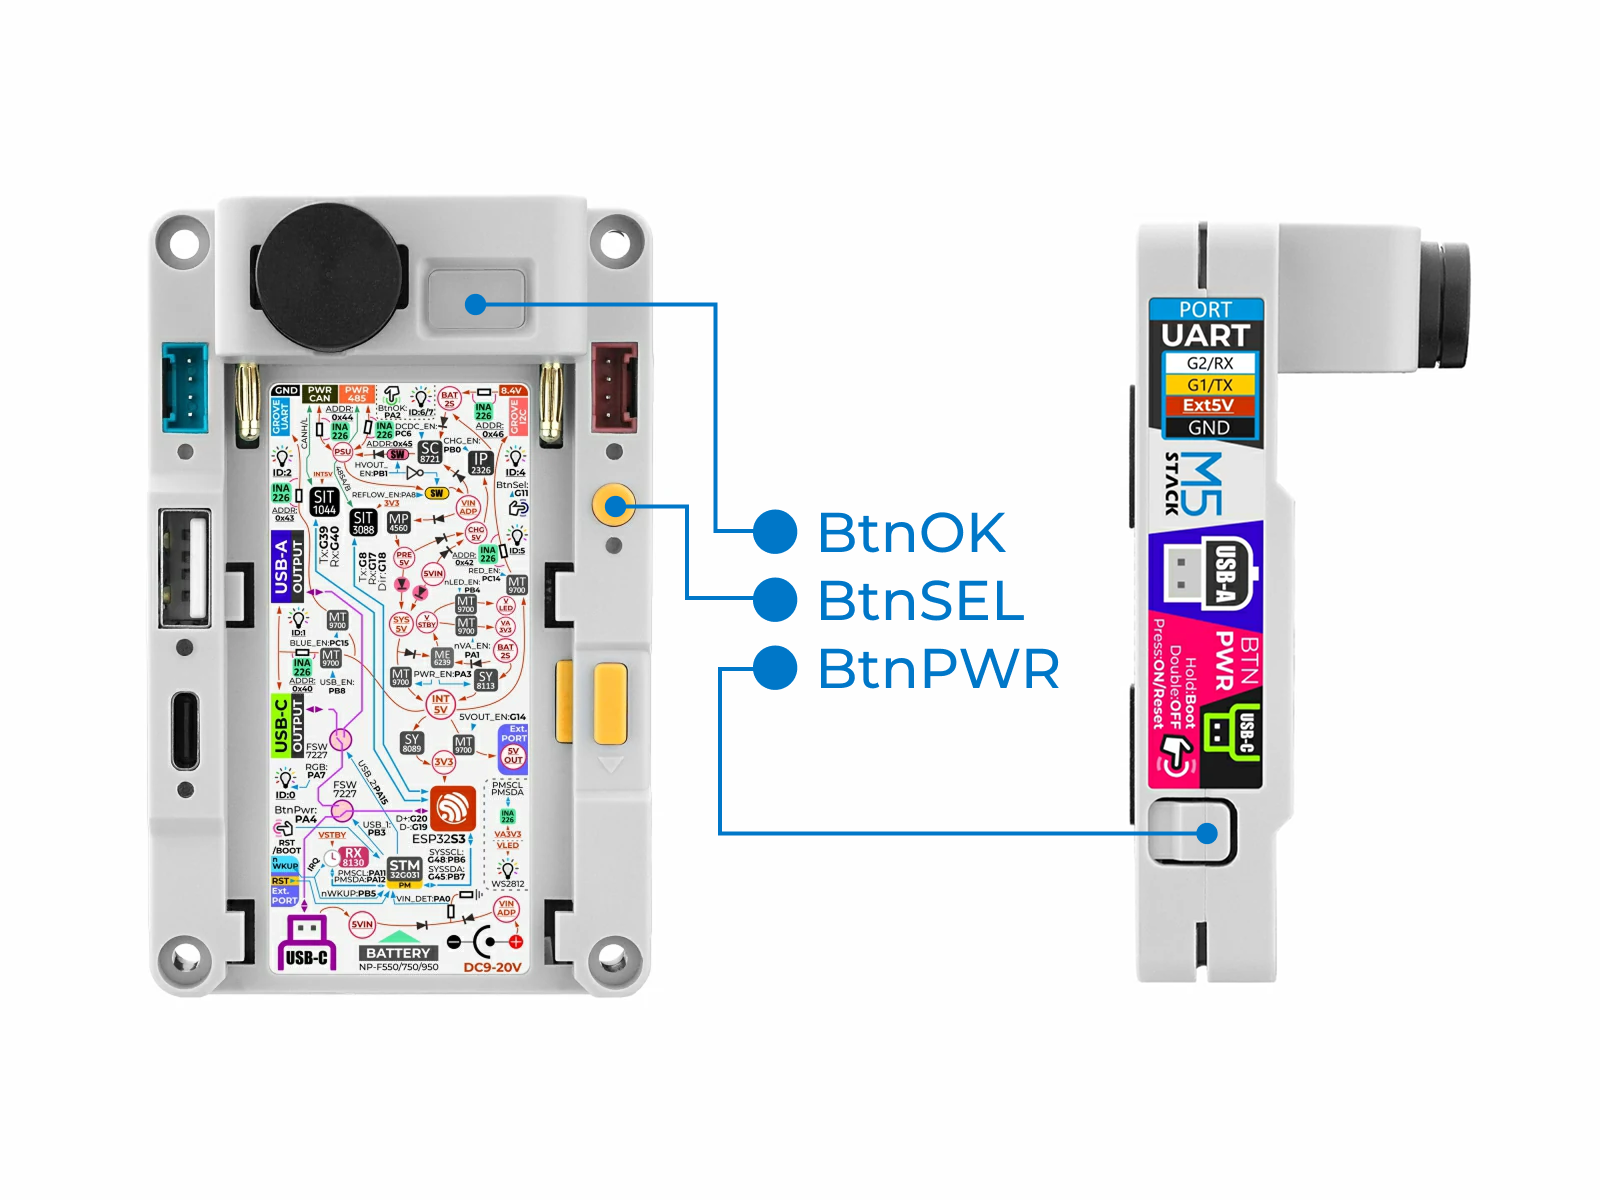
- BtnPWR: Gray button on the left side
- BtnSEL: Yellow round small button on the right front side
- BtnOK: Semi-transparent rectangular button next to the antenna on the front
- Indicator Lights
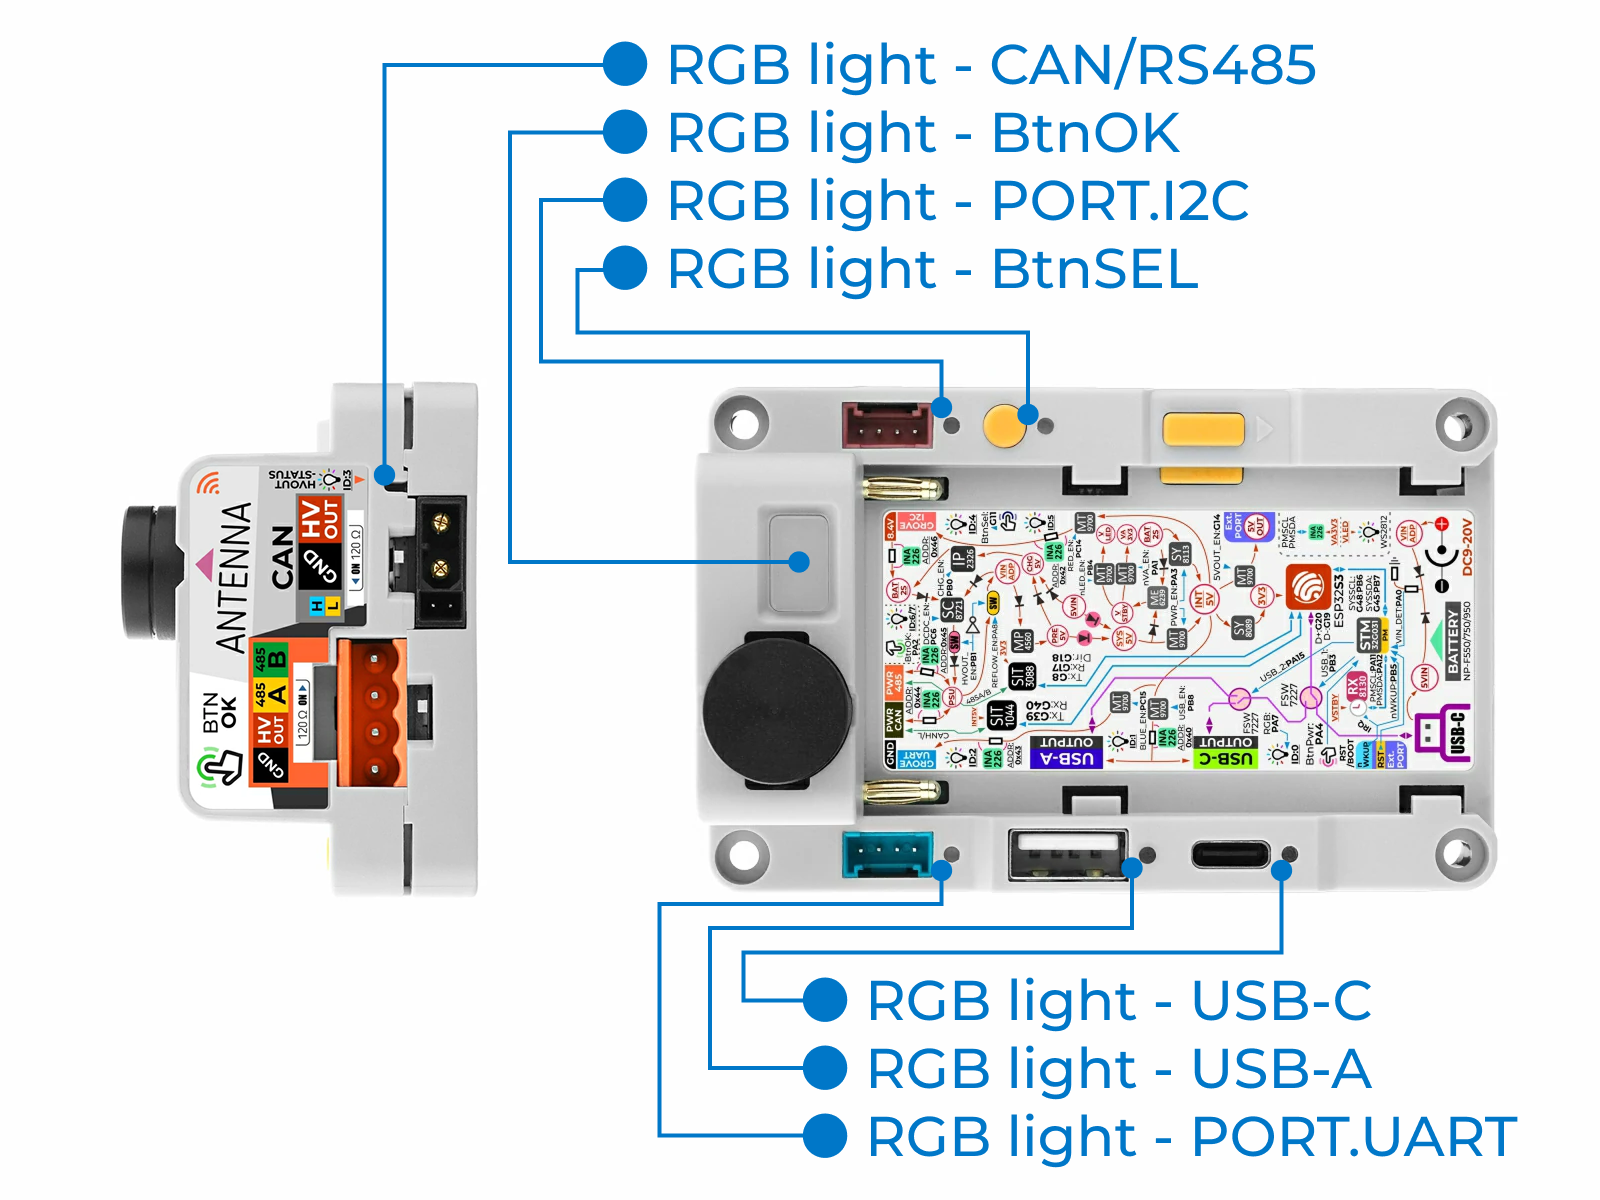
- USB-C Port Indicator Light: Color LED next to the USB-C port
- USB-A Port Indicator Light: Color LED next to the USB-A port
- PORT.UART Indicator Light: Color LED next to the PORT.UART blue port
- CAN/RS485 Port Indicator Light: Color LED next to the CAN / RS485 port
- PORT.I2C Indicator Light: Color LED next to the PORT.I2C red port
- BtnSEL Indicator Light: Color LED next to the BtnSEL button
- BtnOK Indicator Light: Color LED embedded inside the BtnOK button
2.Power On / Off
- BtnPWR Short Press: When powered off, it turns on the device; when powered on, it restarts. During startup, the BtnOK indicator light blinks twice in green.
- BtnPWR Double Click: Power off.
- BtnPWR Long Press: Enter Boot startup mode. The BtnOK indicator light blinks multiple times in blue.
3.Battery Status
The BtnOK indicator light shows the battery charging and power level status:
- Green solid on: Charging, battery full
- Green blinking: Charging, low battery
- Red solid on: Not charging, battery full
- Red blinking: Not charging, low battery
- White solid on: Battery not detected or voltage too low
4.Control Channels via Buttons
Basic Steps: PowerHub in working state - enter setting mode - select the interface to configure - set the on/off state of the interface
- PowerHub in Working State: The five interface indicator lights (excluding button indicators) remain solid without blinking, either green or red. Green indicates the corresponding interface is off (disconnected), while red indicates it is on (connected). The brightness of the red light is proportional to the load current of that interface.
- Entering Setting Mode: While in working state, short press BtnSEL or BtnOK to enter setting mode. After entering setting mode, some or all interface indicator lights will start blinking rapidly in green or red. If no button is pressed for 5 seconds, the PowerHub automatically exits the setting mode and returns to working state.
- Selecting Interface to Configure: In setting mode, the rapidly blinking indicator light represents the currently selected interface. Short press BtnSEL to switch between interfaces in the following sequence: USB-A/USB-C (controlled together) - PORT.UART - CAN/RS485 (controlled together) - PORT.I2C - all interfaces selected, and loop.
- Setting Interface On/Off: When an interface is selected, short press BtnOK to toggle its on/off state. The interface indicator light blinks green when off (disconnected), and blinks red when on (connected).
5.Using the Device via EZData
EZData is a cloud-based IoT data storage service provided by M5Stack. It aggregates data of different types from various devices into the cloud server, enabling easy access, remote control, and historical data analysis.
(1)Preparing an EZData Account
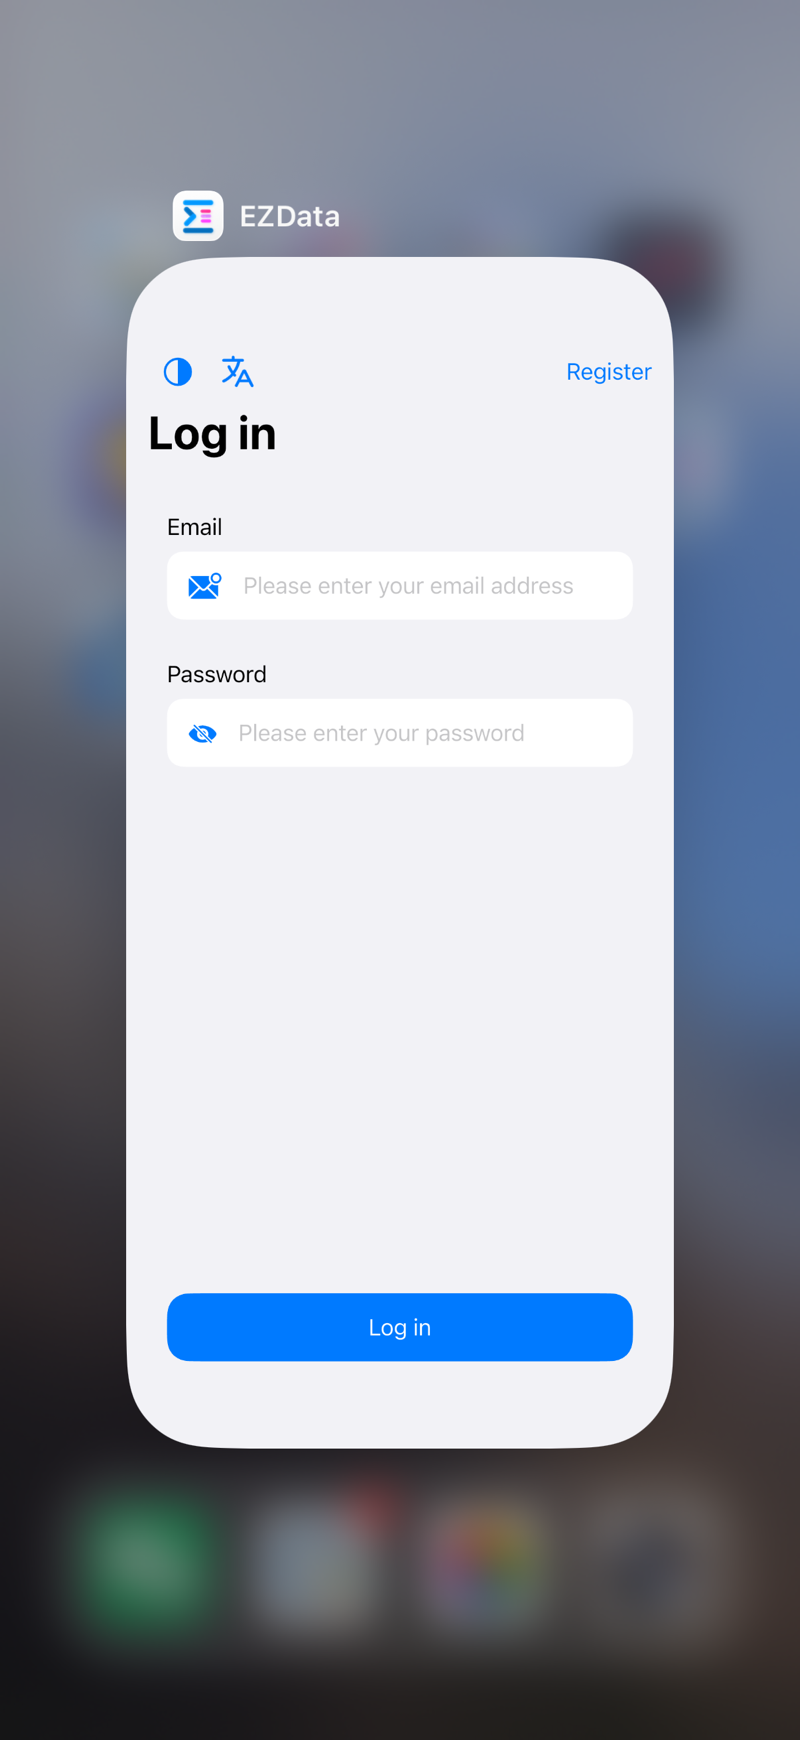
- For Apple devices such as iPhone, iPad or Mac, search in the App Store to download the EZData app (version 1.0.7 or later). After opening the app, tap
Registerin the upper-right corner to create an M5Stack account, then log in with it.
- For other devices such as Android, Windows or Linux, visit this link to register an M5Stack account.
(2)Connecting to Wi-Fi
Press and hold BtnSEL for 7 seconds until the BtnSEL indicator light blinks in blue. PowerHub will enter network configuration mode, creating a Wi-Fi AP (Access Point) named PowerHub-XXXX.
Connect to this AP using your smartphone or computer. A configuration page will automatically pop up. If it doesn’t appear automatically, open a browser and enter 192.168.4.1 to access the configuration page.
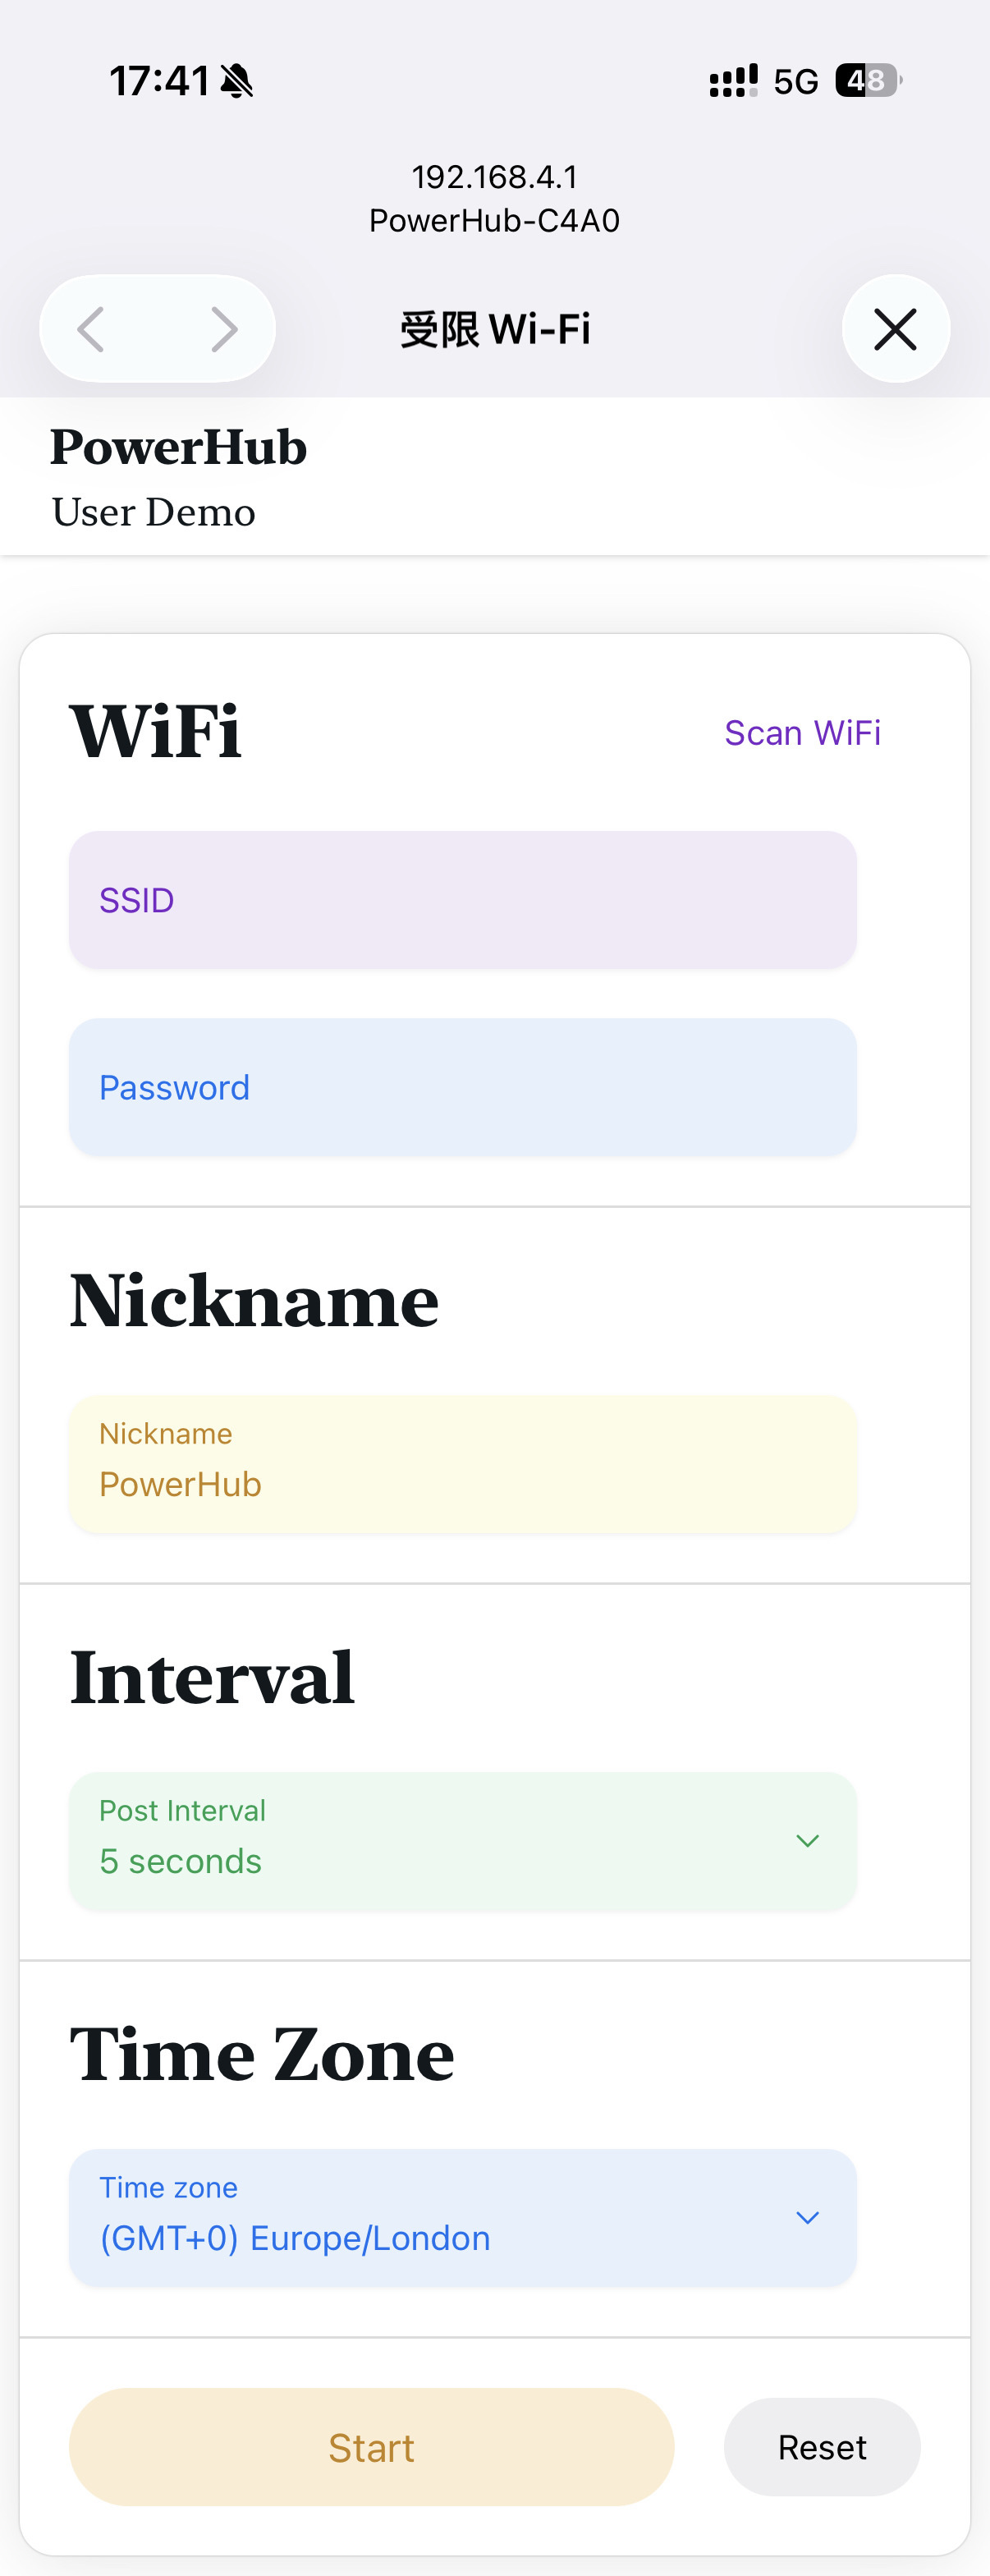
On the configuration page, enter your Wi-Fi SSID (name) and password. You can also modify the device name, communication interval with the server, and time zone as needed. After confirming the settings by clicking Start, tap Yes to apply. PowerHub will reboot and connect to the specified Wi-Fi network.
The BtnSEL indicator light shows the Wi-Fi and EZData connection status:
- Blue blinking: Network configuration mode, AP active
- Red and Blue alternating blink: Wi-Fi connection failed
- Red and Purple alternating blink: Wi-Fi connected, connecting to EZData
- Purple solid on: Connected to EZData successfully
- Purple single blink: Communicating with server
(3)Binding to EZData Account
After PowerHub successfully connects to the EZData server via Wi-Fi, the configuration page on your phone or computer will display the following content:
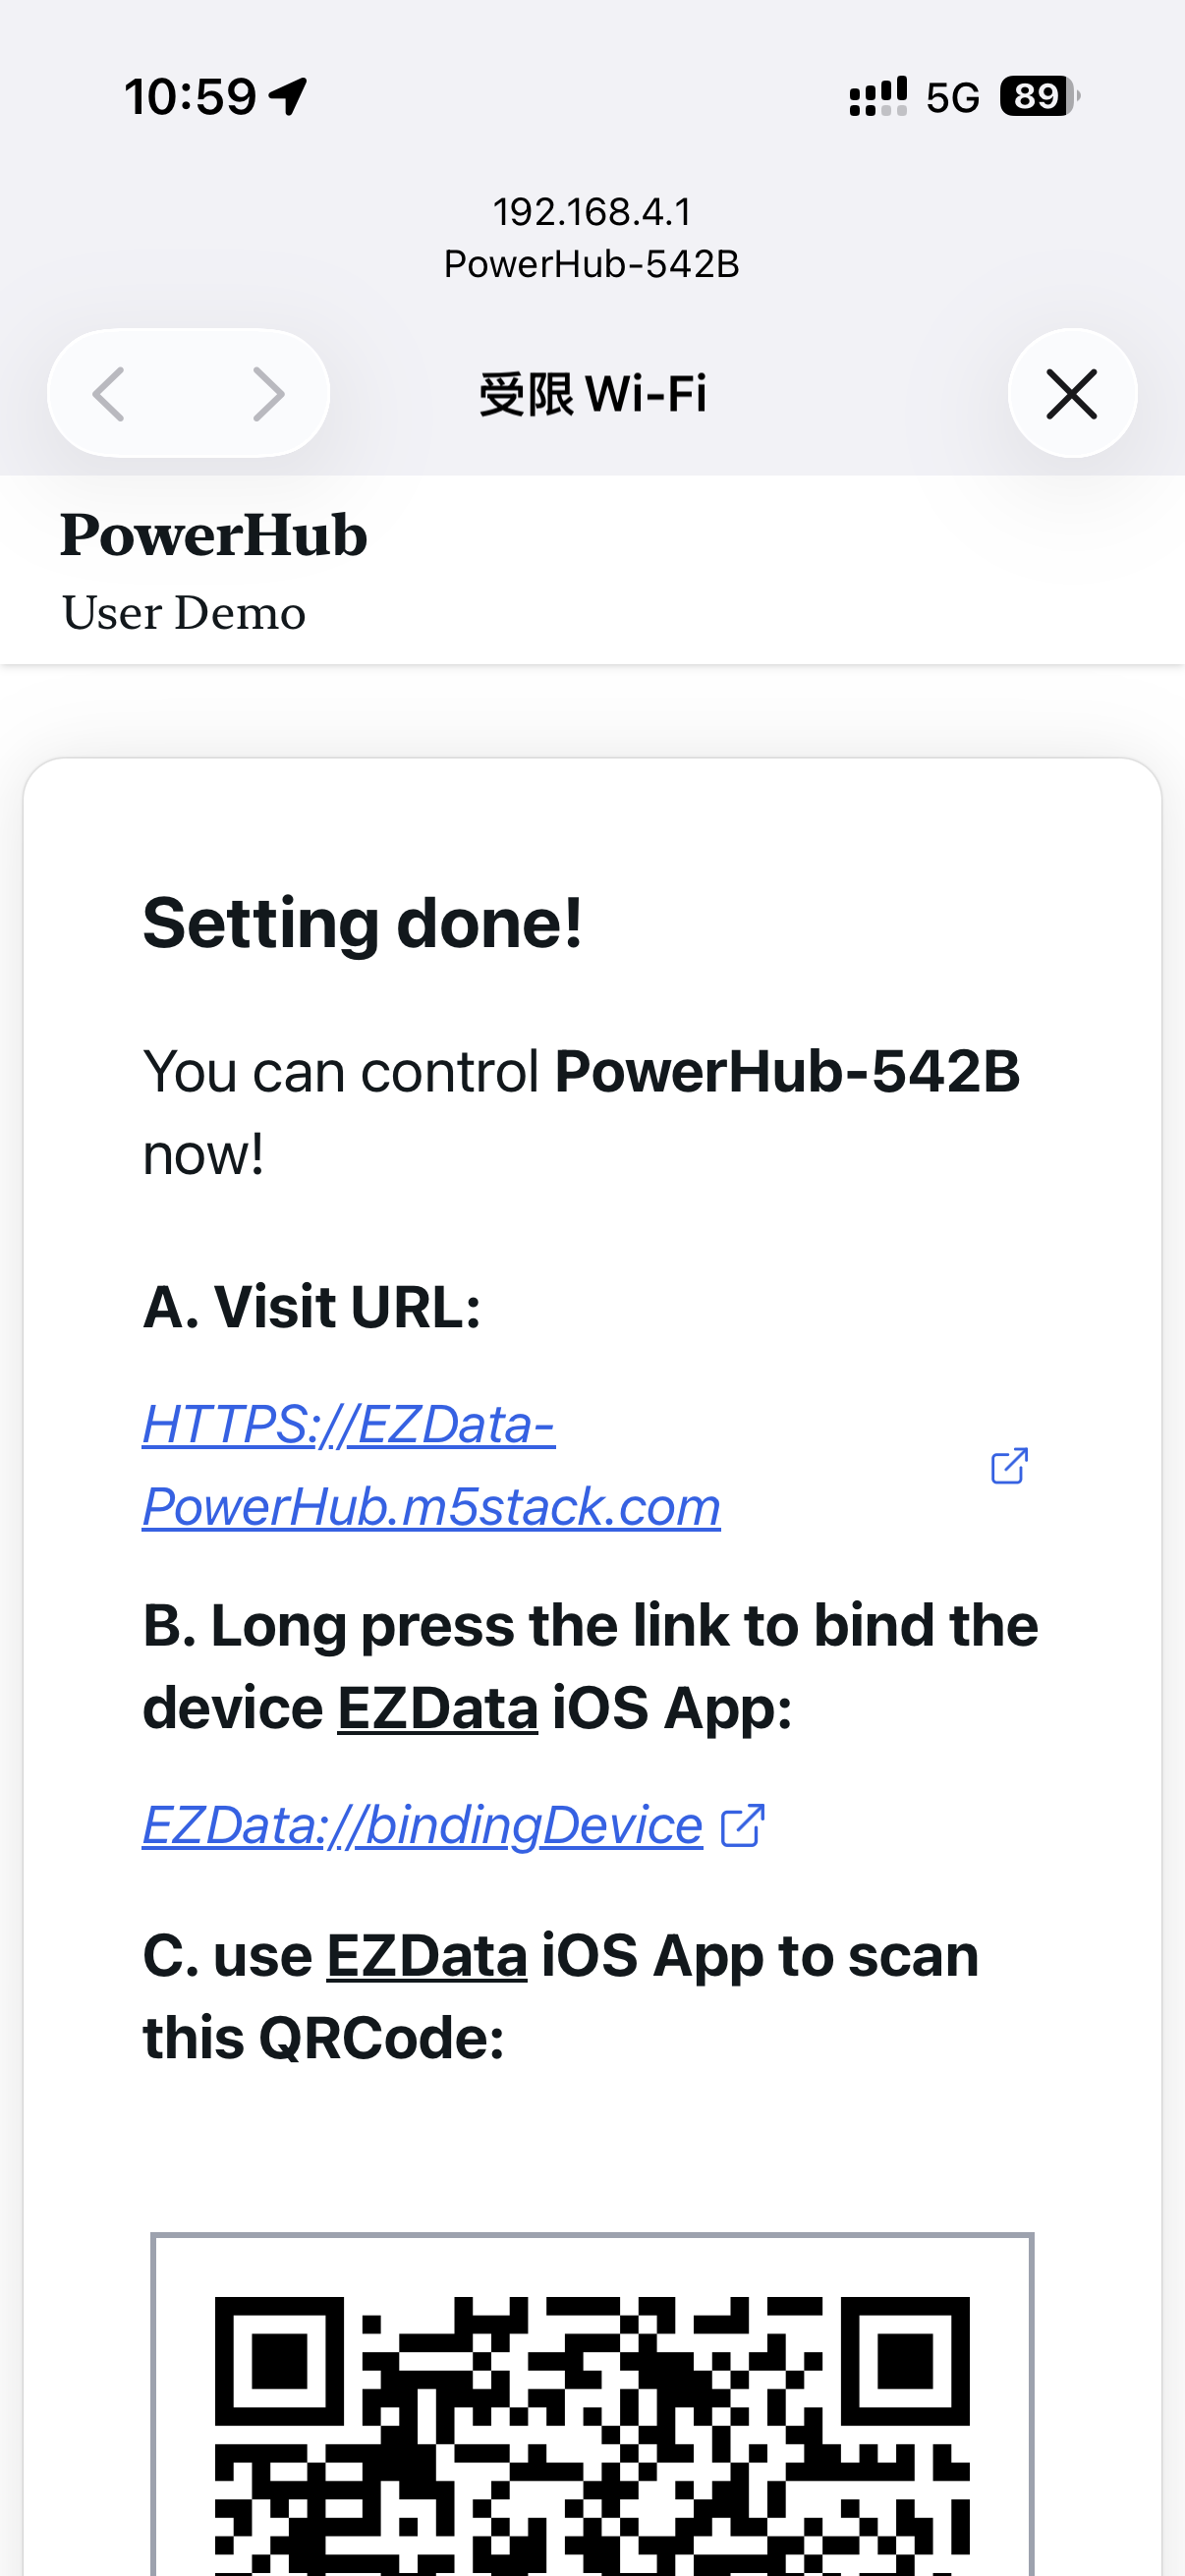
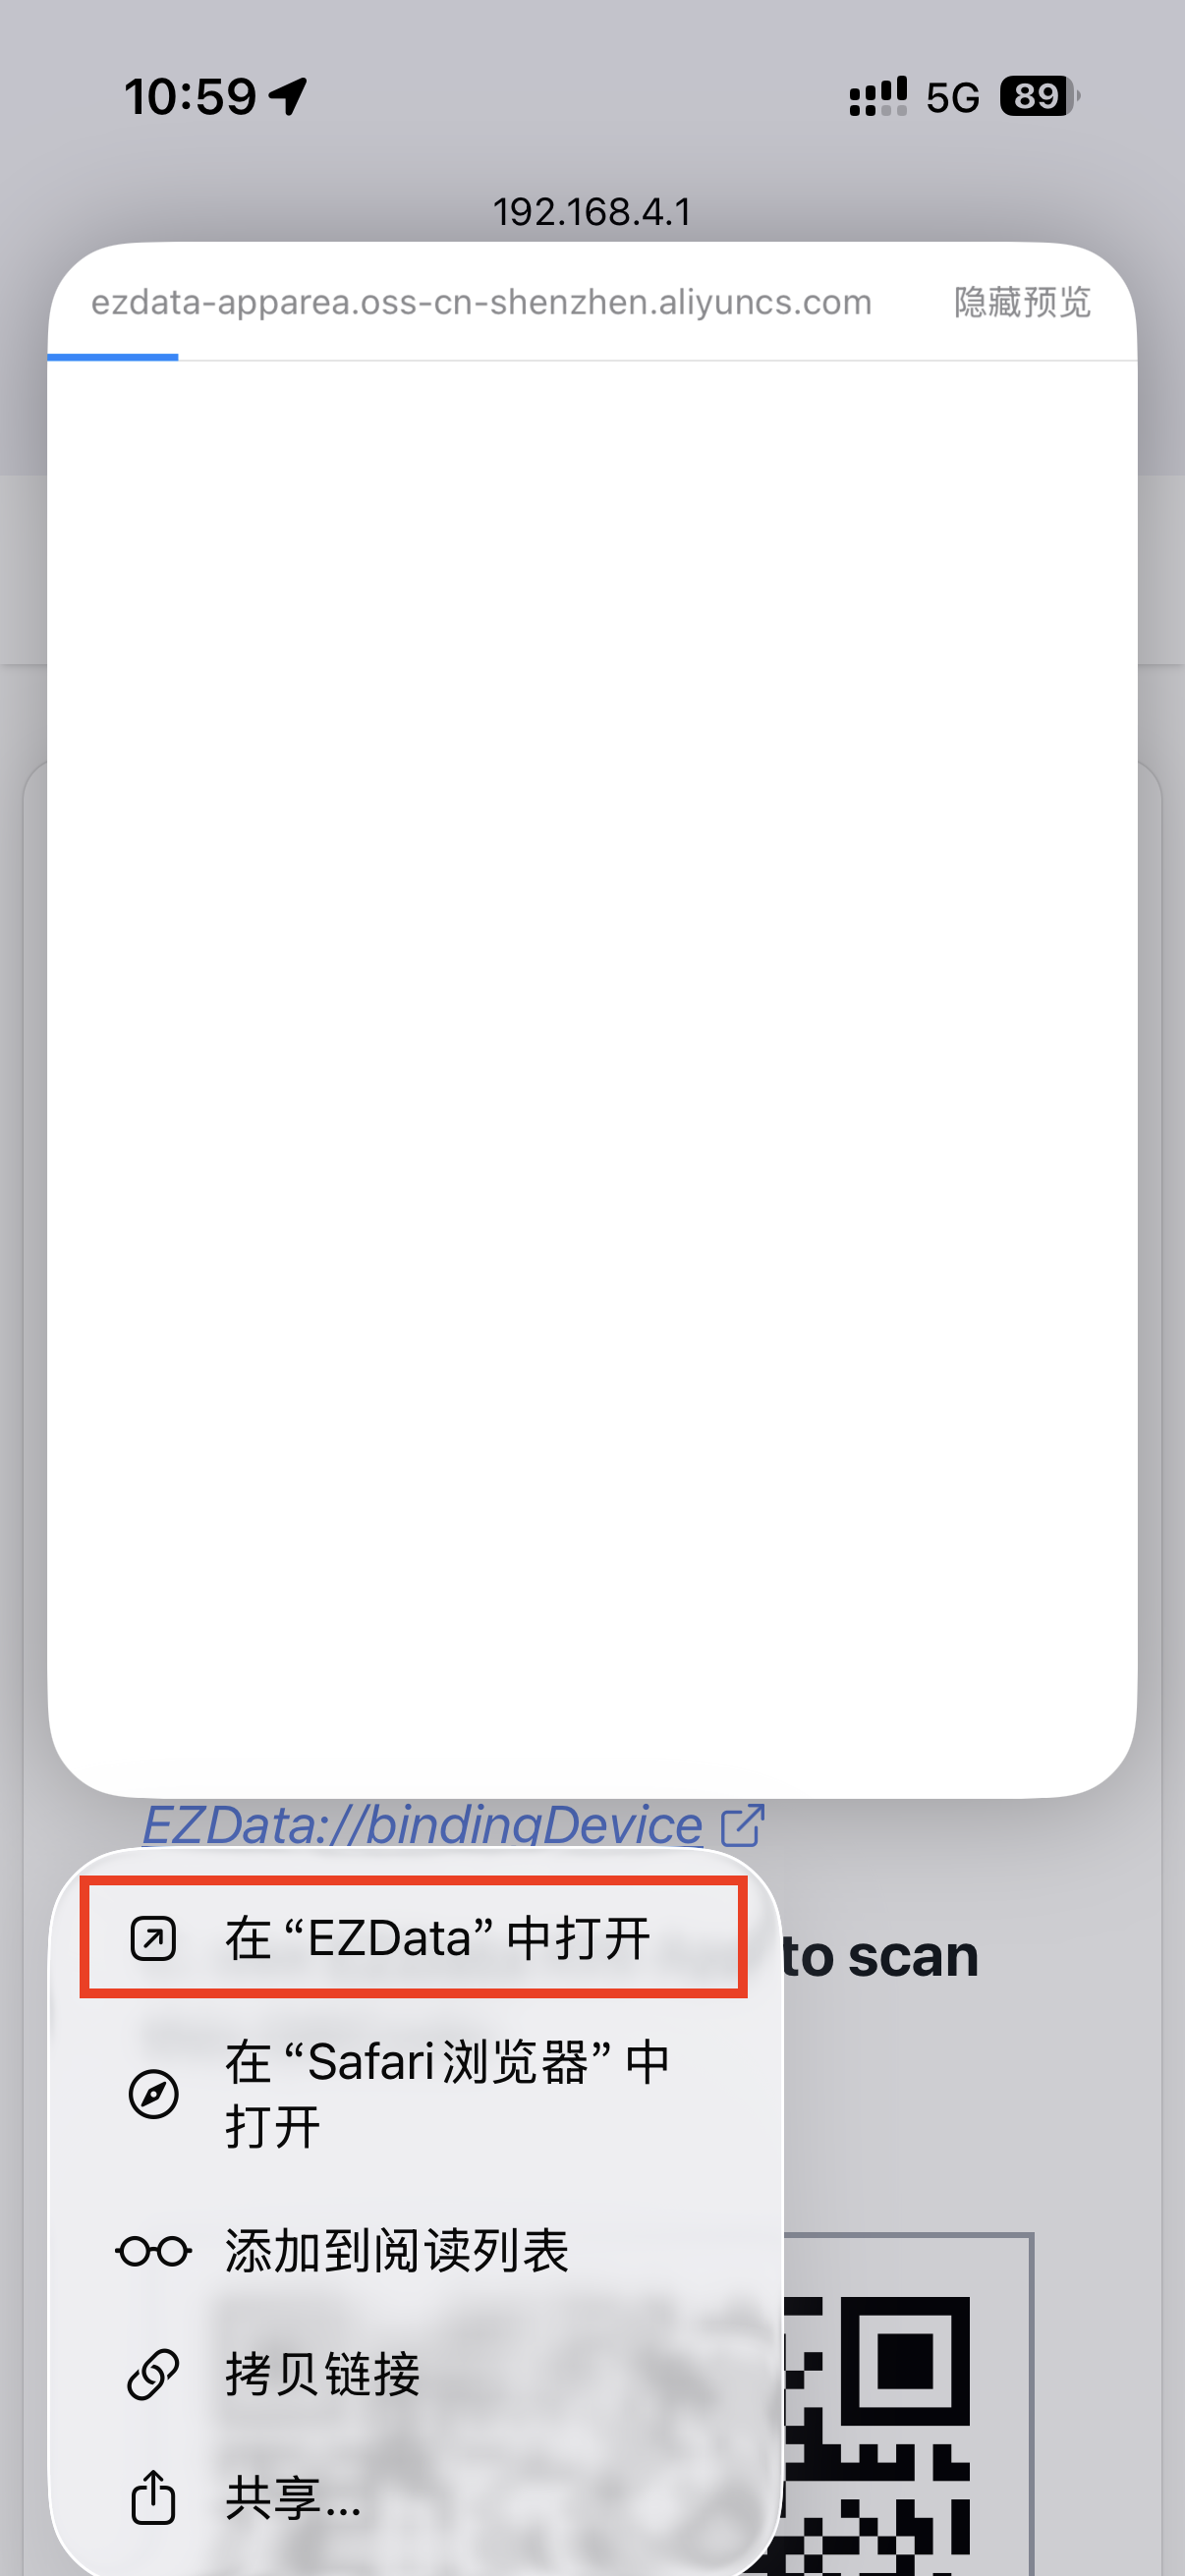
- On Apple devices, long press the link beginning with
EZData://and choose to open it in the EZData app to bind this PowerHub. Alternatively, take a screenshot and open the EZData app, then tap the QR code scan button in the upper-right corner of theDatapage to bind the PowerHub.
- On non-Apple devices, open the link starting with
HTTPS://in a browser, log in to your EZData account, and bind the PowerHub.
(4)EZData App Operation
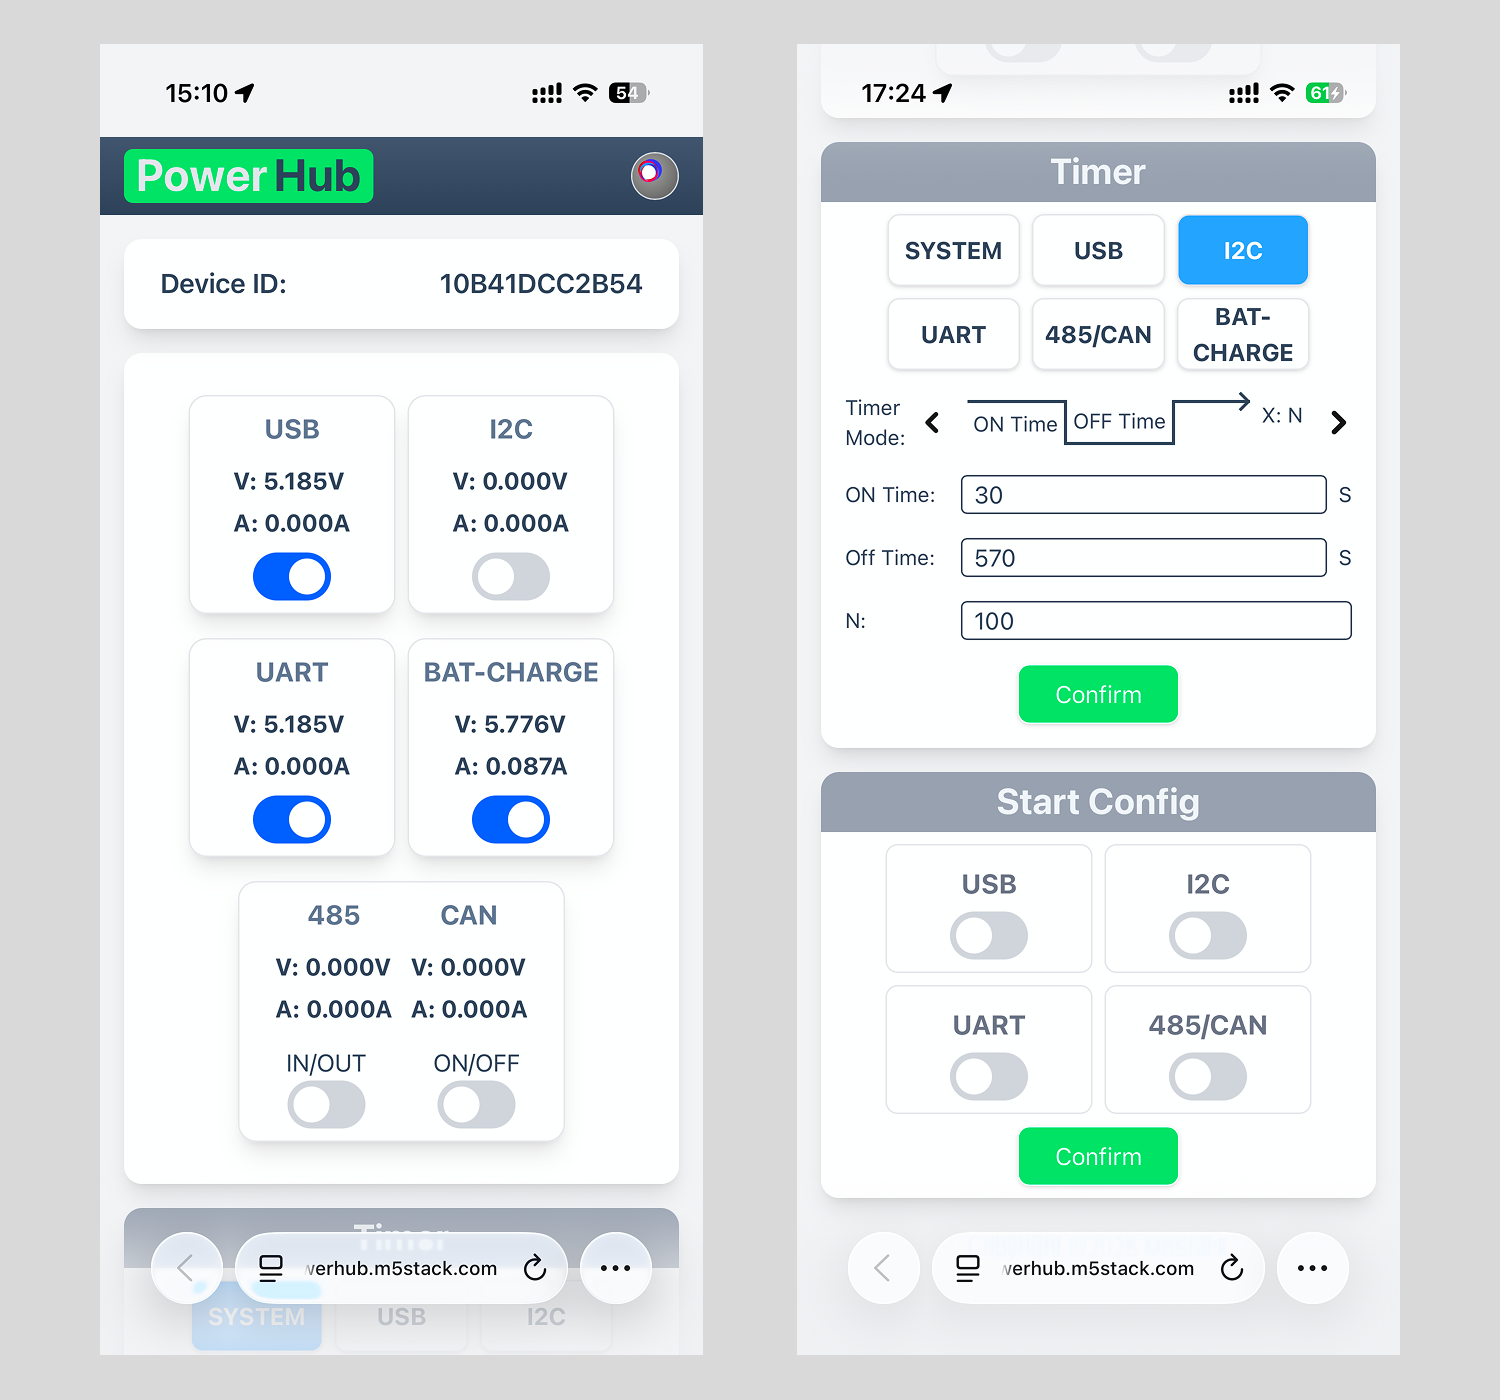
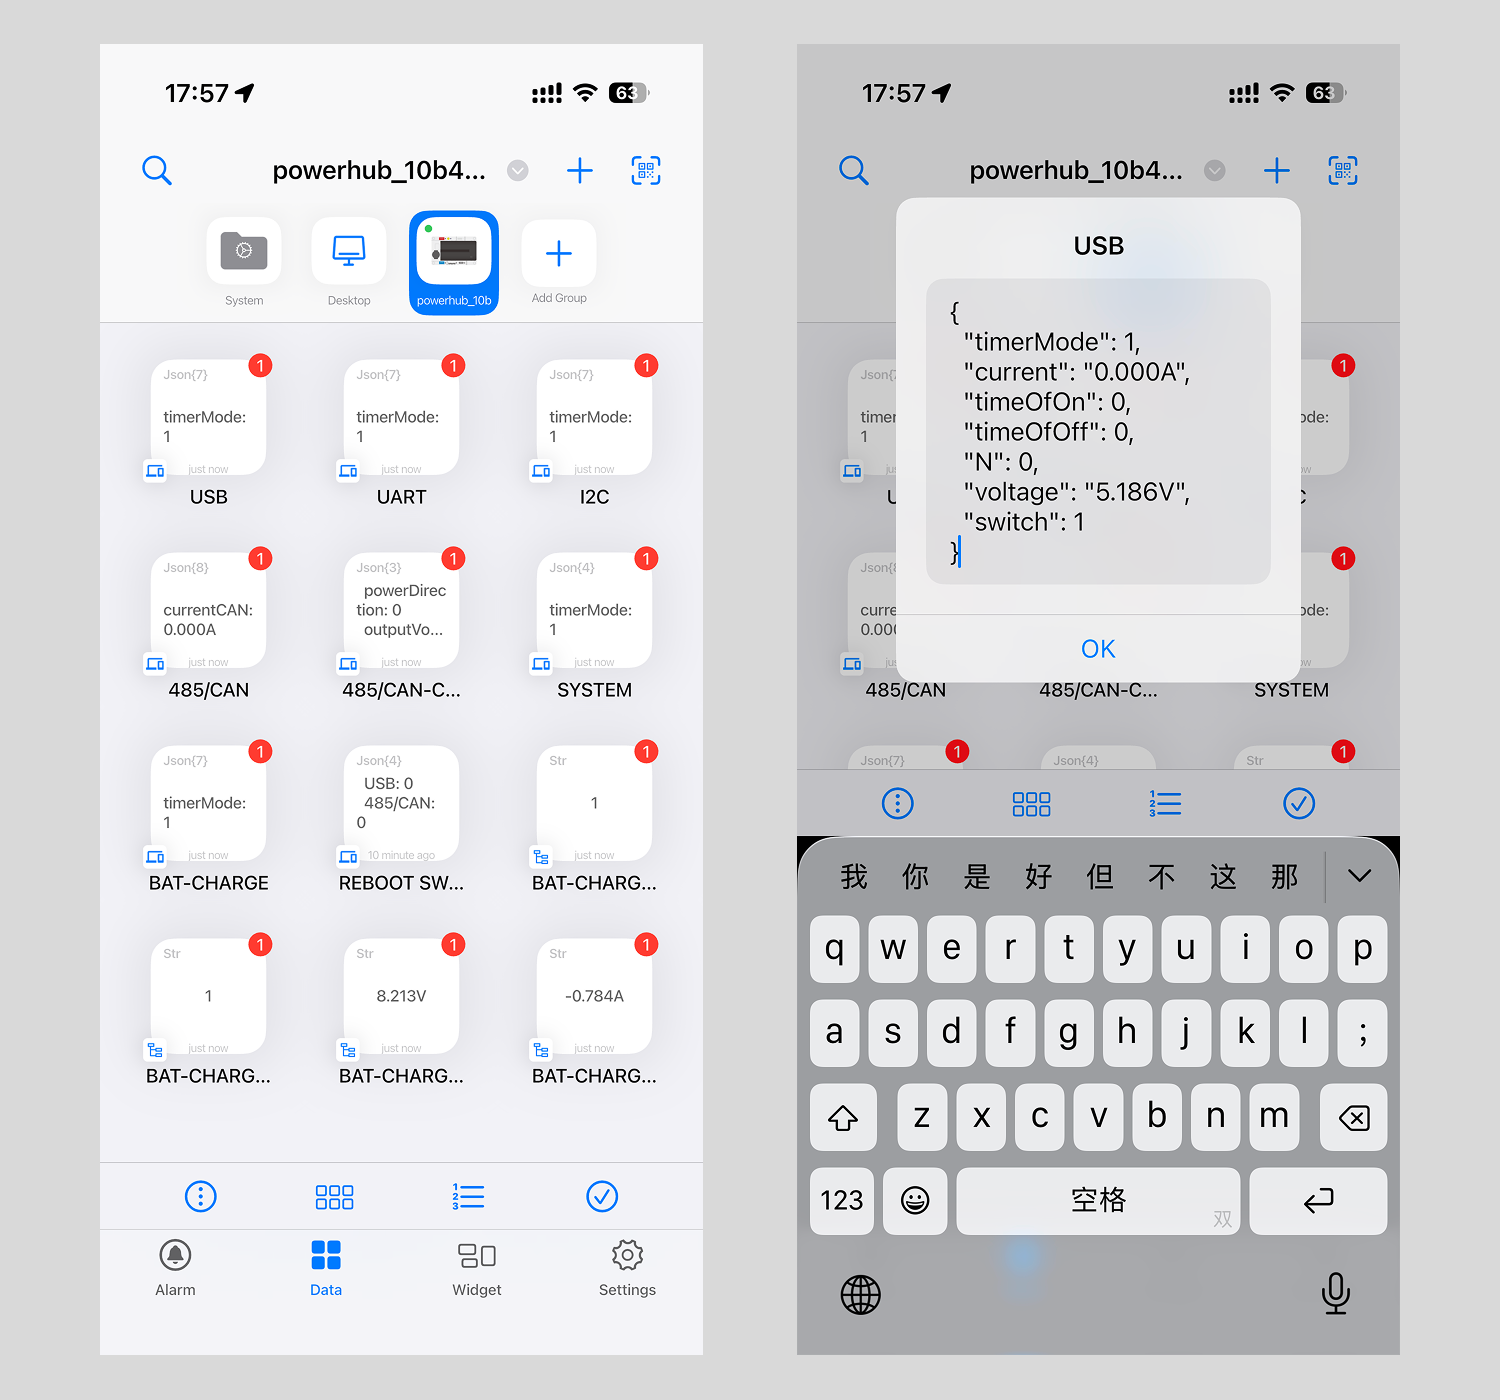
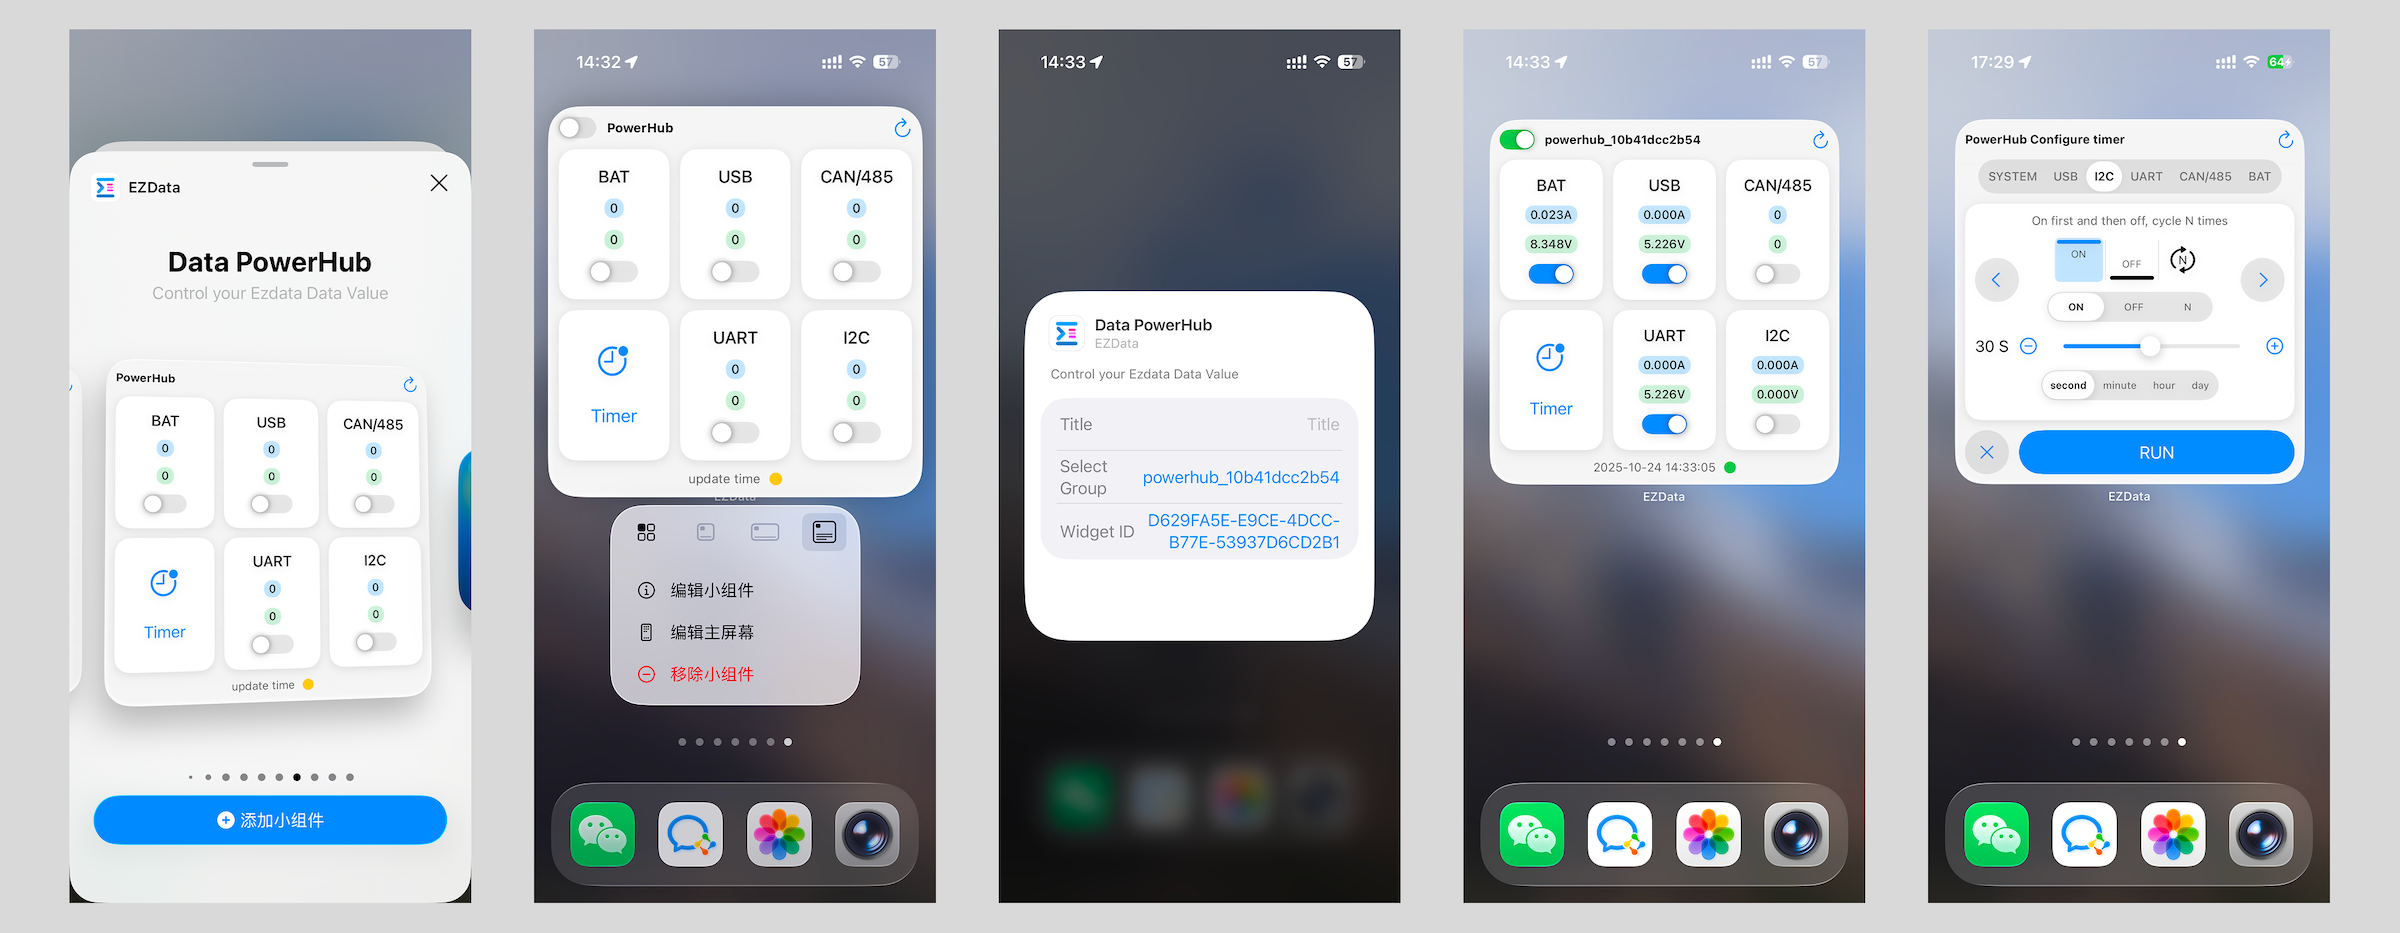
After binding PowerHub in the EZData app on an Apple device, open the Data tab at the bottom and switch to the PowerHub device at the top. You can view various data points, tap each item to view details or edit settings. As shown below, tap USB and set the switch value to 1 to turn on the USB interfaces (USB-A + USB-C).
The EZData app also supports iOS home screen widgets for quick device control. On the iOS home screen, long-press an empty area, tap Edit (top left) - Add Widget, search or scroll to find EZData, and add the Data PowerHub widget to your home screen. Then, long-press the newly added widget, tap Edit Widget, select the device starting with powerhub under Select Group, and return to the home screen to quickly view the channel status in the widget.
(5)Web Operation
After binding PowerHub in a web browser, you can view and control the status of each channel, as well as set scheduled tasks.