

Product Guide
Linux PC
AI アクセラレーターカード
LLM-8850 カード
AI & Agent
リアルタイム音声アシスタント
XiaoZhi ボイスアシスタント
AtomS3R-M12 Volcengine Kit
Industrial Control
IoT Measuring Instruments
Air Quality
PowerHub
Module13.2 PPS
VAMeter
T-Lite
Ethernet Camera
PoECAM
Wi-Fi Camera
Unit CamS3/-5MP
AI Camera
LoRa & LoRaWAN
Motor Control
ファームウェアの初期化
ディップスイッチ&ピン切り替え
CoreMP135 UiFlow2 クイックスタート
1. 準備
- CoreMP135 に電源を供給し(DC 12V 電源または Type-C 5V 入力)、CoreMP135 を LAN ケーブルでネットワークに接続します。
- CoreMP135 に最新バージョンの Debian イメージ(≥
M5_CoreMP135_debian12_20260626)を書き込みます。この手順については、CoreMP135 イメージ書き込みチュートリアルを参照してください。 - PuTTY を使用して、シリアルポート経由でデバイスのターミナルにアクセスします。この手順については、CoreMP135 開発チュートリアルを参照してください。
- CoreMP135 デバイスの microSD カードを再パーティションして
容量を拡張します。この手順については、CoreMP135 パーティション拡張チュートリアルを参照してください。
2. システム依存パッケージのダウンロード
- シリアルポートまたは SSH 経由でデバイスのターミナルに接続し、以下のコマンドを実行してシステム依存パッケージをダウンロードします(ネットワーク接続が必要です)。
apt update
apt install -y python3-pip build-essential python3-dev python3-pyaudioミラーソース
ネットワーク接続が不安定な場合やダウンロードが遅い場合は、以下のミラーソースへの切り替えをお試しください。次のコマンドで既存のソフトウェアソース設定をバックアップしてから、ミラーソース情報を追加します。
- 既存の設定をバックアップし、新しいミラーソースのリンクを追加します。
mv /etc/apt/sources.list /etc/apt/sources.list.backup
vim /etc/apt/sources.listdeb https://mirrors.ustc.edu.cn/debian/ bookworm main non-free non-free-firmware contrib
deb-src https://mirrors.ustc.edu.cn/debian/ bookworm main non-free non-free-firmware contrib
deb https://mirrors.ustc.edu.cn/debian-security/ bookworm-security main
deb-src https://mirrors.ustc.edu.cn/debian-security/ bookworm-security main
deb https://mirrors.ustc.edu.cn/debian/ bookworm-updates main non-free non-free-firmware contrib
deb-src https://mirrors.ustc.edu.cn/debian/ bookworm-updates main non-free non-free-firmware contrib
deb https://mirrors.ustc.edu.cn/debian/ bookworm-backports main non-free non-free-firmware contrib
deb-src https://mirrors.ustc.edu.cn/debian/ bookworm-backports main non-free non-free-firmware contrib- 保存後、
apt updateコマンドを実行してパッケージ情報を更新し、依存パッケージのインストールコマンドを再度実行します。
3. UiFlow2 Python ライブラリのインストール
CoreMP135-UiFlow2 ソフトウェアパッケージ
CoreMP135-UiFlow2 ソフトウェアパッケージは、CoreMP135 UiFlow2 向けの Python 3.11 サードパーティライブラリで、UiFlow2 によって生成されたコードを実行するために使用します。このライブラリには、バックグラウンドサービスを起動 / 停止するための実行可能な UiFlow2 コマンドラインツールが含まれています。バックグラウンドサービスは UiFlow2 サーバーに接続してコマンドを受信します。
- pip パッケージマネージャーを使用して UiFlow2 パッケージをダウンロードします。Debian 12 の pip ではシステム保護機能が有効になっているため、以下のコマンドのように
--break-system-packagesフラグを追加してパッケージをインストールします(ネットワーク接続が必要です)。
pip install uiflow2 --break-system-packages- pip パッケージリストに uiflow2 が表示されることを確認し、インストールが成功したかどうかを検証します。
pip listPackage Version
------------------ ---------
certifi 2026.7.22
charset-normalizer 3.4.9
distro 1.8.0
evdev 1.9.3
idna 3.18
network 0.1
paho-mqtt 2.1.0
pip 23.0.1
PyAudio 0.2.13
pyserial 3.5
requests 2.34.2
setuptools 66.1.1
smbus2 0.6.1
typing_extensions 4.16.0
uiflow2 0.0.6
urllib3 2.7.0
wheel 0.38.44. UiFlow2 サービスの起動
CoreMP135 は Access Code(ネットワーク経由)を使用して UiFlow2 に接続し、プログラムの転送とデバッグを行います。以下の手順に従って操作してください。
- サービス起動コマンドを実行します。初期化が完了すると、画面にデバイスの
Access Codeが表示されます。
# Start the UiFlow2 service
uiflow2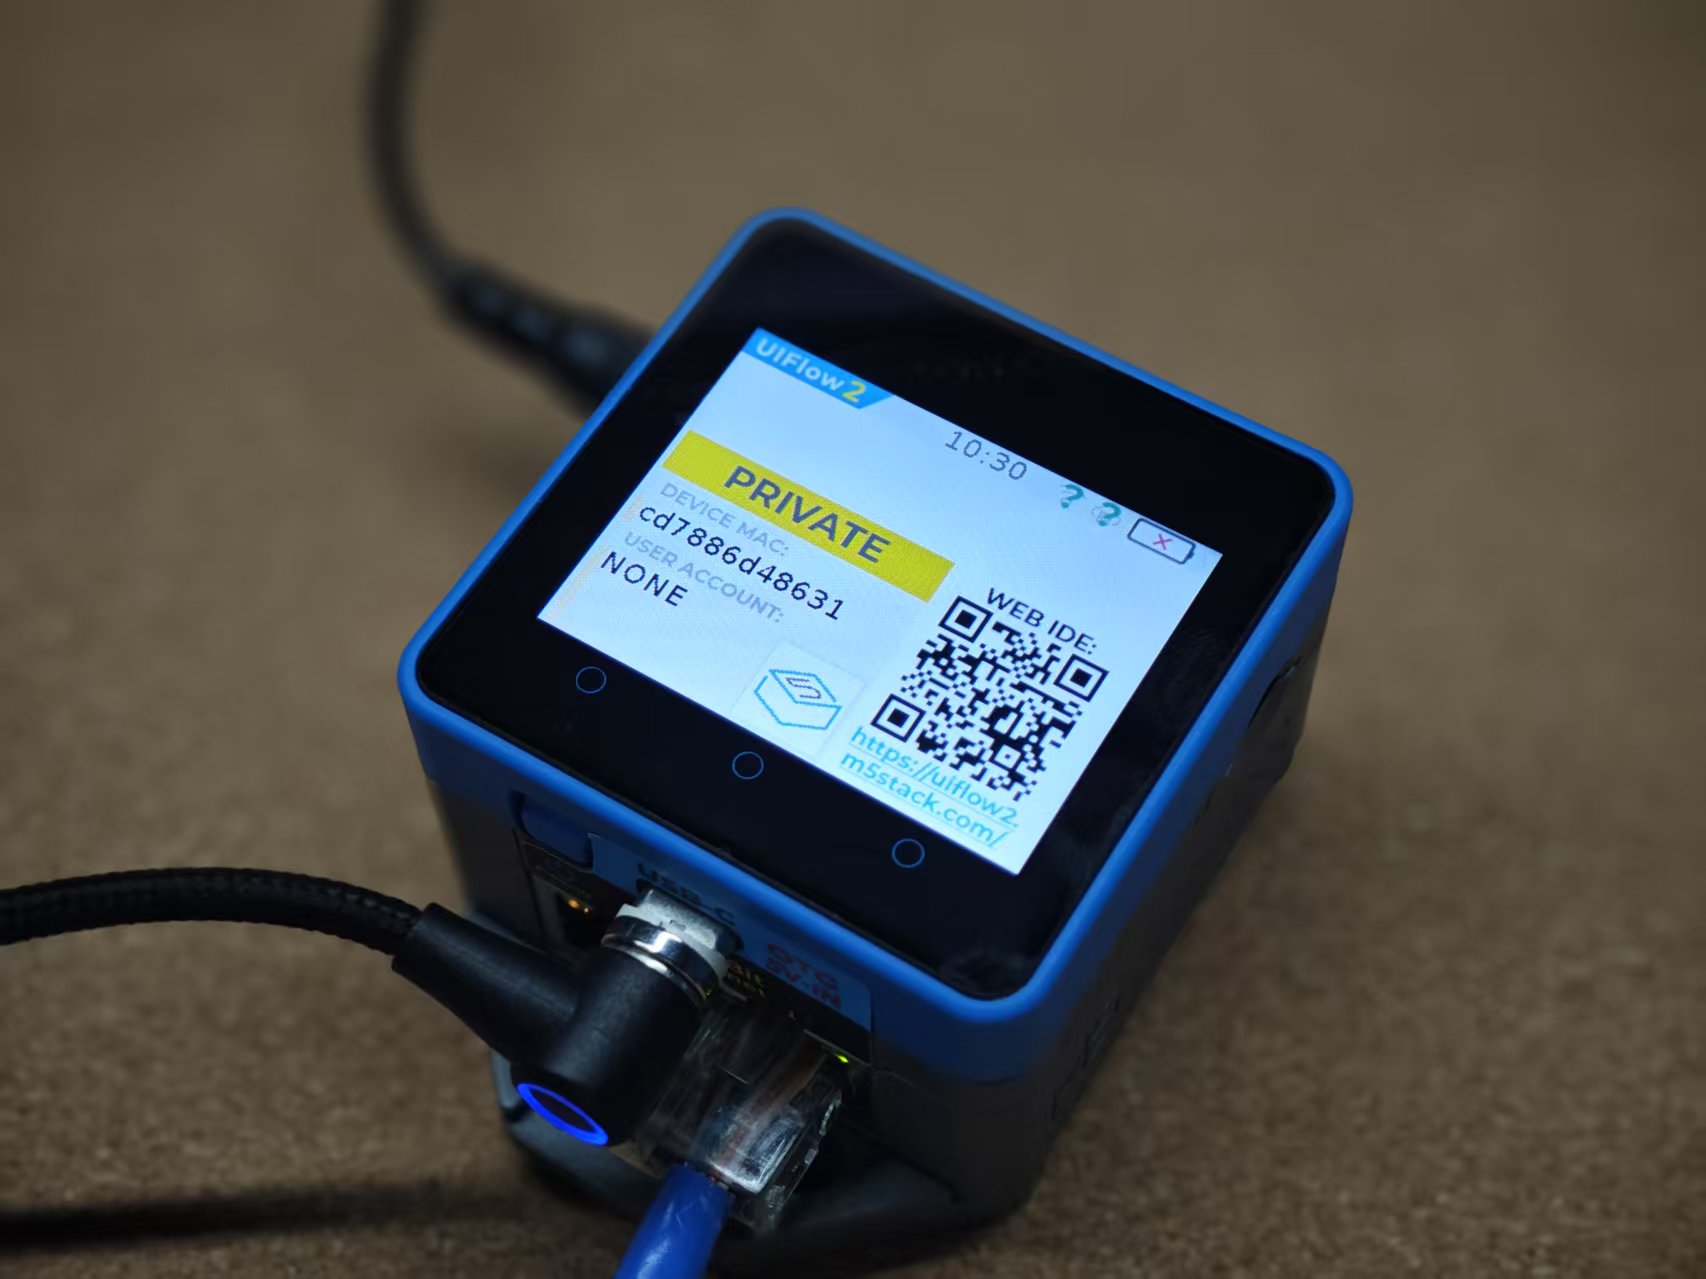
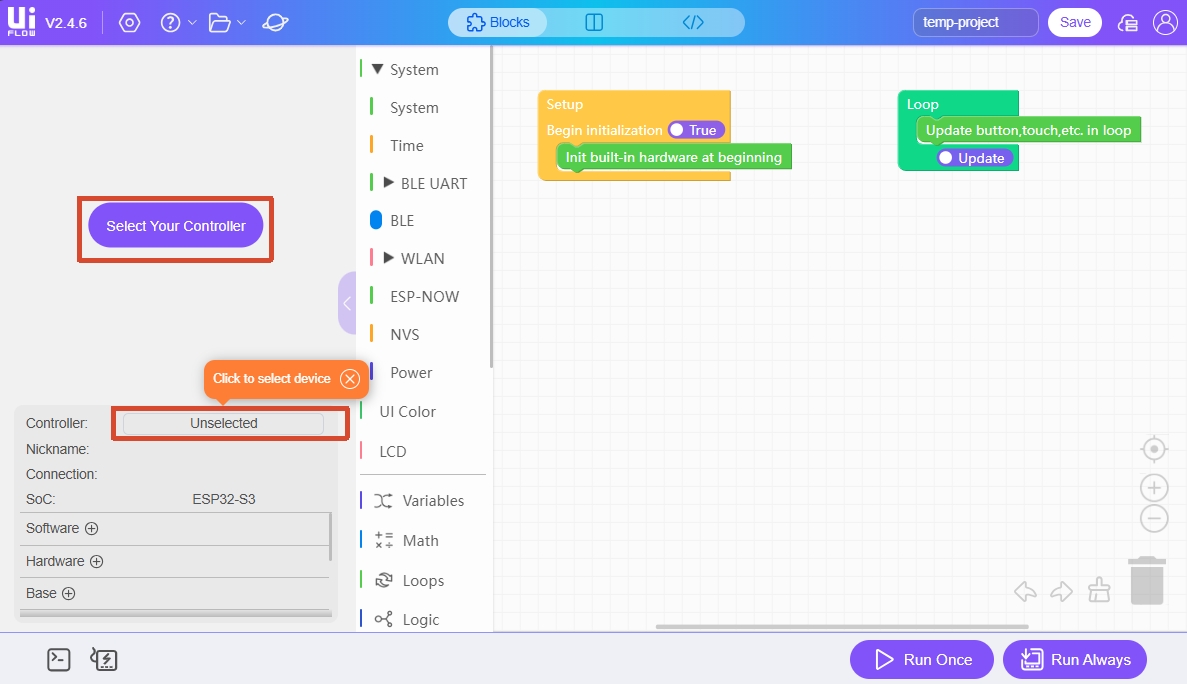
- uiflow2.m5stack.com にアクセスし、UiFlow2 Web IDE を開きます。
- ページ上の
Select Your Controller(初回アクセス時に表示)またはControllerボタンをクリックし、Select Deviceページを開きます。
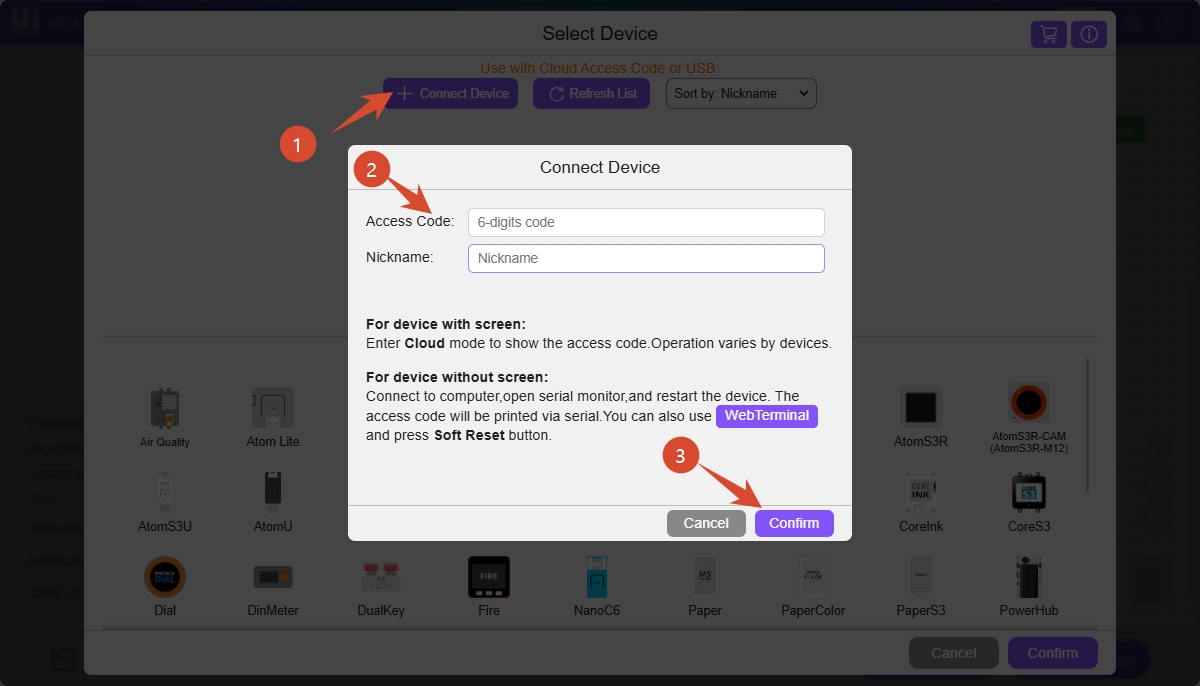
Connect Deviceをクリックし、Access Code と任意のデバイス名を入力してからConfirmをクリックすると、CoreMP135 が UiFlow2 に接続されます。
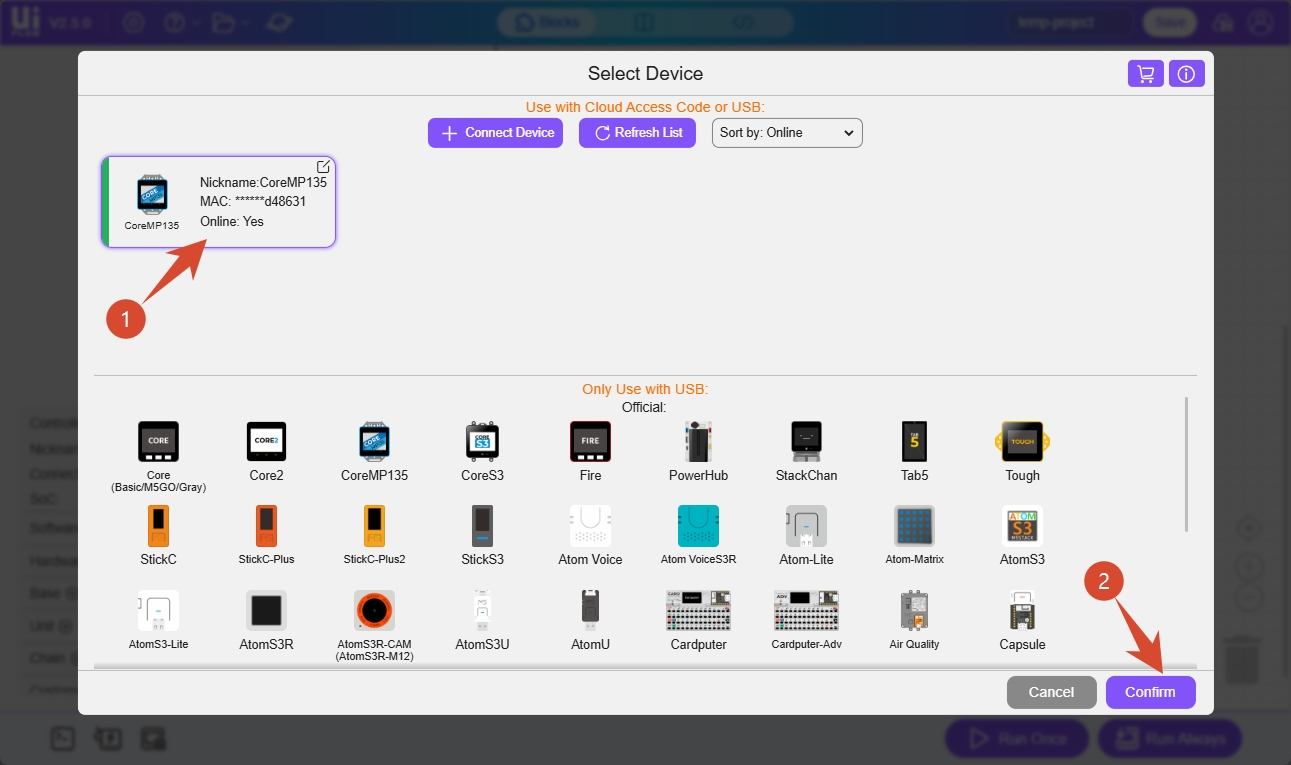
- Select Device ページで、接続済みの CoreMP135 デバイスを選択して
Confirmをクリックすると、UiFlow2 のプログラミング画面が開きます。
5. プログラムの実行とダウンロード
デバイスを UiFlow2 に接続すると、Blockly ブロックをドラッグしてプログラムを編集できます。
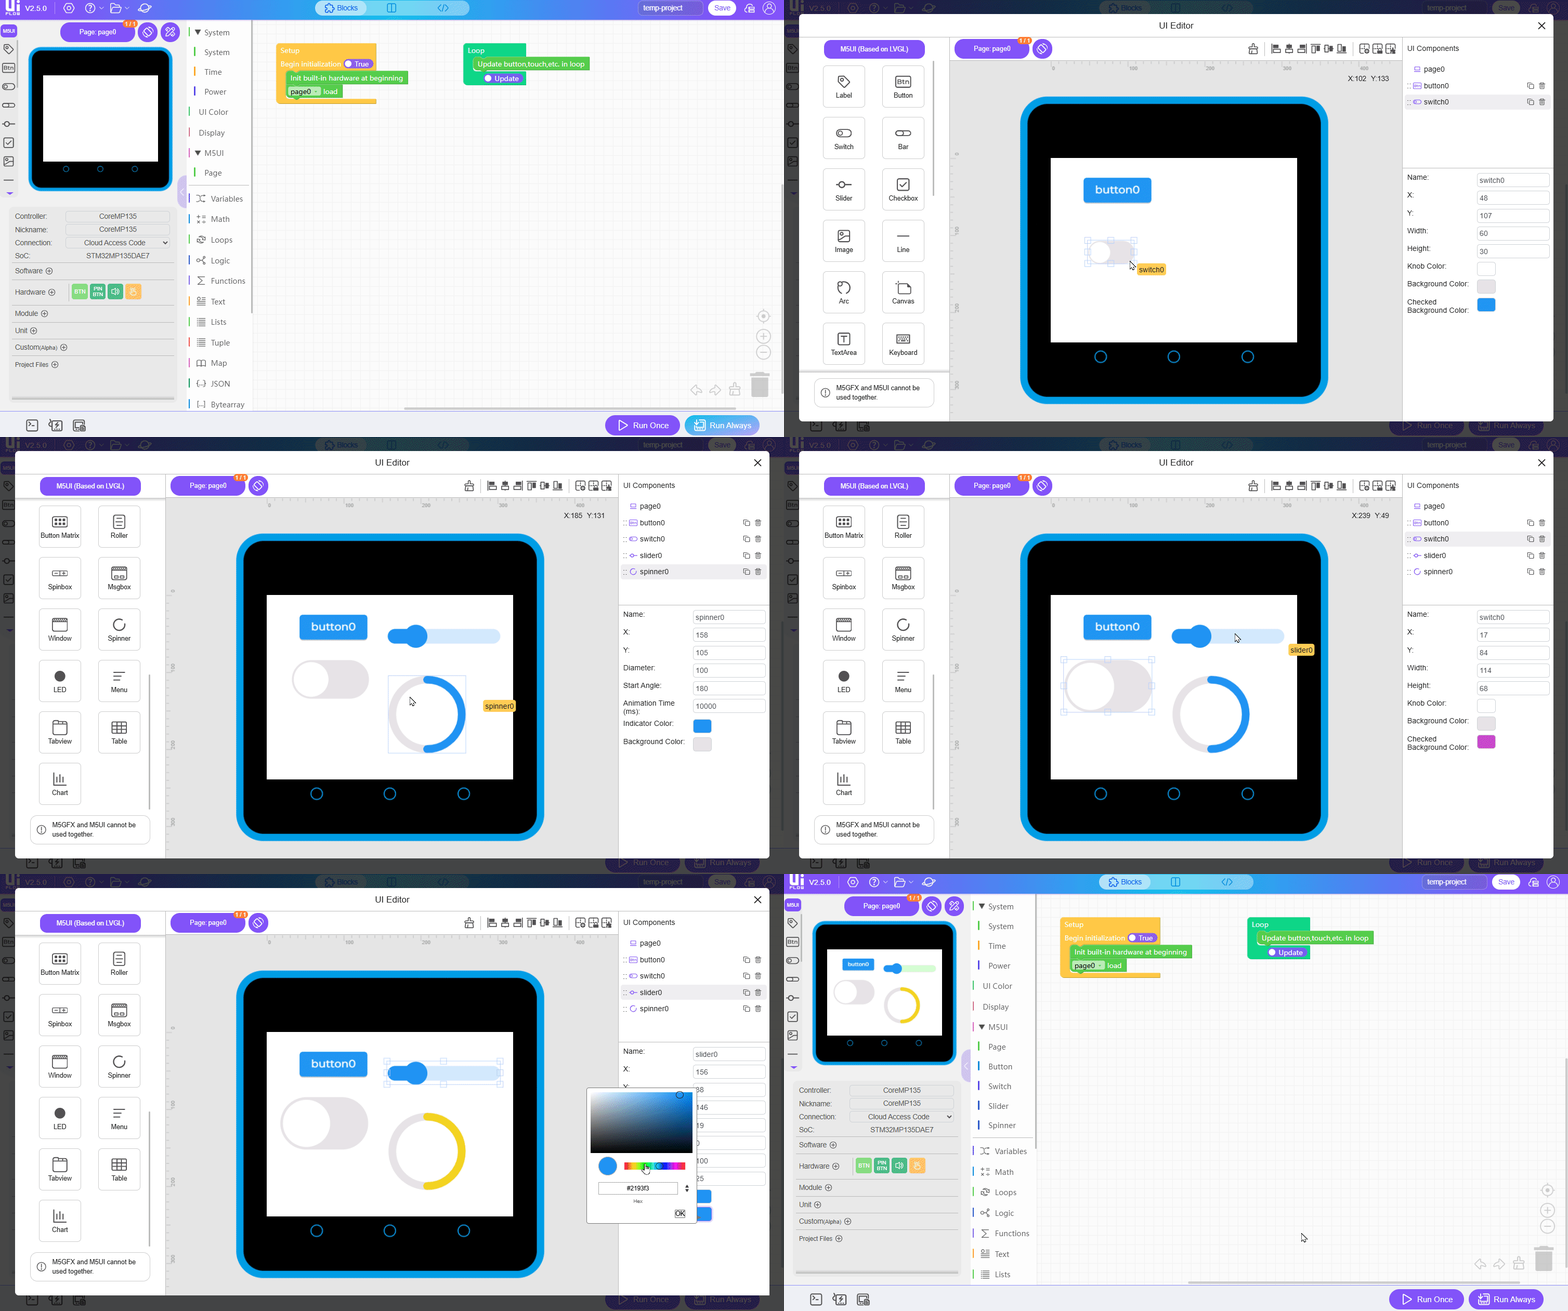
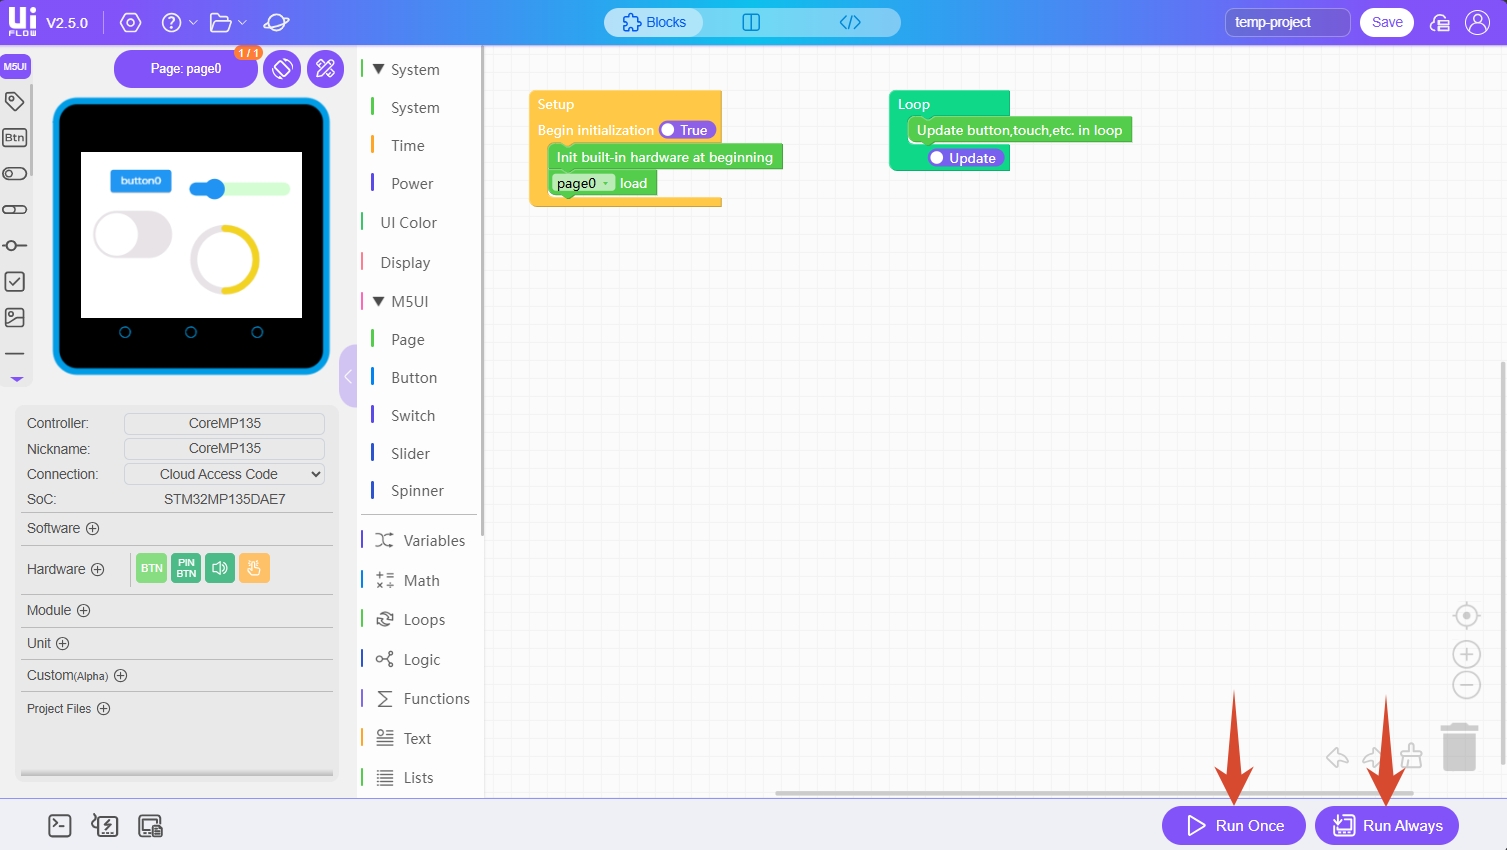
プログラムの編集が完了したら、画面右下の Run Once ボタンをクリックして、テストプログラムを 1 回実行できます。
デバイスの電源投入後にプログラムを自動実行するには、Run Always ボタンをクリックしてプログラムをデバイスにダウンロードし、6. その他の一般的なコマンドを参照して UiFlow2 サービスの自動起動を設定します。
6. その他の一般的なコマンド
# Start the UiFlow2 service and run the default UiFlow2 startup program (Access Code page)
uiflow2 ui

# Stop the UiFlow2 service
uiflow2 stop- Linux システムサービスコマンド
# Enable the UiFlow2 systemd service so UiFlow2 starts automatically when the system starts
uiflow2 enable

# Restart the UiFlow2 systemd service
systemctl restart uiflow2.service

# Check the UiFlow2 systemd service status
systemctl status uiflow2.service

# Stop the UiFlow2 systemd service
systemctl stop uiflow2.service

# Remove the UiFlow2 systemd service
uiflow2 disablePage Tools