Arduino Quick Start
2. Devices & Examples
3. M5Unified
4. M5GFX
5. Extensions
Unit
Atomic
Tab5
IoT
Accessories
Atom DTU NBIoT2 Series Arduino Tutorial
1. Preparations
Environment Configuration: Refer to Arduino IDE Getting Started Tutorial to complete IDE installation, and install corresponding board manager and required driver libraries according to the development board being used.
Required Driver Libraries:
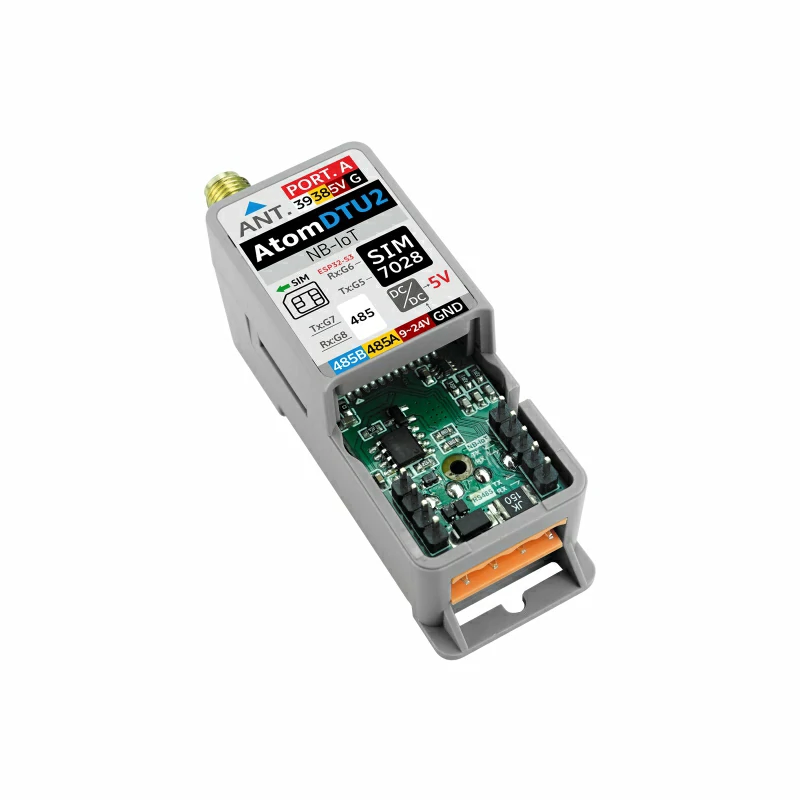
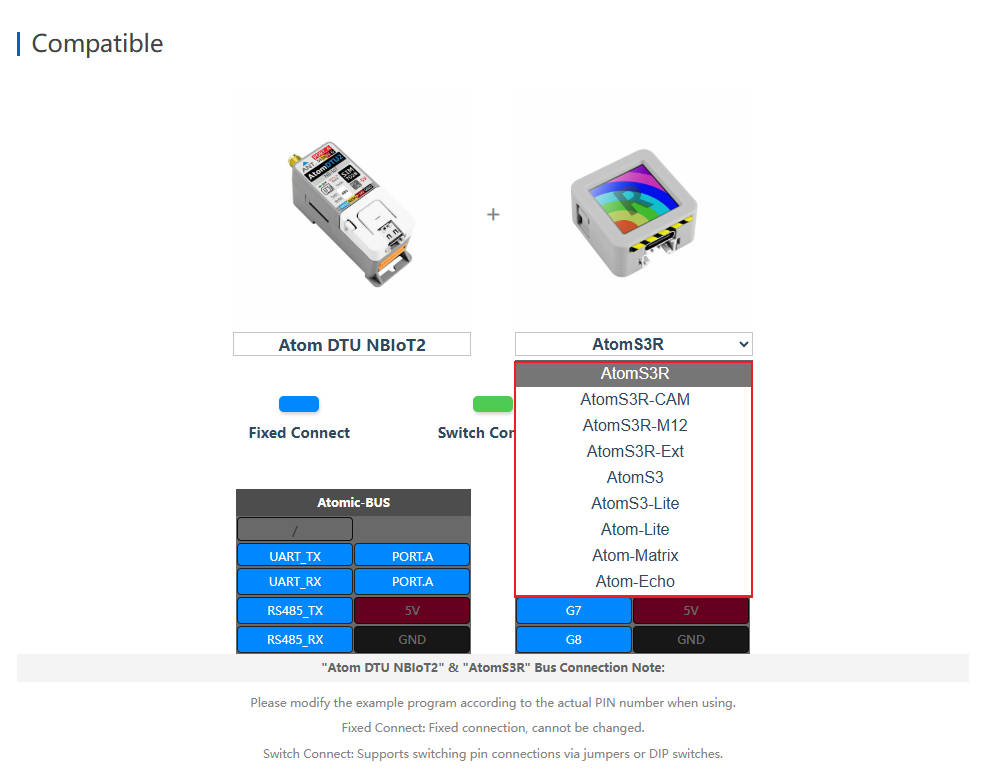
- Hardware Products Used:

2. Notes
3. HTTP Service
By default, it uses the CAT mode of the SIM card. To switch to NB-IoT mode, uncomment the MODE_NB_IOT macro definition in the TinyGsmClientSIM7028.h file. If debugging is needed, you can uncomment the DUMP_AT_COMMANDS macro definition in the TinyGsmClientSIM7028.h file.
#include "ATOM_DTU_NB.h"
#include <TinyGsmClient.h>
#include <M5AtomS3.h>
#include <sys/time.h>
#include <time.h>
#include <ArduinoHttpClient.h>

//#define MODE_NB_IOT     // By default, CAT mode is used. If using NB-IOT
// mode, open this macro definition or TinyGsmClientSIM7028.h line 32 //#define
// MODE_NB_IOT
//#define DUMP_AT_COMMANDS  // If you need to debug, you can open this macro
                          // definition and TinyGsmClientSIM7028.h line 13
                          // //#define TINY_GSM_DEBUG Serial
#ifdef DUMP_AT_COMMANDS
#include <StreamDebugger.h>
StreamDebugger debugger(SerialAT, SerialMon);
TinyGsm modem(debugger, ATOM_DTU_SIM7028_RESET);
#else
TinyGsm modem(SerialAT, ATOM_DTU_SIM7028_RESET);
#endif
// Server details
const char server[] = "api.m5stack.com";
const char resource[] = "/v1";
const int  port = 80;
TinyGsmClient client(modem);
HttpClient    http(client, server, port);

void modemConnect(void);

// Your GPRS credentials, if any
const char apn[] = "YourAPN";
const char gprsUser[] = "";
const char gprsPass[] = "";

struct tm now;
char s_time[50];

void log(String info) { SerialMon.println(info); }

void setup() {
  AtomS3.begin(true);  // Init M5AtomS3Lite.
  AtomS3.dis.setBrightness(100);
  AtomS3.dis.drawpix(0x0000ff);
  Serial.println(">>ATOM DTU NB MQTT TEST");
  SerialAT.begin(SIM7028_BAUDRATE, SERIAL_8N1, ATOM_DTU_SIM7028_RX,
                 ATOM_DTU_SIM7028_TX);

  modemConnect();
}

void loop() {
   AtomS3.update();
   SerialMon.print(F("Performing HTTP GET request... "));
  int err = http.get(resource);
  if (err != 0) {
    SerialMon.println(F("failed to connect"));
    delay(10000);
    return;
  }

  int status = http.responseStatusCode();
  SerialMon.print(F("Response status code: "));
  SerialMon.println(status);
  if (!status) {
    delay(10000);
    return;
  }

  SerialMon.println(F("Response Headers:"));
  while (http.headerAvailable()) {
    String headerName  = http.readHeaderName();
    String headerValue = http.readHeaderValue();
    SerialMon.println("    " + headerName + " : " + headerValue);
  }

  int length = http.contentLength();
  if (length >= 0) {
    SerialMon.print(F("Content length is: "));
    SerialMon.println(length);
  }
  if (http.isResponseChunked()) {
    SerialMon.println(F("The response is chunked"));
  }

  String body = http.responseBody();
  SerialMon.println(F("Response:"));
  SerialMon.println(body);

  SerialMon.print(F("Body length is: "));
  SerialMon.println(body.length());

  // Shutdown

  http.stop();
  SerialMon.println(F("Server disconnected"));
}


void modemConnect(void) {
  // Get card number
  String ccid = modem.getSimCCID();
  Serial.println("CCID: " + ccid);
  // Acquire signal strength
  int csq = modem.getSignalQuality();
  Serial.println("Signal quality: " + String(csq));
  unsigned long start = millis();
  log("Initializing modem...");
  while (!modem.init()) {
    log("waiting...." + String((millis() - start) / 1000) + "s");
  };

  start = millis();
  log("Waiting for network...");
  while (!modem.waitForNetwork()) {
    log("waiting...." + String((millis() - start) / 1000) + "s");
  }
  log("success");
#ifdef MODE_NB_IOT
#else
  SerialMon.println("Waiting for GPRS connect...");
  if (!modem.gprsConnect(apn, gprsUser, gprsPass)) {
    SerialMon.println("waiting...." + String((millis() - start) / 1000) + "s");
  }
  SerialMon.println("success");
#endif

  // Example Query the IP address of a device
  String ip = modem.getLocalIP();

  log("Device IP address: " + ip);

  log("success");
}
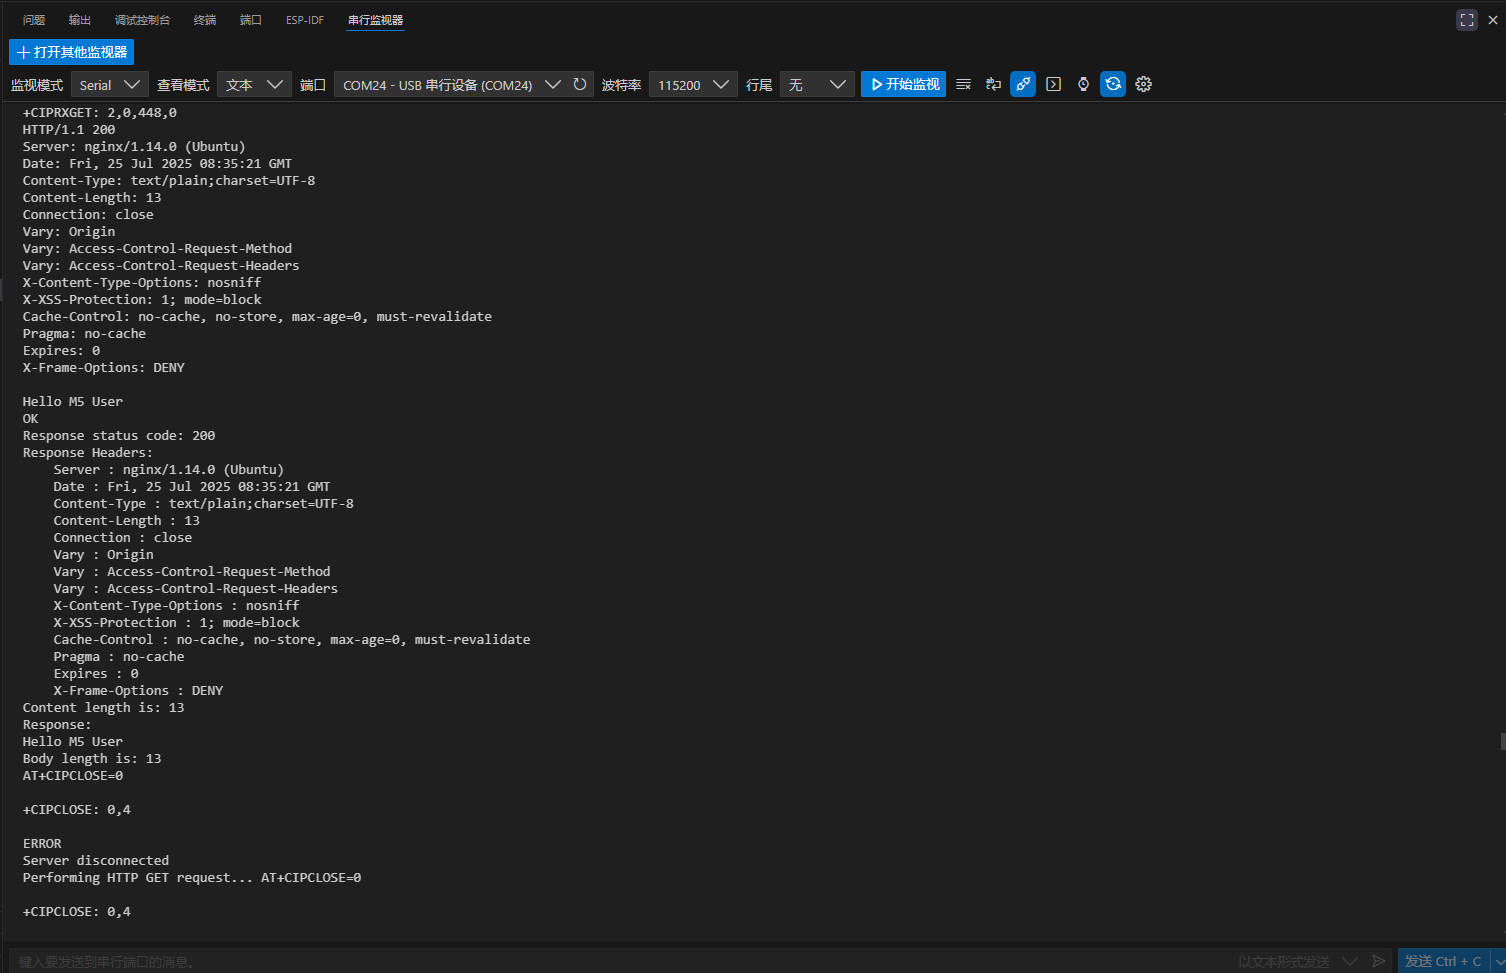
When the HTTP request is successful, it will return a series of information from the server and output it via serial port.
4. MQTT Service
This module also supports MQTT protocol communication. The examples include support for three MQTT service platforms: Baidu Cloud, OneNET and ThingsCloud. This tutorial is based on Baidu Cloud IoT Platform. If you need to use other platforms, please refer to other examples in the example folder.
The SIM card and debug mode selection are the same as for HTTP.
Replace MQTT_BROKER, mqtt_devid, mqtt_pubid, and mqtt_password with your personal MQTT account information. For any questions, please refer to this tutorial.
#include <M5AtomS3.h>
#include "ATOM_DTU_NB.h"
#include <PubSubClient.h>
#include <TinyGsmClient.h>
#include <time.h>
#include <sys/time.h>
#define MQTT_BROKER   "*********"  //Baidu Cloud address
#define MQTT_PORT     1883        //Port number

#define UPLOAD_INTERVAL   2000
#define mqtt_devid        "*******"                      //Device ID
#define mqtt_pubid        "*************"        //username
#define mqtt_password     "*************"          //password
int postMsgId = 0;  //Keep track of how many posts have been made
// This is the template used by post to upload data
#define ONENET_POST_BODY_FORMAT "{\"id\":%d,\"dp\":%s}"
// Receiving and sending properties set the subject
// Receive device properties to get the command topic
#define ONENET_TOPIC_GET "$iot/" mqtt_devid "/msg"
// Send data subject on the device
#define ONENET_TOPIC_POST  "$iot/" mqtt_devid "/events"
int num=0;
uint32_t lastReconnectAttempt = 0;

#define DUMP_AT_COMMANDS    //If you need to debug, you can open this macro definition and TinyGsmClientSIM7028.h line 13 //#define TINY_GSM_DEBUG Serial
#ifdef DUMP_AT_COMMANDS
#include <StreamDebugger.h>
    StreamDebugger debugger(SerialAT, SerialMon);
    TinyGsm modem(debugger, ATOM_DTU_SIM7028_RESET);
#else
    TinyGsm modem(SerialAT, ATOM_DTU_SIM7028_RESET);
#endif

TinyGsmClient tcpClient(modem);
PubSubClient mqttClient(MQTT_BROKER, MQTT_PORT, tcpClient);

void mqttCallback(char *topic, byte *payload, unsigned int len);
bool mqttConnect(void);
void nbConnect(void);

void log(String info) {
    SerialMon.println(info);
}

void setup() {
    AtomS3.begin(true);
    Serial.println(">>ATOM DTU NB MQTT TEST");
    SerialAT.begin(SIM7028_BAUDRATE, SERIAL_8N1, ATOM_DTU_SIM7028_RX,
                   ATOM_DTU_SIM7028_TX);
    AtomS3.dis.drawpix(0x0000ff);
    nbConnect();
    mqttClient.setServer(MQTT_BROKER, MQTT_PORT);
    mqttClient.setCallback(mqttCallback);
}

void loop() {
    static unsigned long timer = 0;

    if (!mqttClient.connected()) {
        log(">>MQTT NOT CONNECTED");
        log(mqttClient.state());
        AtomS3.dis.drawpix(0xff0000);
        uint32_t t = millis();
        if (t - lastReconnectAttempt > 10000L) {
            lastReconnectAttempt = t;
            if (mqttConnect()) {
                lastReconnectAttempt = 0;
            }
        }
        delay(100);
    }
    if (millis() >= timer) {
        timer = millis() + UPLOAD_INTERVAL;
        if (mqttClient.connected())
        {
          // First concatenate the json string
          char param[120];
          char jsonBuf[178];
          sprintf(param, "{\"num\":[{\"v\":%d}]}",num); // We write the data to be uploaded in the param

          postMsgId += 1;
          num+=1;
          if(num>256){
            num=0;
          }
          sprintf(jsonBuf, ONENET_POST_BODY_FORMAT, postMsgId, param);

          log("public the data:");
          log(jsonBuf);
          log("\n");

          mqttClient.publish(ONENET_TOPIC_POST, jsonBuf);
          //Send data to the topic
          delay(100);

        }
    }
    AtomS3.dis.drawpix(0x00ff00);
    mqttClient.loop();
}

void mqttCallback(char *topic, byte *payload, unsigned int len) {
    char info[len + 1];
    memcpy(info, payload, len);
    info[len] = '\0';
    log("Message arrived:"+String(info));
    log("Topic received: " + String(topic));
}

bool mqttConnect(void) {
    log("Connecting to ");
    log(MQTT_BROKER);
    bool status =mqttClient.connect(mqtt_devid, mqtt_pubid, mqtt_password);
    if (status == false) {
        int errorCode = mqttClient.state();
        log("MQTT Connection failed with error code: " + String(errorCode));
        return false;
    }
    log("MQTT CONNECTED!");
    mqttClient.subscribe(ONENET_TOPIC_GET);
    return mqttClient.connected();
}

void nbConnect(void) {
    unsigned long start = millis();
    log("Initializing modem...");
    while (!modem.init()) {
        log("waiting...." + String((millis() - start) / 1000) + "s");
    };

    start = millis();
    log("Waiting for network...");
    while (!modem.waitForNetwork()) {
        log("waiting...." + String((millis() - start) / 1000) + "s");
    }
    log("success");
    String ccid = modem.getSimCCID();
    Serial.println("CCID: " + ccid);
    int csq = modem.getSignalQuality();
    Serial.println("Signal quality: " + String(csq));
}
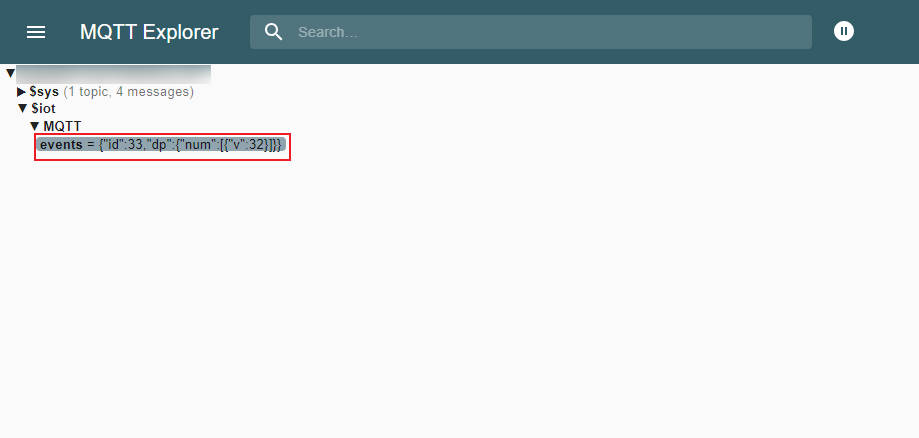
When the MQTT service is successfully connected, you can use MQTT Explorer to add subscription topics and view data. (For any questions, please refer to this interface)