


Arduino 上手教程
2. 设备开发 & 案例程序
3. M5Unified
4. M5GFX
5. 拓展模块
Unit
Atomic
Base
Tab5
IoT
Atom DTU LoRaWAN 系列 Arduino 使用教程
1.准备工作
1.环境配置: 参考Arduino IDE上手教程完成IDE安装, 并根据实际使用的开发板安装对应的板管理, 与需要的驱动库。
2.使用到的驱动库:
3.使用到的硬件产品:


2.LoRa P2P
LoRa P2P 通信模式可让多个 LoRa 设备直接进行通信。此模式直接基于 LoRa 调制技术进行数据包传输,你能够完全自定义数据帧内容,进而搭建属于自己的私有网络。它适用于对通信实时性要求较高、通信范围相对较小且无需复杂网络管理的场景。
LoRa TX/RX 案例
根据实际使用的设备,配置对应的通信参数。LoRa配置参数一致的设备才能进行通信。搭配不同的Atom主控时,请参考宏定义填入对应的TX/RX引脚用于初始化。
#include <M5Unified.h>
#include "rak3172_p2p.hpp"

#define LORA_CONFIG_PRLEN 8
#define LORA_CONFIG_PWR   22
#define LORA_FREQ         868E6  // 868E6 equals to 868*10^6, which is the frequency 868M(Hz). It can be modified to 915 or 470 accordingly.
#define LORA_CR           0      // (4/5=0, 4/6=1, 4/7=2, 4/8=3)
#define LORA_SF           7      // (6, 7, 8, 9, 10, 11, 12)
#define LORA_BW           500    // (125, 250, 500)

#define ATOM_LORA_RX 19
#define ATOM_LORA_TX 22

#define ATOMS3_LORA_RX 6
#define ATOMS3_LORA_TX 5

RAK3172P2P lora;

void LoRaLoopTask(void* arg) {
  while (1) {
    lora.update();
    vTaskDelay(5);
  }
}

void setup() {
  M5.begin();
  Serial.begin(115200);
  Serial.println("LoRa Init...");
  //  The second and third parameters in the next line should start with `ATOM` or `ATOMS3` according to the device actually used.
  while (!lora.init(&Serial2, ATOMS3_LORA_RX, ATOMS3_LORA_TX, RAK3172_BPS_115200)) {
    delay(1000);
  }

  lora.setMode(P2P_RX_MODE, 0);
  if (lora.config(LORA_FREQ, LORA_SF, LORA_BW, LORA_CR, LORA_CONFIG_PRLEN, LORA_CONFIG_PWR)) {
    Serial.println("LoRa config success");
  } else {
    Serial.println("LoRa config failed");
  }
  lora.setMode(P2P_TX_RX_MODE);
  xTaskCreate(LoRaLoopTask, "LoRaLoopTask", 1024 * 10, NULL, 2, NULL);
}

void loop() {
  M5.update();
  if (M5.BtnA.wasPressed()) {
    if (lora.print("Hello!")) {
      Serial.println("Send success");
    }
  }

  if (lora.available()) {
    std::vector<p2p_frame_t> frames = lora.read();
    for (int i = 0; i < frames.size(); i++) {
      Serial.print("RSSI: ");
      Serial.print(frames[i].rssi);
      Serial.print(" SNR: ");
      Serial.print(frames[i].snr);
      Serial.print(" LEN: ");
      Serial.print(frames[i].len);
      Serial.print(" Payload: ");
      for (uint8_t j = 0; j < frames[i].len; j++) {
        Serial.printf("%02X", frames[i].payload[j]);
      }
      Serial.println();
    }
    lora.flush();
  }
}烧录案例程序后,通过串口监视器查看输出日志,单击AtomS3R主控的中心按键发送数据。
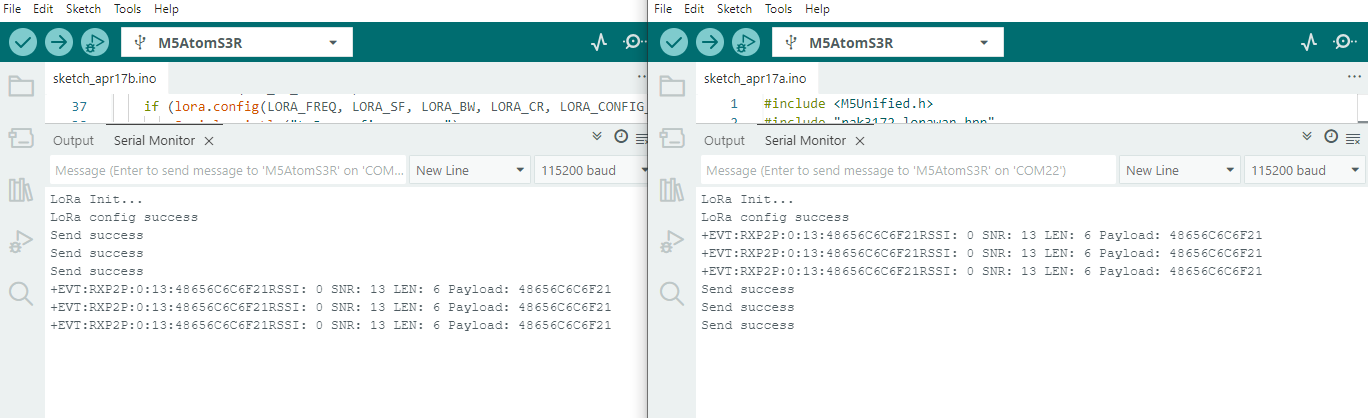
串口监视器中看到的 "48656C6C6F21" 是 "Hello!" 的ASCII编码。
3.LoRaWAN
LoRaWAN 通信模式下,设备需要连接到 LoRaWAN 网关才能实现数据交互。得益于跳频技术的优势,这种接入方式能够同时管理更多的 LoRa 设备节点,并且可以提供一定的数据安全性保障。 在使用前,请您确认当前区域内存在公共 LoRaWAN 网关,若没有公共网关,用户也可自行搭建网关以实现连接 。
通信密钥
1.参考TTN - 设备创建教程,依据当前使用的设备频段创建节点,并获取对应的密钥信息。这些密钥信息包含 DevEUI、AppEUI 和 AppKey 等,不同的入网模式(OTAA / ABP)所使用的密钥内容也存在差异。这些密钥是设备接入 LoRaWAN 网络的必要信息。
2.根据实际使用的设备频段与LoRaWAN网关的监听频段,配置相应的子网掩码与设备类型(ClassA ~ C)。有关 LoRaWAN 介绍与设备配置信息介绍可参考TTN - LoRaWAN Docs。
- 3.将在TTN或其他LoRaWAN服务器(如 Chirpstack)中获取的设备密钥信息填入案例程序中,并根据实际情况配置入网方式和工作频段,然后编译案例并烧录至设备。
OTAA入网
OTAA入网需要用到 DevEUI、AppEUI 和 AppKey 参数。
#include <M5Unified.h>
#include "rak3172_lorawan.hpp"

#define DEVEUI "****************"
#define APPEUI "****************"
#define APPKEY "********************************"

// get or set the channel mask to close or open the channel (only for US915, AU915, CN470)
#define CHANNEL_MASK "0000"

#define ATOM_LORA_RX 19
#define ATOM_LORA_TX 22

#define ATOMS3_LORA_RX 6
#define ATOMS3_LORA_TX 5

RAK3172LoRaWAN lorawan;
bool isJoin = false;

void joinCallback(bool status)
{
    isJoin = status;
    if (status) {
        Serial.println("[LoRaWAN] Join network successful!");
        Serial.println("Device EUI: " + String(DEVEUI));
    } else {
        Serial.println("[LoRaWAN] Join network failed!");
    }
}

void sendCallback()
{
    Serial.println("[LoRaWAN] Uplink confirmed by server");
}

void errorCallback(char* error)
{
    Serial.print("[LoRaWAN] Error: ");
    Serial.println(error);
}

void LoRaWANLoopTask(void* arg)
{
    while (1) {
        lorawan.update();
        vTaskDelay(5);
    }
}

void setup()
{
    M5.begin();
    Serial.begin(115200);
    Serial.println("[Init] Initializing LoRaWAN module...");
    while (!lorawan.init(&Serial2, ATOMS3_LORA_RX, ATOMS3_LORA_TX, RAK3172_BPS_115200)) {
        Serial.println("[Init] Failed to initialize module, retrying...");
        delay(1000);
    }
    Serial.println("Device Init OK");
    Serial.println("[Config] Setting band to EU868...");
    // get or set the channel mask to close or open the channel (only for US915, AU915, CN470)
    while (!lorawan.setBAND(EU868, CHANNEL_MASK)) {
        Serial.println(" failed, retrying...");
        delay(1000);
    }
    Serial.println("[Config] Setting OTAA parameters...");
    while (!lorawan.setOTAA(DEVEUI, APPEUI, APPKEY)) {
        Serial.println(" failed, retrying...");
        delay(1000);
    }
    Serial.println("[Config] Setting device mode to CLASS_C...");
    while (!lorawan.setMode(CLASS_C)) {
        Serial.println(" failed, retrying...");
        delay(1000);
    }
    Serial.println("[Config] Setting data rate to DR4...");
    while (!lorawan.setDR(4)) {
        Serial.println(" failed, retrying...");
        delay(1000);
    }
    Serial.println("[Config] Setting Link check...");
    while (!lorawan.setLinkCheck(ALLWAYS_LINKCHECK)) {
        delay(1000);
    }

    lorawan.onSend(sendCallback);
    lorawan.onJoin(joinCallback);
    lorawan.onError(errorCallback);
    xTaskCreate(LoRaWANLoopTask, "LoRaWANLoopTask", 1024 * 10, NULL, 5, NULL);

    Serial.println("[Info] Attempting to join the network...");
    if (lorawan.join(true, false, 10, 10)) {
        Serial.println("Start Join...");
    } else {
        Serial.println("Join Fail");
    }
}

void loop()
{
    M5.update();
    if (M5.BtnA.wasReleased()) {
        if (isJoin) {
            String data = "UPlink LoRaWAN Frame: " + String(millis());
            if (lorawan.send(data)) {
                Serial.println("Send Successful");
            } else {
                Serial.println("Send fail");
            }
        } else {
            Serial.println("LoRaWAN not joined");
        }
    }
    if (lorawan.available()) {
        std::vector<lorawan_frame_t> frames = lorawan.read();
        for (int i = 0; i < frames.size(); i++) {
            Serial.print("RSSI: ");
            Serial.println(frames[i].rssi);
            Serial.print("SNR: ");
            Serial.println(frames[i].snr);
            Serial.print("LEN: ");
            Serial.println(frames[i].len);
            Serial.print("PORT: ");
            Serial.println(frames[i].port);
            Serial.print("UNITCAST: ");
            Serial.println(frames[i].unicast);
            Serial.print("Payload: ");
            for (uint8_t j = 0; j < frames[i].len; j++) {
                Serial.printf("%02X", frames[i].payload[j]);
            }
            Serial.println();
        }
        lorawan.flush();
    }
    if (Serial.available()) {             // If the serial port reads data.
        String ch = Serial.readString();  // Copy the data read from the serial port
        lorawan.sendCommand(ch);
    }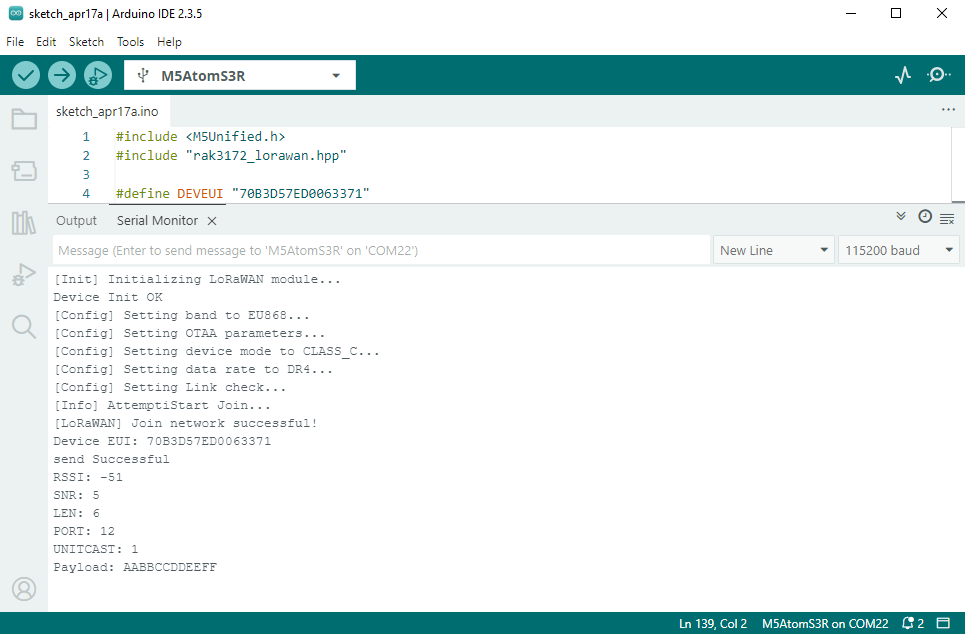
}烧录案例程序后,通过串口监视器查看输出日志,等待join成功后单击AtomS3R主控的中心按键发送数据。
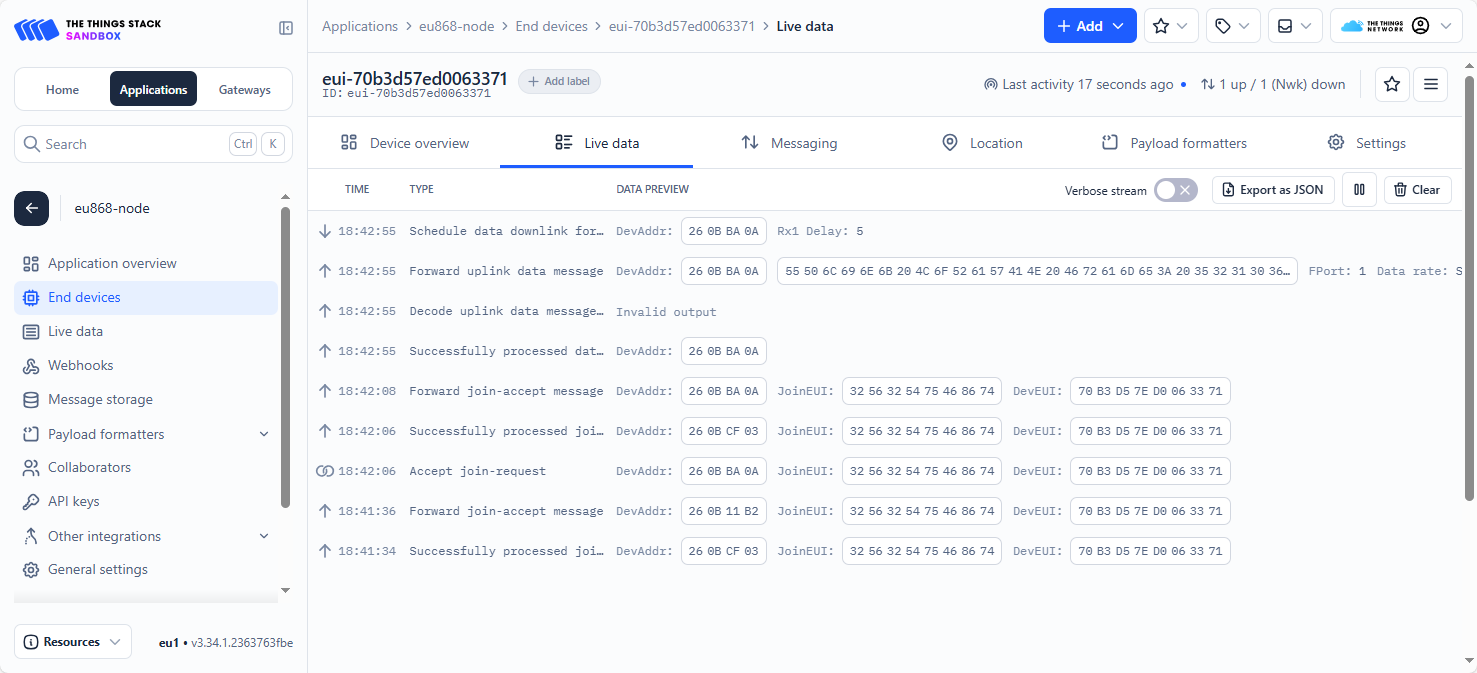
在TTN对应的设备页面能够查看到当前的上下行数据日志。
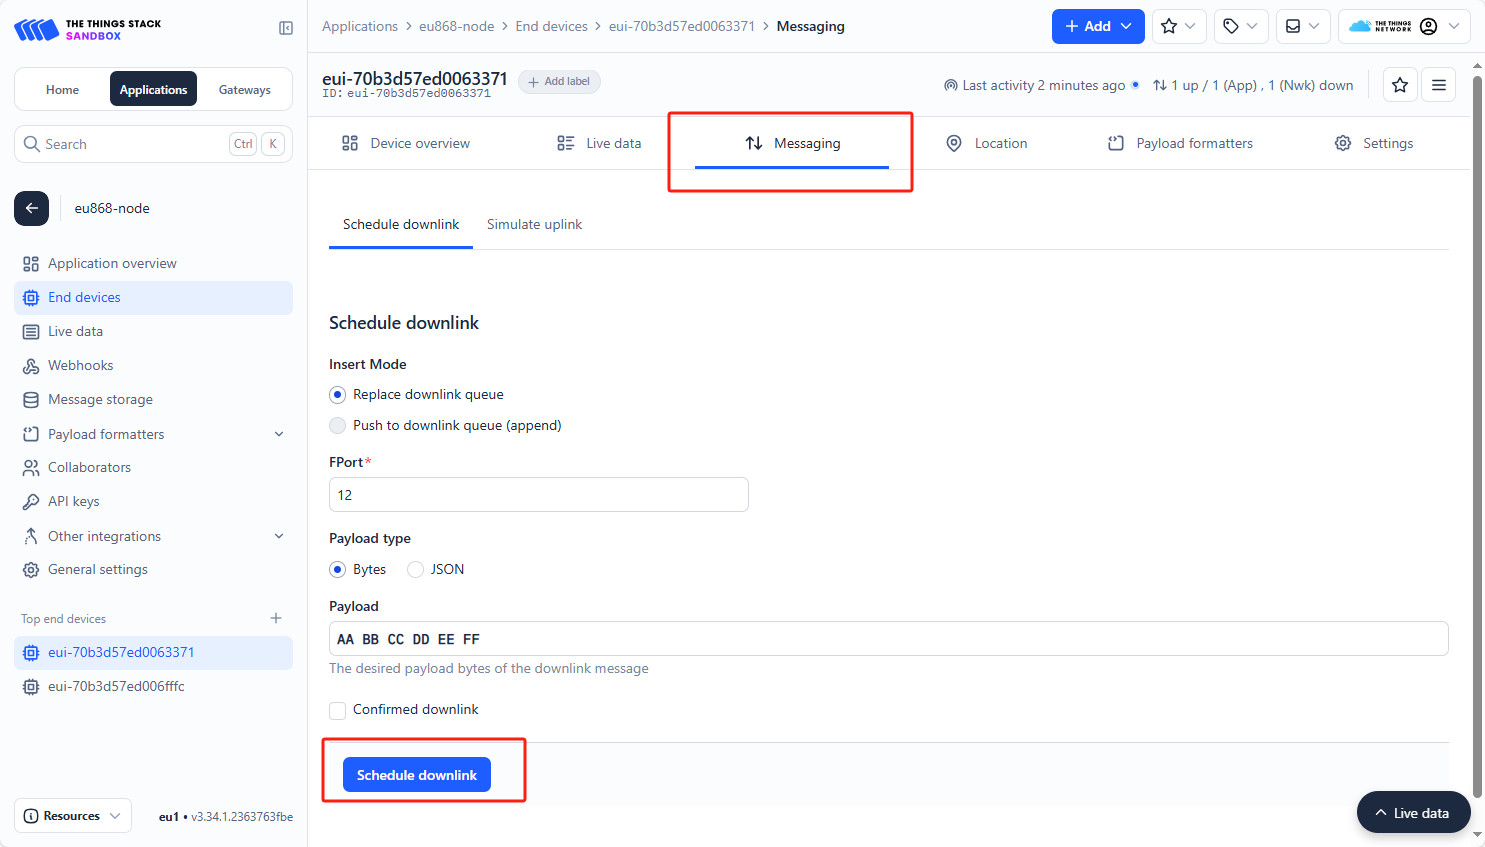
切换至Messaging页面可进行数据下发。
ABP入网
ABP入网需要用到 DevAddr、AppSkey 和 NwkSkey 参数。不需要执行join过程,初始化密钥信息后即可开始发送数据。
#include <M5Unified.h>
#include "rak3172_lorawan.hpp"

#define DEVADDR "***********"             // Device Address
#define APPSKEY "**********************"  // Application Session Key
#define NWKSKEY "**********************"  // Network Session Key

// get or set the channel mask to close or open the channel (only for US915, AU915, CN470)
#define CHANNEL_MASK "0000"

#define ATOM_LORA_RX 19
#define ATOM_LORA_TX 22

#define ATOMS3_LORA_RX 6
#define ATOMS3_LORA_TX 5

RAK3172LoRaWAN lorawan;

void errorCallback(char* error)
{
    Serial.print("[LoRaWAN] Error: ");
    Serial.println(error);
}

void LoRaWANLoopTask(void* arg)
{
    while (1) {
        lorawan.update();
        vTaskDelay(5);
    }
}

void setup()
{
    M5.begin();
    Serial.begin(115200);
    Serial.println("[Init] Initializing LoRaWAN module...");
    while (!lorawan.init(&Serial2, ATOMS3_LORA_RX, ATOMS3_LORA_TX, RAK3172_BPS_115200)) {
        Serial.println("[Init] Failed to initialize module, retrying...");
        delay(1000);
    }
    Serial.println("Device Init OK");
    Serial.println("[Config] Setting band to EU868...");
    // get or set the channel mask to close or open the channel (only for US915, AU915, CN470)
    while (!lorawan.setBAND(EU868, CHANNEL_MASK)) {
        Serial.println(" failed, retrying...");
        delay(1000);
    }
    Serial.println("[Config] Setting ABP parameters...");
    while (!lorawan.setABP(DEVADDR, NWKSKEY, APPSKEY)) {
        Serial.println(" failed, retrying...");
        delay(1000);
    }
    Serial.println("[Config] Setting device mode to CLASS_C...");
    while (!lorawan.setMode(CLASS_C)) {
        Serial.println(" failed, retrying...");
        delay(1000);
    }
    Serial.println("[Config] Setting data rate to DR4...");
    while (!lorawan.setDR(4)) {
        Serial.println(" failed, retrying...");
        delay(1000);
    }
    Serial.println("[Config] Setting Link check...");
    while (!lorawan.setLinkCheck(ALLWAYS_LINKCHECK)) {
        delay(1000);
    }

    lorawan.onError(errorCallback);
    xTaskCreate(LoRaWANLoopTask, "LoRaWANLoopTask", 1024 * 10, NULL, 5, NULL);
}

void loop()
{
    M5.update();
    if (M5.BtnA.wasReleased()) {
        String data = "UPlink LoRaWAN Frame: " + String(millis());
        if (lorawan.send(data)) {
            Serial.println("Send Successful");
        } else {
            Serial.println("Send fail");
        }
    }

    if (lorawan.available()) {
        std::vector<lorawan_frame_t> frames = lorawan.read();
        for (int i = 0; i < frames.size(); i++) {
            Serial.print("RSSI: ");
            Serial.println(frames[i].rssi);
            Serial.print("SNR: ");
            Serial.println(frames[i].snr);
            Serial.print("LEN: ");
            Serial.println(frames[i].len);
            Serial.print("PORT: ");
            Serial.println(frames[i].port);
            Serial.print("UNITCAST: ");
            Serial.println(frames[i].unicast);
            Serial.print("Payload: ");
            for (uint8_t j = 0; j < frames[i].len; j++) {
                Serial.printf("%02X", frames[i].payload[j]);
            }
            Serial.println();
        }
        lorawan.flush();
    }
    if (Serial.available()) {             // If the serial port reads data.
        String ch = Serial.readString();  // Copy the data read from the serial port
        lorawan.sendCommand(ch);
    }
}CayenneLPP
CayenneLPP 是一种经过优化的传感器数据格式。在使用 TTN 或者 Chirpstack 上传数据时,从控制台页面或 API 接口获取到的默认数据通常采用 Base64 编码,可读性欠佳。CayenneLPP 支持多种基本传感器类型,并且在借助 LoRaWAN 网络进行环境数据采集时,其数据格式易于解析。所以,推荐使用 CayenneLPP 处理相关数据。只需在控制台的节点配置页面选择 CayenneLPP 解析器,就能在上传数据中更直观地查看传感器数据。使用案例及相关内容可参考下方 Github 链接。