

Product Guide
Linux PC
CardputerZero
AI Accelerator Card
LLM-8850 Card
Large Language Models
AI & Agent
Real-Time AI Voice Assistant
XiaoZhi Voice Assistant
AtomS3R-M12 Volcengine Kit
Offline Voice Recognition
Industrial Control
IoT Measuring Instruments
Air Quality
PowerHub
Module13.2 PPS
VAMeter
T-Lite
Input & Output Devices
Ethernet Camera
PoECAM
Wi-Fi Camera
Unit CamS3/-5MP
AI Camera
LoRa & LoRaWAN
Motor Control
Restore Factory Firmware
DIP Switch Usage Guide
Using Meshtastic with Cardputer Mesh Kit
Introduction
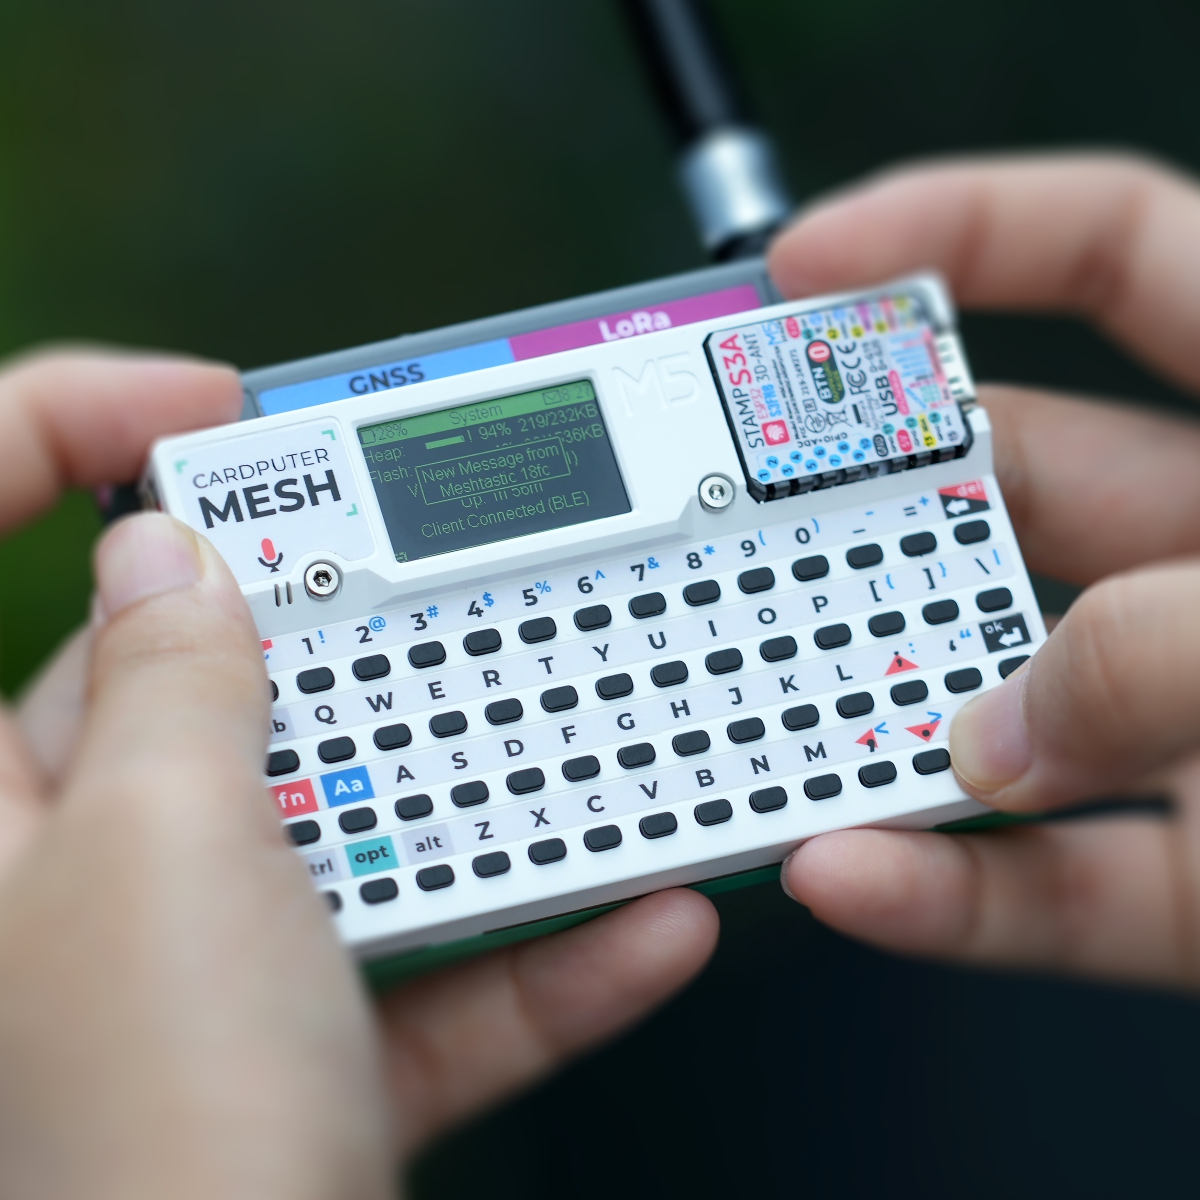
Cardputer Mesh Kit is a stackable combination kit that integrates a portable card-sized computer with long-range communication and global positioning capabilities. It consists of the Cardputer-Adv core controller and the Cap LoRa-1262 communication expansion module. This tutorial covers how to use Meshtastic with the Cardputer Mesh Kit.
1. Introduction to Meshtastic
See Using Meshtastic with M5Stack Products and the Meshtastic Official Website for details.
2. Getting Started
Hardware Requirements
- Cardputer Mesh Kit
- Android / iOS smartphone
- Windows / macOS / Linux computer
Installing M5Burner
M5Burner is M5Stack's unified firmware flashing tool, allowing users to easily flash firmware onto a wide range of devices.
Download and install the appropriate version of M5Burner for your operating system using the links below.
Flashing Firmware
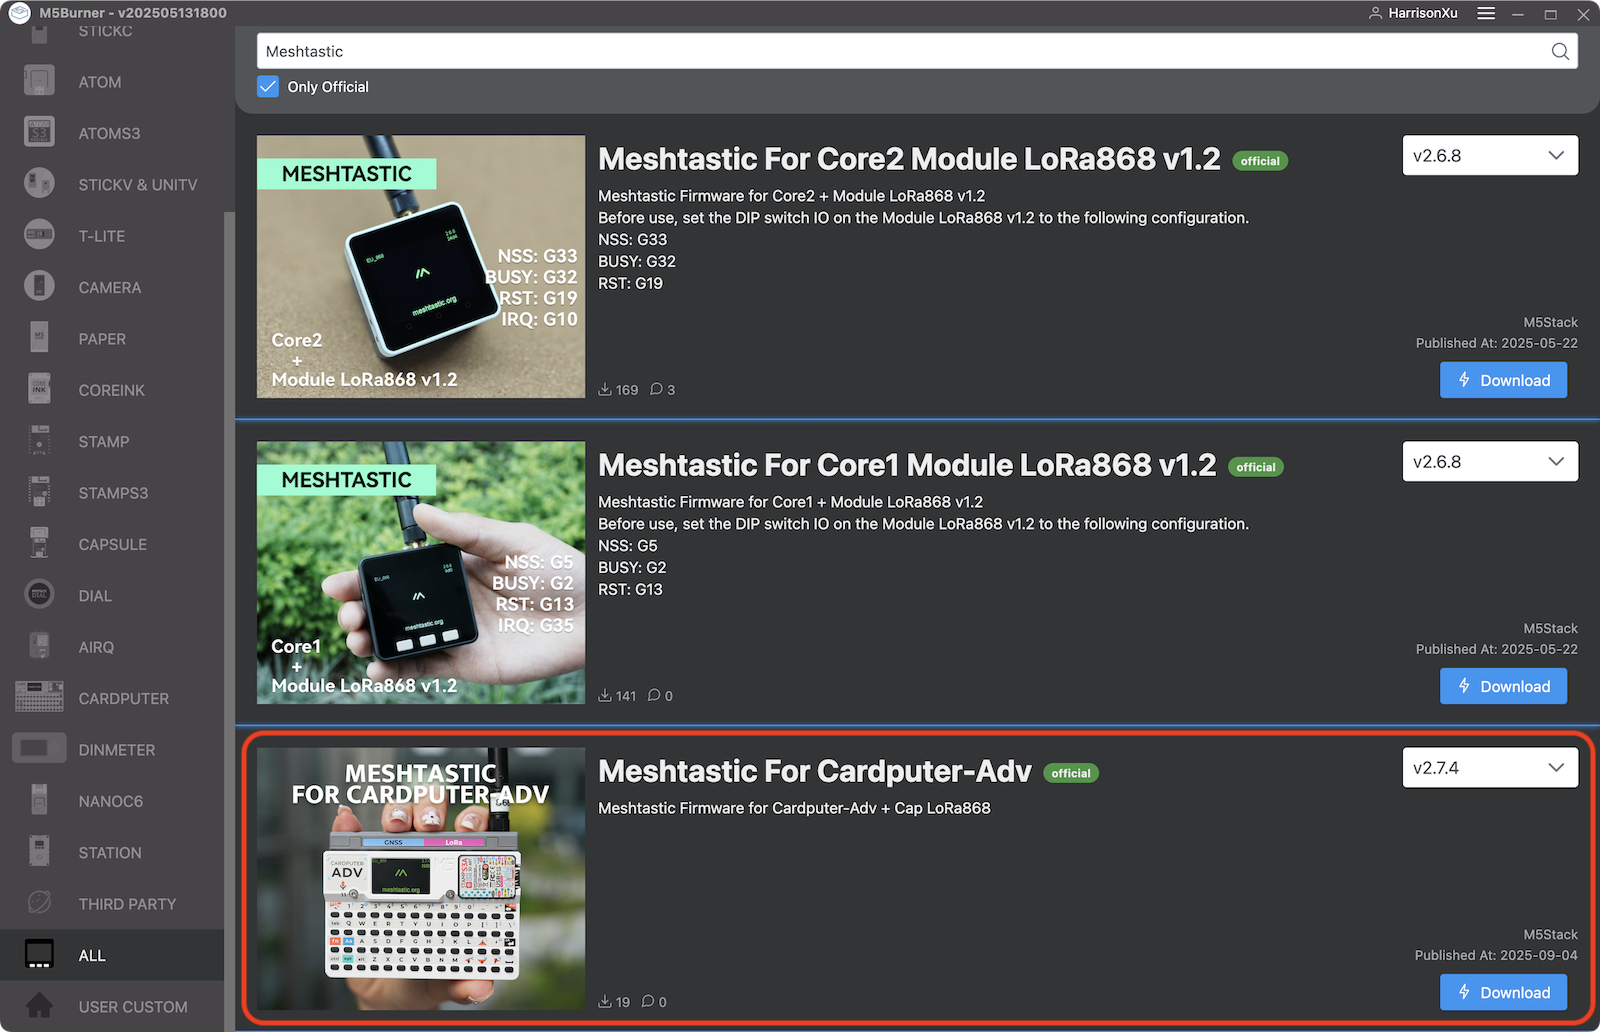
Open M5Burner and select ALL at the bottom of the device list on the left. Type "Meshtastic" in the search bar at the top, select the firmware entry corresponding to the Cardputer-Adv from the search results, and click Download.
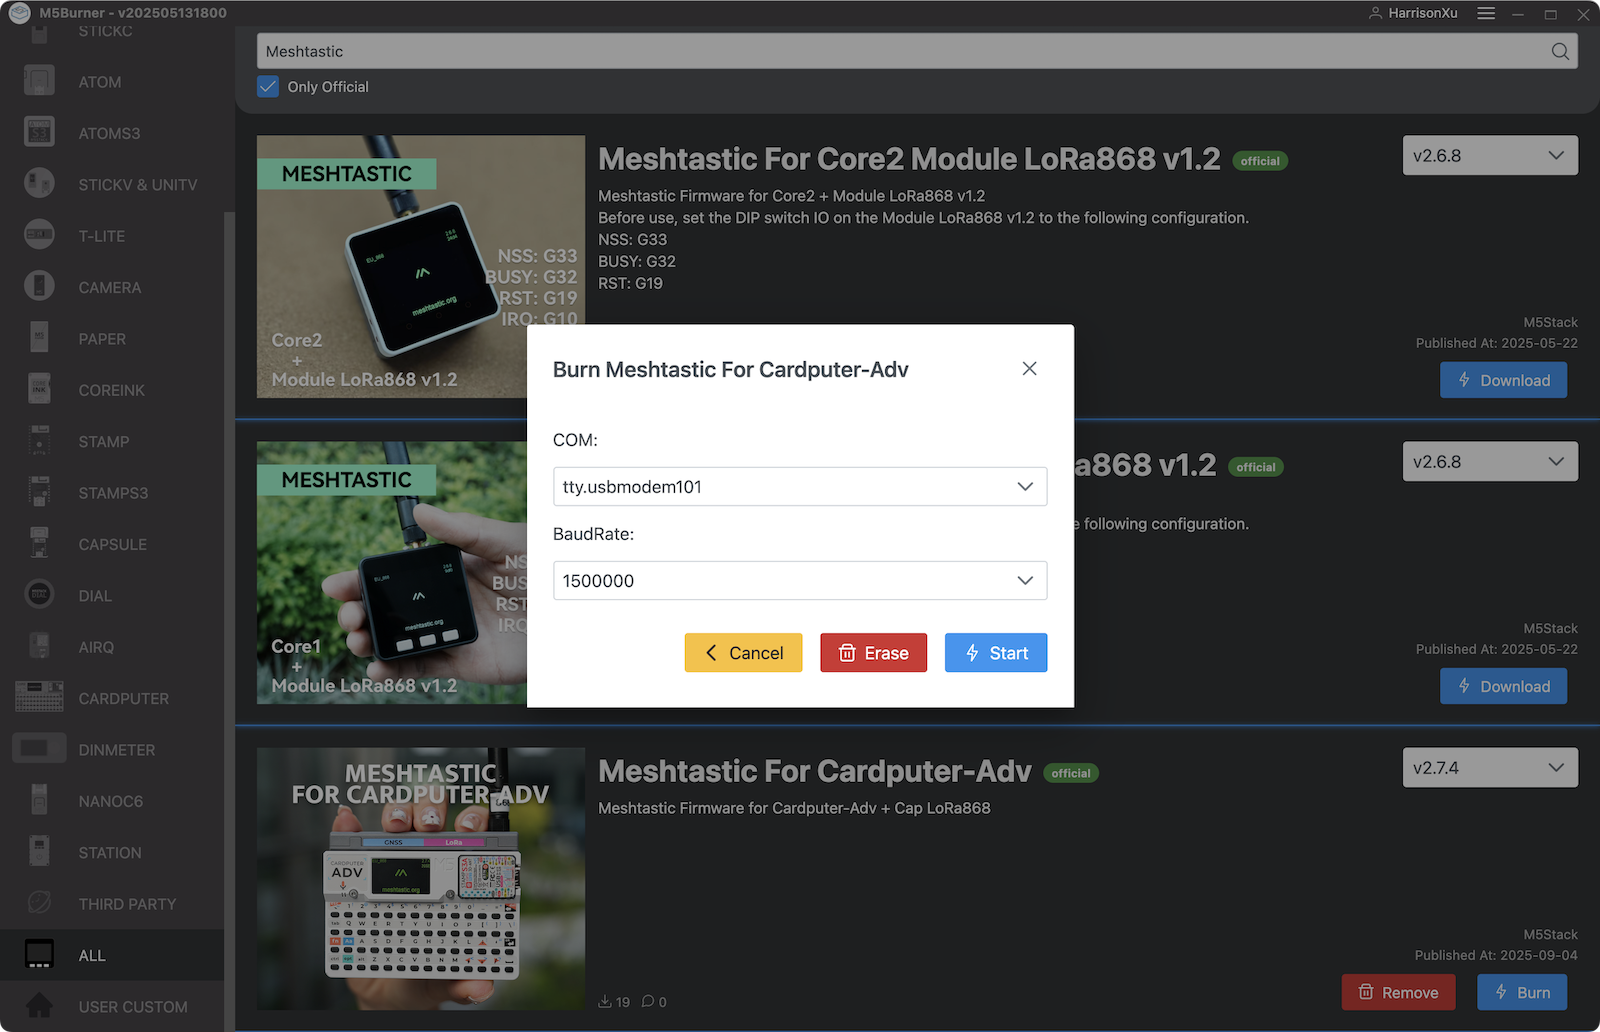
Set the side switch on the Cardputer-Adv to OFF. Hold down the G0 key, connect the device to your computer via a USB-C cable, then release the key — the device will enter download mode. Click Burn, select the correct USB port and set the baud rate to 1500000, then click Start to begin flashing. Once the Burn successfully, click here to return button appears, click it to confirm. Flashing is complete — disconnect the Cardputer-Adv from your computer.
If you encounter issues during flashing, your computer may need a USB driver installed. Refer to the Cardputer-Adv product documentation page for instructions.
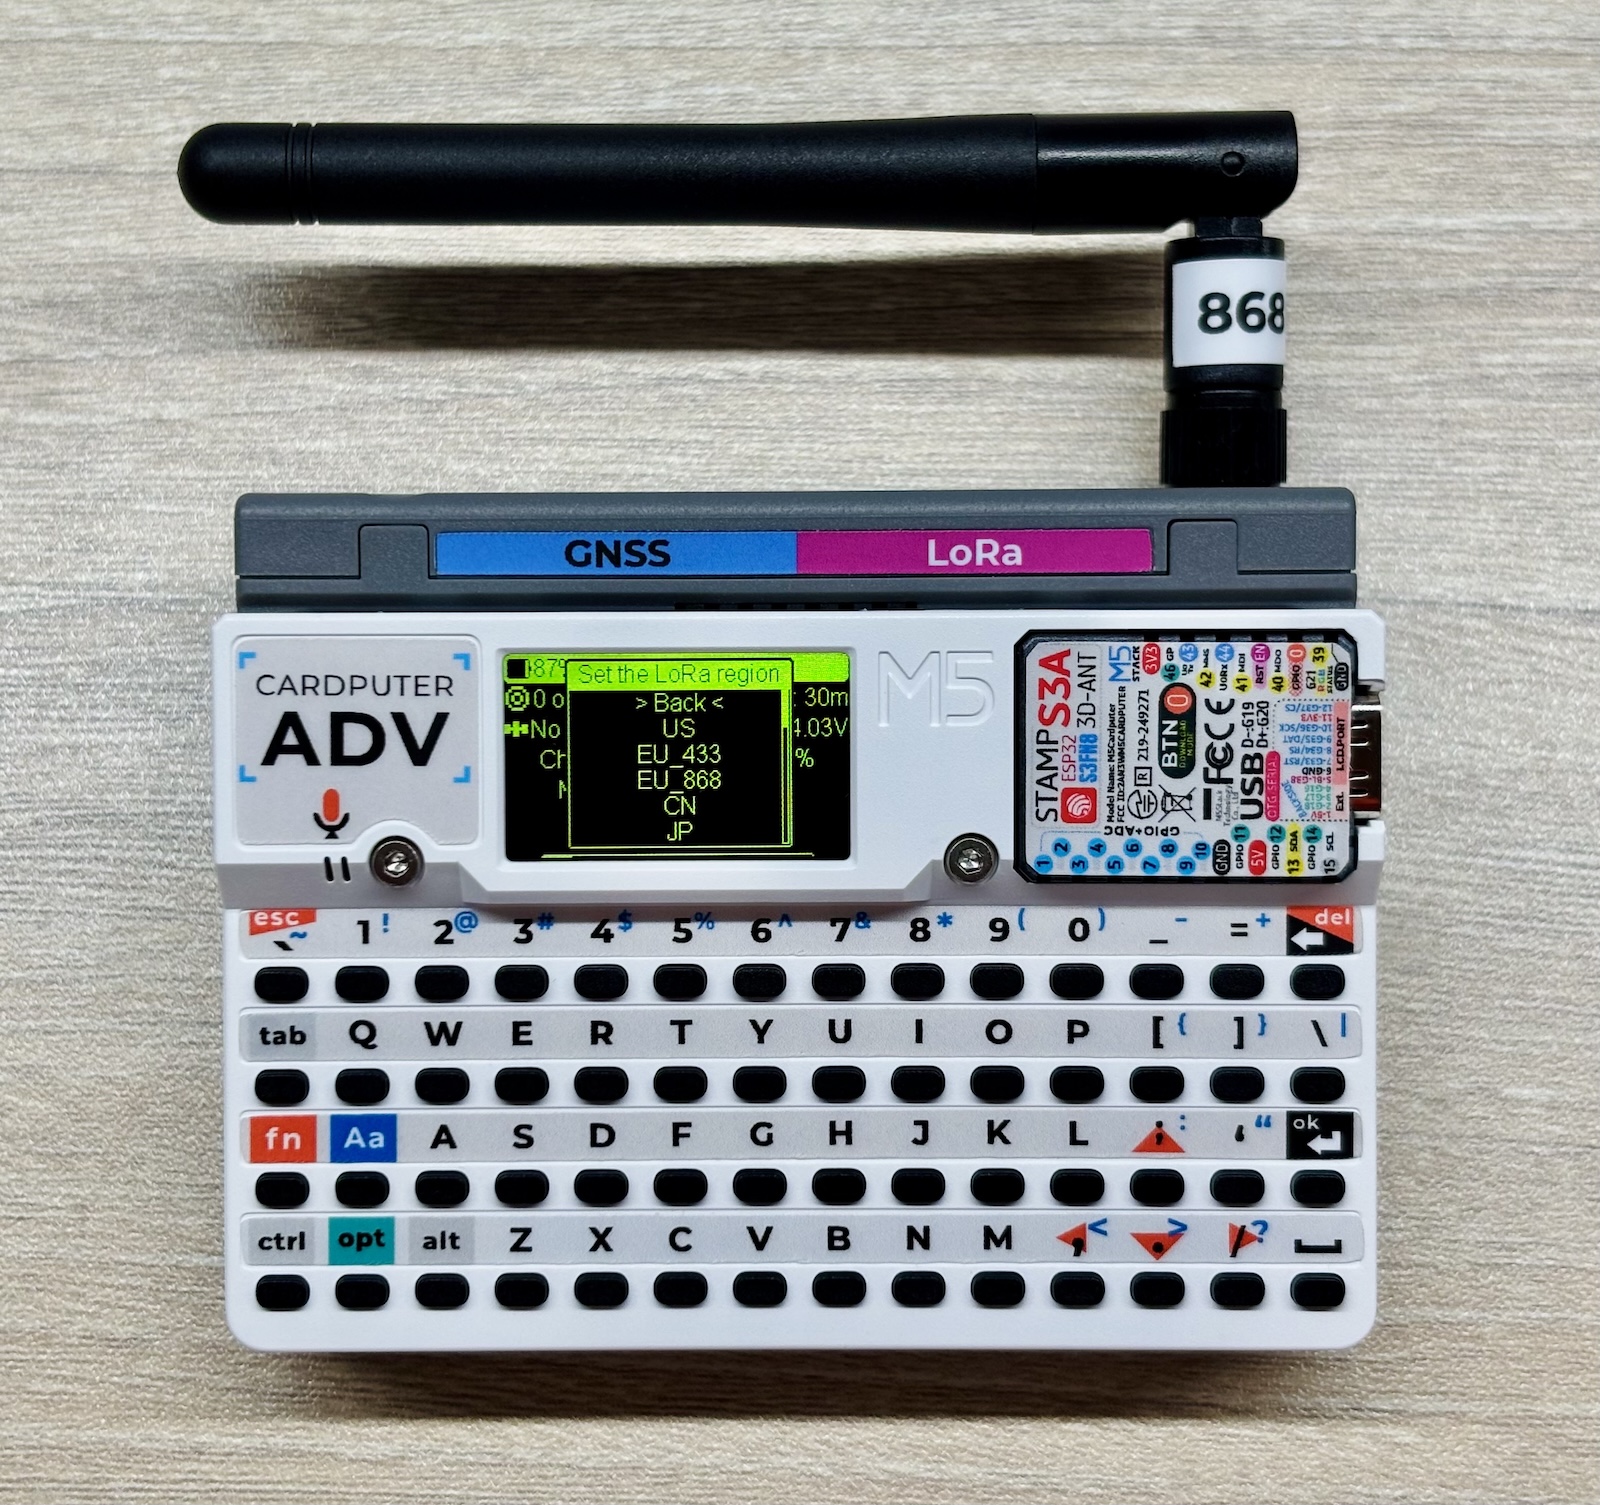
Assembly and Startup
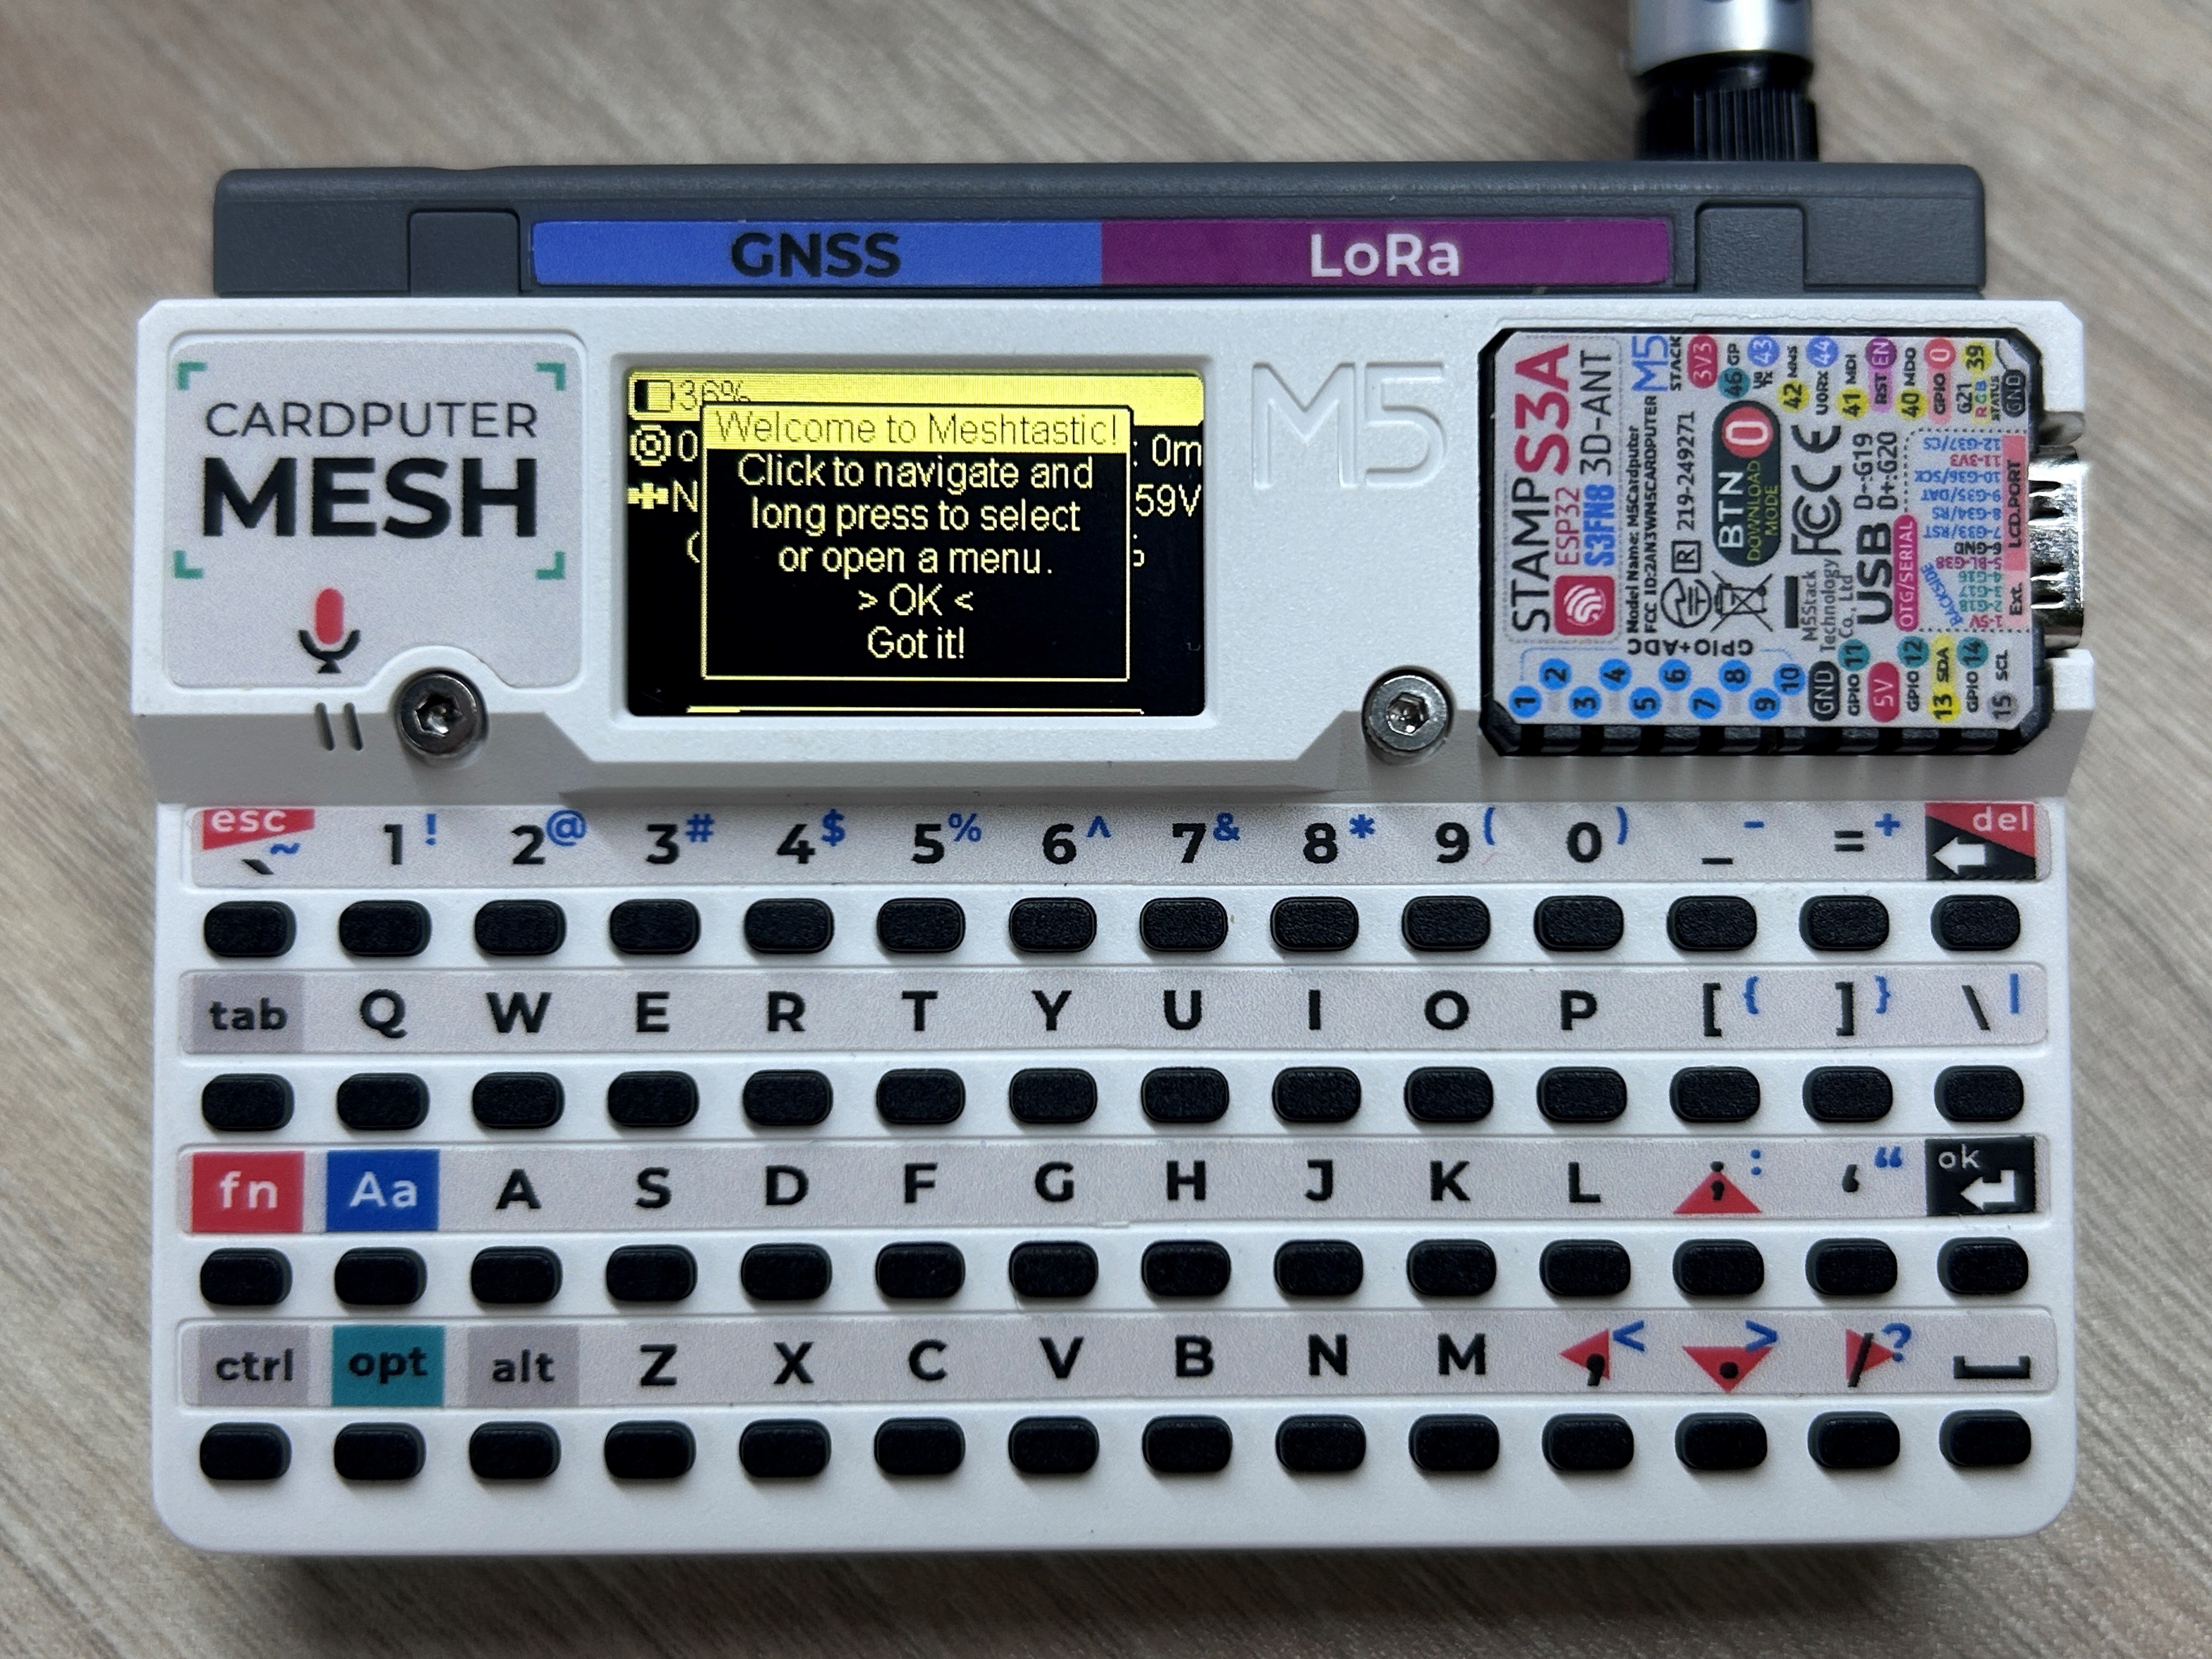
Attach the included antenna to the Cap LoRa-1262, then connect it to the Cardputer-Adv. Once properly and securely assembled, set the side switch to ON or connect a USB-C cable to power on the device. Upon startup, a welcome screen will appear. Press the ↩️ Enter key to proceed to the Set the LoRa Region screen. Set the region according to your hardware (EU_868 in this example). Briefly press the G0 button on the side of the device to scroll to the next option, and long-press G0 to confirm your selection.
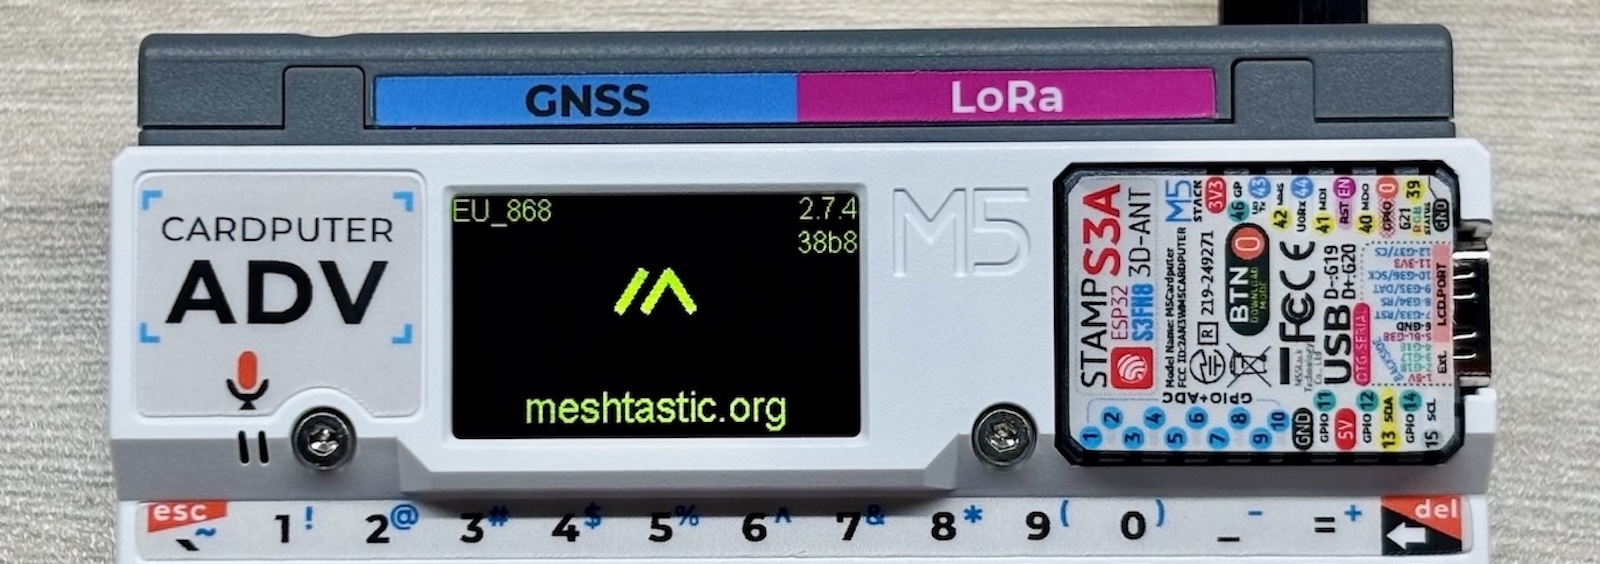
After confirming, the device will reboot and display a boot screen showing the Meshtastic "/\" logo, the region in the top-left corner, the firmware version and the device's short name (a 4-character alphanumeric code) in the top-right corner. The device will then enter the main interface.
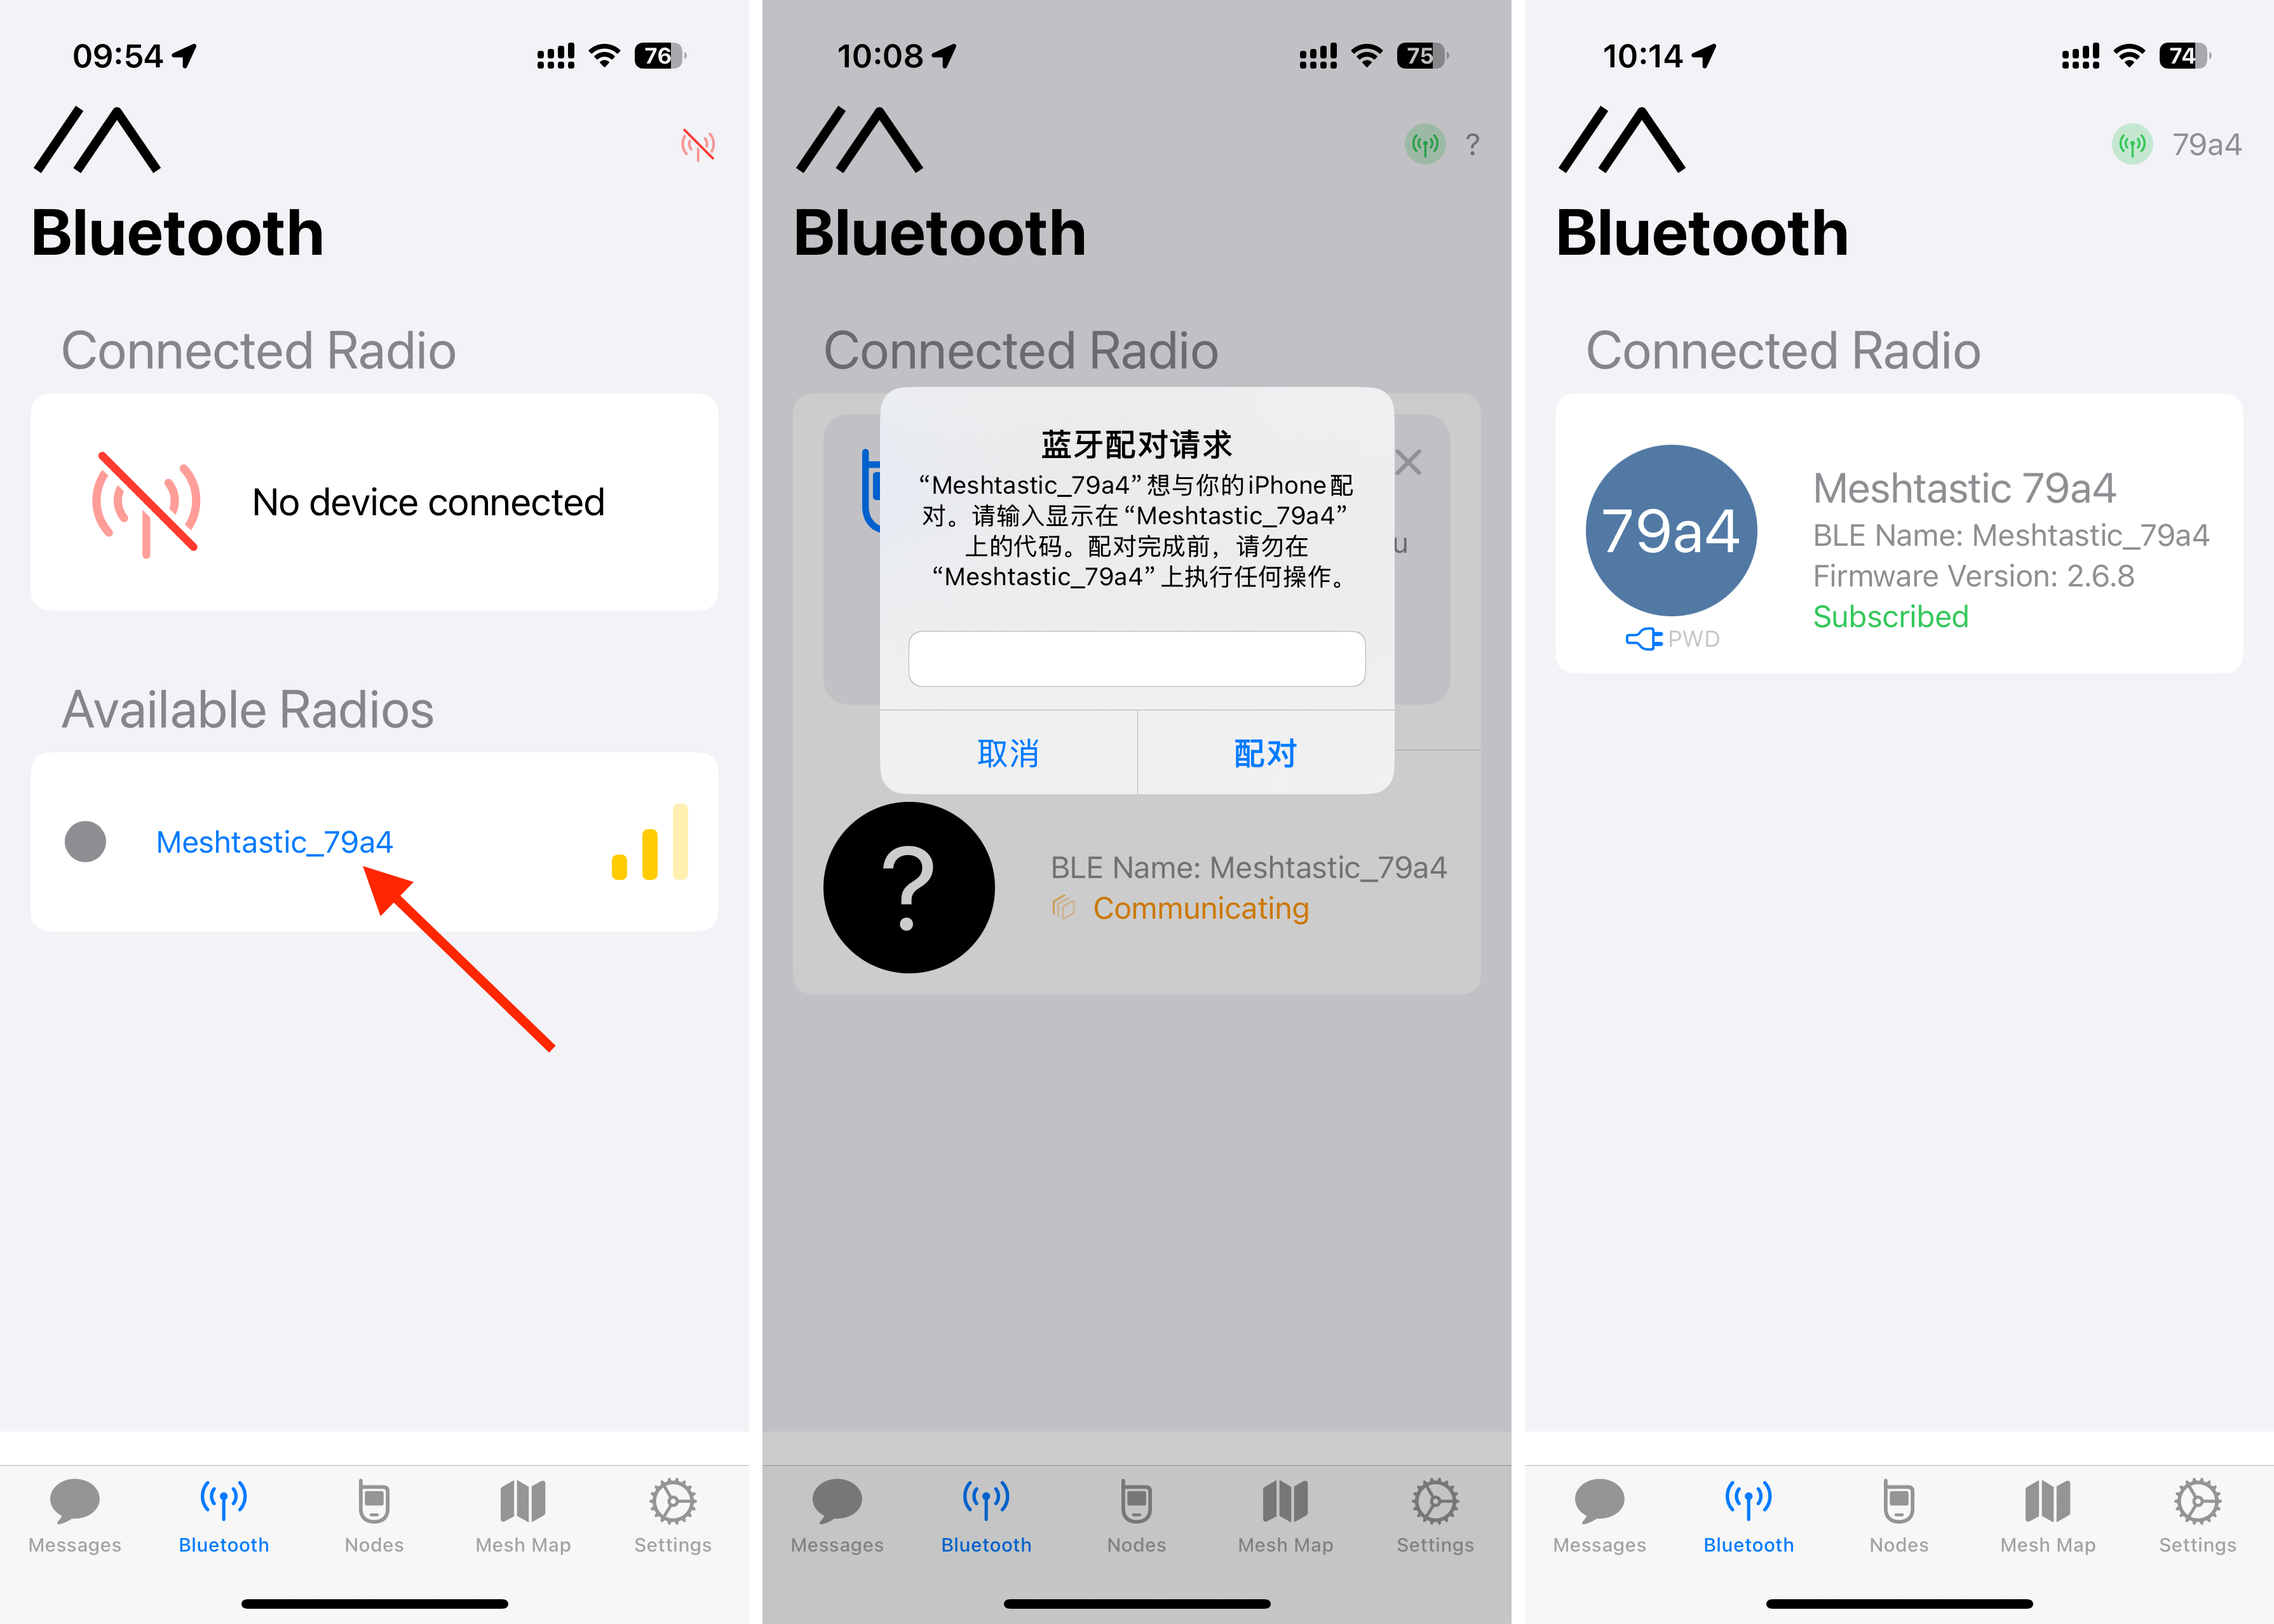
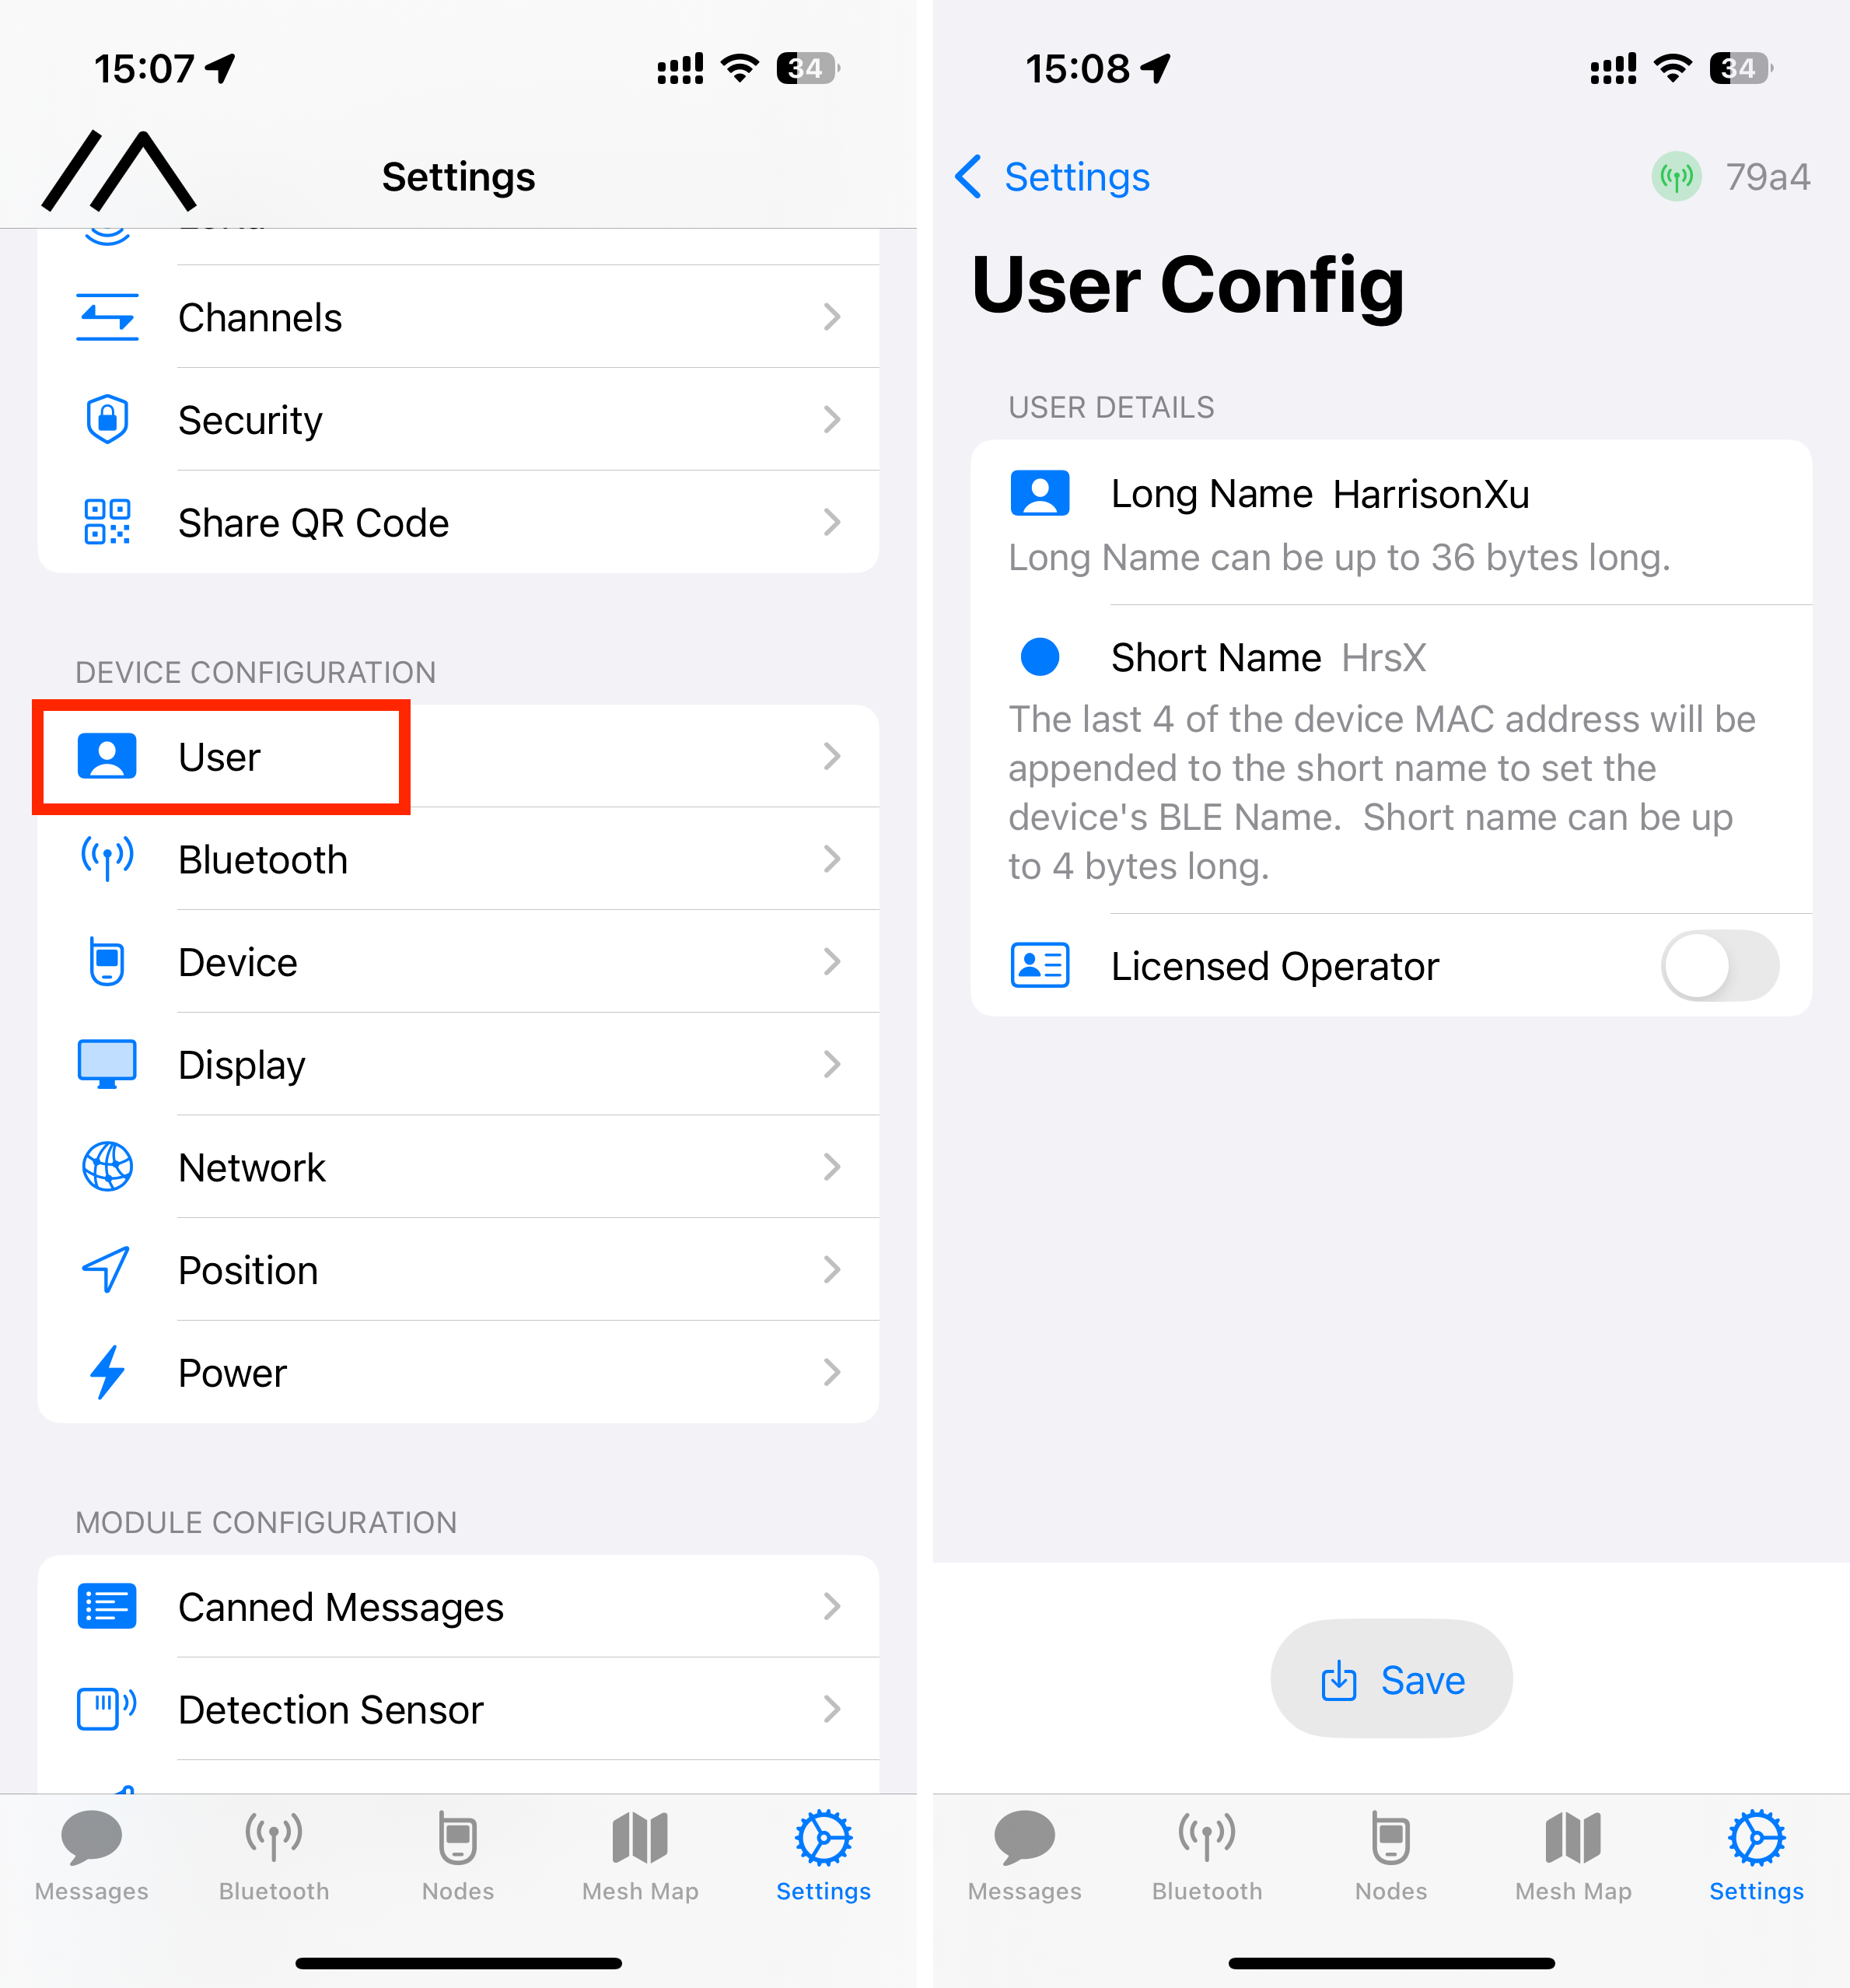
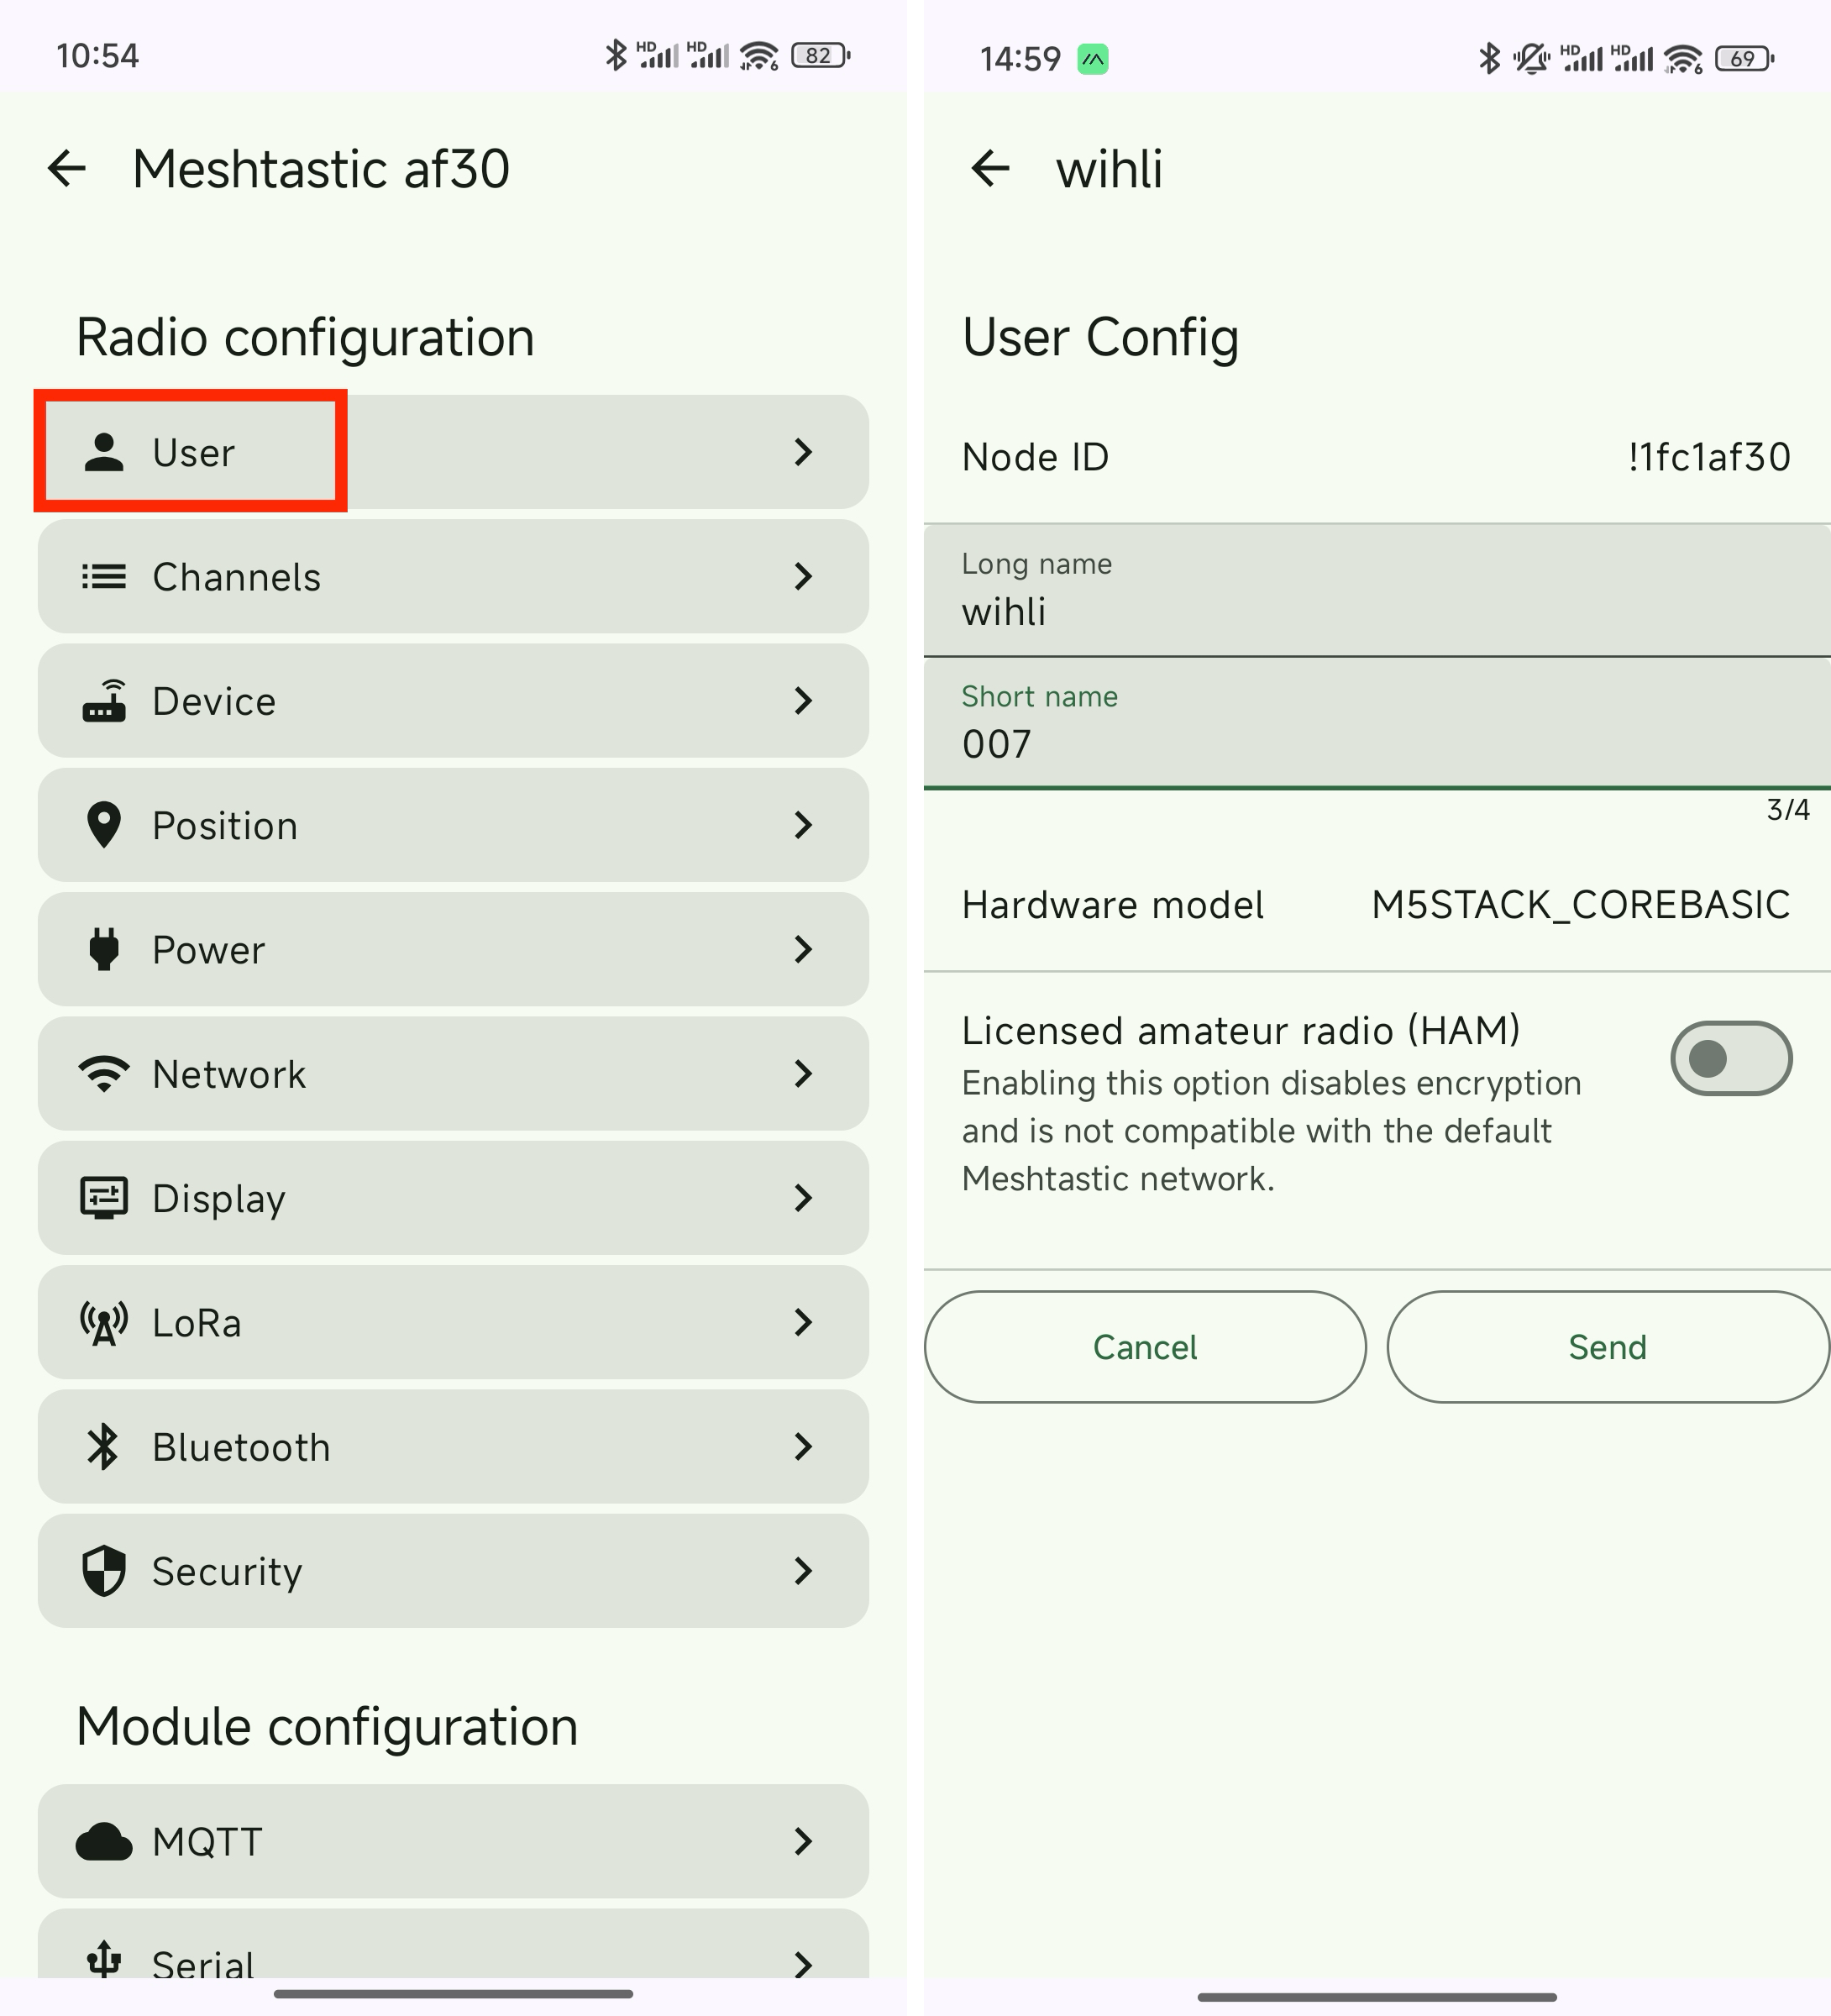
Pairing with Your Phone and Setting a Username
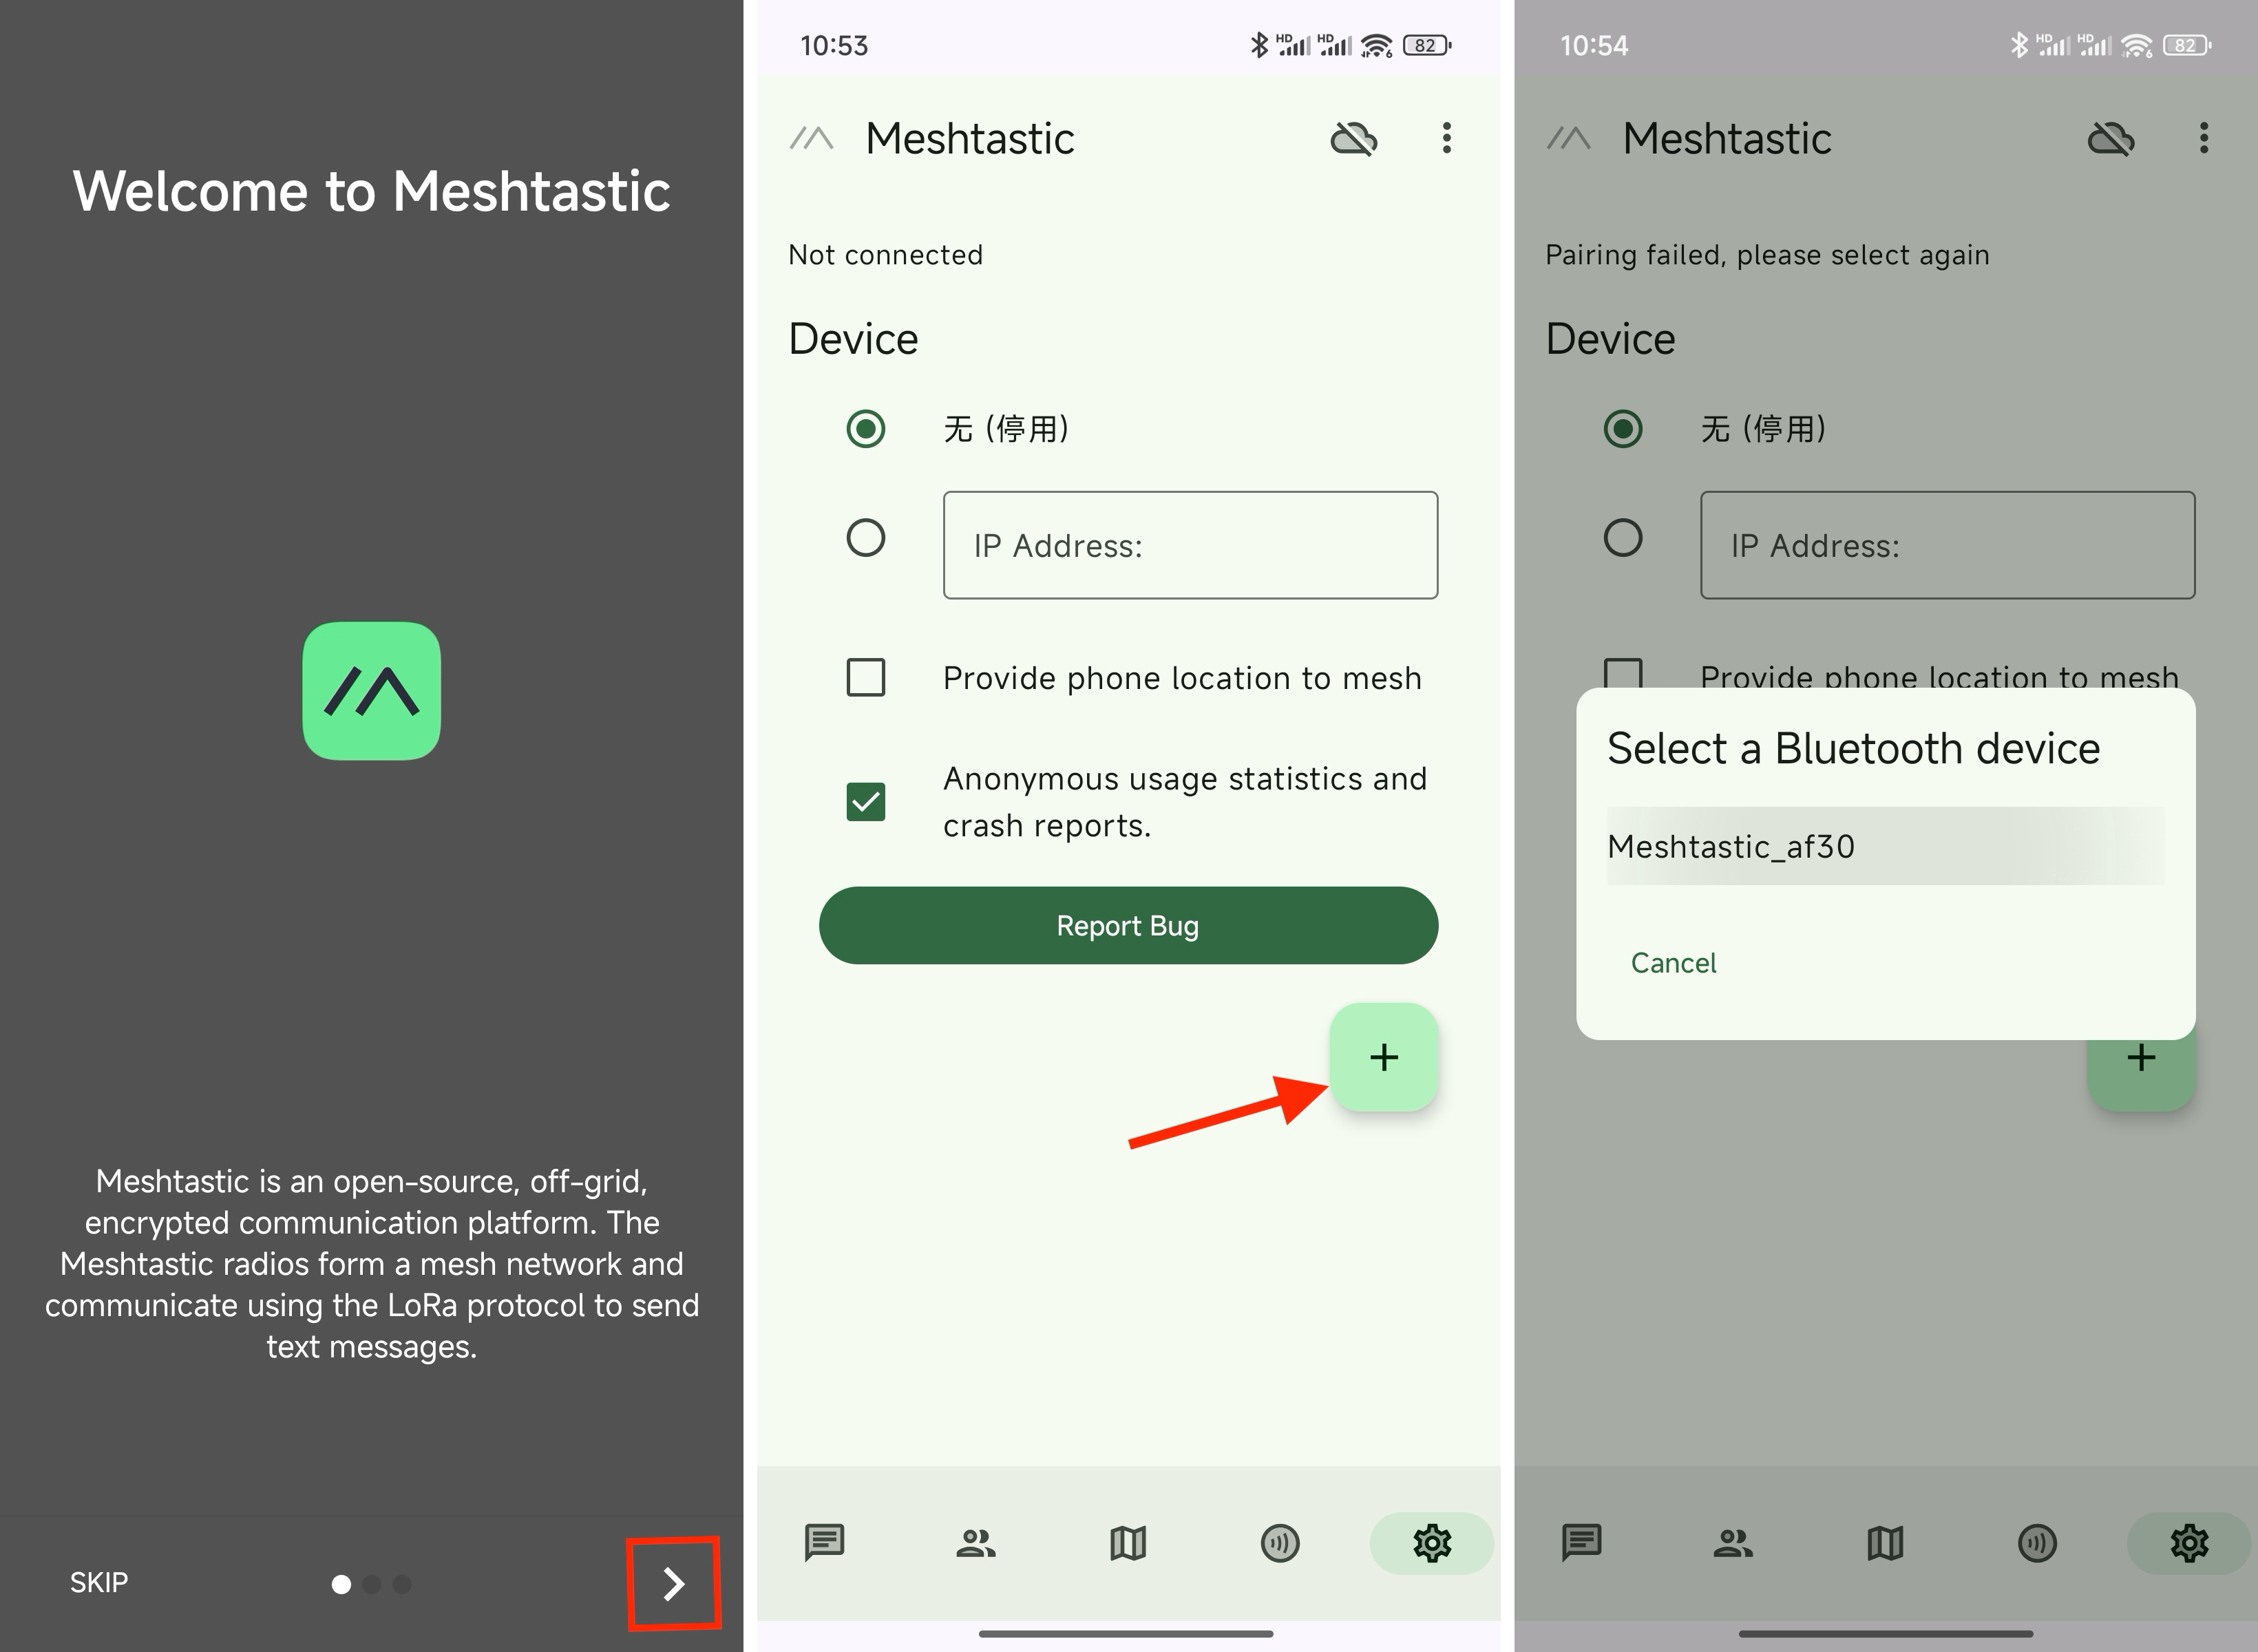
Download and install the Meshtastic app from one of the following sources, depending on your phone's operating system.
- Meshtastic Official Downloads Page
- iOS — App Store
- Android — Google Play or Download APK from GitHub
The iOS and Android versions of the Meshtastic app share similar functionality but have significantly different interfaces. Step-by-step instructions and screenshots for both are provided below. As the app may be updated at any time, the following is for reference only — please follow the actual latest version of the app.
All preparation steps are now complete and the device is ready for everyday use.
3. Features
Mobile App
The Meshtastic mobile app works similarly to common instant messaging applications. You can send and receive messages in channels (equivalent to group chats) and direct messages, and create, share (invite others to), or join channels.
For detailed information about the mobile app, refer to the official Meshtastic documentation:
Location Information
The Cap LoRa-1262 features an integrated GNSS / GPS receiver. You can view the locations of nearby Meshtastic devices on the Mesh Map / Map page in the Meshtastic mobile app, making it easy for team members to check each other's positions in outdoor and field scenarios.
Device Controls
The Cardputer-Adv is equipped with a full keyboard that supports text input. The onboard firmware also provides basic functionality such as sending and receiving messages.
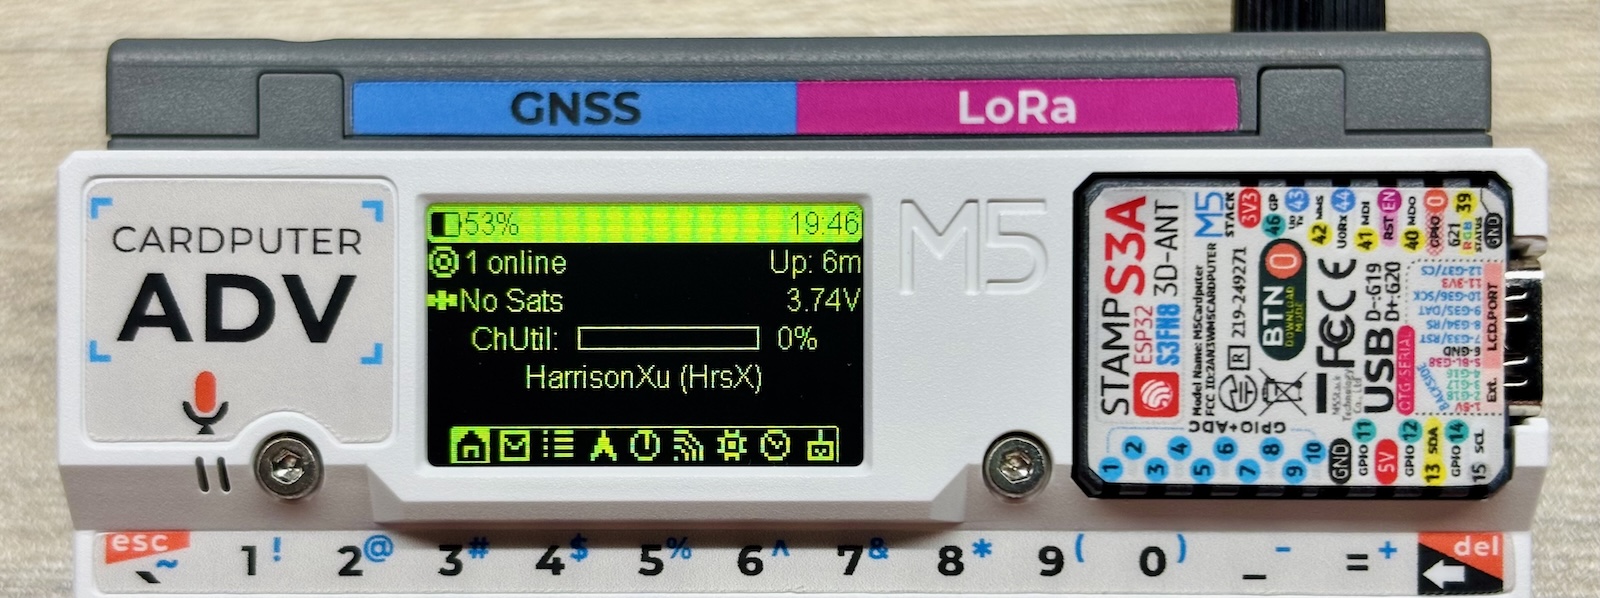
The image above shows the main interface, with the bottom icons hidden by default. Briefly press the G0 key to switch to the next page to the right; briefly press the ⬅️ Backspace key in the top-right corner of the keyboard to switch to the previous page to the left. Pages are arranged from left to right as follows:
- Home: Displays the number of nearby online nodes and their last seen time, the number of GNSS / GPS satellites, ChUtil channel utilization, and the device's long and short name.
- Recent Messages: Displays the timestamp, sender, and content of recently received messages.
- Node Signal: Displays signal information for nearby online nodes, including short name, last seen time, distance, and signal strength.
- Node Direction: Displays directional information for nearby online nodes — specifically, the clockwise angle of each node relative to true north, with the local node at the center.
- Location Info: Displays information obtained via GNSS / GPS, including date, latitude and longitude, altitude, and a compass.
- LoRa Info: Displays the device's LoRa configuration, including region, preset, specific frequency, and channel utilization.
- Memory Usage: Displays heap memory and flash storage usage, firmware version, and device uptime.
- Current Time: Displays the current time (hours, minutes, seconds). Only shown when connected to a phone via Bluetooth or when a GNSS / GPS signal is available.
- Node Detail: Displays detailed information for a single nearby online node on a dedicated page. There may be multiple such pages.
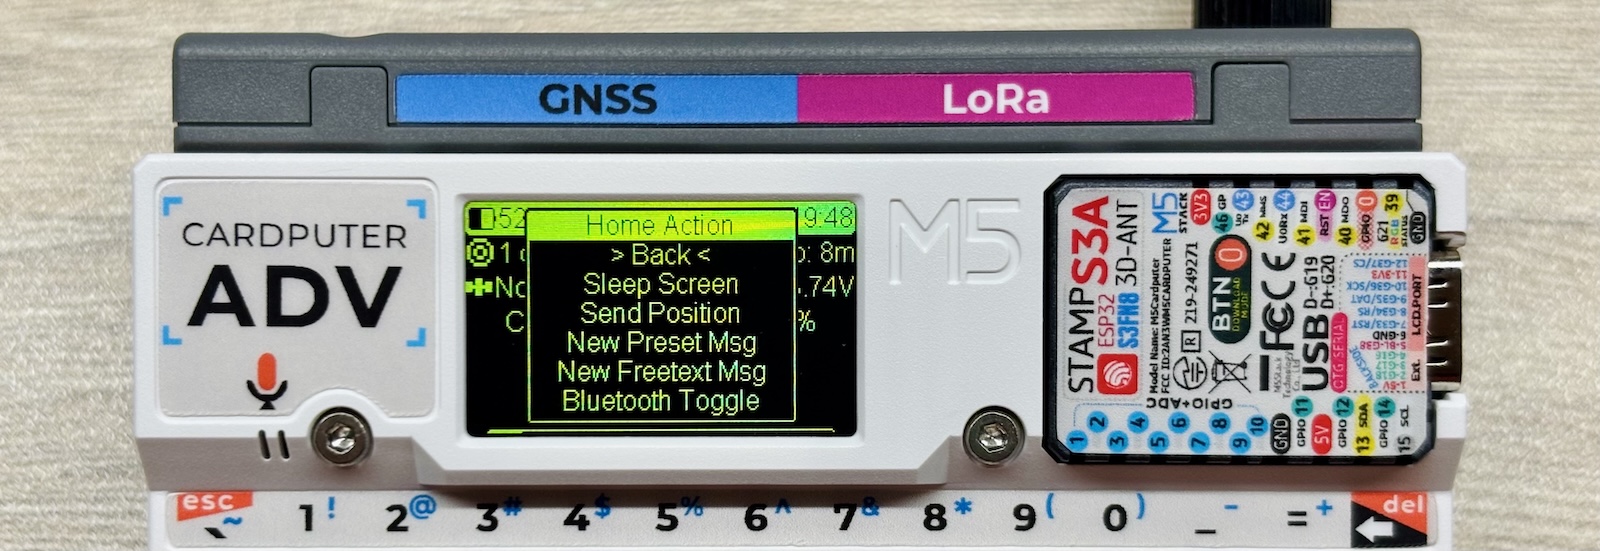
As shown above, long-pressing G0 or briefly pressing the ↩️ Enter key on any page brings up the corresponding context menu. Within the menu, briefly press G0 to scroll to the next option, and long-press G0 or briefly press ↩️ Enter to confirm the selection.
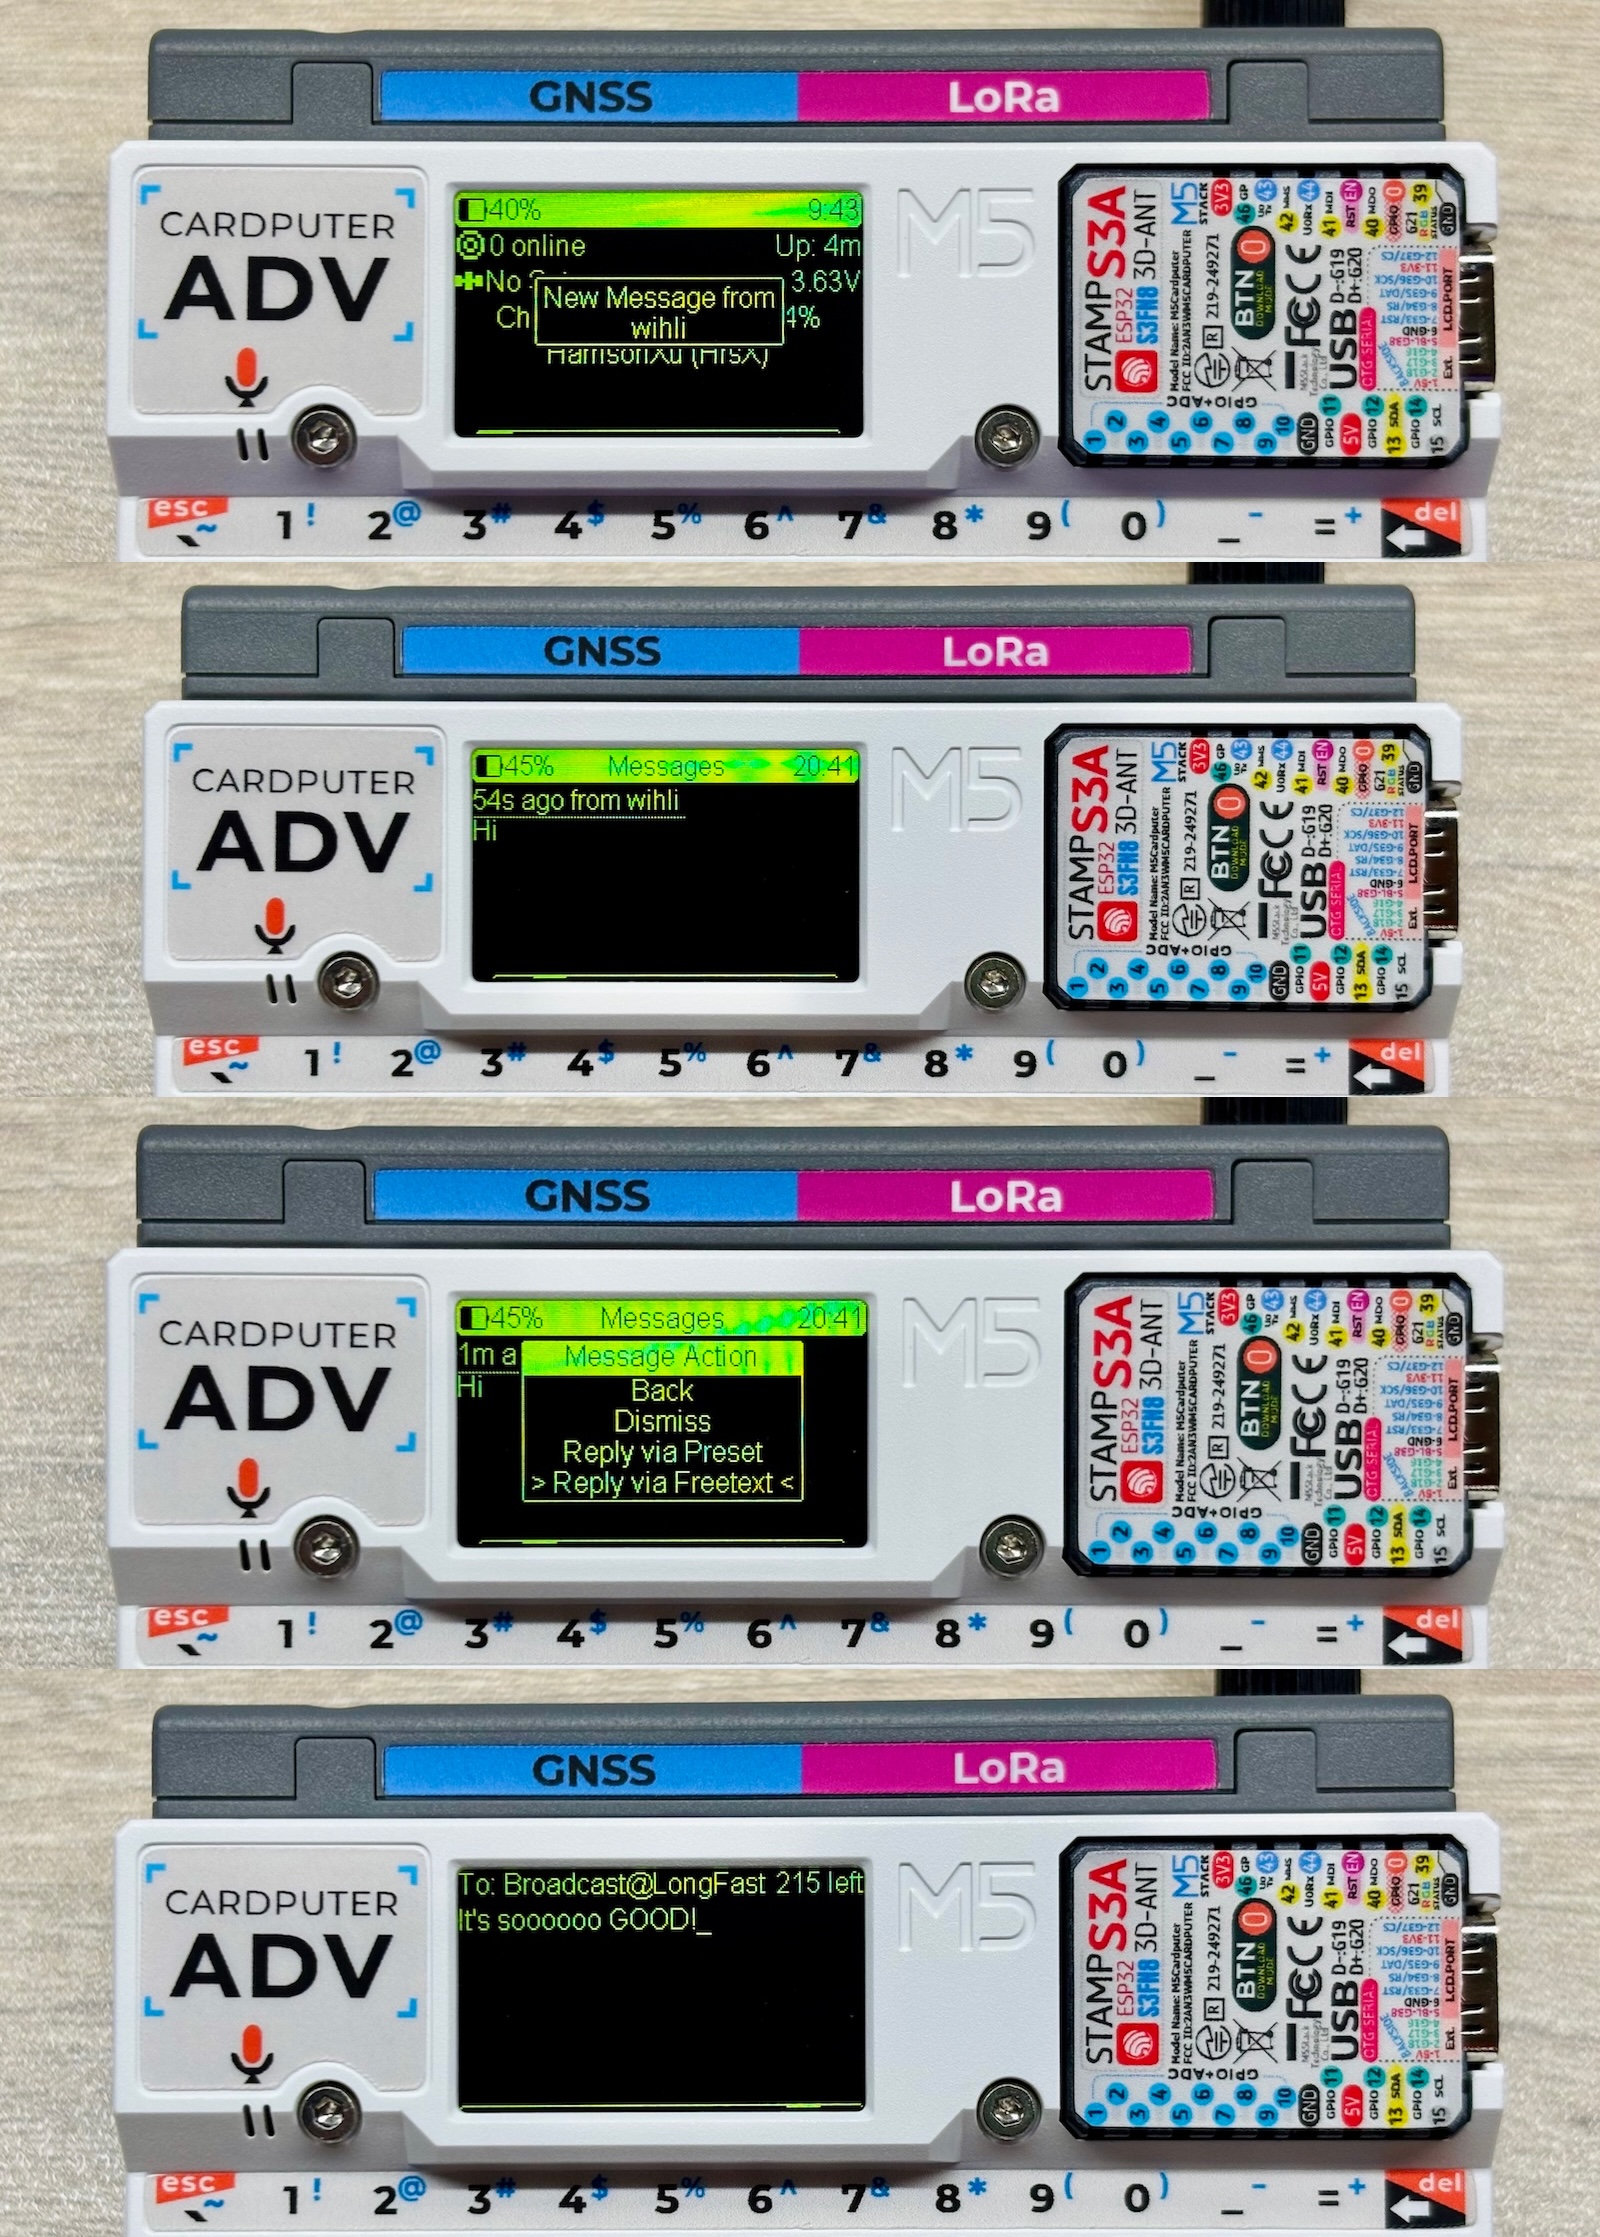
The image above demonstrates receiving and replying to messages. When replying, you can choose from preset messages or type a custom message freely. Preset messages can be edited in the mobile app. After typing a free-form message, briefly press the ↩️ Enter key to send it.
On any page of the main interface, you can also press any letter, number, or symbol key on the keyboard to quickly start typing a message. While typing, briefly press the Aa key to toggle Caps Lock, and briefly press the ⬅️ Backspace key to delete the character to the left.
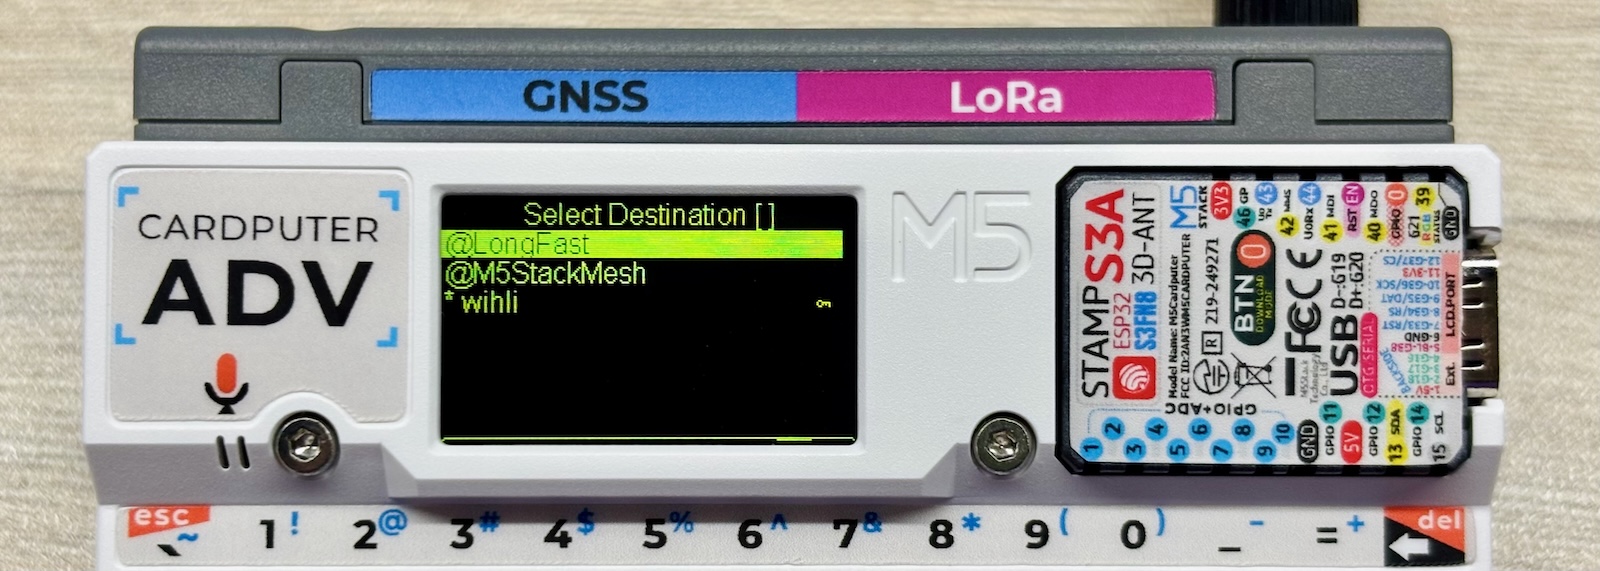
As shown above, on the text input page, briefly press the Tab key to display available channels (group chats) or nodes (direct messages) to send to. Briefly press G0 to scroll to the next option, and long-press G0 or briefly press ↩️ Enter to confirm the selection.
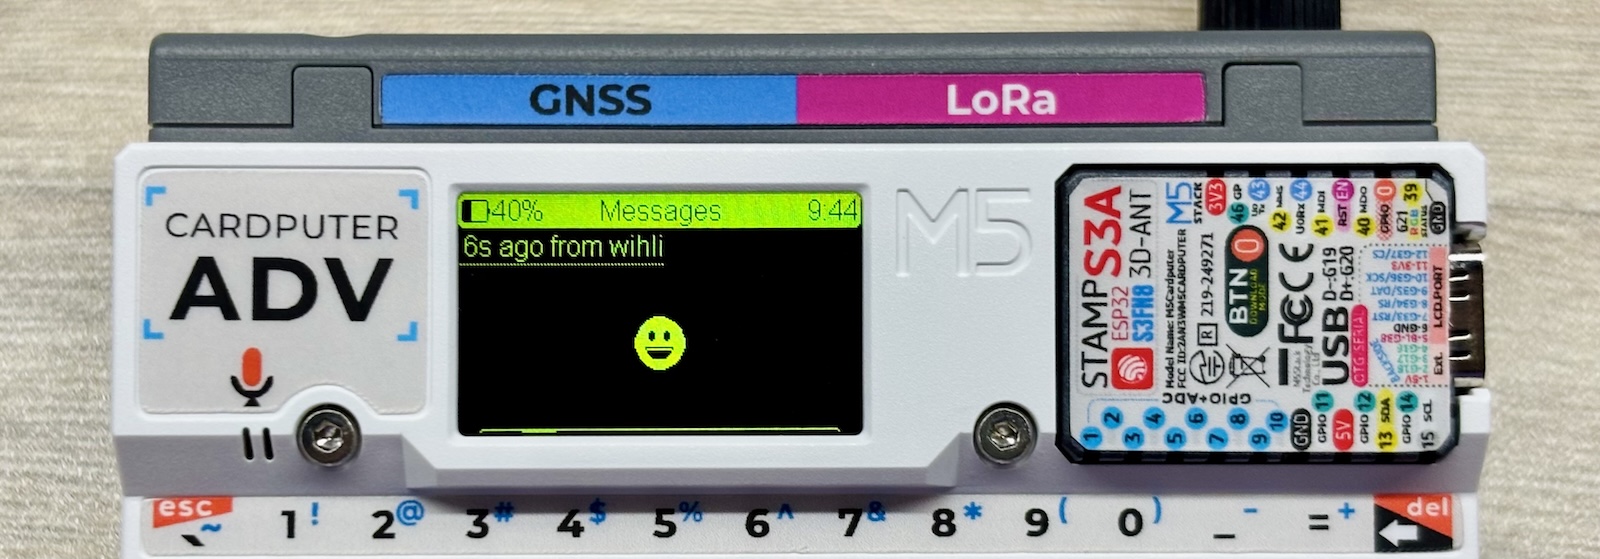
The firmware also supports rendering certain Emoji characters 😀
4. Related Links
5. Related Videos
Coming soon...