Arduino Quick Start
2. Devices & Examples
3. M5Unified
4. M5GFX
5. Extensions
Unit
Atomic
Tab5
IoT
Accessories
NanoC6 Zigbee Arduino
NanoC6 Zigbee Arduino related example programs.
Preparation
Compilation Requirements
- M5Stack board manager version >= 3.2.5
- Development board option = M5NanoC6
Zigbee Thermostat (Coordinator)
This example demonstrates how to configure a Zigbee Coordinator and use it as a thermostat to achieve the following functions:
- Run as a Zigbee Coordinator
- Receive temperature sensor data
- Configure the reporting interval of the temperature sensor
- Print temperature and configuration information via serial
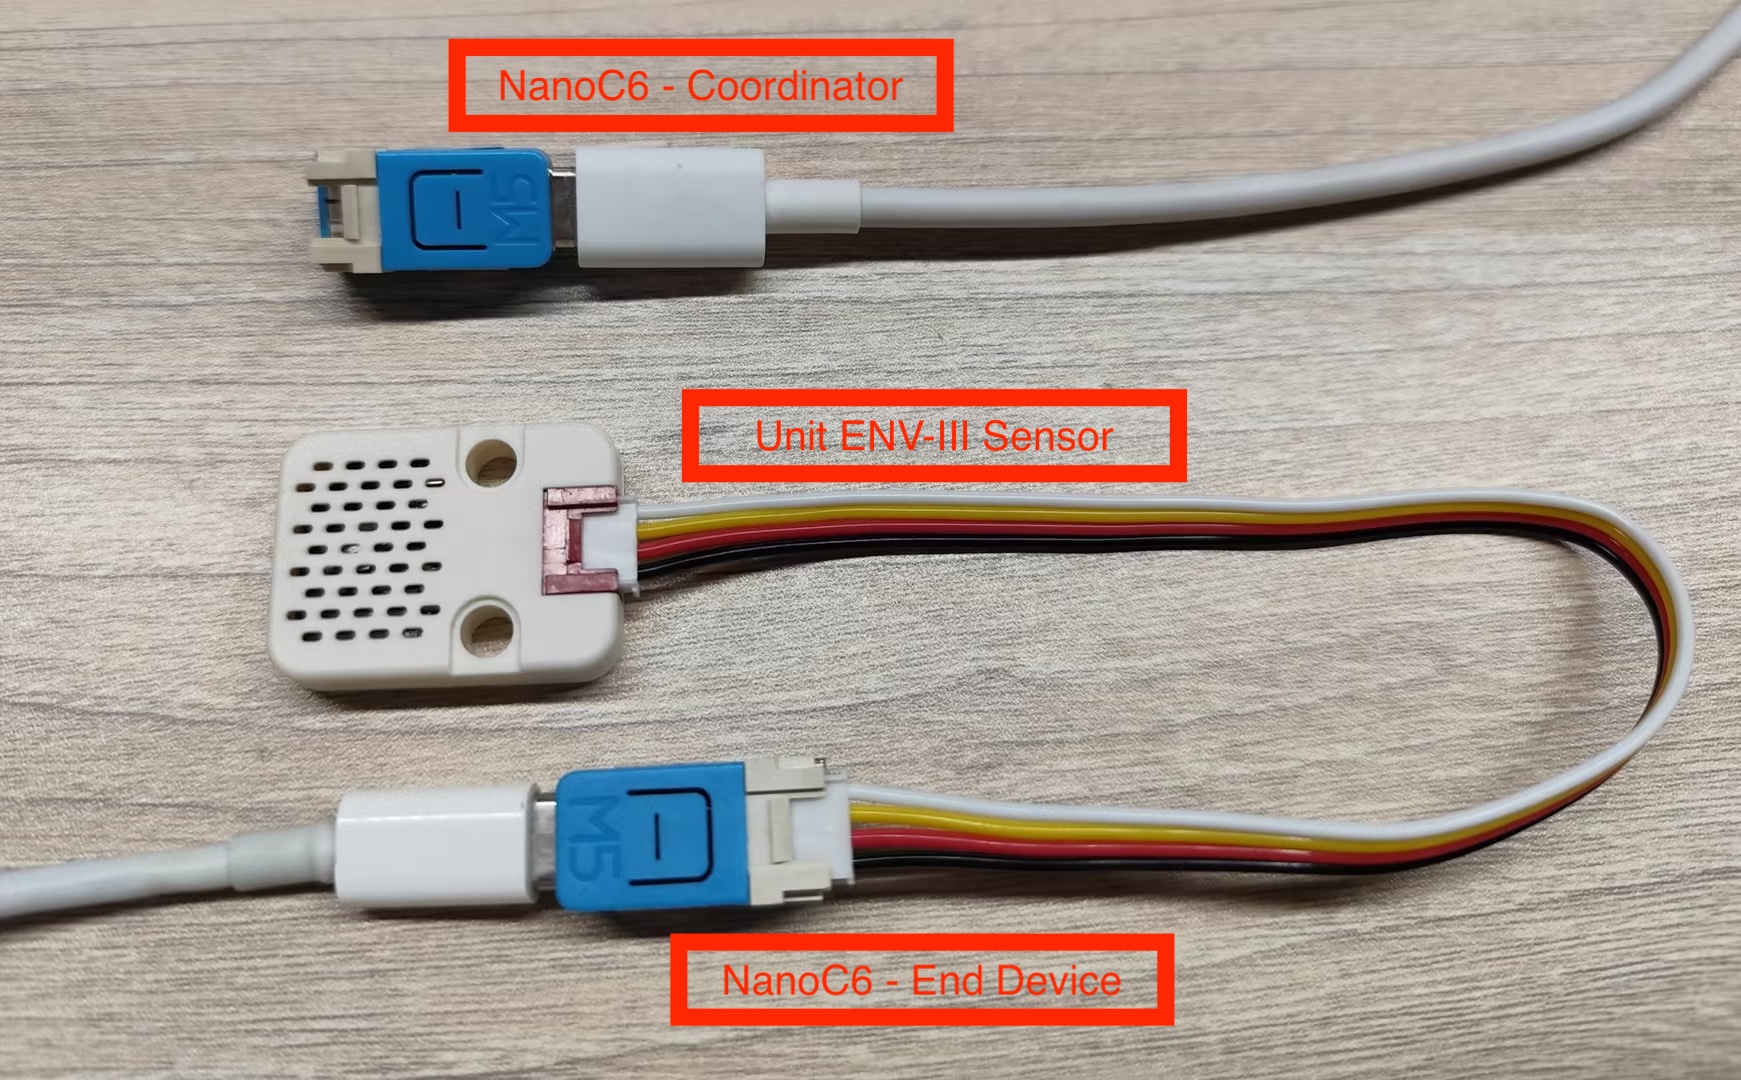
Hardware Requirements
- One NanoC6 as the Zigbee Coordinator (running this thermostat example)
- One NanoC6 as the Zigbee End Device (running the temperature sensor example)
- One Unit ENV-III (for measuring ambient temperature)
Configuration Instructions
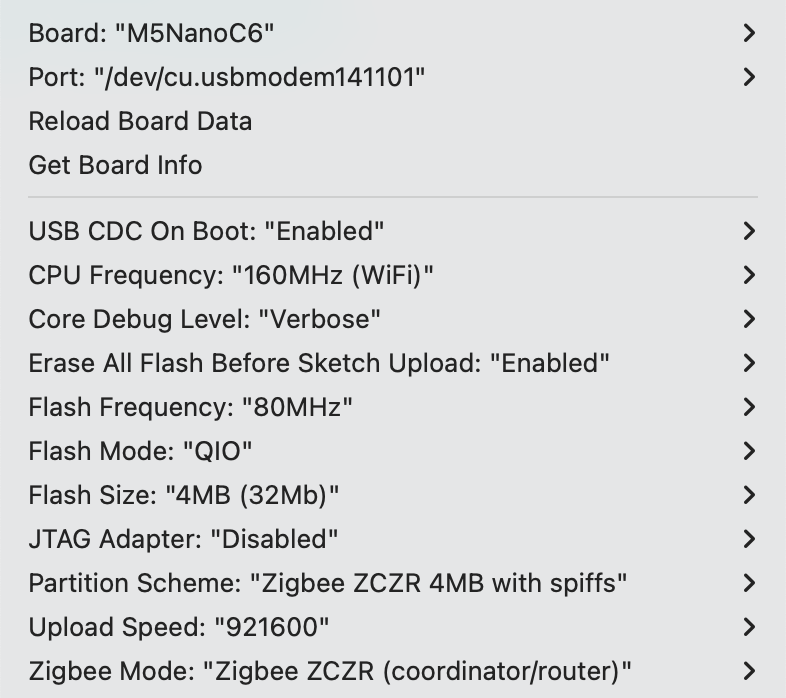
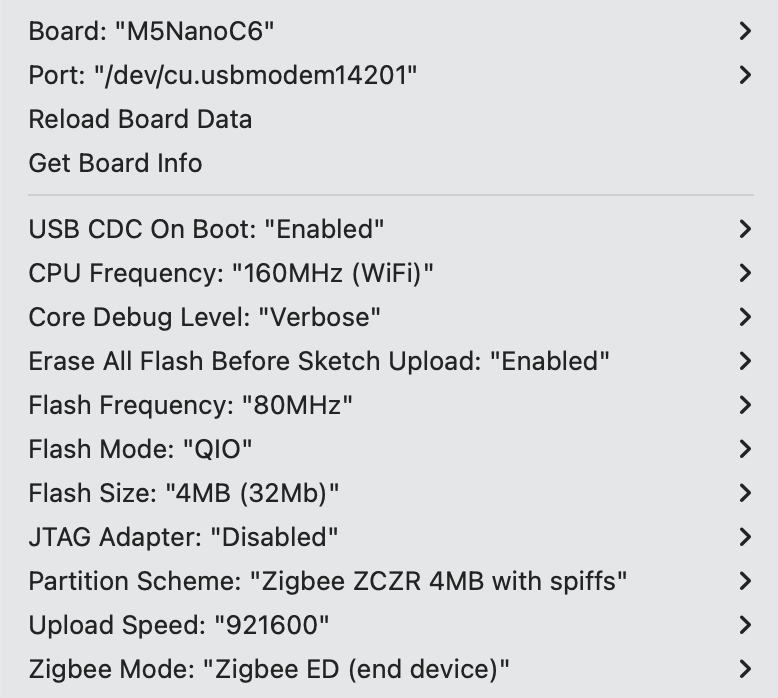
Arduino IDE Tools menu configuration:
- Select the correct development board:
Tools -> Board: M5NanoC6 - Enable USB serial on boot:
Tools -> USB CDC On Boot: Enabled - Enable erase all flash:
Tools -> Erase All Flash Before Sketch Upload: Enabled(disabling this may cause connection failures) - Select flash size:
Tools -> Flash Size: 4MB - Select Zigbee partition scheme:
Tools -> Partition Scheme: Zigbee ZCZR 4MB with spiffs - Select coordinator mode:
Tools -> Zigbee mode: Zigbee ZCZR (coordinator/router) - Select the correct serial port:
Tools -> Port
Example Program
#ifndef ZIGBEE_MODE_ZCZR
#error "Zigbee coordinator mode is not selected in Tools->Zigbee mode"
#endif

#include "Zigbee.h"

// Define endpoint number
#define THERMOSTAT_ENDPOINT_NUMBER 5

// Create Zigbee Thermostat object (used to receive temperature data)
ZigbeeThermostat zbThermostat = ZigbeeThermostat(THERMOSTAT_ENDPOINT_NUMBER);

// Temperature data variables
float sensor_temp = 0.0;
float sensor_max_temp = 120.0;
float sensor_min_temp = -40.0;
float sensor_tolerance = 1.0;

// Temperature receive callback function
void receiveSensorTemp(float temperature) {
    Serial.printf("Temperature received: %.2f°C\n", temperature);
    sensor_temp = temperature;
}

// Sensor configuration receive callback function
void receiveSensorConfig(float min_temp, float max_temp, float tolerance) {
    Serial.printf("Sensor config: min=%.2f°C, max=%.2f°C, tolerance=%.2f°C\n",
                   min_temp, max_temp, tolerance);
    sensor_min_temp = min_temp;
    sensor_max_temp = max_temp;
    sensor_tolerance = tolerance;
}

void setup() {
    Serial.begin(115200);
    delay(1000);
    Serial.println("=== NanoC6 Zigbee Coordinator ===");

    // Set callback functions
    zbThermostat.onTempReceive(receiveSensorTemp);
    zbThermostat.onConfigReceive(receiveSensorConfig);

    // Configure device information
    zbThermostat.setManufacturerAndModel("Espressif", "ZigbeeThermostat");

    // Add endpoint
    Zigbee.addEndpoint(&zbThermostat);

    // Open network for 180 seconds
    Zigbee.setRebootOpenNetwork(180);

    // Start Coordinator
    Serial.println("Starting Zigbee Coordinator...");
    if (!Zigbee.begin(ZIGBEE_COORDINATOR)) {
        Serial.println("Zigbee failed to start!");
        Serial.println("Rebooting...");
        ESP.restart();
    }

    Serial.println("Zigbee Coordinator started");
    Serial.println("Network is open for 180 seconds");
    Serial.println("Waiting for temperature sensor to bind...");

    // Wait for End Device binding
    while (!zbThermostat.bound()) {
        Serial.print(".");
        delay(500);
    }

    Serial.println("\nTemperature sensor bound successfully!");

    // Configure reporting interval only once
    zbThermostat.setTemperatureReporting(0, 10, 2);
    Serial.println("Temperature reporting configured");

    // Get sensor configuration
    zbThermostat.getSensorSettings();
}

void loop() {
    // Periodically print temperature data
    static uint32_t last_print = 0;
    if (millis() - last_print > 10000) {
        last_print = millis();

        int temp_percent = (int)((sensor_temp - sensor_min_temp) /
                                 (sensor_max_temp - sensor_min_temp) * 100);
        Serial.printf("Current temperature: %.2f°C (%d%%)\n",
                      sensor_temp, temp_percent);
    }

    delay(100);
}Usage Steps
- Flash the thermostat code to the Coordinator device
- Flash the temperature sensor code to the End Device
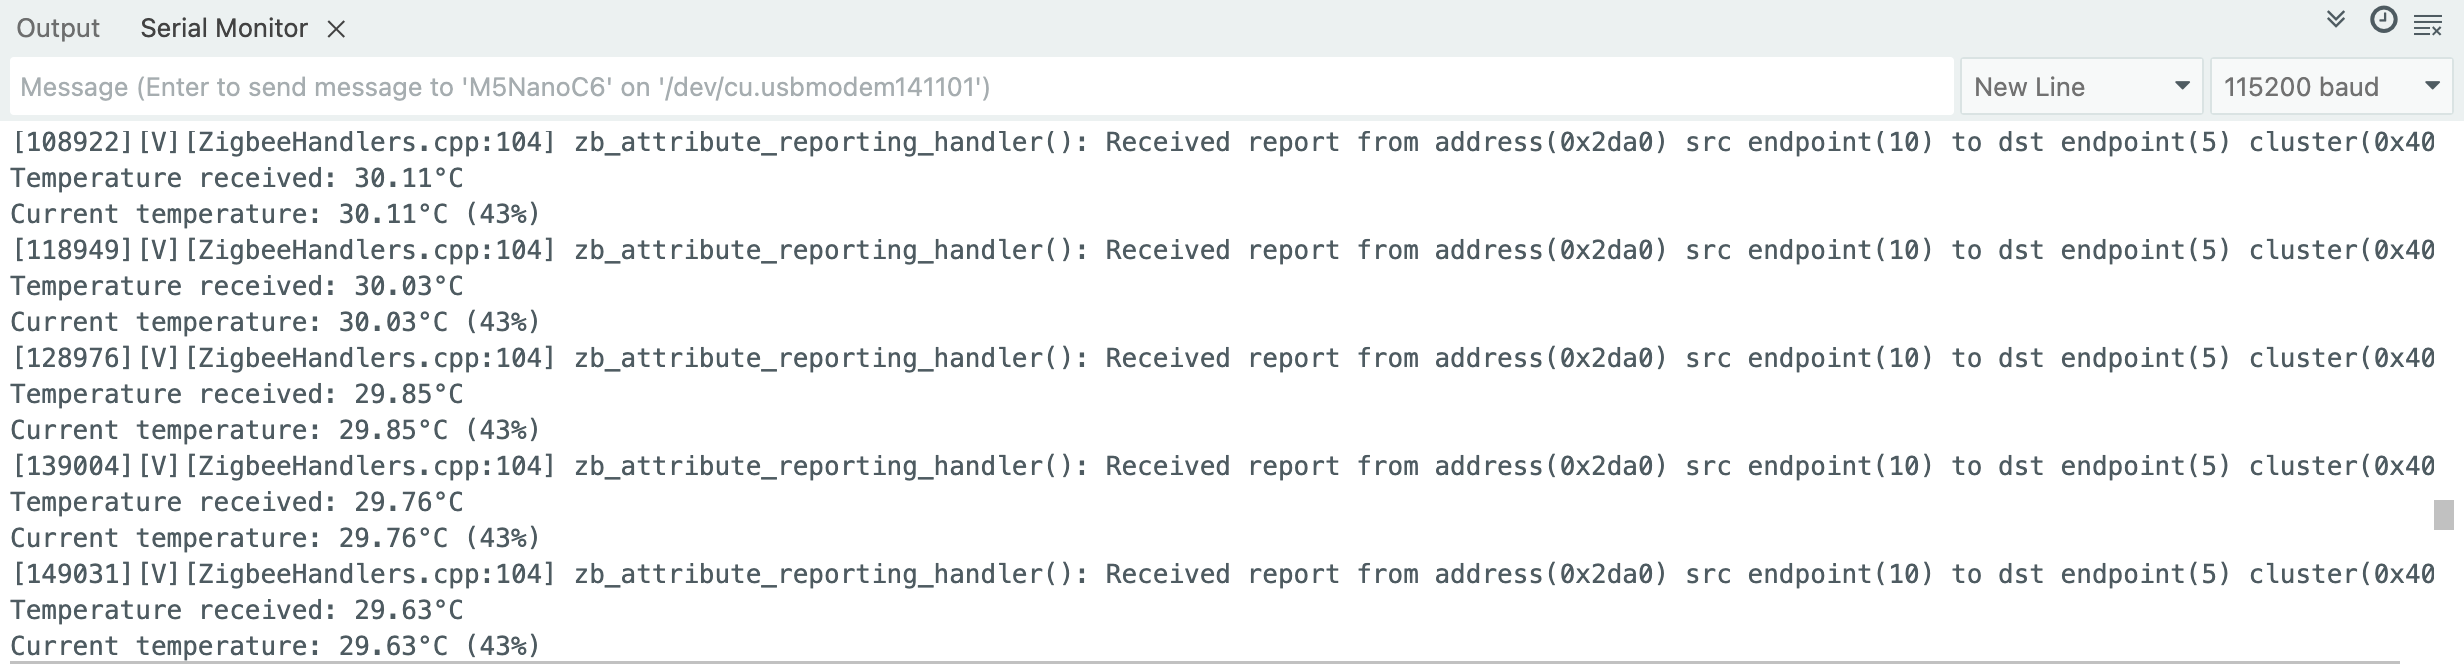
- After the Coordinator starts, it will automatically create a network and wait for devices to join. The current temperature will be printed every 10 seconds
- Check the temperature data in the serial monitor and observe automatic reports when the temperature changes. Verify that configuration information is received correctly
Zigbee Temperature Sensor
This example demonstrates how to configure a Zigbee End Device and use it as a Home Automation (HA) temperature sensor to achieve the following functions:
- Run as a Zigbee End Device
- Read temperature data from the chip
- Periodically report temperature to the Coordinator
- Support on-demand temperature reporting
Configuration Instructions
Arduino IDE Tools menu configuration:
- Select the correct development board:
Tools -> Board: M5NanoC6 - Enable USB serial on boot:
Tools -> USB CDC On Boot: Enabled - Enable erase all flash:
Tools -> Erase All Flash Before Sketch Upload: Enabled(disabling this may cause connection failures) - Select flash size:
Tools -> Flash Size: 4MB - Select Zigbee partition scheme:
Tools -> Partition Scheme: Zigbee ZCZR 4MB with spiffs - Select end device mode:
Tools -> Zigbee mode: Zigbee ED (end device) - Select the correct serial port:
Tools -> Port
Example Program
#ifndef ZIGBEE_MODE_ED
#error "Zigbee end device mode is not selected in Tools->Zigbee mode"
#endif
#include "Zigbee.h"
#include <Wire.h>
// Define endpoint number
#define TEMP_SENSOR_ENDPOINT_NUMBER 10
// Define SHT30 I2C address
#define SHT30_I2C_ADDR 0x44
// I2C pins of NanoH2 Grove interface
#define I2C_SDA 2 // G2 = GPIO2 (Yellow wire)
#define I2C_SCL 1 // G1 = GPIO1 (White wire)
// Create Zigbee temperature sensor object
ZigbeeTempSensor zbTempSensor = ZigbeeTempSensor(TEMP_SENSOR_ENDPOINT_NUMBER);
// Temperature data variable
float temperature = 0.0;
// Task synchronization flag
volatile bool temp_updated = false;
/************************ SHT30 Temperature Read Function (Temperature Only) *****************************/
bool readSHT30Temperature(float &temp) {
// Send measurement command (high repeatability measurement)
Wire.beginTransmission(SHT30_I2C_ADDR);
Wire.write(0x2C); // Measurement command high byte
Wire.write(0x06); // Measurement command low byte
if (Wire.endTransmission() != 0) {
Serial.println("SHT30 communication failed!");
return false;
}
// Wait for measurement to complete (SHT30 requires about 15ms)
delay(20);
// Request to read 6 bytes (temperature 3 bytes + humidity 3 bytes)
Wire.requestFrom(SHT30_I2C_ADDR, 6);
if (Wire.available() < 6) {
Serial.println("SHT30 data not available!");
return false;
}
// Read temperature data (first 3 bytes)
uint8_t tempData[3];
for (int i = 0; i < 3; i++) {
tempData[i] = Wire.read();
}
// Skip humidity data (last 3 bytes)
for (int i = 0; i < 3; i++) {
Wire.read();
}
// Calculate temperature (formula: -45 + 175 * (rawTemp / 65535))
uint16_t rawTemp = (tempData[0] << 8) | tempData[1];
temp = -45.0 + 175.0 * ((float)rawTemp / 65535.0);
// Data validity check
if (temp < -40.0 || temp > 125.0) {
Serial.printf("Invalid temperature: %.2f°C\n", temp);
return false;
}
return true;
}
/************************ Temperature Read Task *****************************/
static void temp_sensor_value_update(void *arg) {
for (;;) {
// Read SHT30 temperature
if (readSHT30Temperature(temperature)) {
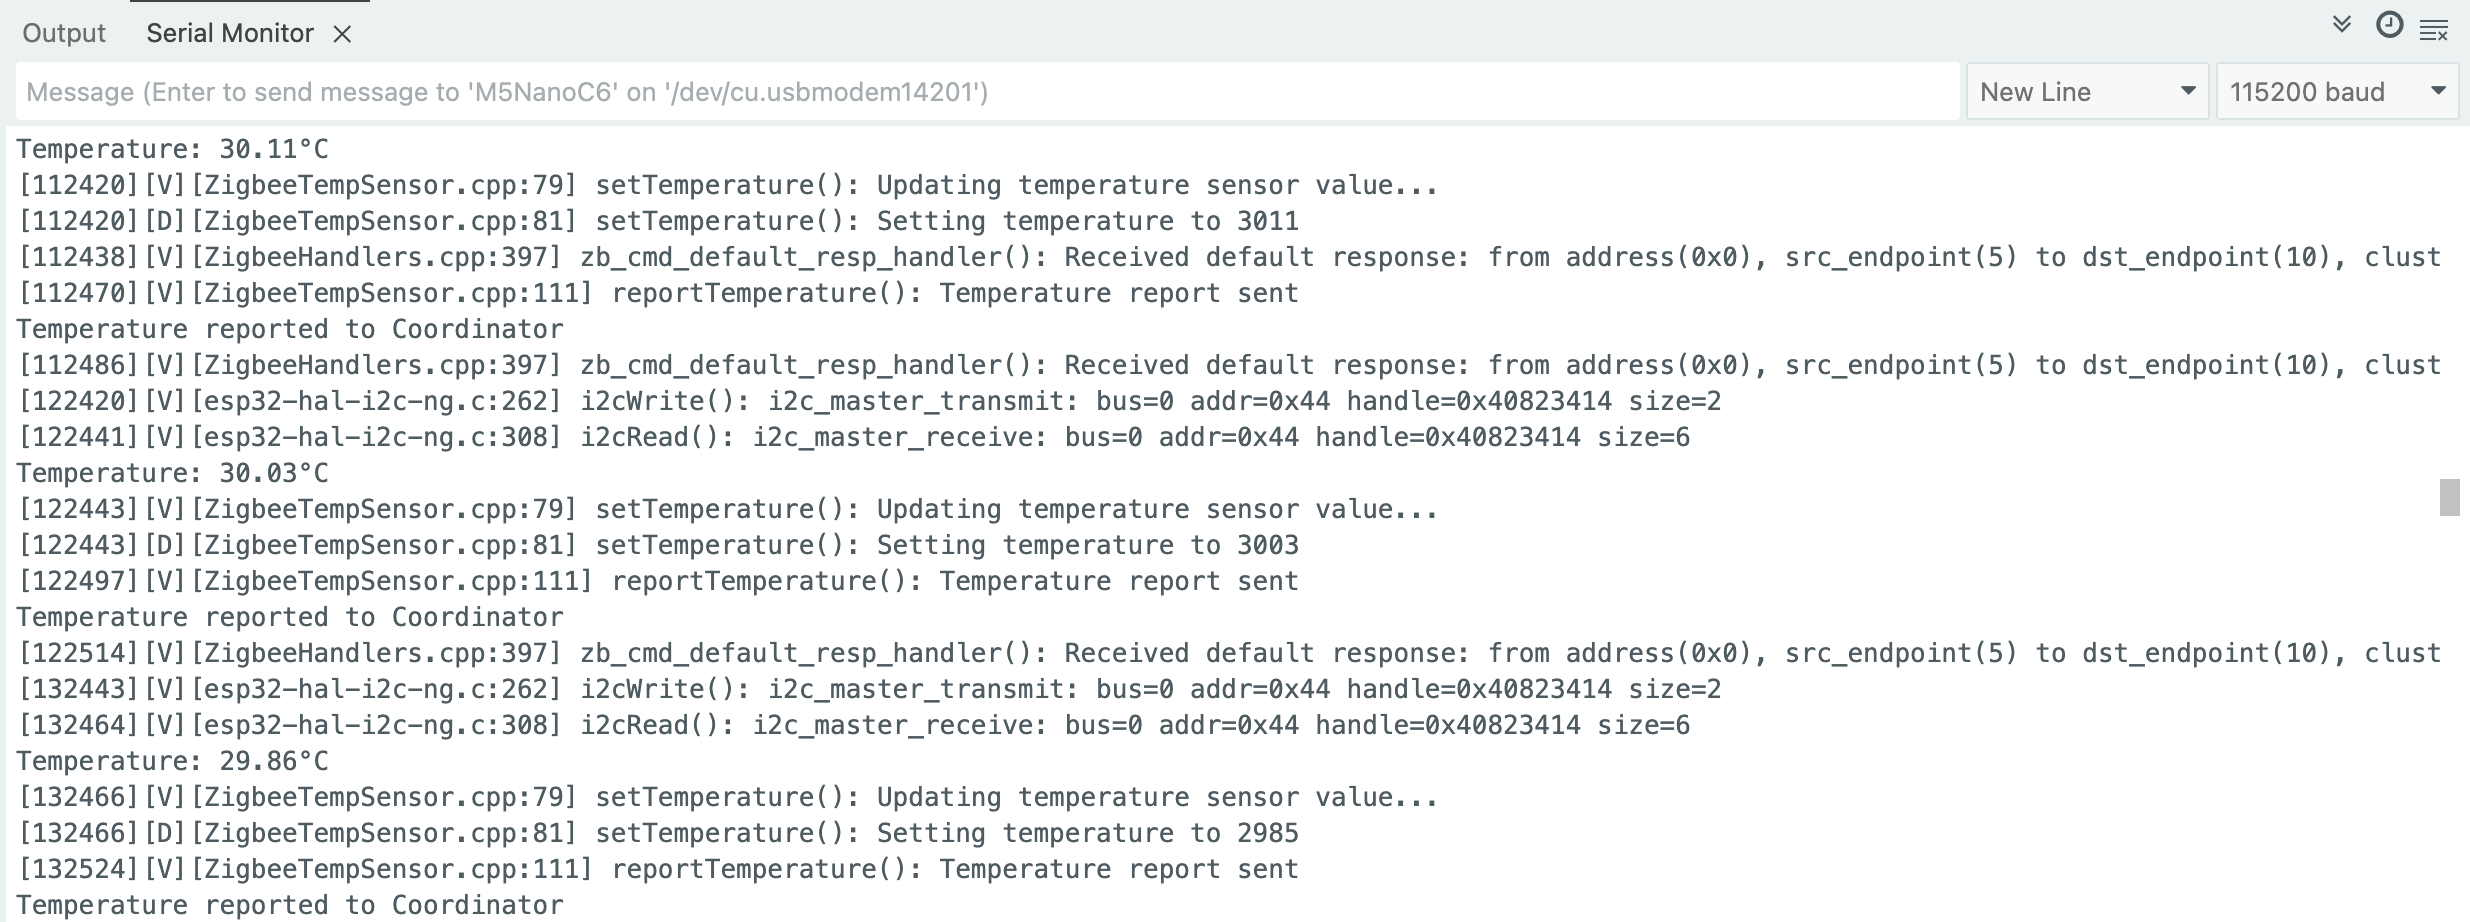
Serial.printf("Temperature: %.2f°C\n", temperature);
// Update temperature value to Zigbee endpoint
zbTempSensor.setTemperature(temperature);
// Set flag to notify main loop for reporting
temp_updated = true;
} else {
Serial.println("Failed to read SHT30");
}
delay(10000); // Read every 10 seconds
}
}
/********************* Arduino Main Functions ***************************/
void setup() {
Serial.begin(115200);
delay(1000);
Serial.println("=== NanoC6 End Device + Unit ENV III (Temperature Only) ===");
// Initialize I2C (using correct pins)
Wire.begin(I2C_SDA, I2C_SCL, 100000); // 100kHz
Serial.printf("I2C initialized (SDA=GPIO%d, SCL=GPIO%d, 100kHz)\n",
I2C_SDA, I2C_SCL);
// Add delay to wait for bus stabilization
delay(100);
// Test SHT30 connection
Serial.println("Scanning I2C bus...");
Wire.beginTransmission(SHT30_I2C_ADDR);
uint8_t error = Wire.endTransmission();
if (error == 0) {
Serial.println("SHT30 detected at address 0x44");
} else {
Serial.printf("SHT30 not found! Error code: %d\n", error);
Serial.println("\n Expected wiring:");
Serial.println(" - Black (GND) → GND");
Serial.println(" - Red (5V) → 5V");
Serial.println(" - Yellow (SDA) → G2 (GPIO2)");
Serial.println(" - White (SCL) → G1 (GPIO1)");
while (1) delay(1000); // Stop execution
}
// Configure Zigbee temperature sensor
zbTempSensor.setManufacturerAndModel("Espressif", "TempSensor");
zbTempSensor.setMinMaxValue(-40, 120); // Set temperature range
zbTempSensor.setTolerance(1); // Set tolerance ±1°C
// Add endpoint to Zigbee core
Zigbee.addEndpoint(&zbTempSensor);
// Start Zigbee End Device
Serial.println("Starting Zigbee End Device...");
if (!Zigbee.begin()) {
Serial.println("Zigbee failed to start!");
Serial.println("Rebooting in 5 seconds...");
delay(5000);
ESP.restart();
}
Serial.println("Zigbee End Device started");
Serial.println("Connecting to network...");
// Wait for Zigbee network connection
while (!Zigbee.connected()) {
Serial.print(".");
delay(1000);
}
Serial.println("\nConnected to Zigbee network!");
// Create temperature read task (stack size 4096 bytes)
xTaskCreate(temp_sensor_value_update, "temp_sensor_update", 4096, NULL, 10, NULL);
// Configure reporting interval
zbTempSensor.setReporting(1, 0, 1);
Serial.println("Temperature reporting configured");
}
void loop() {
// Report only when temperature is updated
if (temp_updated) {
temp_updated = false;
zbTempSensor.reportTemperature();
Serial.println("Temperature reported to Coordinator");
}
delay(100);
}Usage Steps
- Ensure the Coordinator is already running and has created a network, then flash the temperature sensor code to the End Device
- After startup, the device will automatically search for and join the network, read temperature data every 10 seconds, and automatically report when the temperature change exceeds 0.01°C
Zigbee Network Scan
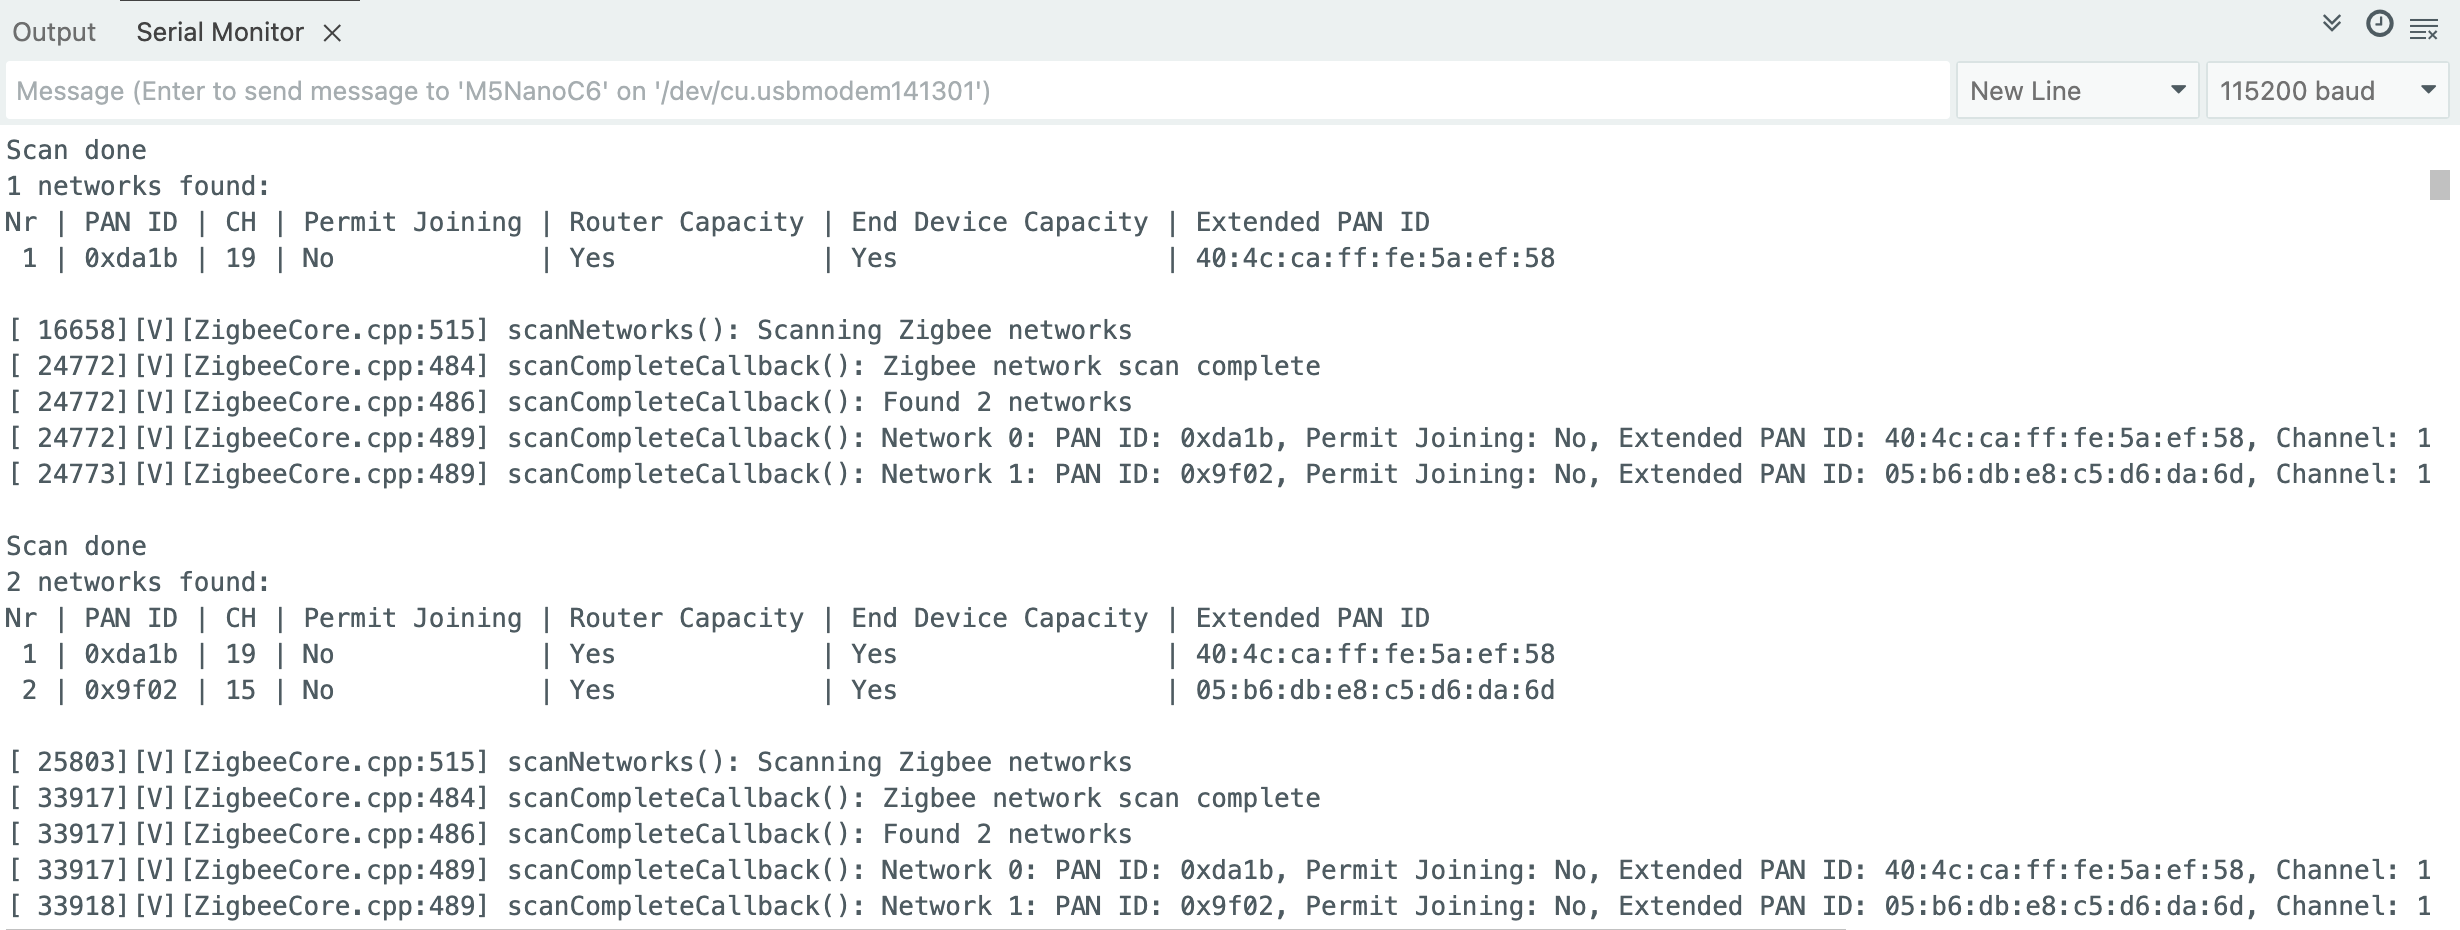
This example demonstrates scanning nearby Zigbee networks and printing network information to the serial port.
- Ensure there are active Zigbee networks nearby, then flash the scan code to the device
- After startup, the device will automatically begin scanning. After each scan completes, results are displayed and the next scan starts automatically
Example Program
#if !defined(ZIGBEE_MODE_ED) && !defined(ZIGBEE_MODE_ZCZR)
#error "Zigbee device mode is not selected in Tools->Zigbee mode"
#endif

#include "Zigbee.h"

#ifdef ZIGBEE_MODE_ZCZR
zigbee_role_t role = ZIGBEE_ROUTER;  // or can be ZIGBEE_COORDINATOR, but it won't scan itself
#else
zigbee_role_t role = ZIGBEE_END_DEVICE;
#endif

void printScannedNetworks(uint16_t networksFound) {
    if (networksFound == 0) {
        Serial.println("No networks found");
    } else {
        zigbee_scan_result_t *scan_result = Zigbee.getScanResult();
        Serial.println("\nScan done");
        Serial.print(networksFound);
        Serial.println(" networks found:");
        Serial.println("Nr | PAN ID | CH | Permit Joining | Router Capacity | End Device Capacity | Extended PAN ID");
        for (int i = 0; i < networksFound; ++i) {
        // Print all available info for each network found
        Serial.printf("%2d", i + 1);
        Serial.print(" | ");
        Serial.printf("0x%04hx", scan_result[i].short_pan_id);
        Serial.print(" | ");
        Serial.printf("%2d", scan_result[i].logic_channel);
        Serial.print(" | ");
        Serial.printf("%-14.14s", scan_result[i].permit_joining ? "Yes" : "No");
        Serial.print(" | ");
        Serial.printf("%-15.15s", scan_result[i].router_capacity ? "Yes" : "No");
        Serial.print(" | ");
        Serial.printf("%-19.19s", scan_result[i].end_device_capacity ? "Yes" : "No");
        Serial.print(" | ");
        Serial.printf(
            "%02x:%02x:%02x:%02x:%02x:%02x:%02x:%02x", scan_result[i].extended_pan_id[7], scan_result[i].extended_pan_id[6], scan_result[i].extended_pan_id[5],
            scan_result[i].extended_pan_id[4], scan_result[i].extended_pan_id[3], scan_result[i].extended_pan_id[2], scan_result[i].extended_pan_id[1],
            scan_result[i].extended_pan_id[0]
        );
        Serial.println();
        delay(10);
        }
        Serial.println("");
        // Delete the scan result to free memory for code below.
        Zigbee.scanDelete();
    }
}

void setup() {
    Serial.begin(115200);

    // Initialize Zigbee stack without any EPs just for scanning
    if (!Zigbee.begin(role)) {
        Serial.println("Zigbee failed to start!");
        Serial.println("Rebooting...");
        ESP.restart();
    }

    Serial.println("Setup done, starting Zigbee network scan...");
    // Start Zigbee Network Scan with default parameters (all channels, scan time 5)
    Zigbee.scanNetworks();
}

void loop() {
    // check Zigbee Network Scan process
    int16_t ZigbeeScanStatus = Zigbee.scanComplete();
    if (ZigbeeScanStatus < 0) {  // it is busy scanning or got an error
        if (ZigbeeScanStatus == ZB_SCAN_FAILED) {
        Serial.println("Zigbee scan has failed. Starting again.");
        delay(1000);
        Zigbee.scanNetworks();
        }
        delay(100);
        // other option is status ZB_SCAN_RUNNING - just wait.
    } else {  // Found Zero or more Wireless Networks
        printScannedNetworks(ZigbeeScanStatus);
        delay(1000);
        Zigbee.scanNetworks();  // start over...
    }
    // Loop can do something else...
}Usage Steps
- Ensure there are active Zigbee networks nearby and flash the scan code to the device
- After startup, the device will automatically begin scanning. After each scan completes, results are displayed and the next scan starts automatically
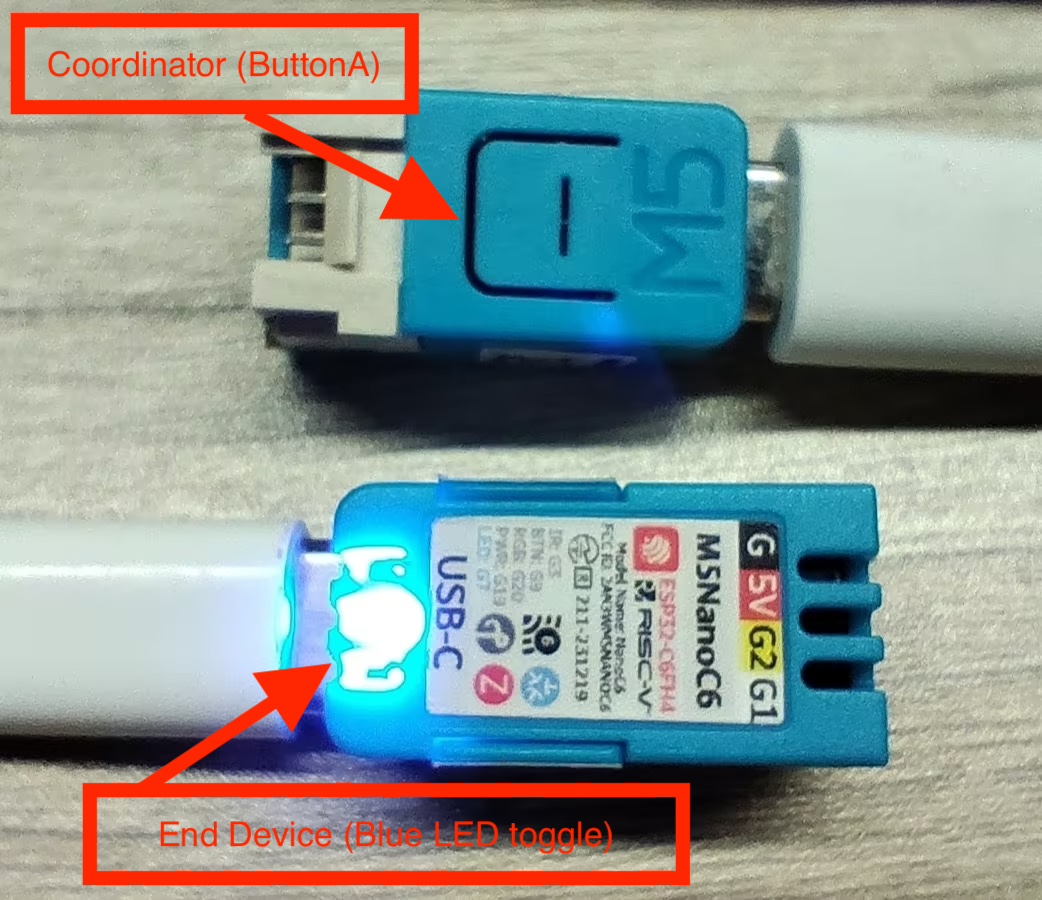
Zigbee Switch (Coordinator)
This example demonstrates how to configure a Zigbee Coordinator, detect ButtonA to control the blue LED of an End Device, and achieve the following functions:
- Run as a Zigbee Coordinator
- Detect whether ButtonA is pressed
- Send commands to control the blue LED on the End Device
- Print command information via serial
Hardware Requirements
- One NanoC6 as the Zigbee Coordinator (Switch)
- One NanoC6 as the Zigbee End Device (Blue LED toggle)
Configuration Instructions
Arduino IDE Tools menu configuration:
- Select the correct development board:
Tools -> Board: M5NanoC6 - Enable USB serial on boot:
Tools -> USB CDC On Boot: Enabled - Enable erase all flash:
Tools -> Erase All Flash Before Sketch Upload: Enabled(disabling this may cause connection failures) - Select flash size:
Tools -> Flash Size: 4MB - Select Zigbee partition scheme:
Tools -> Partition Scheme: Zigbee ZCZR 4MB with spiffs - Select coordinator mode:
Tools -> Zigbee mode: Zigbee ZCZR (coordinator/router) - Select the correct serial port:
Tools -> Port
Example Program
#ifndef ZIGBEE_MODE_ZCZR
#error "Zigbee coordinator mode is not selected in Tools->Zigbee mode"
#endif

#include "Zigbee.h"

#define SWITCH_ENDPOINT_NUMBER 5

// ButtonA Pin (GPIO9)
#define BUTTON_A_PIN 9

// Zigbee Switch (To send On/Off command)
ZigbeeSwitch zbSwitch = ZigbeeSwitch(SWITCH_ENDPOINT_NUMBER);

// LED state
bool led_state = false;

// ButtonA debounce
unsigned long last_button_press = 0;
const unsigned long debounce_delay = 200;  // 200ms

void setup() {
    Serial.begin(115200);
    delay(1000);
    Serial.println("=== NanoC6 Zigbee Coordinator (ButtonA Controller) ===");

    pinMode(BUTTON_A_PIN, INPUT_PULLUP);
    Serial.println("ButtonA (G9/GPIO9) initialized");

    zbSwitch.setManufacturerAndModel("Espressif", "ZigbeeSwitch");

    Zigbee.addEndpoint(&zbSwitch);

    // Network open for joining for 180 secs
    Zigbee.setRebootOpenNetwork(180);

    // Setup Coordinator
    Serial.println("Starting Zigbee Coordinator...");
    if (!Zigbee.begin(ZIGBEE_COORDINATOR)) {
        Serial.println("Zigbee failed to start!");
        Serial.println("Rebooting...");
        ESP.restart();
    }

    Serial.println("Zigbee Coordinator started");
    Serial.println("Network is open for 180 seconds");
    Serial.println("Waiting for LED device to bind...");

    while (!zbSwitch.bound()) {
        Serial.print(".");
        delay(500);
    }

    Serial.println("\nLED device bound successfully!");
    Serial.println("\nPress ButtonA to toggle LED");
}

void loop() {
    // Check if ButtonA is pressed
    if (digitalRead(BUTTON_A_PIN) == LOW) {
        unsigned long current_time = millis();
        if (current_time - last_button_press > debounce_delay) {
            last_button_press = current_time;

            // Switch LED states
            led_state = !led_state;

            if (led_state) {
                Serial.println("Sending ON command...");
                zbSwitch.lightOn();
            } else {
                Serial.println("Sending OFF command...");
                zbSwitch.lightOff();
            }

            // Wait for ButtonA to release
            while (digitalRead(BUTTON_A_PIN) == LOW) {
                delay(10);
            }
        }
    }

    delay(10);
}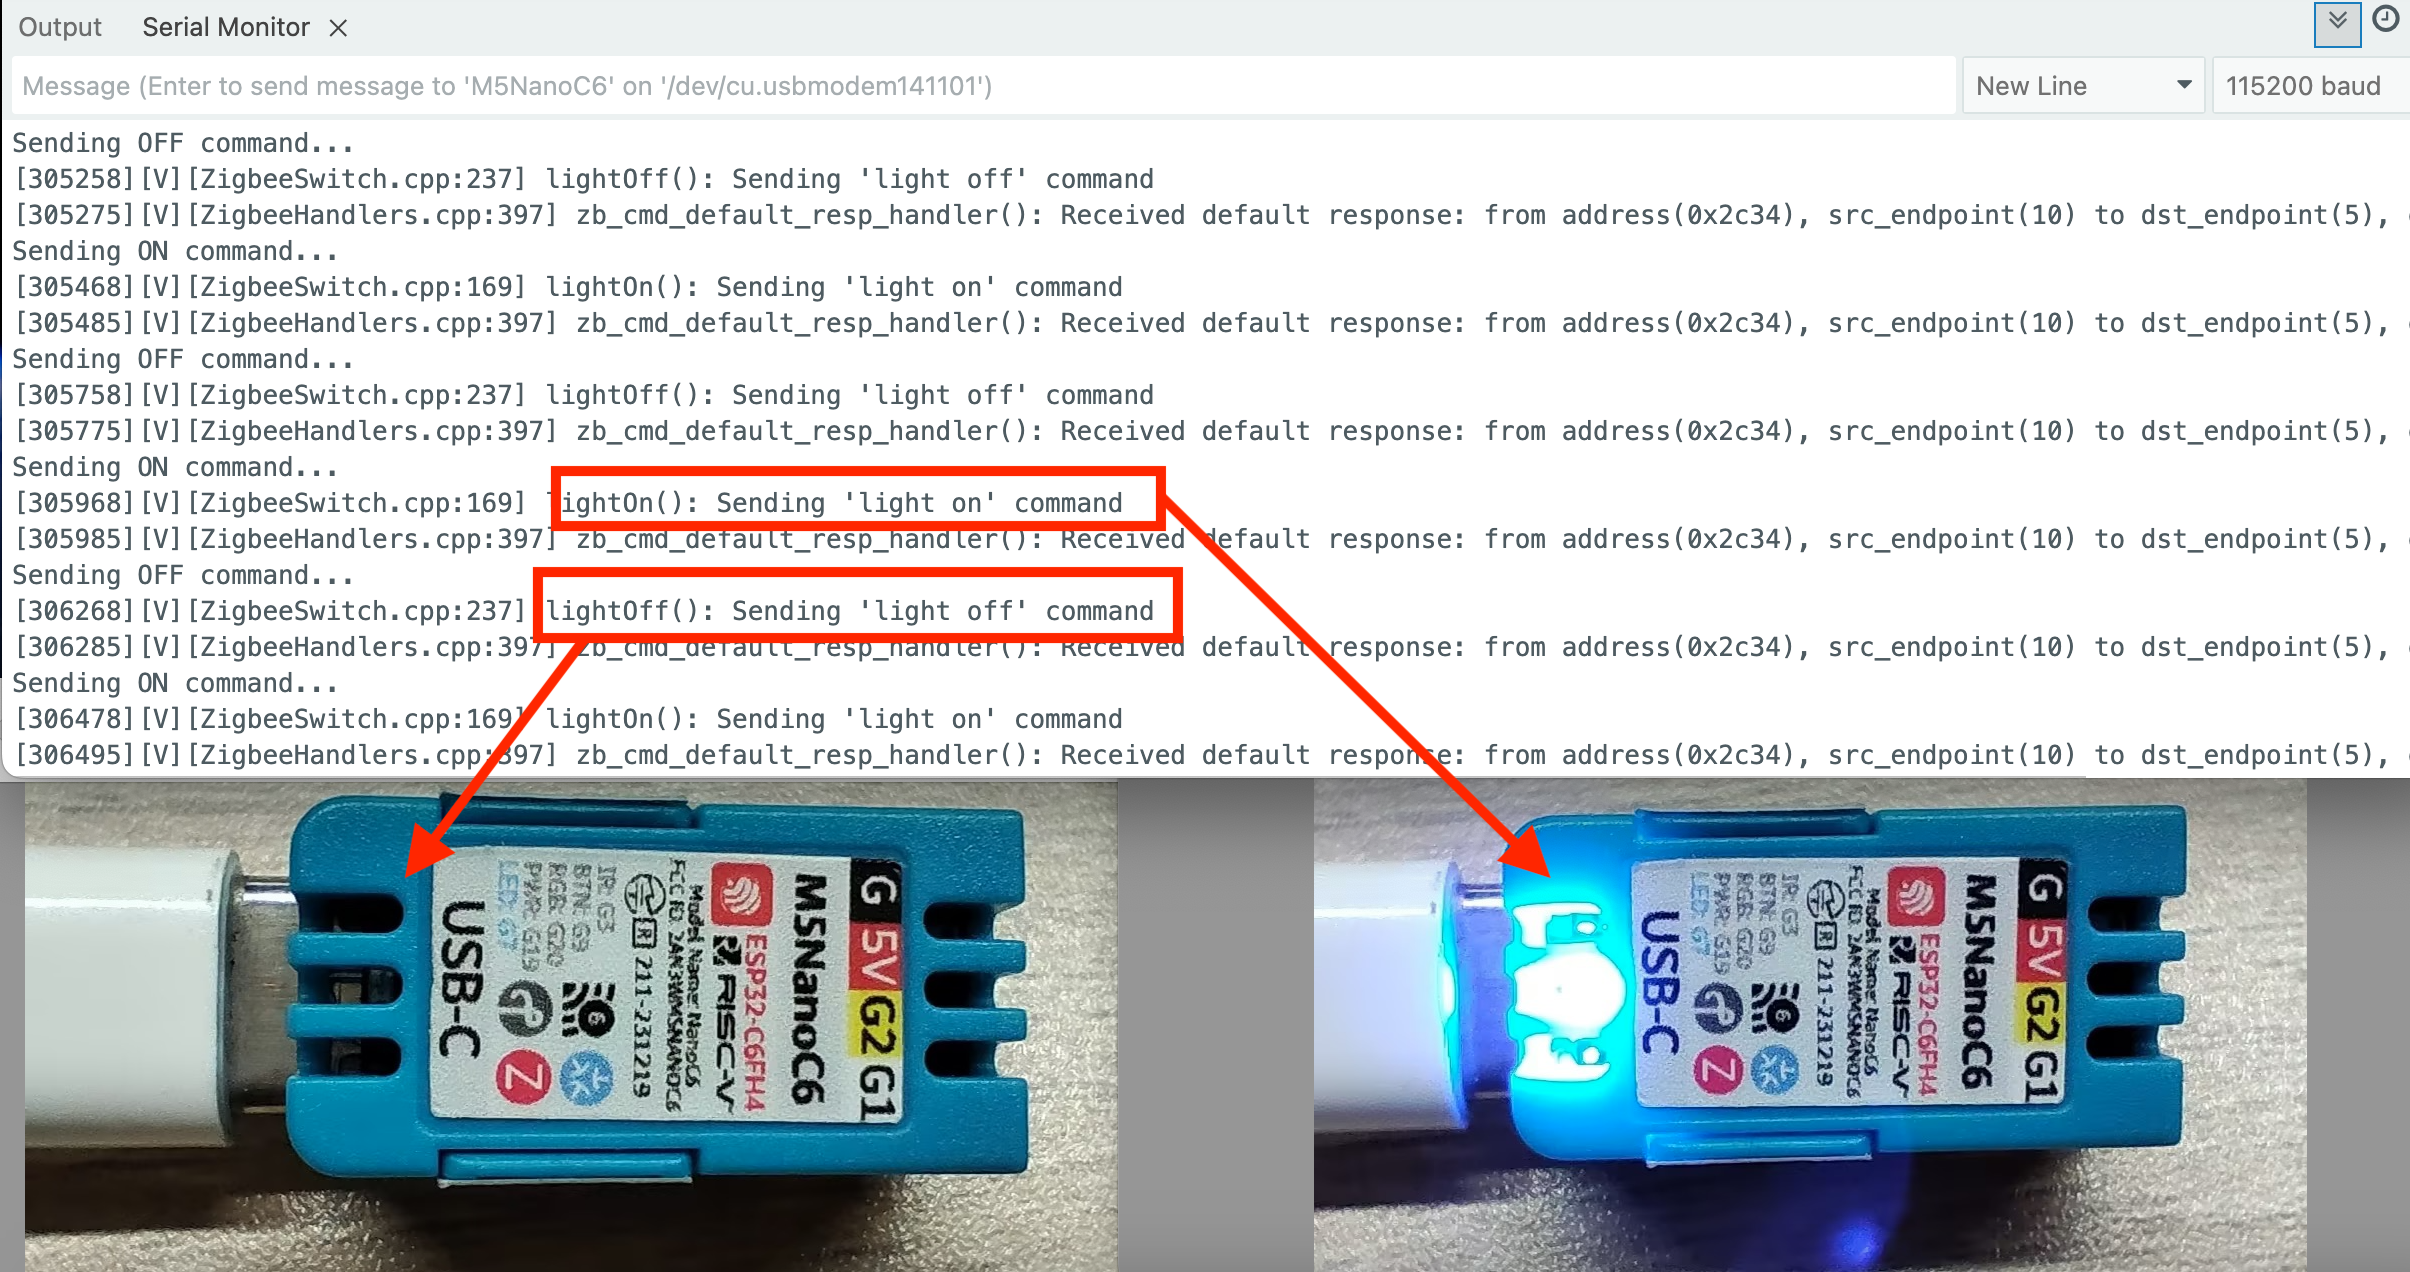
Zigbee Command Receiver for Blue LED
This example demonstrates how to configure a Zigbee End Device to receive commands to turn the blue LED on or off, achieving the following functions:
- Run as a Zigbee End Device
- Receive commands from the Coordinator
- Print received data via serial
- Control the blue LED on NanoC6
Configuration Instructions
Arduino IDE Tools menu configuration:
- Select the correct development board:
Tools -> Board: M5NanoC6 - Enable USB serial on boot:
Tools -> USB CDC On Boot: Enabled - Enable erase all flash:
Tools -> Erase All Flash Before Sketch Upload: Enabled(disabling this may cause connection failures) - Select flash size:
Tools -> Flash Size: 4MB - Select Zigbee partition scheme:
Tools -> Partition Scheme: Zigbee ZCZR 4MB with spiffs - Select end device mode:
Tools -> Zigbee mode: Zigbee ED (end device) - Select the correct serial port:
Tools -> Port
Example Program
#ifndef ZIGBEE_MODE_ED
#error "Zigbee end device mode is not selected in Tools->Zigbee mode"
#endif

#include "Zigbee.h"

#define LIGHT_ENDPOINT_NUMBER 10

// Blue LED Pin (GPIO7)
#define BLUE_LED_PIN 7

// Zigbee controlled LED (listen for On/Off command)
ZigbeeLight zbLight = ZigbeeLight(LIGHT_ENDPOINT_NUMBER);

// LED toggle
void setLED(bool state) {
    digitalWrite(BLUE_LED_PIN, state ? HIGH : LOW); // NanoC6 Blue LED is active LOW
}

void setup() {
    Serial.begin(115200);
    delay(1000);
    Serial.println("=== NanoC6 Zigbee End Device (LED) ===");

    // Set Blue LED Pin
    pinMode(BLUE_LED_PIN, OUTPUT);
    digitalWrite(BLUE_LED_PIN, HIGH);
    Serial.println("Blue LED (G4/GPIO4) initialized");

    zbLight.setManufacturerAndModel("Espressif", "ZigbeeLight");

    zbLight.onLightChange(setLED);

    Zigbee.addEndpoint(&zbLight);

    // Setup End Device
    Serial.println("Starting Zigbee End Device...");
    if (!Zigbee.begin()) {
        Serial.println("Zigbee failed to start!");
        Serial.println("Rebooting in 5 seconds...");
        delay(5000);
        ESP.restart();
    }

    Serial.println("Zigbee End Device started");
    Serial.println("Searching for Zigbee network...");

    // Wait for connecting to network
    while (!Zigbee.connected()) {
        Serial.print(".");
        delay(1000);
    }

    Serial.println("\nConnected to Zigbee network!");
    Serial.println("Waiting for commands from Coordinator...");
}

void loop() {
    // Zigbee network will auto serial print
    delay(100);
}