


Arduino Quick Start
2. Devices & Examples
3. M5Unified
4. M5GFX
5. Extensions
Unit
Atomic
Tab5
IoT
Accessories
Unit Cat1-CN Arduino Tutorial
1. Preparation
- Environment setup: Refer to the Arduino IDE Getting Started Guide to complete IDE installation, and install the corresponding board package and required libraries according to your development board.
- Required libraries:
- Required hardware:


2. Notes
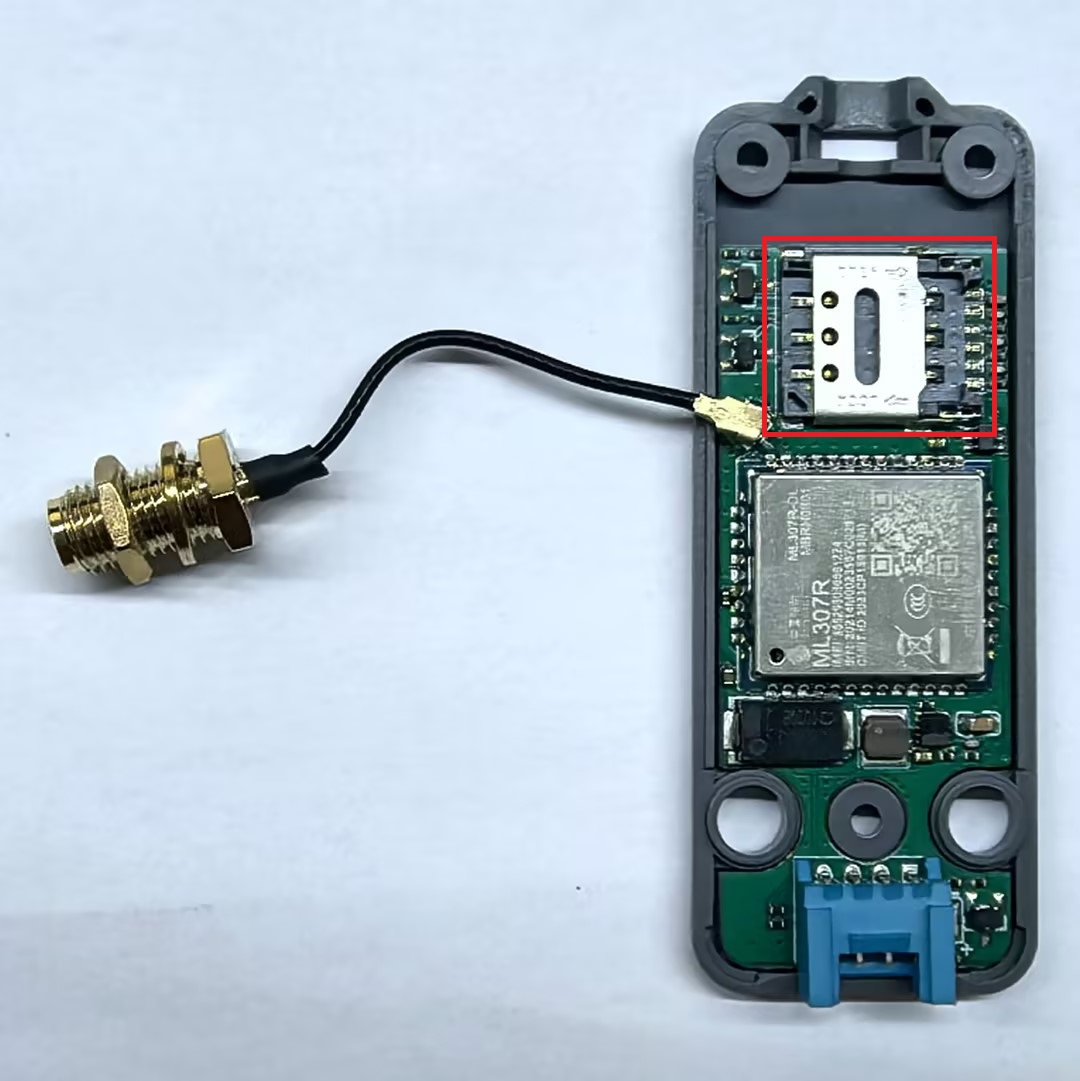
Before using Unit Cat1-CN, make sure an LTE Cat1 network-compatible SIM card has been inserted and data services have been activated (standard SIM cards from China Mobile, China Unicom and China Telecom are supported). The SIM card slot is located inside the module. Use a hex screwdriver to remove the three screws at the bottom of Unit Cat1-CN, then flip it over, and remove the bottom cover. The specific location of the slot is shown in the red box in the image below:
3. Example Programs
- The main controller used in this tutorial is CoreS3, paired with Unit Cat1-CN. This communication module uses UART communication. Modify the pin definitions in the program according to your actual circuit connections. The corresponding UART IOs after device connection are
G17 (RX),G18 (TX).
Unit Cat1-CN supports multiple communication protocols. The following provides example programs for both MQTT and HTTP protocols.
3.1 MQTT
#include <M5Unified.h>
#define TINY_GSM_MODEM_ML307  // Specify to use ML307 module; TinyGsm library adapts instruction set based on this macro, must be placed here
#include <TinyGsmClient.h>
#include <StreamDebugger.h>
#include <PubSubClient.h>

#define SerialMon        Serial             // MCU -> PC for log output
#define MONITOR_BAUDRATE 115200
#define SerialAT         Serial1            // MCU <-> ML307 module communication
#define ML307_BAUDRATE   115200
#define ML307_RESET      -1
#define MCU_TX           17
#define MCU_RX           18
#define MQTT_BROKER      "XXXXXXXX"         // MQTT broker address
#define MQTT_PORT        1883               // MQTT service port
#define mqtt_devid       "XXXXXXXX"         // MQTT client ID
#define mqtt_pubid       "XXXXXXXX"         // MQTT username
#define mqtt_password    "XXXXXXXX"         // MQTT authentication key
#define UPLOAD_INTERVAL  10000              // Data upload interval, 10s

// If you need to see log detail, you can open the following macro definition
// #define DUMP_AT_COMMANDS
// If you need to debug, you can open the following macro definition in TinyGsmClientSIM7028.h line 13
// #define TINY_GSM_DEBUG Serial
#ifdef DUMP_AT_COMMANDS
StreamDebugger debugger(SerialAT, SerialMon);
TinyGsm modem(debugger);
#else
TinyGsm modem(SerialAT);
#endif

TinyGsmClient tcpClient(modem); // Create TCP client based on TinyGsm (MQTT relies on TCP connection)
PubSubClient mqttClient(MQTT_BROKER, MQTT_PORT, tcpClient); // Create MQTT client instance (specify broker, port and TCP client)

void mqttCallback(char *topic, byte *payload, unsigned int len); // Callback function for receiving MQTT messages
bool mqttConnect(void); // Function to establish MQTT connection
void nbConnect(void);   // Function to initialize ML307 and connect to NB-IoT network

const char* topicSub = "Unit Cat1-CN Receive"; // MQTT topic for receiving messages (replace with your actual subscribe topic)
const char* topicPub = "Unit Cat1-CN Send";    // MQTT topic for sending messages (replace with your actual publish topic)
int         num               = 0; // Counter for published messages
uint32_t lastReconnectAttempt = 0; // Timestamp for last MQTT reconnection attempt (avoid frequent retries)
bool lastMqttState = false; // Track MQTT connection status
const char apn[] = "cmnet";

void log(String info)
{
    SerialMon.println(info);
}

void setup()
{
    M5.begin();
    Serial.begin(115200);
    Serial.println(">>ML307 MQTT TEST");
    SerialAT.begin(ML307_BAUDRATE, SERIAL_8N1, MCU_RX, MCU_TX);
    M5.Display.setFont(&fonts::FreeMonoBold9pt7b);
    M5.Display.setCursor(5,0);
    M5.Display.printf("Unit Cat1-CN Example");
    M5.Display.setCursor(0, 120);
    M5.Display.printf("[MQTT RECEIVE] (latest)\n NULL");
    nbConnect(); // Initialize ML307 module and connect to network
    mqttClient.setServer(MQTT_BROKER, MQTT_PORT);  // Set MQTT broker address and port
    mqttClient.setKeepAlive(120);                  // MQTT keep-alive interval (120 seconds)
    mqttClient.setSocketTimeout(15000);            // TCP connection timeout (15 seconds)
    mqttClient.setCallback(mqttCallback);          // Register MQTT message receive callback
}

void loop()
{
    static unsigned long timer = 0;

    // Check for MQTT connection status change (connected <-> disconnected)
    if (mqttClient.connected() != lastMqttState) {
        if (mqttClient.connected()) {
            log("=== MQTT CONNECTED ===");
            M5.Display.fillRect(0, 25, 320, 25, TFT_BLACK);
            M5.Display.setTextColor(TFT_GREEN);
            M5.Display.setCursor(5, 25);
            M5.Display.printf("MQTT CONNECTED");
        } else {
            log("=== MQTT DISCONNECTED ===");
            M5.Display.fillRect(0, 25, 320, 25, TFT_BLACK);
            M5.Display.setCursor(5, 25);
            M5.Display.setTextColor(TFT_RED);
            M5.Display.printf("MQTT DISCONNECTED");
        }
        lastMqttState = mqttClient.connected();
    }

    // MQTT reconnection logic (retry every 3 seconds if disconnected)
    if (!mqttClient.connected()) {
        log(">> MQTT NOT CONNECTED");
        log("MQTT state code: " + String(mqttClient.state()));
        M5.Display.fillRect(0, 25, 320, 25, TFT_BLACK);
        M5.Display.setCursor(5, 25);
        M5.Display.setTextColor(TFT_RED);
        M5.Display.printf("MQTT NOT CONNECTED");
        uint32_t t = millis();
        if (t - lastReconnectAttempt > 3000L) {
            lastReconnectAttempt = t;
            if (mqttConnect()) {
                lastReconnectAttempt = 0;
            }
        }
        delay(100);
    }

    // Periodic data publishing (triggered when timer expires)
    if (millis() >= timer) {
        timer = millis() + UPLOAD_INTERVAL;
        if (mqttClient.connected()) {
            char jsonBuf[256];
            snprintf(jsonBuf, sizeof(jsonBuf), "ML307 MQTT! #%d", num++);
            log(">> [MQTT SEND] Topic: " + String(topicPub));
            log("Info: " + String(jsonBuf));
            mqttClient.publish(topicPub, jsonBuf);
            M5.Display.fillRect(0, 50, 320, 70, TFT_BLACK);
            M5.Display.setCursor(0, 50);
            M5.Display.setTextColor(TFT_WHITE);
            M5.Display.printf("[MQTT SEND]\n Topic: ");
            M5.Display.print(String(topicPub));
            M5.Display.setCursor(0, 85);
            M5.Display.printf(" Info: ");
            M5.Display.print(String(jsonBuf));
        }
    }

    mqttClient.loop();// Process MQTT incoming messages, maintain connection and handle keep-alive
    delay(10);
}

void mqttCallback(char *topic, byte *payload, unsigned int len)
{
    String payloadStr;
    for (unsigned int i = 0; i < len; i++) {
        payloadStr += (char)payload[i];
    }
    log(">> [MQTT RECEIVE] Topic: " + String(topic) + "\nInfo: " + payloadStr);
    M5.Display.fillRect(0, 120, 320, 70, TFT_BLACK);
    M5.Display.setCursor(0, 120);
    M5.Display.setTextColor(TFT_WHITE);
    M5.Display.printf("[MQTT RECEIVE] (latest)\n Topic: ");
    M5.Display.print(String(topic));
    M5.Display.setCursor(0, 155);
    M5.Display.printf(" Info: ");
    M5.Display.print(String(payloadStr));
}

bool mqttConnect(void)
{
    log(">> Connecting to MQTT broker: " + String(MQTT_BROKER));
    bool status = mqttClient.connect(mqtt_devid, mqtt_pubid, mqtt_password);
    if (!status) {
        log("!! MQTT Connection FAILED, code: " + String(mqttClient.state()));
        return false;
    }
    log(">> MQTT CONNECTED, subscribing: " + String(topicSub));
    mqttClient.subscribe(topicSub);
    return true;
}

void nbConnect(void)
{
    unsigned long start = millis();
    log("Initializing modem...");
    while (!modem.init()) {
        log("waiting...." + String((millis() - start) / 1000) + "s");
    };

    start = millis();
    log("Waiting for network...");
    while (!modem.waitForNetwork()) {
        log("waiting...." + String((millis() - start) / 1000) + "s");
    }
    log("success");

    log("Waiting for GPRS connect...");
    if (!modem.gprsConnect(apn)) {
        log("waiting...." + String((millis() - start) / 1000) + "s");
    }
    log("success");
    // Get card number
    String ccid = modem.getSimCCID();
    Serial.println("CCID: " + ccid);
    // Acquire signal strength
    int csq = modem.getSignalQuality();
    Serial.println("Signal quality: " + String(csq));
    // Example Query the IP address of a device
    String ip = modem.getLocalIP();
    log("Device IP address: " + ip);
    log("success");
}3.2 HTTP
#include <M5Unified.h>
#define TINY_GSM_MODEM_ML307  // Specify to use ML307 module; TinyGsm library adapts instruction set based on this macro, must be placed here
#include <TinyGsmClient.h>
#include <StreamDebugger.h>
#include <ArduinoHttpClient.h>

#define SerialMon        Serial             // MCU -> PC for log output
#define MONITOR_BAUDRATE 115200
#define SerialAT         Serial1            // MCU <-> ML307 module communication
#define ML307_BAUDRATE   115200
#define ML307_RESET      -1
#define MCU_TX           17
#define MCU_RX           18

// If you need to see log detail, you can open the following macro definition
// #define DUMP_AT_COMMANDS
// If you need to debug, you can open the following macro definition in TinyGsmClientSIM7028.h line 13
// #define TINY_GSM_DEBUG Serial
#ifdef DUMP_AT_COMMANDS
StreamDebugger debugger(SerialAT, SerialMon);
TinyGsm modem(debugger);
#else
TinyGsm modem(SerialAT);
#endif

// Server details
const char server[]   = "api.m5stack.com";
const char resource[] = "/v1"; // API endpoint path
const int port        = 80;    // HTTP port
TinyGsmClient client(modem); // Create TCP client based on TinyGsm (HTTP relies on TCP connection)
HttpClient http(client, server, port); // Create HTTP client instance (specify TCP client, server and port)

void modemConnect(void);// Initialize ML307 module and establish network connection

const char apn[] = "cmnet"; // APN (Access Point Name) configuration: "cmnet" for China Mobile, "3GNET" for China Unicom, "CTNET" for China Telecom

void log(String info)
{
    SerialMon.println(info);
}

void setup()
{
    M5.begin();
    Serial.begin(115200);
    log(">>ML307 HTTP TEST");
    SerialAT.begin(ML307_BAUDRATE, SERIAL_8N1, MCU_RX, MCU_TX);
    M5.Display.clear();
    M5.Display.setFont(&fonts::FreeMonoBold9pt7b);
    M5.Display.setCursor(5,0);
    M5.Display.printf("Unit Cat1-CN Example");
    modemConnect(); // Initialize ML307 module and connect to network
}

void loop()
{
    SerialMon.print(F("Performing HTTP GET request... "));
    M5.Display.fillRect(0, 25, 320, 215, TFT_BLACK);
    M5.Display.setTextColor(TFT_YELLOW);
    M5.Display.setCursor(5,25);
    M5.Display.printf("HTTP GET request...");
    // Send HTTP GET request to the specified resource (server + resource = http://api.m5stack.com/v1)
    int err = http.get(resource);
    if (err != 0) {
        log(F("failed to connect"));
        delay(10000);
        return;
    }
    else {
        M5.Display.fillRect(0, 25, 320, 25, TFT_BLACK);
        M5.Display.setTextColor(TFT_GREEN);
        M5.Display.setCursor(5,25);
        M5.Display.printf(server);
        M5.Display.printf(resource);
    }
    // Get HTTP response status code (e.g., 200=Success, 404=Not Found, 500=Server Error)
    int status = http.responseStatusCode();
    SerialMon.print(F("Response status code: "));
    log(String(status));
    M5.Display.setTextColor(TFT_WHITE);
    M5.Display.printf("\n\n Response status code: ");
    M5.Display.print(String(status));M5.Display.println();
    if (!status) {
        delay(10000);
        return;
    }
    // Log all HTTP response headers (metadata about the response)
    log(F("Response Headers:"));
    // Loop through all available response headers (header name + value pairs)
    while (http.headerAvailable()) {
        String headerName  = http.readHeaderName(); // Read header name (e.g., "Content-Type")
        String headerValue = http.readHeaderValue();// Read header value (e.g., "text/plain")
        log("    " + headerName + " : " + headerValue); // Log header in "Name : Value" format
    }

    int length = http.contentLength();
    if (length >= 0) {
        SerialMon.print(F("Content length is: "));
        log(String(length));
        M5.Display.printf("\n Content length is: %d\n", length);
    }
    // Check if the response uses chunked transfer encoding (common for dynamic content)
    if (http.isResponseChunked()) {
        log(F("The response is chunked"));
    }
    // Read the full HTTP response body (the actual data returned by the server)
    String body = http.responseBody();
    log(F("Response:"));
    log("    " + body);
    M5.Display.printf("\n Response: ");
    M5.Display.print(body);M5.Display.println();

    SerialMon.print(F("Body length is: "));
    log(String(body.length()));
    M5.Display.printf("\n Body length is: ");
    M5.Display.print(String(body.length()));M5.Display.println();

    http.stop(); // Close the HTTP connection to release resources
    log(F("Server disconnected"));
    delay(5000); // Wait 5 seconds before sending the next HTTP request
}

void modemConnect(void)
{
    unsigned long start = millis();
    log("Initializing modem...");
    while (!modem.init()) {
        log("waiting...." + String((millis() - start) / 1000) + "s");
    };

    start = millis();
    log("Waiting for network...");
    while (!modem.waitForNetwork()) {
        log("waiting...." + String((millis() - start) / 1000) + "s");
    }
    log("success");

    log("Waiting for GPRS connect...");
    if (!modem.gprsConnect(apn)) {
        log("waiting...." + String((millis() - start) / 1000) + "s");
    }
    log("success");
    // Get card number
    String ccid = modem.getSimCCID();
    log("CCID: " + ccid);
    // Acquire signal strength
    int csq = modem.getSignalQuality();
    log("Signal quality: " + String(csq));
    // Example Query the IP address of a device
    String ip = modem.getLocalIP();
    log("Device IP address: " + ip);
    log("success");
}4. Compiling and Uploading
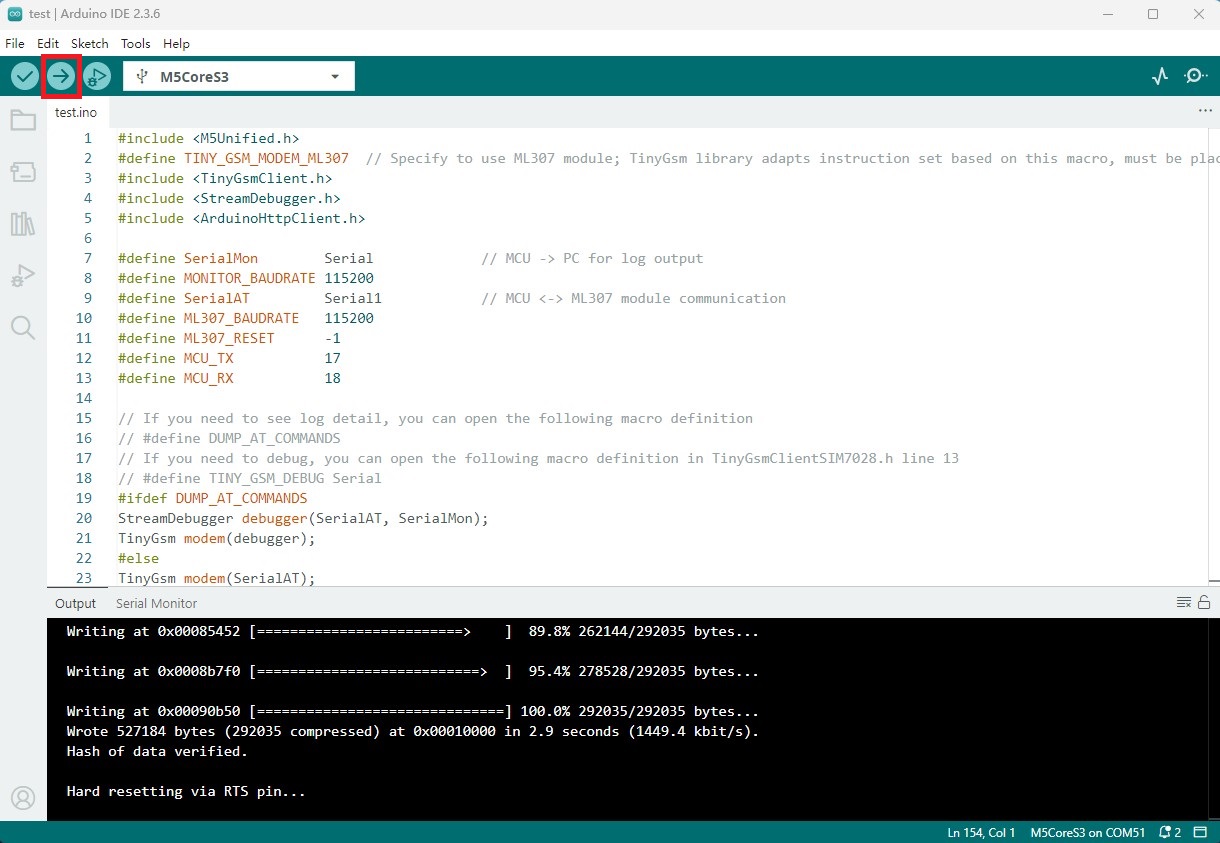
- 1. Enter download mode: Press and hold the reset button on CoreS3-SE (approximately 2 seconds) until the internal green LED lights up, then release it. The device is now in download mode, waiting for programming.
- 2. Select the device port and click the compile and upload button in the upper left corner of Arduino IDE. Wait for the program to complete compilation and upload to the device.
5. Example Output
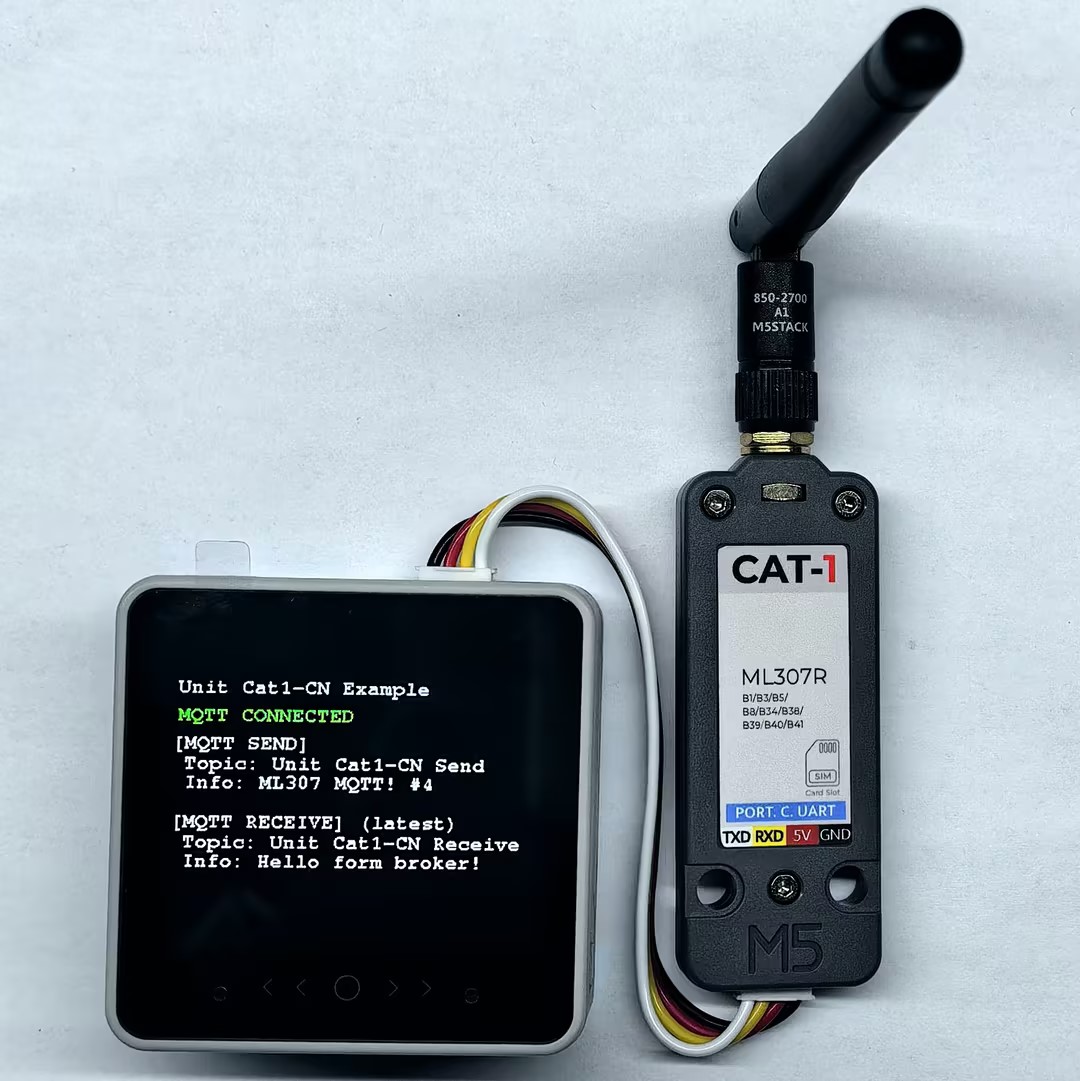
- MQTT Communication
After power-on, the serial monitor will output information about network and MQTT server connection. After successful connection, the device will publish a message to the server every 10 seconds. When the subscribed topic receives messages, it will print the received message content.
Serial monitor feedback is as follows:
>>ML307 MQTT TEST
Initializing modem...
Waiting for network...
success
Waiting for GPRS connect...
success
CCID: 898600B11925F0192677
Signal quality: 31
Device IP address: 10.42.155.4
success
>> Connecting to MQTT broker: mqtt.m5stack.com
>> MQTT CONNECTED, subscribing: Unit Cat1-CN Receive
=== MQTT CONNECTED ===
>> [MQTT SEND] Topic: Unit Cat1-CN Send
Info: ML307 MQTT! #0
......
>> [MQTT RECEIVE] Topic: Unit Cat1-CN Receive
Info: Hello from MQTT Broker- HTTP Communication
After power-on, the serial monitor will output information about network connection. After successful connection, the device will send HTTP GET requests to the specified server and print the returned status code, response headers, and response body content.
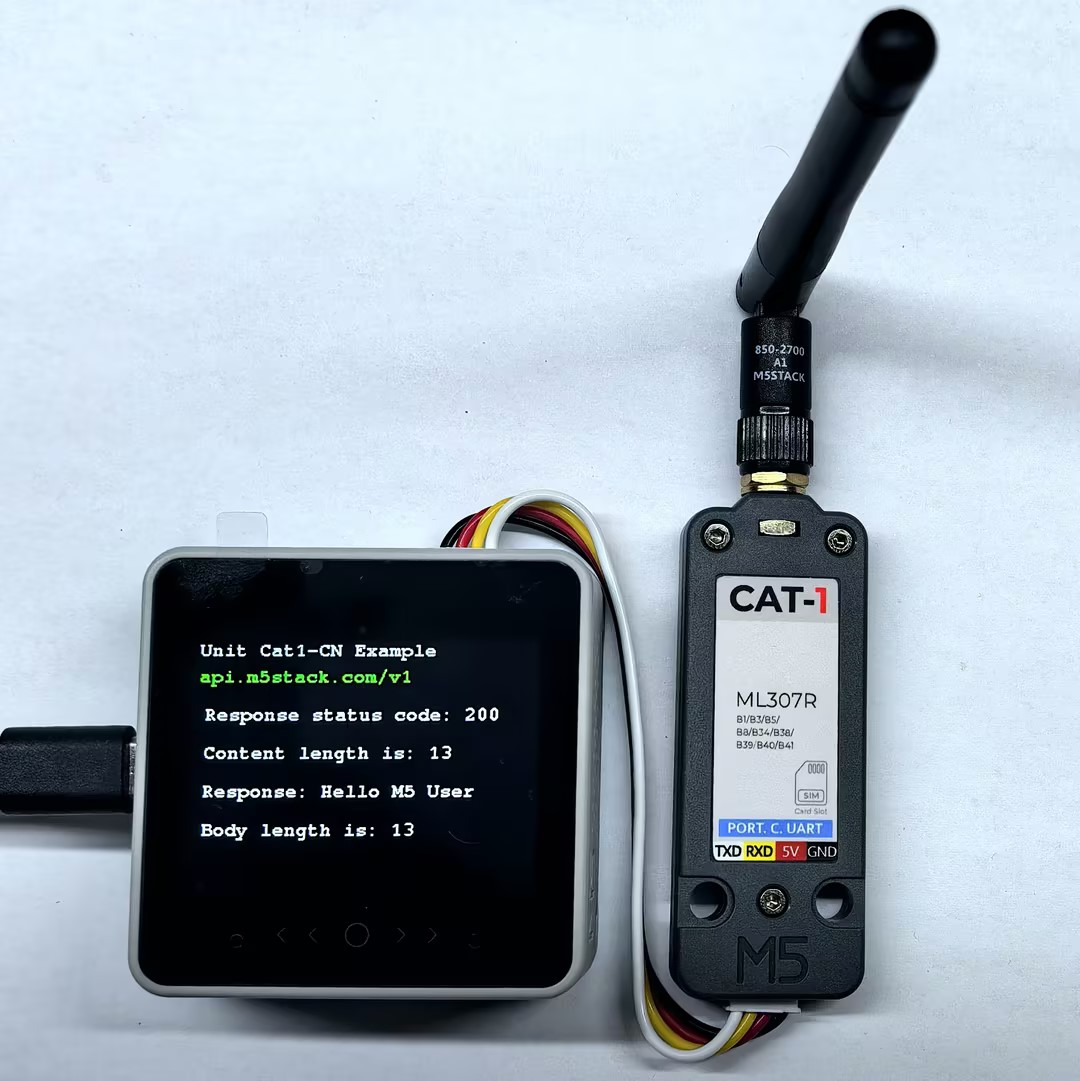
Serial monitor feedback is as follows:
Performing HTTP GET request... Response status code: 200
Response Headers:
    Server : nginx/1.14.0 (Ubuntu)
    Date : Tue, 25 Nov 2025 07:27:26 GMT
    Content-Type : text/plain;charset=UTF-8
    Content-Length : 13
    Connection : close
    Vary : Origin
    Vary : Access-Control-Request-Method
    Vary : Access-Control-Request-Headers
    X-Content-Type-Options : nosniff
    X-XSS-Protection : 1; mode=block
    Cache-Control : no-cache, no-store, max-age=0, must-revalidate
    Pragma : no-cache
    Expires : 0
    X-Frame-Options : DENY
Content length is: 13
Response:
    Hello M5 User
Body length is: 13
Server disconnected