

Arduino入門
2. デバイス&サンプル
3. M5Unified
4. M5GFX
5. 拡張モジュール&サンプル
Unit
Atomic
Tab5
IoT
アクセサリー
NanoC6 Zigbee Arduino
NanoC6 Zigbee Arduino に関連するサンプルプログラム。
準備作業
コンパイル要件
- M5Stack ボードマネージャーバージョン >= 3.2.5
- 開発ボードオプション = M5NanoC6
Zigbee サーモスタット(コーディネータ)
このサンプルは、Zigbee コーディネータ(Coordinator)を設定し、サーモスタットとして使用して以下の機能を実現する方法を示します。
- Zigbee コーディネータとして動作
- 温度センサーデータを受信
- 温度センサーのレポート間隔を設定
- シリアルに温度および設定情報を表示
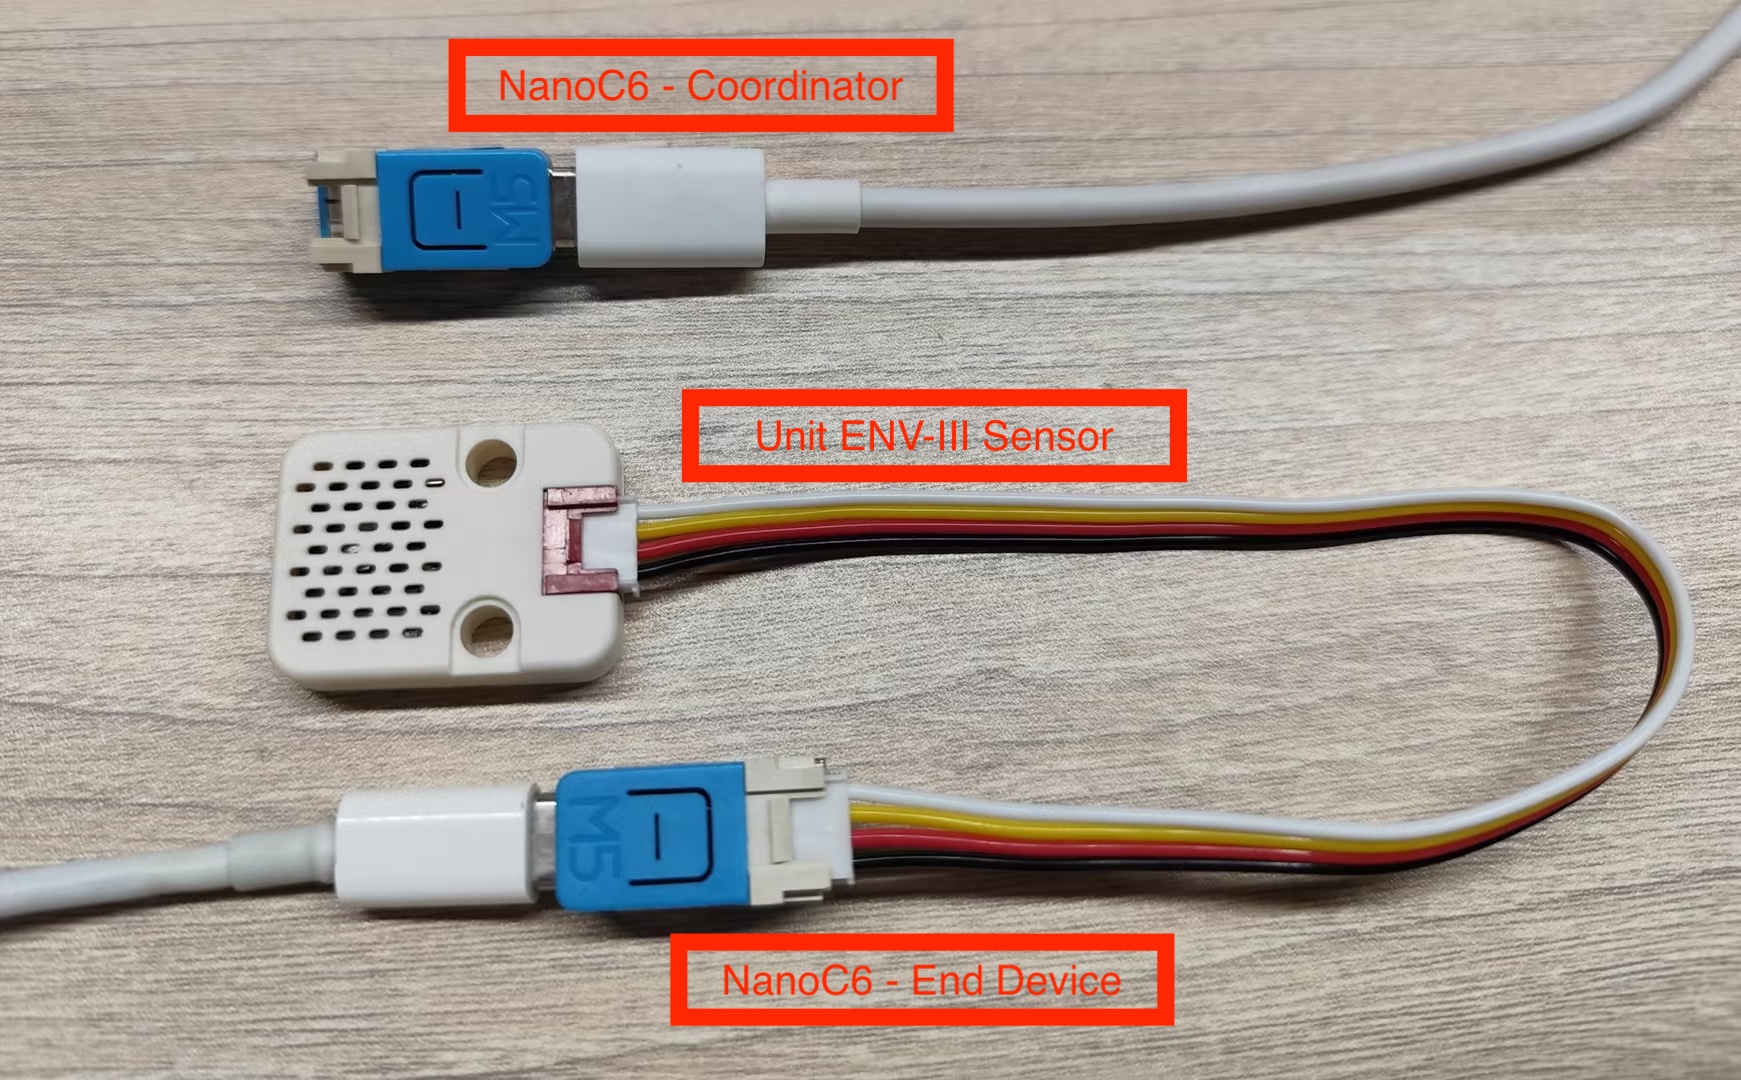
ハードウェア要件
- NanoC6 ×1(Zigbee コーディネータ、サーモスタット例を実行)
- NanoC6 ×1(Zigbee エンドデバイス、温度センサー例を実行)
- Unit ENV-III ×1(環境温度測定用)
設定説明
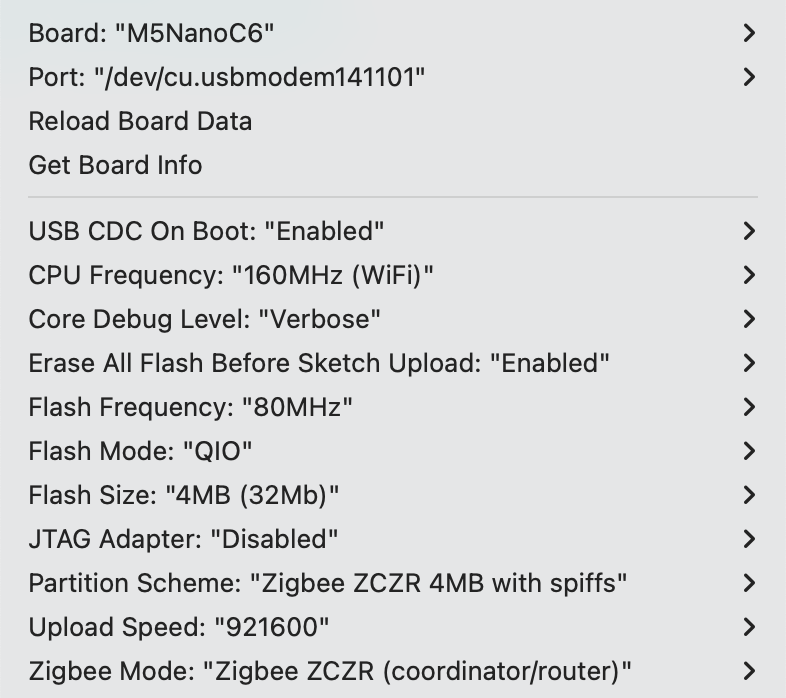
Arduino IDE ツールメニュー設定:
- 正しい開発ボードを選択:
Tools -> Board: M5NanoC6 - USB シリアル起動を有効化:
Tools -> USB CDC On Boot: Enabled - 消去を有効化:
Tools -> Erase All Flash Before Sketch Upload: Enabled(無効の場合、接続失敗の可能性あり) - flash サイズを選択:
Tools -> Flash Size: 4MB - Zigbee パーティションスキームを選択:
Tools -> Partition Scheme: Zigbee ZCZR 4MB with spiffs - コーディネータモードを選択:
Tools -> Zigbee mode: Zigbee ZCZR (coordinator/router) - 正しいシリアルポートを選択:
Tools -> Port
サンプルプログラム
cpp
1 2 3 4 5 6 7 8 9 10 11 12 13 14 15 16 17 18 19 20 21 22 23 24 25 26 27 28 29 30 31 32 33 34 35 36 37 38 39 40 41 42 43 44 45 46 47 48 49 50 51 52 53 54 55 56 57 58 59 60 61 62 63 64 65 66 67 68 69 70 71 72 73 74 75 76 77 78 79 80 81 82 83 84 85 86 87 88 89 90 91 92 93
#ifndef ZIGBEE_MODE_ZCZR
#error "Zigbee coordinator mode is not selected in Tools->Zigbee mode"
#endif

#include "Zigbee.h"

// 定義エンドポイント番号
#define THERMOSTAT_ENDPOINT_NUMBER 5

// Zigbee サーモスタットオブジェクトを作成(温度データ受信)
ZigbeeThermostat zbThermostat = ZigbeeThermostat(THERMOSTAT_ENDPOINT_NUMBER);

// 温度データ変数
float sensor_temp = 0.0;
float sensor_max_temp = 120.0;
float sensor_min_temp = -40.0;
float sensor_tolerance = 1.0;

// 温度受信コールバック関数
void receiveSensorTemp(float temperature) {
    Serial.printf("Temperature received: %.2f°C\n", temperature);
    sensor_temp = temperature;
}

// センサー設定受信コールバック関数
void receiveSensorConfig(float min_temp, float max_temp, float tolerance) {
    Serial.printf("Sensor config: min=%.2f°C, max=%.2f°C, tolerance=%.2f°C\n",
                   min_temp, max_temp, tolerance);
    sensor_min_temp = min_temp;
    sensor_max_temp = max_temp;
    sensor_tolerance = tolerance;
}

void setup() {
    Serial.begin(115200);
    delay(1000);
    Serial.println("=== NanoC6 Zigbee Coordinator ===");

    // コールバック関数を設定
    zbThermostat.onTempReceive(receiveSensorTemp);
    zbThermostat.onConfigReceive(receiveSensorConfig);

    // デバイス情報を設定
    zbThermostat.setManufacturerAndModel("Espressif", "ZigbeeThermostat");

    // エンドポイントを追加
    Zigbee.addEndpoint(&zbThermostat);

    // ネットワークを 180 秒間オープン
    Zigbee.setRebootOpenNetwork(180);

    // コーディネータを起動
    Serial.println("Starting Zigbee Coordinator...");
    if (!Zigbee.begin(ZIGBEE_COORDINATOR)) {
        Serial.println("Zigbee failed to start!");
        Serial.println("Rebooting...");
        ESP.restart();
    }

    Serial.println("Zigbee Coordinator started");
    Serial.println("Network is open for 180 seconds");
    Serial.println("Waiting for temperature sensor to bind...");

    // End Device のバインドを待機
    while (!zbThermostat.bound()) {
        Serial.print(".");
        delay(500);
    }

    Serial.println("\nTemperature sensor bound successfully!");

    // レポート間隔を一度だけ設定
    zbThermostat.setTemperatureReporting(0, 10, 2);
    Serial.println("Temperature reporting configured");

    // センサー設定を取得
    zbThermostat.getSensorSettings();
}

void loop() {
    // 定期的に温度データを表示
    static uint32_t last_print = 0;
    if (millis() - last_print > 10000) {
        last_print = millis();

        int temp_percent = (int)((sensor_temp - sensor_min_temp) /
                                 (sensor_max_temp - sensor_min_temp) * 100);
        Serial.printf("Current temperature: %.2f°C (%d%%)\n",
                      sensor_temp, temp_percent);
    }

    delay(100);
}使用手順
- サーモスタットコードをコーディネータ(Coordinator)デバイスに書き込む
- 温度センサーコードをエンドデバイス(End Device)に書き込む
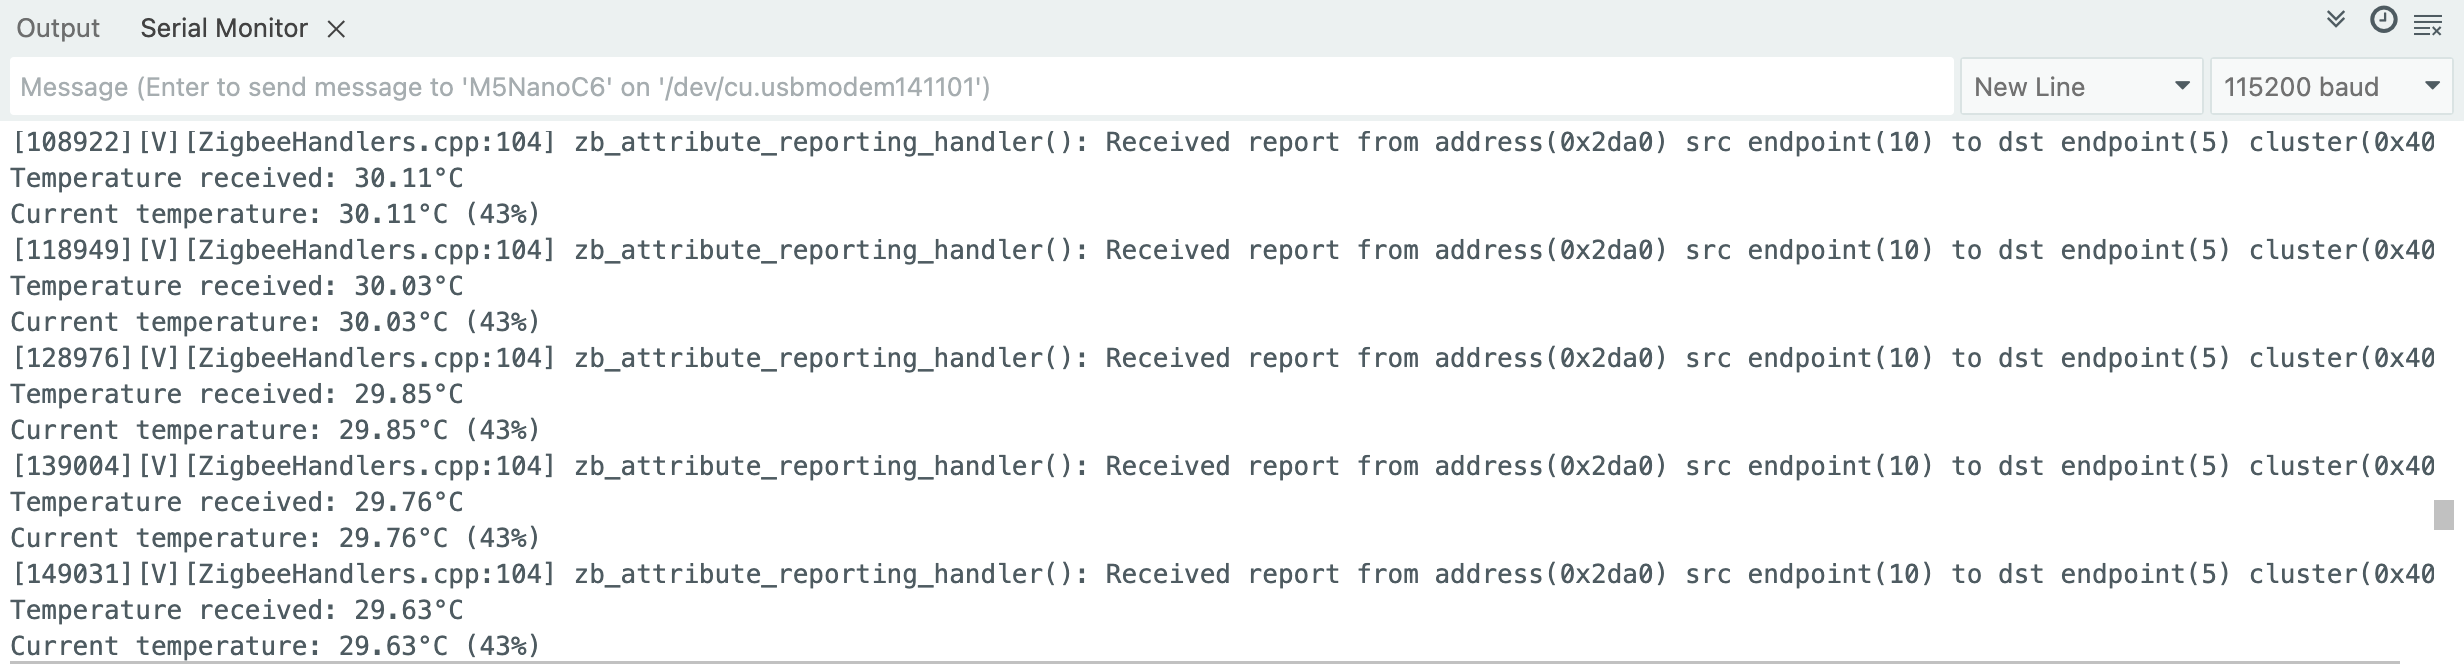
- コーディネータ起動後、自動的にネットワークを作成しデバイス参加を待機、10 秒ごとに現在の温度情報を表示
- シリアルモニタで温度データを確認し、温度変化時の自動レポートおよび設定情報の受信を確認
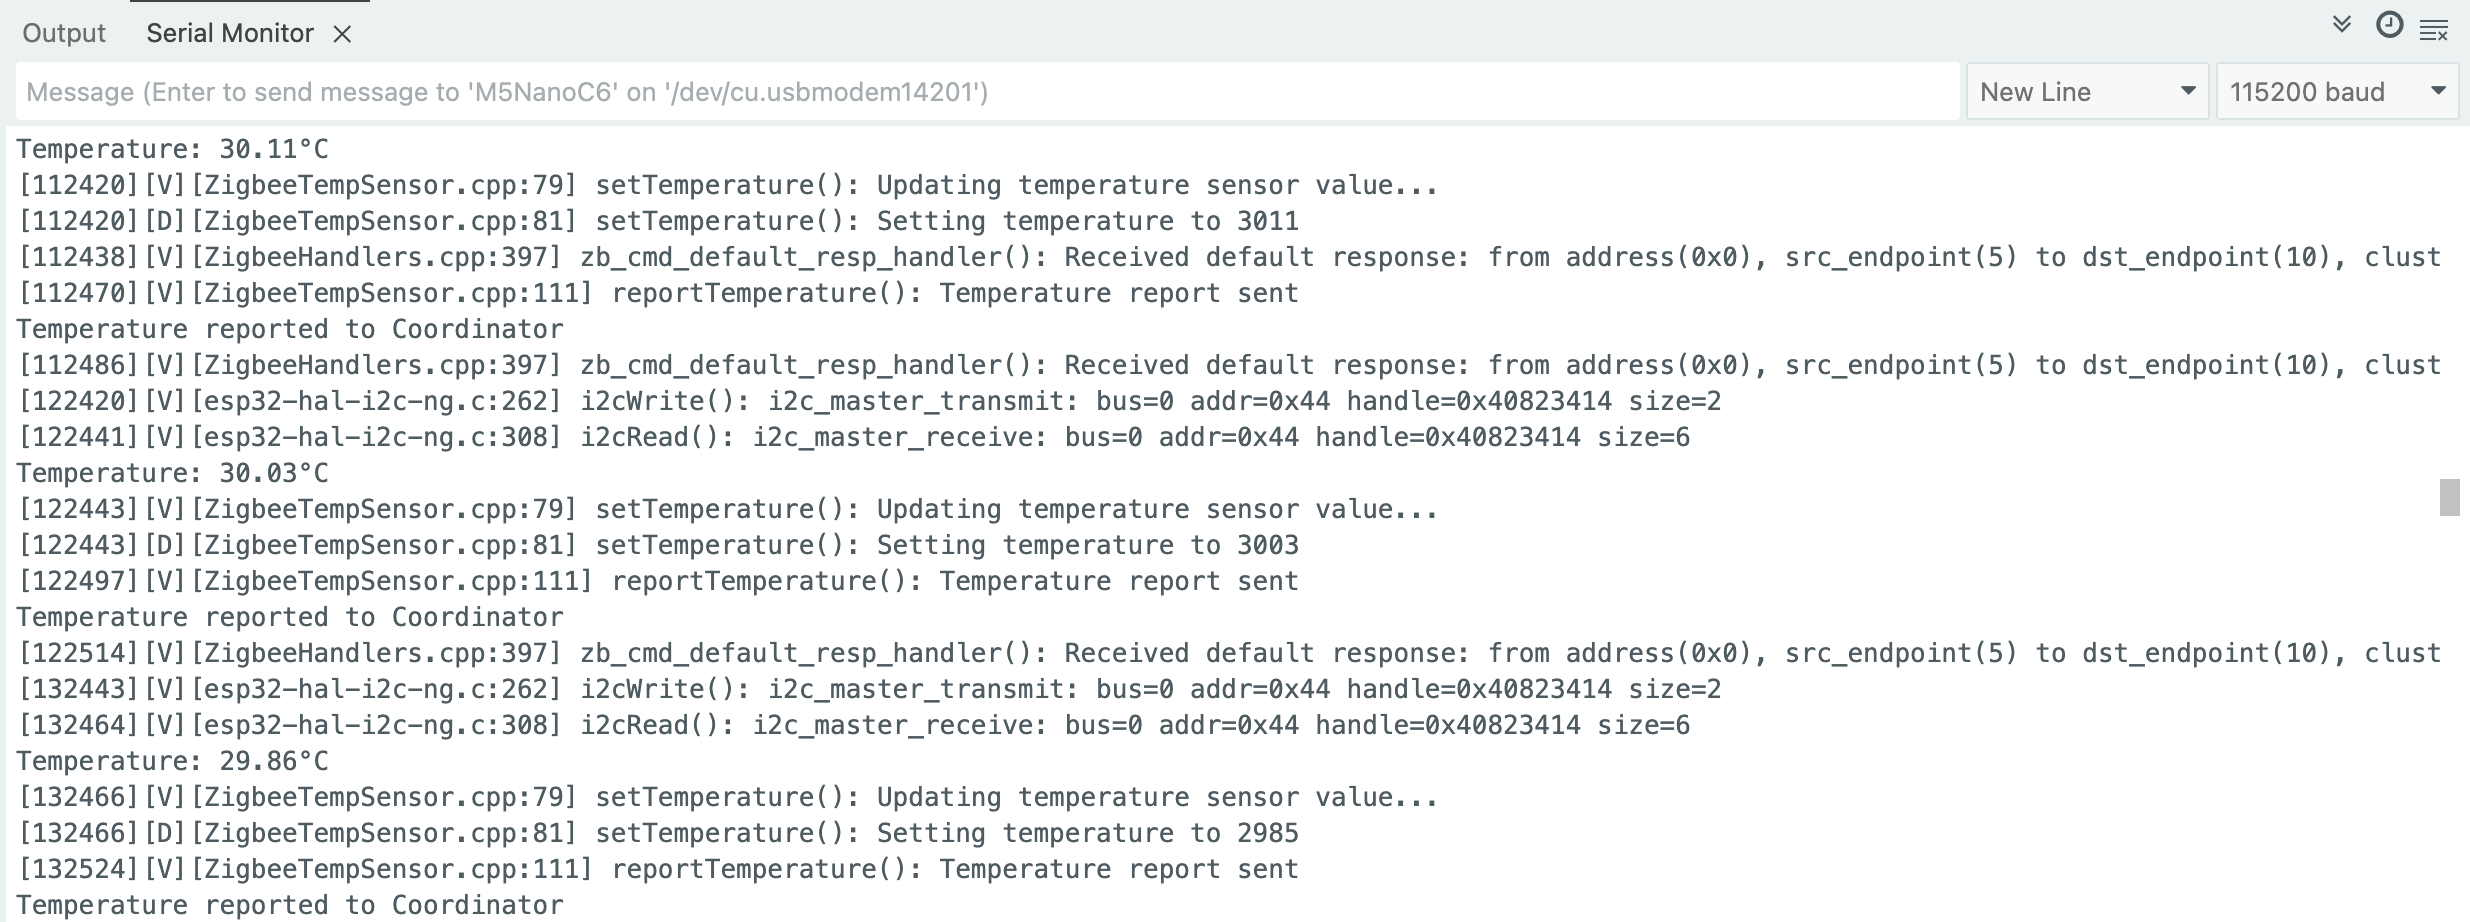
Zigbee 温度センサー
このサンプルは、Zigbee エンドデバイス(End Device)を設定し、家庭用オートメーション(HA)温度センサーとして使用する方法を示します。
- Zigbee エンドデバイスとして動作
- チップ温度データを読み取り
- 定期的にコーディネータへ温度をレポート
- 要求に応じた温度レポートをサポート
設定説明
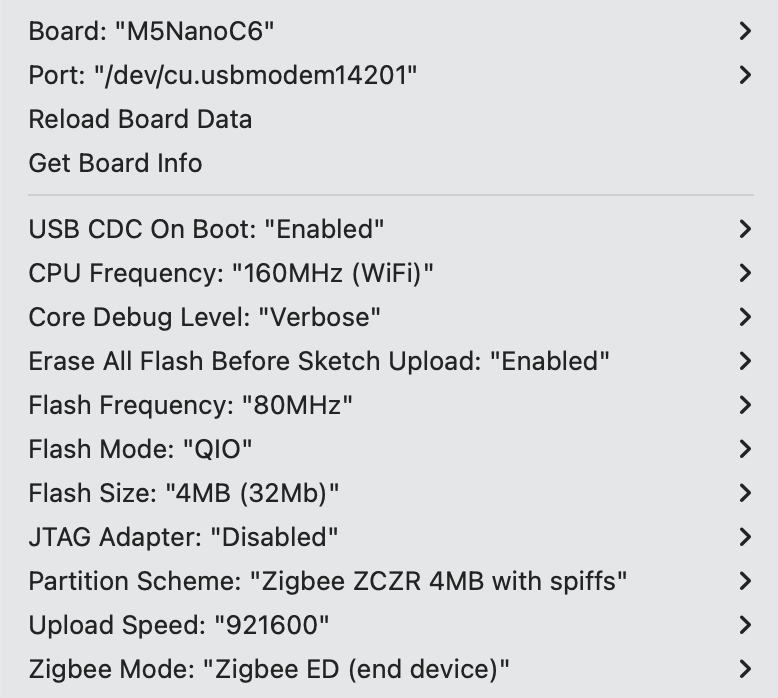
Arduino IDE ツールメニュー設定:
- 正しい開発ボードを選択:
Tools -> Board: M5NanoC6 - USB シリアル起動を有効化:
Tools -> USB CDC On Boot: Enabled - 消去を有効化:
Tools -> Erase All Flash Before Sketch Upload: Enabled(無効の場合、接続失敗の可能性あり) - flash サイズを選択:
Tools -> Flash Size: 4MB - Zigbee パーティションスキームを選択:
Tools -> Partition Scheme: Zigbee ZCZR 4MB with spiffs - エンドデバイスモードを選択:
Tools -> Zigbee mode: Zigbee ED (end device) - 正しいシリアルポートを選択:
Tools -> Port
サンプルプログラム
cpp
1 2 3 4 5 6 7 8 9 10 11 12 13 14 15 16 17 18 19 20 21 22 23 24 25 26 27 28 29 30 31 32 33 34 35 36 37 38 39 40 41 42 43 44 45 46 47 48 49 50 51 52 53 54 55 56 57 58 59 60 61 62 63 64 65 66 67 68 69 70 71 72 73 74 75 76 77 78 79 80 81 82 83 84 85 86 87 88 89 90 91 92 93 94 95 96 97 98 99 100 101 102 103 104 105 106 107 108 109 110 111 112 113 114 115 116 117 118 119 120 121 122 123 124 125 126 127 128 129 130 131 132 133 134 135 136 137 138 139 140 141 142 143 144 145 146 147 148
#ifndef ZIGBEE_MODE_ED
#error "Zigbee end device mode is not selected in Tools->Zigbee mode"
#endif

#include "Zigbee.h"
#include <Wire.h>

// 定義エンドポイント番号
#define TEMP_SENSOR_ENDPOINT_NUMBER 10

// 定義 SHT30 I2C アドレス
#define SHT30_I2C_ADDR 0x44

// NanoH2 Grove インターフェースの I2C ピン
#define I2C_SDA 2   // G2 = GPIO2 (黄色線)
#define I2C_SCL 1   // G1 = GPIO1 (白色線)

// Zigbee 温度センサーオブジェクトを作成
ZigbeeTempSensor zbTempSensor = ZigbeeTempSensor(TEMP_SENSOR_ENDPOINT_NUMBER);

// 温度データ変数
float temperature = 0.0;

// タスク同期フラグ
volatile bool temp_updated = false;

/************************ SHT30 温度読み取り関数(温度のみ)*****************************/
bool readSHT30Temperature(float &temp) {
    // 測定コマンド送信(高再現性測定)
    Wire.beginTransmission(SHT30_I2C_ADDR);
    Wire.write(0x2C);
    Wire.write(0x06);

    if (Wire.endTransmission() != 0) {
        Serial.println("SHT30 communication failed!");
        return false;
    }

    delay(20);

    Wire.requestFrom(SHT30_I2C_ADDR, 6);

    if (Wire.available() < 6) {
        Serial.println("SHT30 data not available!");
        return false;
    }

    uint8_t tempData[3];
    for (int i = 0; i < 3; i++) {
        tempData[i] = Wire.read();
    }

    for (int i = 0; i < 3; i++) {
        Wire.read();
    }

    uint16_t rawTemp = (tempData[0] << 8) | tempData[1];
    temp = -45.0 + 175.0 * ((float)rawTemp / 65535.0);

    if (temp < -40.0 || temp > 125.0) {
        Serial.printf("Invalid temperature: %.2f°C\n", temp);
        return false;
    }

    return true;
}

/************************ 温度読み取りタスク *****************************/
static void temp_sensor_value_update(void *arg) {
    for (;;) {
        if (readSHT30Temperature(temperature)) {
            Serial.printf("Temperature: %.2f°C\n", temperature);
            zbTempSensor.setTemperature(temperature);
            temp_updated = true;
        } else {
            Serial.println("Failed to read SHT30");
        }

        delay(10000);
    }
}

void setup() {
    Serial.begin(115200);
    delay(1000);
    Serial.println("=== NanoC6 End Device + Unit ENV III (Temperature Only) ===");

    Wire.begin(I2C_SDA, I2C_SCL, 100000);
    Serial.printf("I2C initialized (SDA=GPIO%d, SCL=GPIO%d, 100kHz)\n",
                  I2C_SDA, I2C_SCL);

    delay(100);

    Serial.println("Scanning I2C bus...");
    Wire.beginTransmission(SHT30_I2C_ADDR);
    uint8_t error = Wire.endTransmission();

    if (error == 0) {
        Serial.println("SHT30 detected at address 0x44");
    } else {
        Serial.printf("SHT30 not found! Error code: %d\n", error);
        Serial.println("\n   Expected wiring:");
        Serial.println("   - Black (GND) → GND");
        Serial.println("   - Red (5V) → 5V");
        Serial.println("   - Yellow (SDA) → G2 (GPIO2)");
        Serial.println("   - White (SCL) → G1 (GPIO1)");
        while (1) delay(1000);
    }

    zbTempSensor.setManufacturerAndModel("Espressif", "TempSensor");
    zbTempSensor.setMinMaxValue(-40, 120);
    zbTempSensor.setTolerance(1);

    Zigbee.addEndpoint(&zbTempSensor);

    Serial.println("Starting Zigbee End Device...");
    if (!Zigbee.begin()) {
        Serial.println("Zigbee failed to start!");
        Serial.println("Rebooting in 5 seconds...");
        delay(5000);
        ESP.restart();
    }

    Serial.println("Zigbee End Device started");
    Serial.println("Connecting to network...");

    while (!Zigbee.connected()) {
        Serial.print(".");
        delay(1000);
    }

    Serial.println("\nConnected to Zigbee network!");

    xTaskCreate(temp_sensor_value_update, "temp_sensor_update", 4096, NULL, 10, NULL);

    zbTempSensor.setReporting(1, 0, 1);
    Serial.println("Temperature reporting configured");
}

void loop() {
    if (temp_updated) {
        temp_updated = false;
        zbTempSensor.reportTemperature();
        Serial.println("Temperature reported to Coordinator");
    }

    delay(100);
}使用手順
- コーディネータが起動してネットワークを作成していることを確認し、温度センサーコードをエンドデバイスに書き込む
- デバイス起動後、自動的にネットワークを検索して参加し、10 秒ごとに温度を読み取り、温度変化が 0.01°C を超えると自動的にレポート
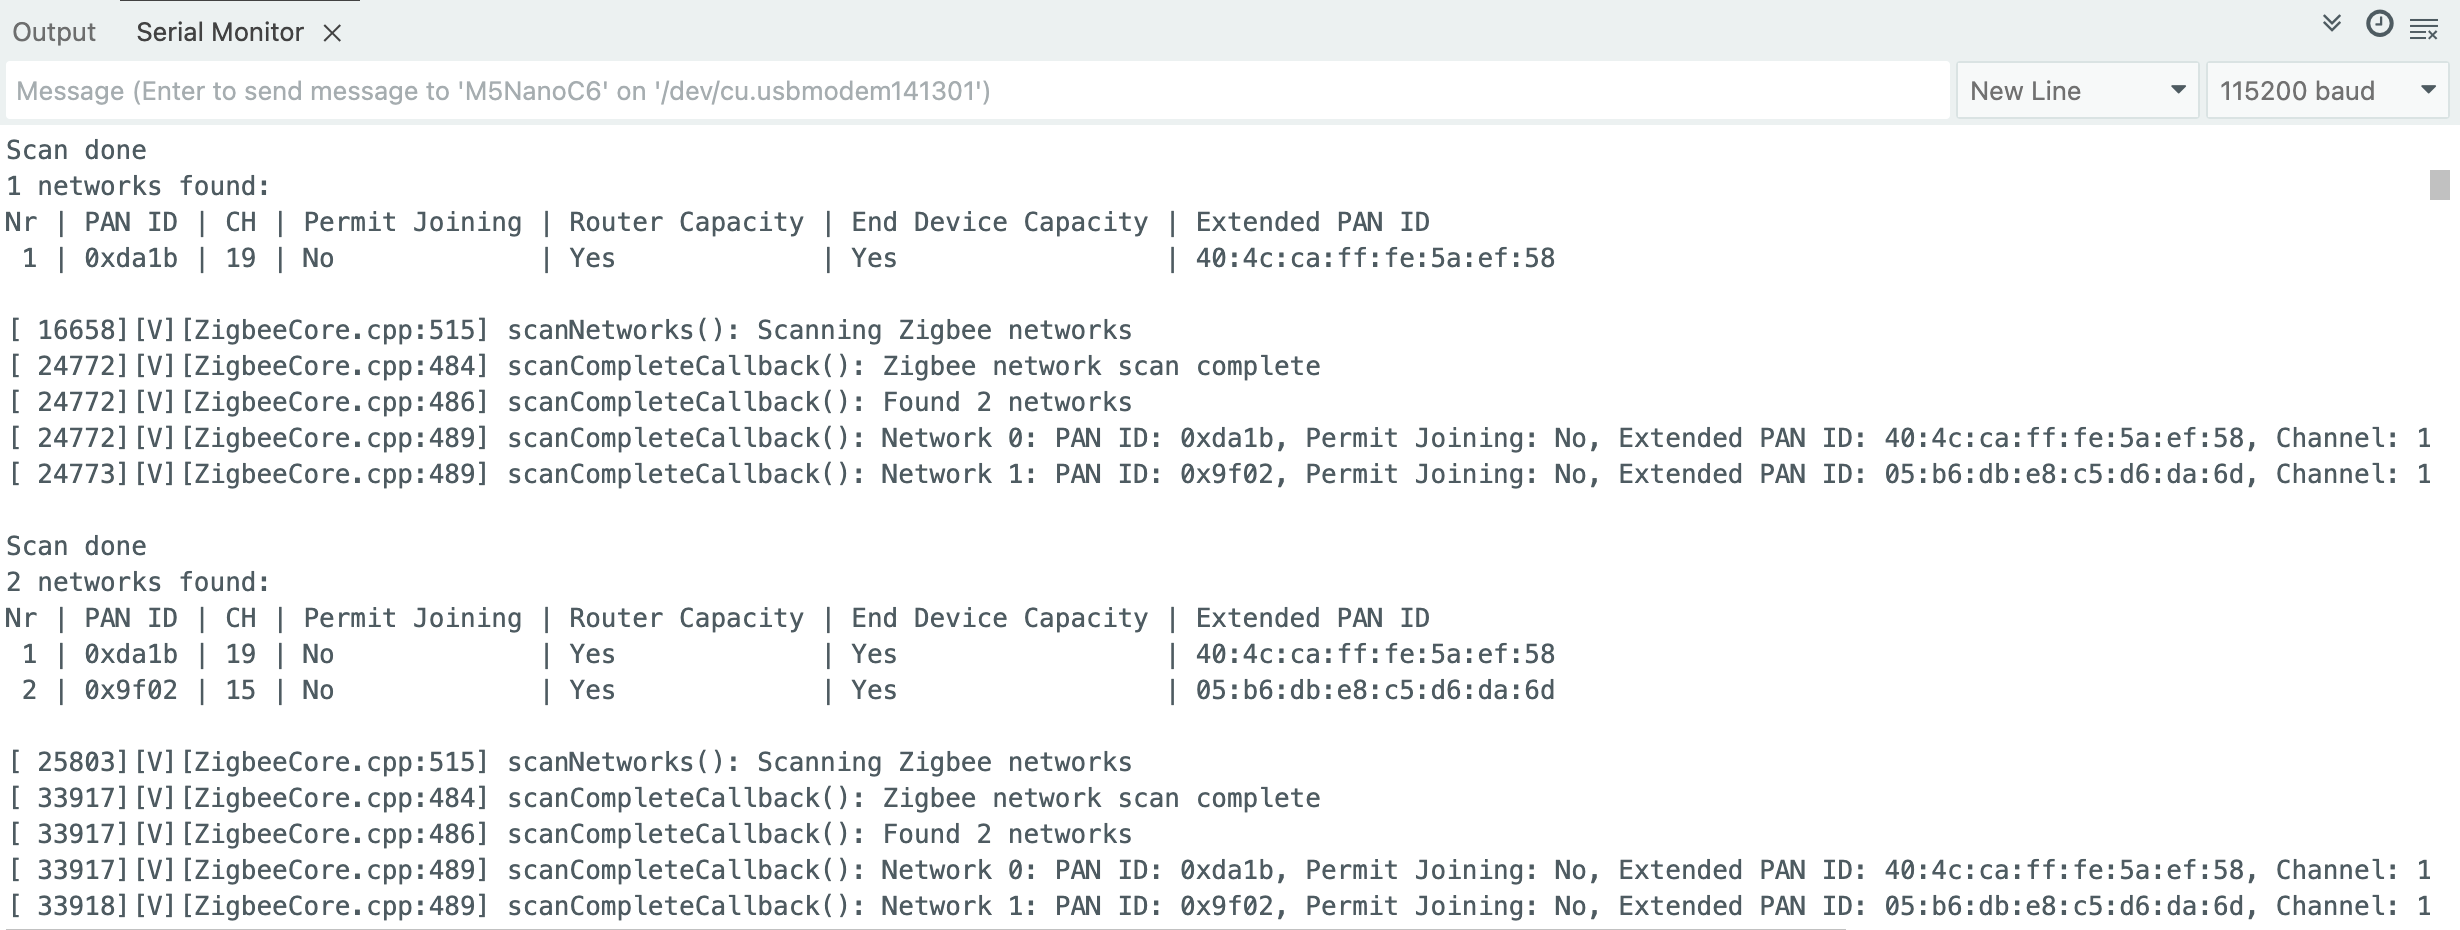
Zigbee ネットワークスキャン
このサンプルは、周囲の Zigbee ネットワークをスキャンし、ネットワーク情報をシリアルに表示します。
- 周囲にアクティブな Zigbee ネットワークがあることを確認し、スキャンコードをデバイスに書き込む
- デバイス起動後、自動的にスキャンを開始し、各スキャン完了時に結果を表示して次のスキャンを開始
サンプルプログラム
cpp
1 2 3 4 5 6 7 8 9 10 11 12 13 14 15 16 17 18 19 20 21 22 23 24 25 26 27 28 29 30 31 32 33 34 35 36 37 38 39 40 41 42 43 44 45 46 47 48 49 50 51 52 53 54 55 56 57 58 59 60 61 62 63 64 65 66 67 68 69 70 71 72 73 74 75
#if !defined(ZIGBEE_MODE_ED) && !defined(ZIGBEE_MODE_ZCZR)
#error "Zigbee device mode is not selected in Tools->Zigbee mode"
#endif

#include "Zigbee.h"

#ifdef ZIGBEE_MODE_ZCZR
zigbee_role_t role = ZIGBEE_ROUTER;
#else
zigbee_role_t role = ZIGBEE_END_DEVICE;
#endif

void printScannedNetworks(uint16_t networksFound) {
    if (networksFound == 0) {
        Serial.println("No networks found");
    } else {
        zigbee_scan_result_t *scan_result = Zigbee.getScanResult();
        Serial.println("\nScan done");
        Serial.print(networksFound);
        Serial.println(" networks found:");
        Serial.println("Nr | PAN ID | CH | Permit Joining | Router Capacity | End Device Capacity | Extended PAN ID");
        for (int i = 0; i < networksFound; ++i) {
        Serial.printf("%2d", i + 1);
        Serial.print(" | ");
        Serial.printf("0x%04hx", scan_result[i].short_pan_id);
        Serial.print(" | ");
        Serial.printf("%2d", scan_result[i].logic_channel);
        Serial.print(" | ");
        Serial.printf("%-14.14s", scan_result[i].permit_joining ? "Yes" : "No");
        Serial.print(" | ");
        Serial.printf("%-15.15s", scan_result[i].router_capacity ? "Yes" : "No");
        Serial.print(" | ");
        Serial.printf("%-19.19s", scan_result[i].end_device_capacity ? "Yes" : "No");
        Serial.print(" | ");
        Serial.printf(
            "%02x:%02x:%02x:%02x:%02x:%02x:%02x:%02x", scan_result[i].extended_pan_id[7], scan_result[i].extended_pan_id[6], scan_result[i].extended_pan_id[5],
            scan_result[i].extended_pan_id[4], scan_result[i].extended_pan_id[3], scan_result[i].extended_pan_id[2], scan_result[i].extended_pan_id[1],
            scan_result[i].extended_pan_id[0]
        );
        Serial.println();
        delay(10);
        }
        Serial.println("");
        Zigbee.scanDelete();
    }
}

void setup() {
    Serial.begin(115200);

    if (!Zigbee.begin(role)) {
        Serial.println("Zigbee failed to start!");
        Serial.println("Rebooting...");
        ESP.restart();
    }

    Serial.println("Setup done, starting Zigbee network scan...");
    Zigbee.scanNetworks();
}

void loop() {
    int16_t ZigbeeScanStatus = Zigbee.scanComplete();
    if (ZigbeeScanStatus < 0) {
        if (ZigbeeScanStatus == ZB_SCAN_FAILED) {
        Serial.println("Zigbee scan has failed. Starting again.");
        delay(1000);
        Zigbee.scanNetworks();
        }
        delay(100);
    } else {
        printScannedNetworks(ZigbeeScanStatus);
        delay(1000);
        Zigbee.scanNetworks();
    }
}使用手順
- 周囲にアクティブな Zigbee ネットワークがあることを確認し、スキャンコードをデバイスに書き込む
- デバイス起動後、自動的にスキャンを開始し、各スキャン完了時に結果を表示して次のスキャンを開始
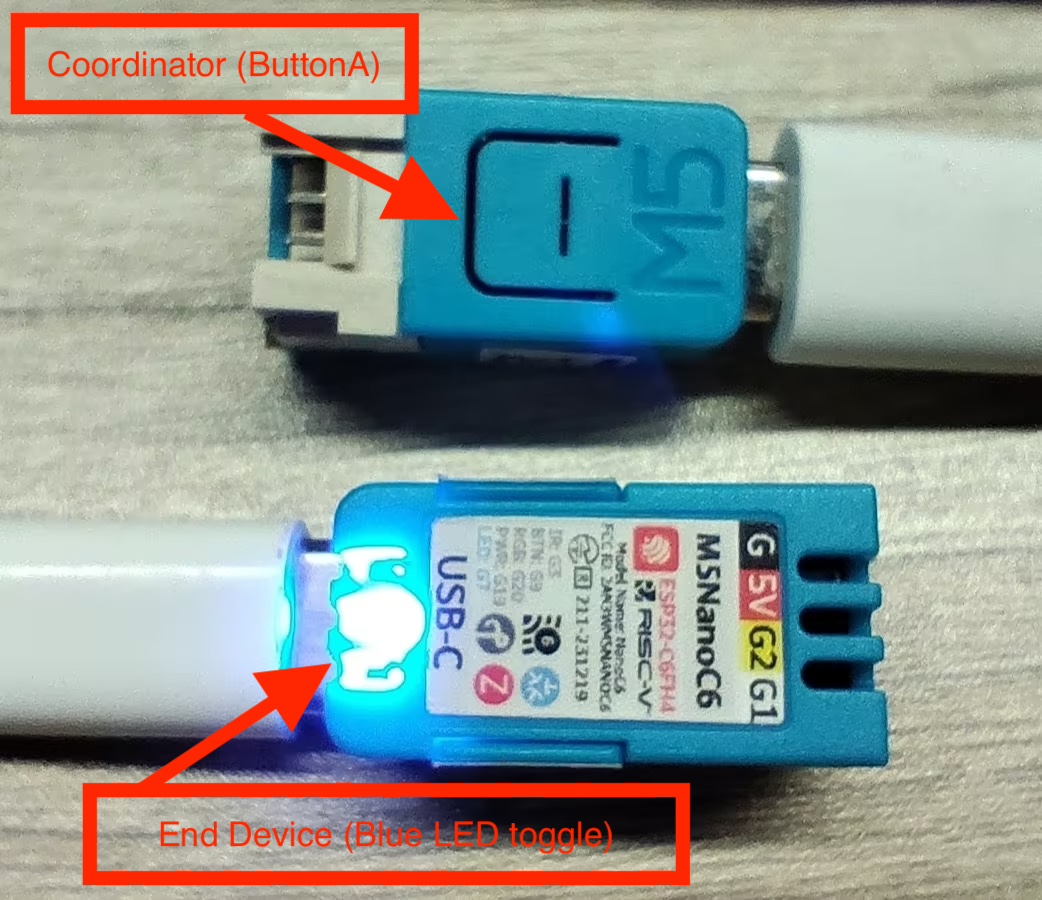
Zigbee Switch(コーディネータ)
このサンプルは、Zigbee コーディネータを設定し、ButtonA を検出してエンドデバイスの青色 LED を制御します。
- Zigbee コーディネータとして動作
- ButtonA の押下を検出
- エンドデバイスの青色 LED の ON/OFF を制御
- 指令情報をシリアルに表示
ハードウェア要件
- NanoC6 ×1(Zigbee コーディネータ/スイッチ)
- NanoC6 ×1(Zigbee エンドデバイス/青色 LED 制御)
設定説明
Arduino IDE ツールメニュー設定:
- 正しい開発ボードを選択:
Tools -> Board: M5NanoC6 - USB シリアル起動を有効化:
Tools -> USB CDC On Boot: Enabled - 消去を有効化:
Tools -> Erase All Flash Before Sketch Upload: Enabled - flash サイズを選択:
Tools -> Flash Size: 4MB - Zigbee パーティションスキーム:
Tools -> Partition Scheme: Zigbee ZCZR 4MB with spiffs - コーディネータモード:
Tools -> Zigbee mode: Zigbee ZCZR (coordinator/router) - 正しいシリアルポート:
Tools -> Port
サンプルプログラム
cpp
1 2 3 4 5 6 7 8 9 10 11 12 13 14 15 16 17 18 19 20 21 22 23 24 25 26 27 28 29 30 31 32 33 34 35 36 37 38 39 40 41 42 43 44 45 46 47 48 49 50 51 52 53 54 55 56 57 58 59 60 61 62 63 64 65 66 67 68 69
#ifndef ZIGBEE_MODE_ZCZR
#error "Zigbee coordinator mode is not selected in Tools->Zigbee mode"
#endif

#include "Zigbee.h"

#define SWITCH_ENDPOINT_NUMBER 5

#define BUTTON_A_PIN 9

ZigbeeSwitch zbSwitch = ZigbeeSwitch(SWITCH_ENDPOINT_NUMBER);

bool led_state = false;

unsigned long last_button_press = 0;
const unsigned long debounce_delay = 200;

void setup() {
    Serial.begin(115200);
    delay(1000);
    Serial.println("=== NanoC6 Zigbee Coordinator (ButtonA Controller) ===");

    pinMode(BUTTON_A_PIN, INPUT_PULLUP);
    Serial.println("ButtonA (G9/GPIO9) initialized");

    zbSwitch.setManufacturerAndModel("Espressif", "ZigbeeSwitch");

    Zigbee.addEndpoint(&zbSwitch);

    Zigbee.setRebootOpenNetwork(180);

    Serial.println("Starting Zigbee Coordinator...");
    if (!Zigbee.begin(ZIGBEE_COORDINATOR)) {
        Serial.println("Zigbee failed to start!");
        ESP.restart();
    }

    Serial.println("Zigbee Coordinator started");
    Serial.println("Waiting for LED device to bind...");

    while (!zbSwitch.bound()) {
        Serial.print(".");
        delay(500);
    }

    Serial.println("\nLED device bound successfully!");
    Serial.println("\nPress ButtonA to toggle LED");
}

void loop() {
    if (digitalRead(BUTTON_A_PIN) == LOW) {
        unsigned long current_time = millis();
        if (current_time - last_button_press > debounce_delay) {
            last_button_press = current_time;
            led_state = !led_state;
            if (led_state) {
                Serial.println("Sending ON command...");
                zbSwitch.lightOn();
            } else {
                Serial.println("Sending OFF command...");
                zbSwitch.lightOff();
            }
            while (digitalRead(BUTTON_A_PIN) == LOW) {
                delay(10);
            }
        }
    }
    delay(10);
}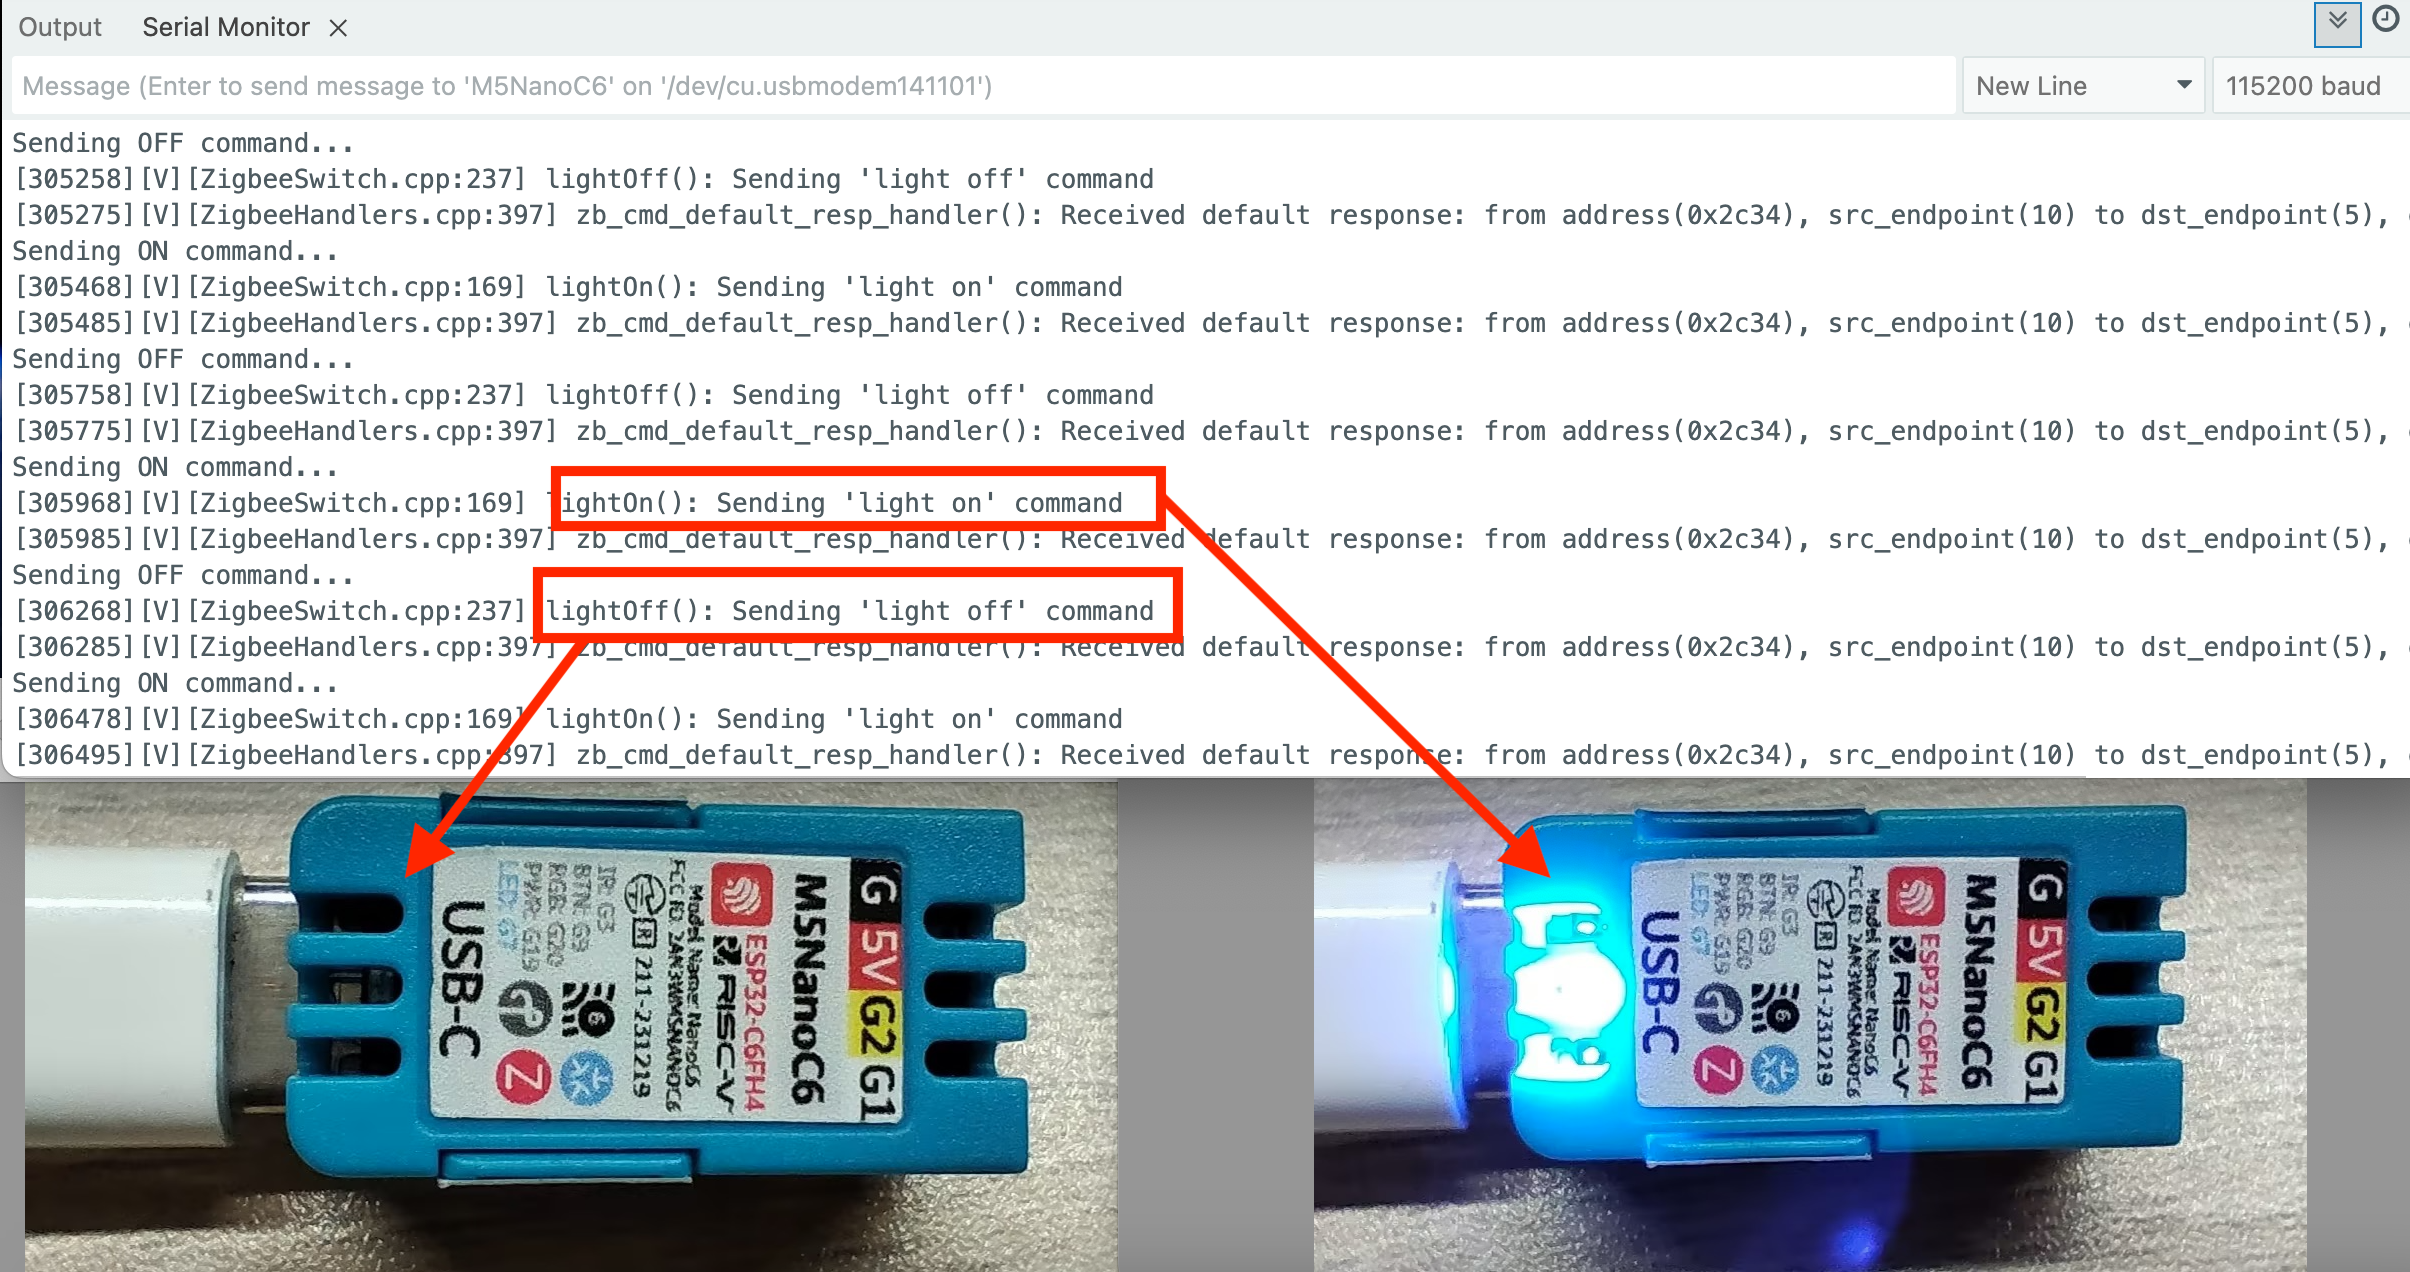
Zigbee コマンド受信による青色 LED 制御
このサンプルは、Zigbee エンドデバイスを設定し、コーディネータからのコマンドで青色 LED を制御します。
- Zigbee エンドデバイスとして動作
- コーディネータからの指令を受信
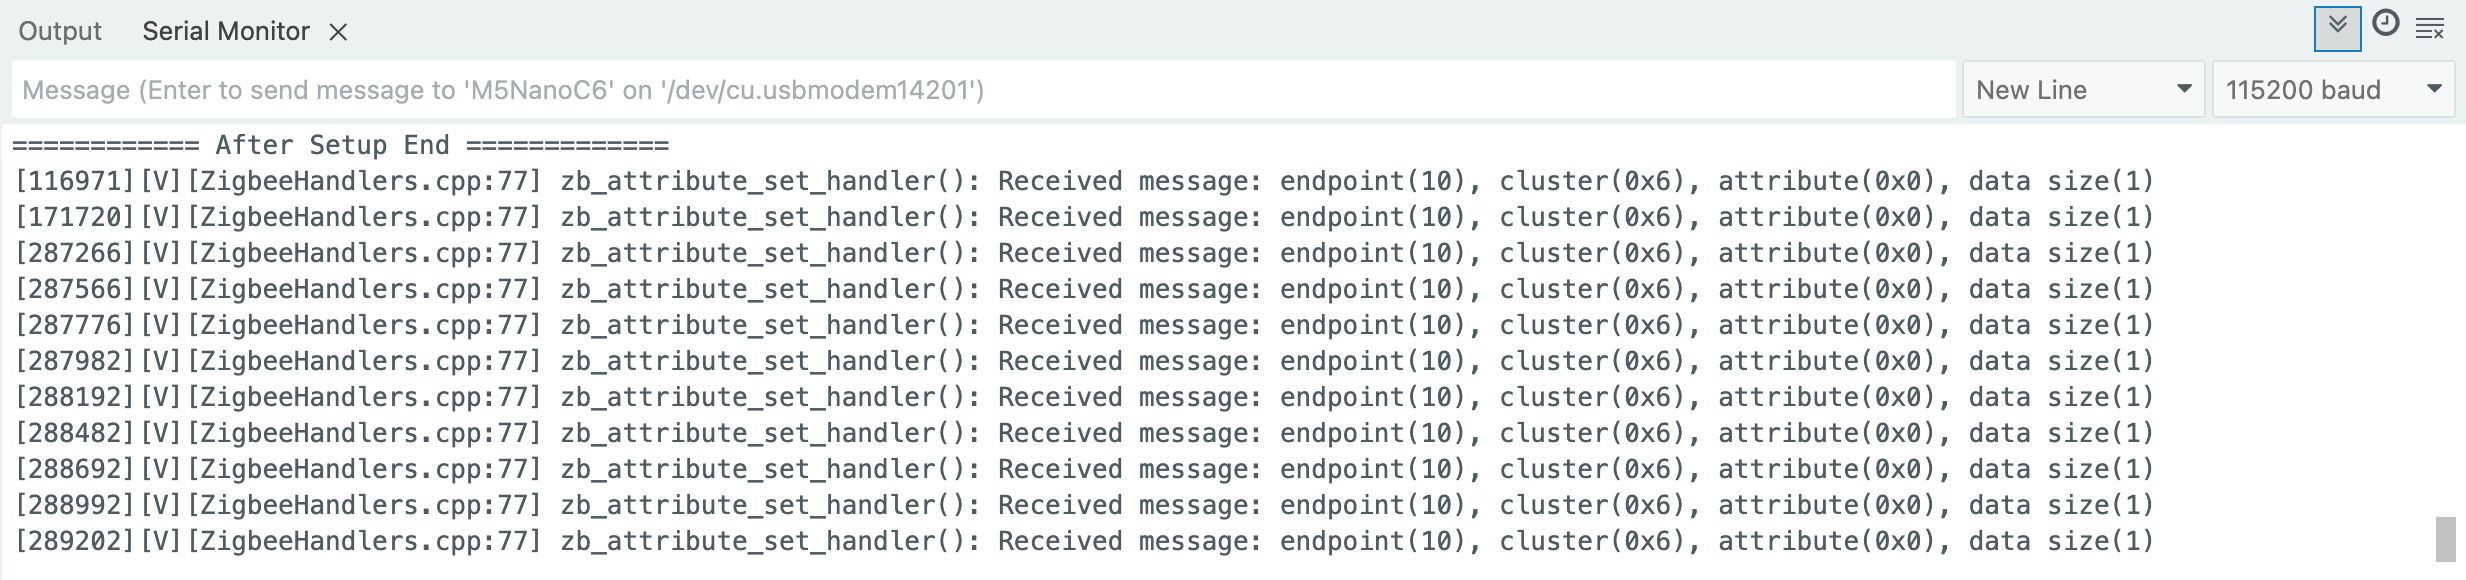
- 受信データをシリアルに表示
- NanoC6 上の青色 LED を ON/OFF
設定説明
Arduino IDE ツールメニュー設定:
- 正しい開発ボードを選択:
Tools -> Board: M5NanoC6 - USB シリアル起動を有効化:
Tools -> USB CDC On Boot: Enabled - 消去を有効化:
Tools -> Erase All Flash Before Sketch Upload: Enabled - flash サイズを選択:
Tools -> Flash Size: 4MB - Zigbee パーティションスキーム:
Tools -> Partition Scheme: Zigbee ZCZR 4MB with spiffs - エンドデバイスモード:
Tools -> Zigbee mode: Zigbee ED (end device) - 正しいシリアルポート:
Tools -> Port
サンプルプログラム
cpp
1 2 3 4 5 6 7 8 9 10 11 12 13 14 15 16 17 18 19 20 21 22 23 24 25 26 27 28 29 30 31 32 33 34 35 36 37 38 39 40 41 42 43 44 45 46 47 48 49 50 51
#ifndef ZIGBEE_MODE_ED
#error "Zigbee end device mode is not selected in Tools->Zigbee mode"
#endif

#include "Zigbee.h"

#define LIGHT_ENDPOINT_NUMBER 10

#define BLUE_LED_PIN 7

ZigbeeLight zbLight = ZigbeeLight(LIGHT_ENDPOINT_NUMBER);

void setLED(bool state) {
    digitalWrite(BLUE_LED_PIN, state ? HIGH : LOW);
}

void setup() {
    Serial.begin(115200);
    delay(1000);
    Serial.println("=== NanoC6 Zigbee End Device (LED) ===");

    pinMode(BLUE_LED_PIN, OUTPUT);
    digitalWrite(BLUE_LED_PIN, HIGH);
    Serial.println("Blue LED (G4/GPIO4) initialized");

    zbLight.setManufacturerAndModel("Espressif", "ZigbeeLight");
    zbLight.onLightChange(setLED);
    Zigbee.addEndpoint(&zbLight);

    Serial.println("Starting Zigbee End Device...");
    if (!Zigbee.begin()) {
        Serial.println("Zigbee failed to start!");
        delay(5000);
        ESP.restart();
    }

    Serial.println("Zigbee End Device started");
    Serial.println("Searching for Zigbee network...");

    while (!Zigbee.connected()) {
        Serial.print(".");
        delay(1000);
    }

    Serial.println("\nConnected to Zigbee network!");
    Serial.println("Waiting for commands from Coordinator...");
}

void loop() {
    delay(100);
}
Page Tools