Arduino 上手教程
2. 设备开发 & 案例程序
3. M5Unified
4. M5GFX
5. 拓展模块
Unit
Atomic
Tab5
IoT
传感器套件
下方为 M5GO 主机控制使用 M5GO Kit 中 6 个 Unit 传感器的案例程序。
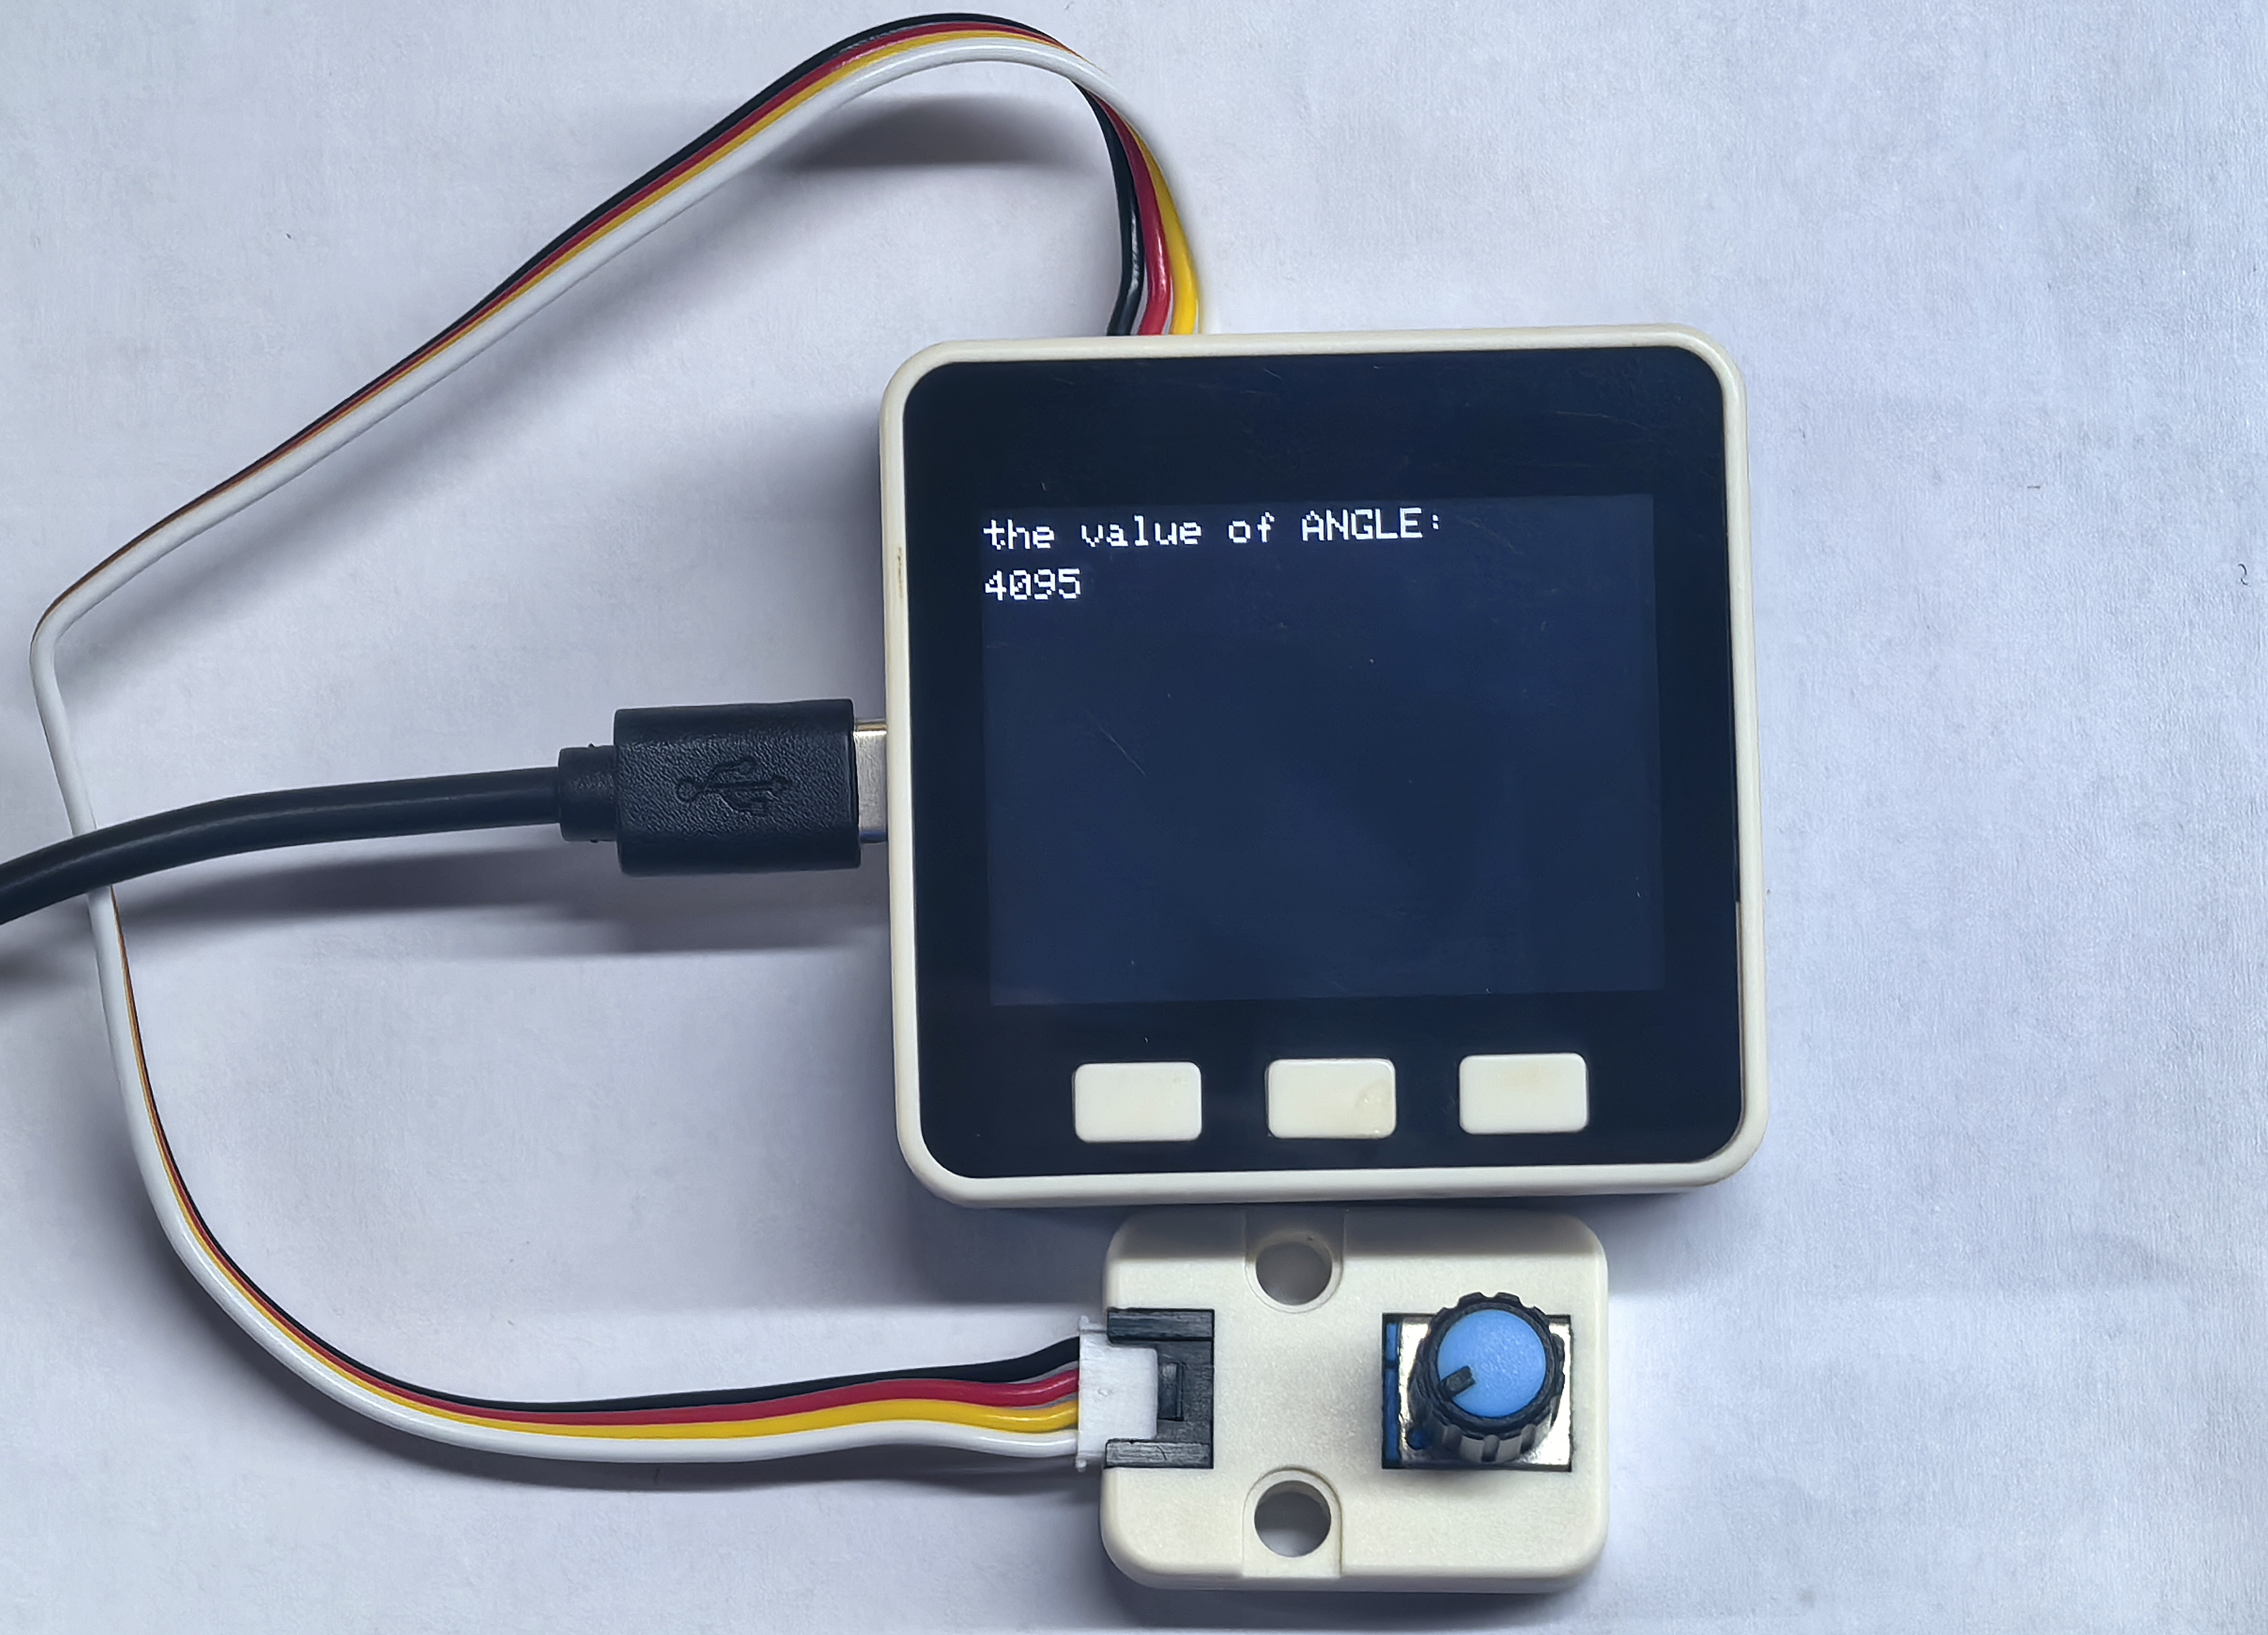
Unit Angle
M5GO 获取 Unit Angle 旋钮电压参考值案例程序。
案例程序
cpp
1 2 3 4 5 6 7 8 9 10 11 12 13 14 15 16 17 18 19 20 21 22 23 24 25
#include <M5Unified.h>

int sensorPin        = 36;   // Set the input pin for the potentiometer
int last_sensorValue = 100;  // Stores the value last read by the sensor
int cur_sensorValue  = 0;    // Stores the value currently read by the sensor.

void setup()
{
    M5.begin();                 // Init
    pinMode(sensorPin, INPUT);  // Sets the specified pin to input mode
    M5.Lcd.setTextSize(2);      // Set the font size to 2
    M5.Lcd.print("the value of ANGLE: ");
}

void loop()
{
    cur_sensorValue = analogRead(sensorPin);             // Read the value from the sensor
    M5.Lcd.setCursor(0, 25);                             // Place the cursor at (0,25)
    if (abs(cur_sensorValue - last_sensorValue) > 10) {  // Debounce
        M5.Lcd.fillRect(0, 25, 100, 25, BLACK);
        M5.Lcd.print(cur_sensorValue);
        last_sensorValue = cur_sensorValue;
    }
    delay(50);
} 该程序将实时获取Unit Angle 旋钮电压参考值并在屏幕上显示参考值。
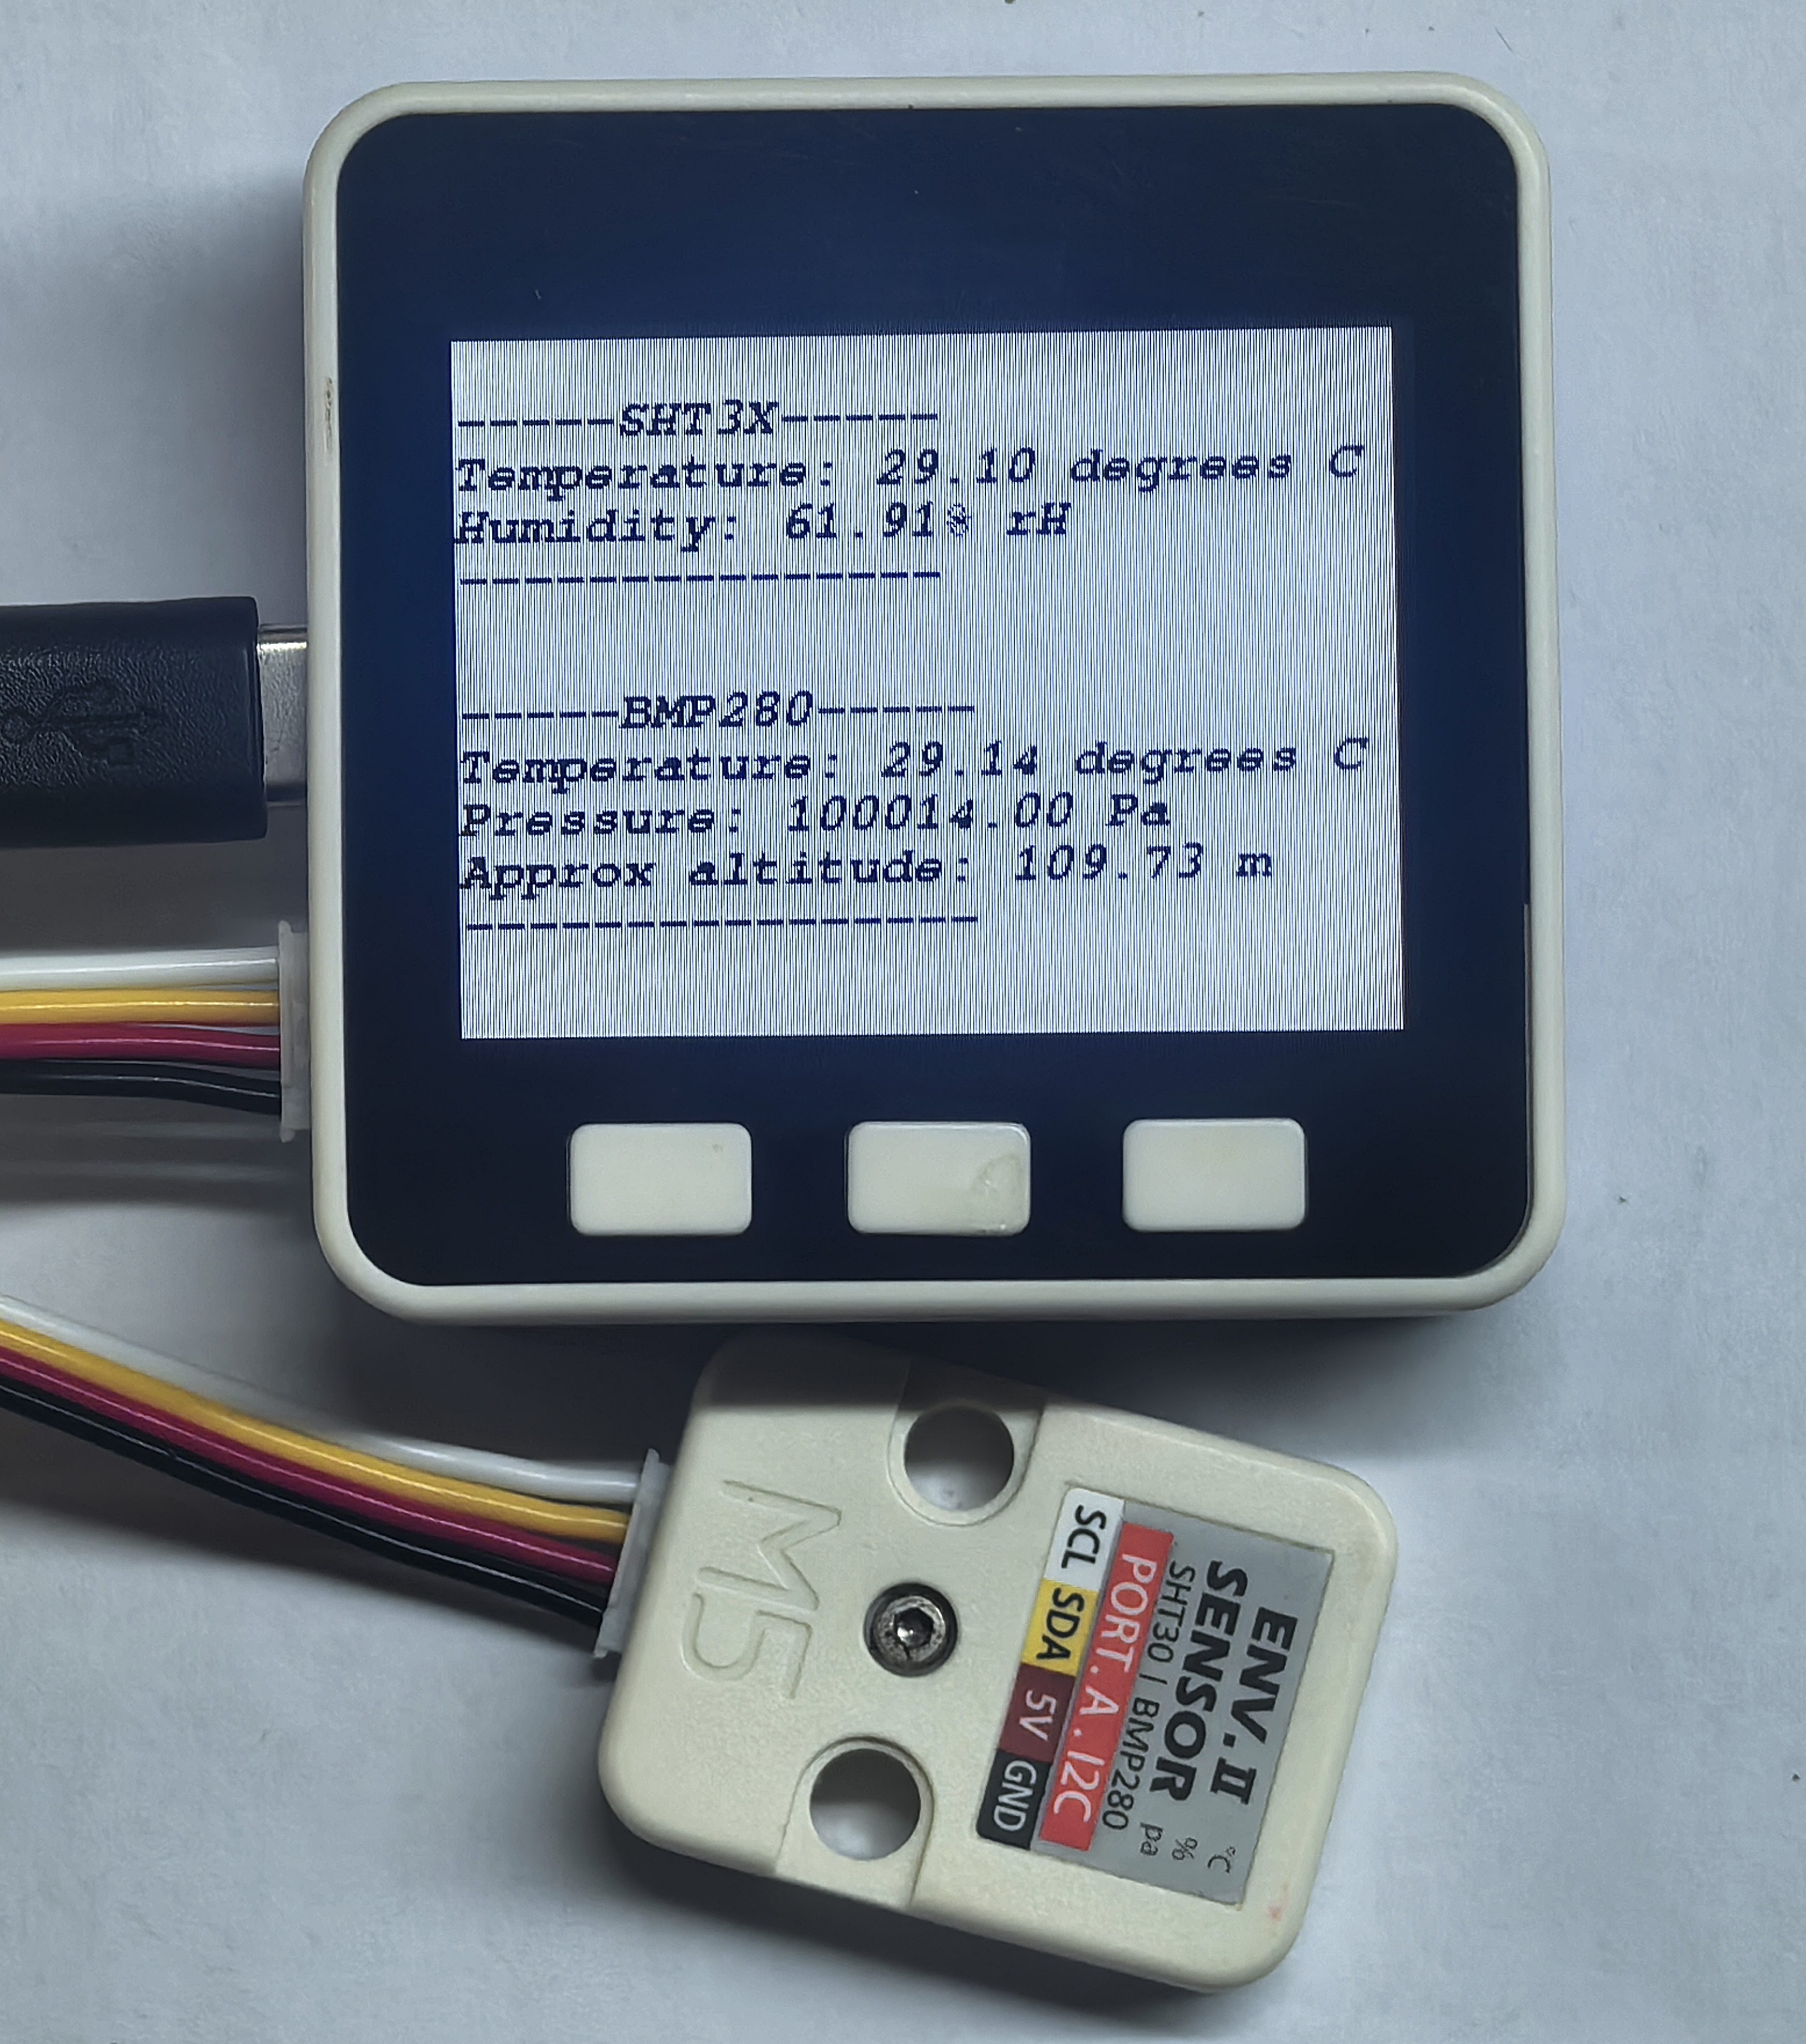
Unit ENV
M5GO 控制 Unit ENV 获取温湿度、大气压强、海拔高度信息案例程序。
案例程序
1. M5GO Iot Kit -- Unit ENV-II
cpp
1 2 3 4 5 6 7 8 9 10 11 12 13 14 15 16 17 18 19 20 21 22 23 24 25 26 27 28 29 30 31 32 33 34 35 36 37 38 39 40 41 42 43 44 45 46 47 48 49 50 51 52 53 54 55 56 57 58 59 60 61 62 63 64 65 66 67 68 69 70 71 72 73 74 75 76 77 78 79 80 81 82 83 84 85 86 87 88 89 90 91 92 93 94 95 96 97
#include "M5UnitENV.h"
#include "M5Unified.h"

SHT3X sht3x;
BMP280 bmp;
char ENV_SDA = 21;
char ENV_SCL = 22;

void setup() {
    M5.begin();
    M5.Display.setTextColor(TFT_BLACK);
    M5.Display.setTextFont(&fonts::FreeMonoBoldOblique9pt7b);
    M5.Display.clear(TFT_WHITE);

    Serial.begin(115200);

    if (!sht3x.begin(&Wire, SHT3X_I2C_ADDR, ENV_SDA, ENV_SCL, 400000U)) {
        Serial.println("Couldn't find SHT3X\n");
        M5.Display.printf("Couldn't find SHT3X");
        while (1) delay(1);
    }
    else{
        Serial.println("Find SHT3X\n");
        M5.Display.printf("Find SHT3X\n");
    }

    if (!bmp.begin(&Wire, BMP280_I2C_ADDR, ENV_SDA, ENV_SCL, 400000U)) {
        Serial.println("Couldn't find BMP280\n");
        M5.Display.printf("Couldn't find BMP280\n");
        while (1) delay(1);
    }
    else{
        Serial.println("Find BMP280\n");
        M5.Display.printf("Find BMP280\n");
    }
    /* Default settings from datasheet. */
    bmp.setSampling(BMP280::MODE_NORMAL,     /* Operating Mode. */
                    BMP280::SAMPLING_X2,     /* Temp. oversampling */
                    BMP280::SAMPLING_X16,    /* Pressure oversampling */
                    BMP280::FILTER_X16,      /* Filtering. */
                    BMP280::STANDBY_MS_500); /* Standby time. */
    delay(2000);
    M5.Display.clear(TFT_WHITE);
}

void loop() {
    if (sht3x.update()) {
        Serial.println("-----SHT3X-----");
        Serial.print("Temperature: ");
        Serial.print(sht3x.cTemp);
        Serial.println(" degrees C");
        Serial.print("Humidity: ");
        Serial.print(sht3x.humidity);
        Serial.println("% rH");
        Serial.println("---------------\r\n");

        M5.Display.fillRect(0, 0, 320, 120, TFT_WHITE);
        M5.Display.setCursor(0, 20);
        M5.Display.println("-----SHT3X-----");
        M5.Display.print("Temperature: ");
        M5.Display.print(sht3x.cTemp);
        M5.Display.println(" degrees C");
        M5.Display.print("Humidity: ");
        M5.Display.print(sht3x.humidity);
        M5.Display.println("% rH");
        M5.Display.println("---------------\r\n");
    }

    if (bmp.update()) {
        Serial.println("-----BMP280-----");
        Serial.print(F("Temperature: "));
        Serial.print(bmp.cTemp);
        Serial.println(" degrees C");
        Serial.print(F("Pressure: "));
        Serial.print(bmp.pressure);
        Serial.println(" Pa");
        Serial.print(F("Approx altitude: "));
        Serial.print(bmp.altitude);
        Serial.println(" m");
        Serial.println("----------------\r\n");

        M5.Display.fillRect(0, 120, 320, 120, TFT_WHITE);
        M5.Display.setCursor(0, 120);
        M5.Display.println("-----BMP280-----");
        M5.Display.print(F("Temperature: "));
        M5.Display.print(bmp.cTemp);
        M5.Display.println(" degrees C");
        M5.Display.print(F("Pressure: "));
        M5.Display.print(bmp.pressure);
        M5.Display.println(" Pa");
        M5.Display.print(F("Approx altitude: "));
        M5.Display.print(bmp.altitude);
        M5.Display.println(" m");
        M5.Display.println("----------------\r\n");
    }
    delay(1000);
} 该程序将在屏幕上显示 SHT3X 及 BMP280 获取到的温湿度、大气压强、海拔高度信息,每1秒刷新一次。
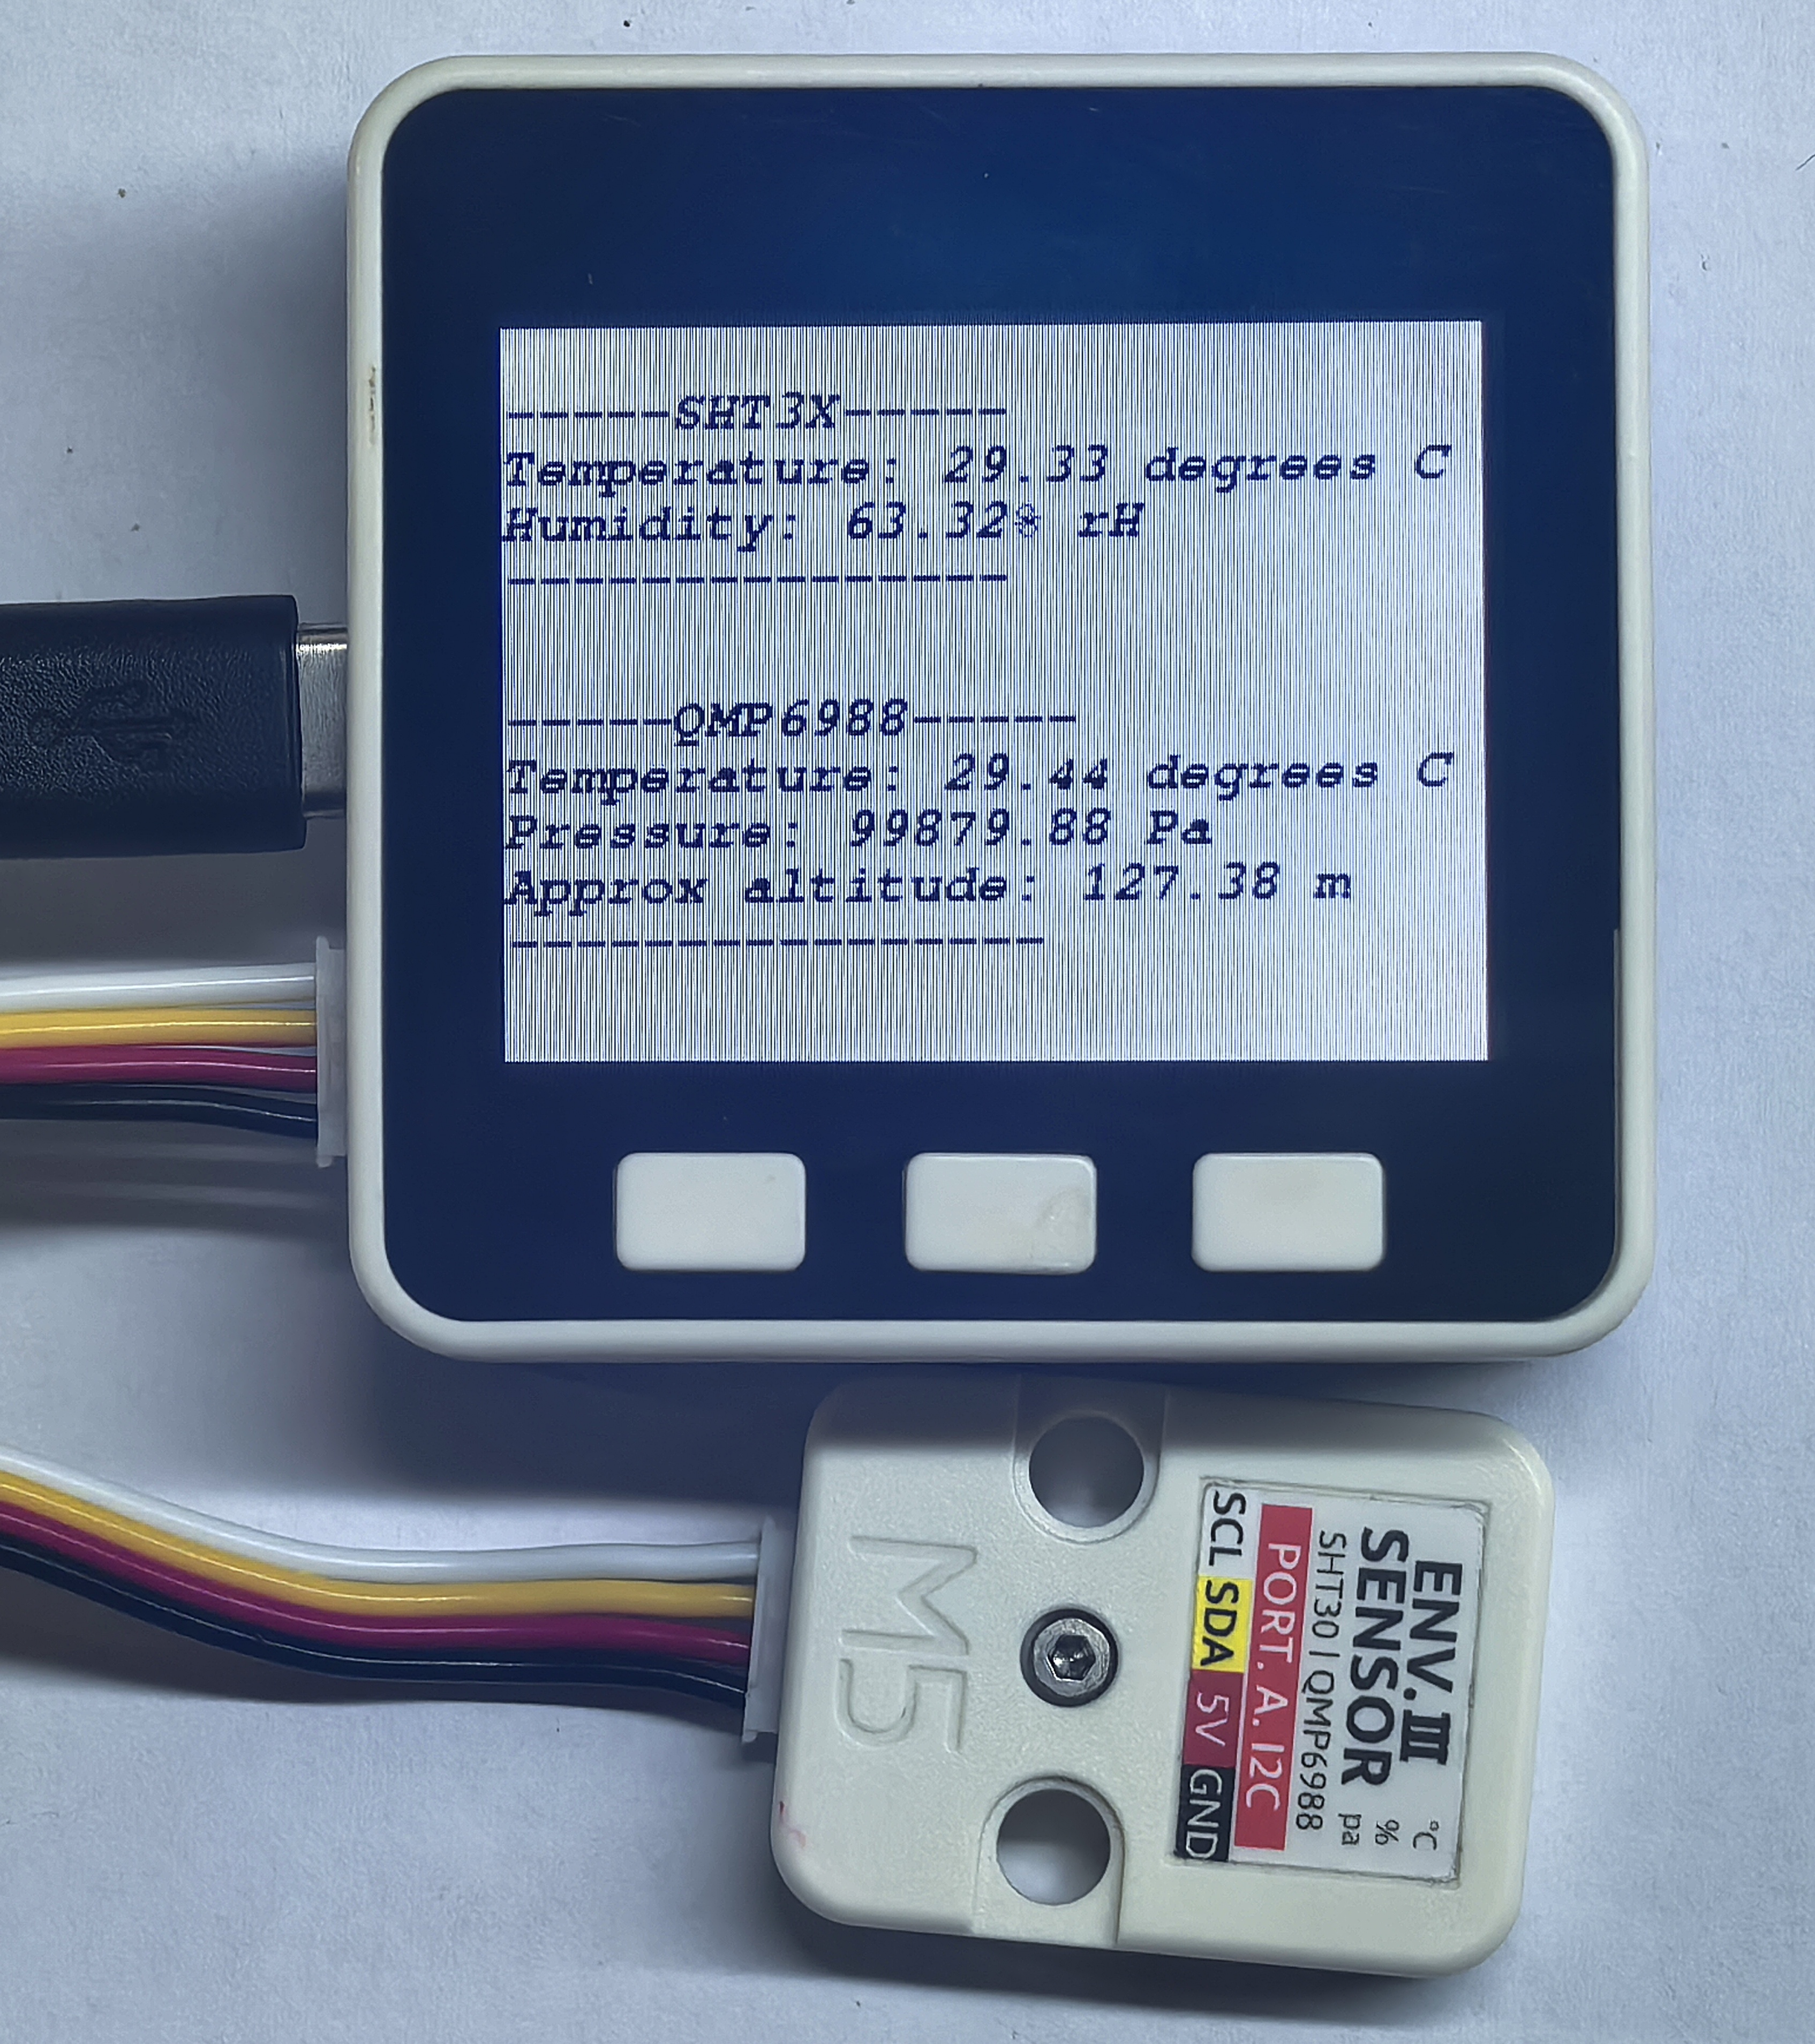
2. M5GO Iot Kit 2.6 / M5GO Iot Kit 2.7 -- Unit ENV-II
cpp
1 2 3 4 5 6 7 8 9 10 11 12 13 14 15 16 17 18 19 20 21 22 23 24 25 26 27 28 29 30 31 32 33 34 35 36 37 38 39 40 41 42 43 44 45 46 47 48 49 50 51 52 53 54 55 56 57 58 59 60 61 62 63 64 65 66 67 68 69 70 71 72 73 74 75 76 77 78 79 80 81 82 83 84 85 86 87 88 89 90 91 92
#include "M5UnitENV.h"
#include "M5Unified.h"

SHT3X sht3x;
QMP6988 qmp;
char ENV_SDA = 21;
char ENV_SCL = 22;

void setup() {
    M5.begin();
    M5.Display.setTextColor(TFT_BLACK);
    M5.Display.setTextFont(&fonts::FreeMonoBoldOblique9pt7b);
    M5.Display.clear(TFT_WHITE);

    Serial.begin(115200);

    if (!sht3x.begin(&Wire, SHT3X_I2C_ADDR, ENV_SDA, ENV_SCL, 400000U)) {
        Serial.println("Couldn't find SHT3X\n");
        M5.Display.printf("Couldn't find SHT3X");
        while (1) delay(1);
    }
    else{
        Serial.println("Find SHT3X\n");
        M5.Display.printf("Find SHT3X\n");
    }

    if (!qmp.begin(&Wire, QMP6988_SLAVE_ADDRESS_L, 21, 22, 400000U)) {
        Serial.println("Couldn't find QMP6988\n");
        M5.Display.printf("Couldn't find QMP6988\n");
        while (1) delay(1);
    }
    else{
        Serial.println("Find QMP6988\n");
        M5.Display.printf("Find QMP6988\n");
    }

    delay(2000);
    M5.Display.clear(TFT_WHITE);
}

void loop() {
    if (sht3x.update()) {
        Serial.println("-----SHT3X-----");
        Serial.print("Temperature: ");
        Serial.print(sht3x.cTemp);
        Serial.println(" degrees C");
        Serial.print("Humidity: ");
        Serial.print(sht3x.humidity);
        Serial.println("% rH");
        Serial.println("---------------\r\n");

        M5.Display.fillRect(0, 0, 320, 120, TFT_WHITE);
        M5.Display.setCursor(0, 20);
        M5.Display.println("-----SHT3X-----");
        M5.Display.print("Temperature: ");
        M5.Display.print(sht3x.cTemp);
        M5.Display.println(" degrees C");
        M5.Display.print("Humidity: ");
        M5.Display.print(sht3x.humidity);
        M5.Display.println("% rH");
        M5.Display.println("---------------\r\n");
    }

    if (qmp.update()) {
        Serial.println("-----QMP6988-----");
        Serial.print(F("Temperature: "));
        Serial.print(qmp.cTemp);
        Serial.println(" degrees C");
        Serial.print(F("Pressure: "));
        Serial.print(qmp.pressure);
        Serial.println(" Pa");
        Serial.print(F("Approx altitude: "));
        Serial.print(qmp.altitude);
        Serial.println(" m");
        Serial.println("----------------\r\n");

        M5.Display.fillRect(0, 120, 320, 120, TFT_WHITE);
        M5.Display.setCursor(0, 120);
        M5.Display.println("-----QMP6988-----");
        M5.Display.print(F("Temperature: "));
        M5.Display.print(qmp.cTemp);
        M5.Display.println(" degrees C");
        M5.Display.print(F("Pressure: "));
        M5.Display.print(qmp.pressure);
        M5.Display.println(" Pa");
        M5.Display.print(F("Approx altitude: "));
        M5.Display.print(qmp.altitude);
        M5.Display.println(" m");
        M5.Display.println("----------------\r\n");
    }
    delay(1000);
} 该程序将在屏幕上显示 SHT3X 及 QMP6988 获取到的温湿度、大气压强、海拔高度信息,每1秒刷新一次。
Unit HUB
Unit HUB 主要作用是把一个 Grove 端口拓展为三个,方便用户同时连接多个 I2C 设备,其内部所有端口的信号是并联的,可通过不同的 I2C 地址控制多个 I2C 设备。
Unit IR
M5GO 控制 Unit IR 实现红外 NEC 编码收发案例程序。
案例程序
cpp
1 2 3 4 5 6 7 8 9 10 11 12 13 14 15 16 17 18 19 20 21 22 23 24 25 26 27 28 29 30 31 32 33 34 35 36 37 38 39 40 41 42 43 44 45 46 47 48 49 50 51 52 53 54 55 56 57 58 59 60 61 62 63 64 65 66 67 68 69 70 71 72 73 74 75 76 77 78 79 80 81 82
#include <IRremote.hpp>
#include <M5Unified.h>

#define IR_SEND_PIN    21      // GPIO pin for IR transmitter
#define IR_RECEIVE_PIN 22      // GPIO pin for IR receiver

// Demo parameters for NEC protocol
uint16_t address = 0x0000;     // Starting device address
uint8_t  command = 0x55;       // Starting command value
uint8_t  repeats = 0;          // Number of repeat transmissions

void setup() {
    M5.begin();                // Initialize M5Stack device
    Serial.begin(115200);      // Start serial communication at 115200 baud
    delay(200);                // Wait for serial port to stabilize

    // Configure display settings
    M5.Display.setTextColor(TFT_BLACK);
    M5.Display.setTextFont(&fonts::FreeMonoBoldOblique9pt7b);
    M5.Display.clear(TFT_WHITE);
    M5.Display.setCursor(0,0);
    M5.Display.printf("M5GO IRremote example");
    Serial.println("M5GO IRremote example");

    // Initialize IR communication
    IrReceiver.begin(IR_RECEIVE_PIN);     // Start IR receiver
    IrSender.begin(DISABLE_LED_FEEDBACK);  // Initialize IR sender without LED feedback
    IrSender.setSendPin(IR_SEND_PIN);      // Assign transmitter pin

    Serial.printf("IR Send Pin: %d, IR Recv Pin: %d\n", IR_SEND_PIN, IR_RECEIVE_PIN);
    delay(500); // Wait for hardware components to stabilize
}

void loop() {
    // 1. Send infrared signal using NEC protocol
    Serial.printf("Send NEC: addr=0x%04x, cmd=0x%02x\n", address, command);
    IrSender.sendNEC(address, command, repeats);

    // Update display with transmission info
    M5.Display.fillRect(0, 20, 320, 90, TFT_WHITE);  // Clear previous content
    M5.Display.setCursor(0, 40);
    M5.Display.printf("Send NEC:\n addr=0x%04x\n cmd=0x%02x\n", address, command);

    IrReceiver.restartAfterSend();  // Re-enable receiver after transmission

    // 2. Wait for possible reflection (short-range testing)
    delay(20);  // Brief pause to allow signal reception

    // Attempt to decode received IR signal
    if (IrReceiver.decode()) {
        // Print received data to serial monitor
        Serial.printf("Received: protocol=%s, addr=0x%04x, cmd=0x%02x, raw=0x%08lx\n",
                      getProtocolString(IrReceiver.decodedIRData.protocol),
                      IrReceiver.decodedIRData.address,
                      IrReceiver.decodedIRData.command,
                      (unsigned long)IrReceiver.decodedIRData.decodedRawData);

        // Display received data on screen
        M5.Display.fillRect(0, 110, 320, 130, TFT_WHITE);  // Clear previous content
        M5.Display.setCursor(0, 110);
        M5.Display.printf("Received:\n protocol=%s\n addr=0x%04x\n cmd=0x%02x\n raw=0x%08lx\n",
                        getProtocolString(IrReceiver.decodedIRData.protocol),
                        IrReceiver.decodedIRData.address,
                        IrReceiver.decodedIRData.command,
                        (unsigned long)IrReceiver.decodedIRData.decodedRawData);

        IrReceiver.resume();  // Enable reception of next signal
    } else {
        // Handle case where no signal was received
        Serial.println("No IR received.");
        M5.Display.fillRect(0, 110, 320, 130, TFT_WHITE);  // Clear previous content
        M5.Display.setCursor(0, 110);
        M5.Display.println("No IR received.");
    }

    // Update transmission parameters for next cycle
    address += 0x0001;  // Increment device address
    command += 0x01;     // Increment command code
    repeats  = 0;        // Disable repeat frames (set >0 to test repeats)

    delay(2000);  // Main loop delay (2 seconds)
} 该程序将控制 Unit IR 发收红外 NEC 编码并在屏幕上显示 NEC 编码相关信息。
Unit PIR
M5GO 控制 Unit PIR 实现检测红外辐射案例程序。
案例程序
cpp
1 2 3 4 5 6 7 8 9 10 11 12 13 14 15 16 17 18 19 20 21 22 23 24 25 26 27 28 29 30 31 32
#include <M5Unified.h>

char sensorPin = 36;

void setup()
{
    M5.begin();             // Init M5GO
    M5.Display.setTextColor(TFT_BLACK);
    M5.Display.setTextFont(&fonts::FreeMonoBoldOblique9pt7b);
    M5.Display.clear(TFT_WHITE);
    M5.Lcd.println("PIR example");
    M5.Lcd.setCursor(0, 25);  // Position the cursor at (0,25)
    M5.Lcd.println("Status: \nValue: ");
    pinMode(sensorPin, INPUT);  // Set pin sensorPin to input mode
}

void loop()
{
    M5.Lcd.fillRect(90, 25, 180, 50, TFT_WHITE);  // Draw a black rectangle 180 by 50 at (90,25)
    if (digitalRead(sensorPin) == 1) {            // If pin sensorPin reads a value of 1
        M5.Lcd.setCursor(95, 25);
        M5.Lcd.print("Sensing");
        M5.Lcd.setCursor(95, 45);
        M5.Lcd.print("1");
    } else {
        M5.Lcd.setCursor(95, 25);
        M5.Lcd.print("Not Sensed");
        M5.Lcd.setCursor(95, 45);
        M5.Lcd.print("0");
    }
    delay(500);
} 该程序将控制 Unit PIR 检测红外辐射并在屏幕上显示是否检测到红外辐射。请注意,此检测有一定的延迟时间。
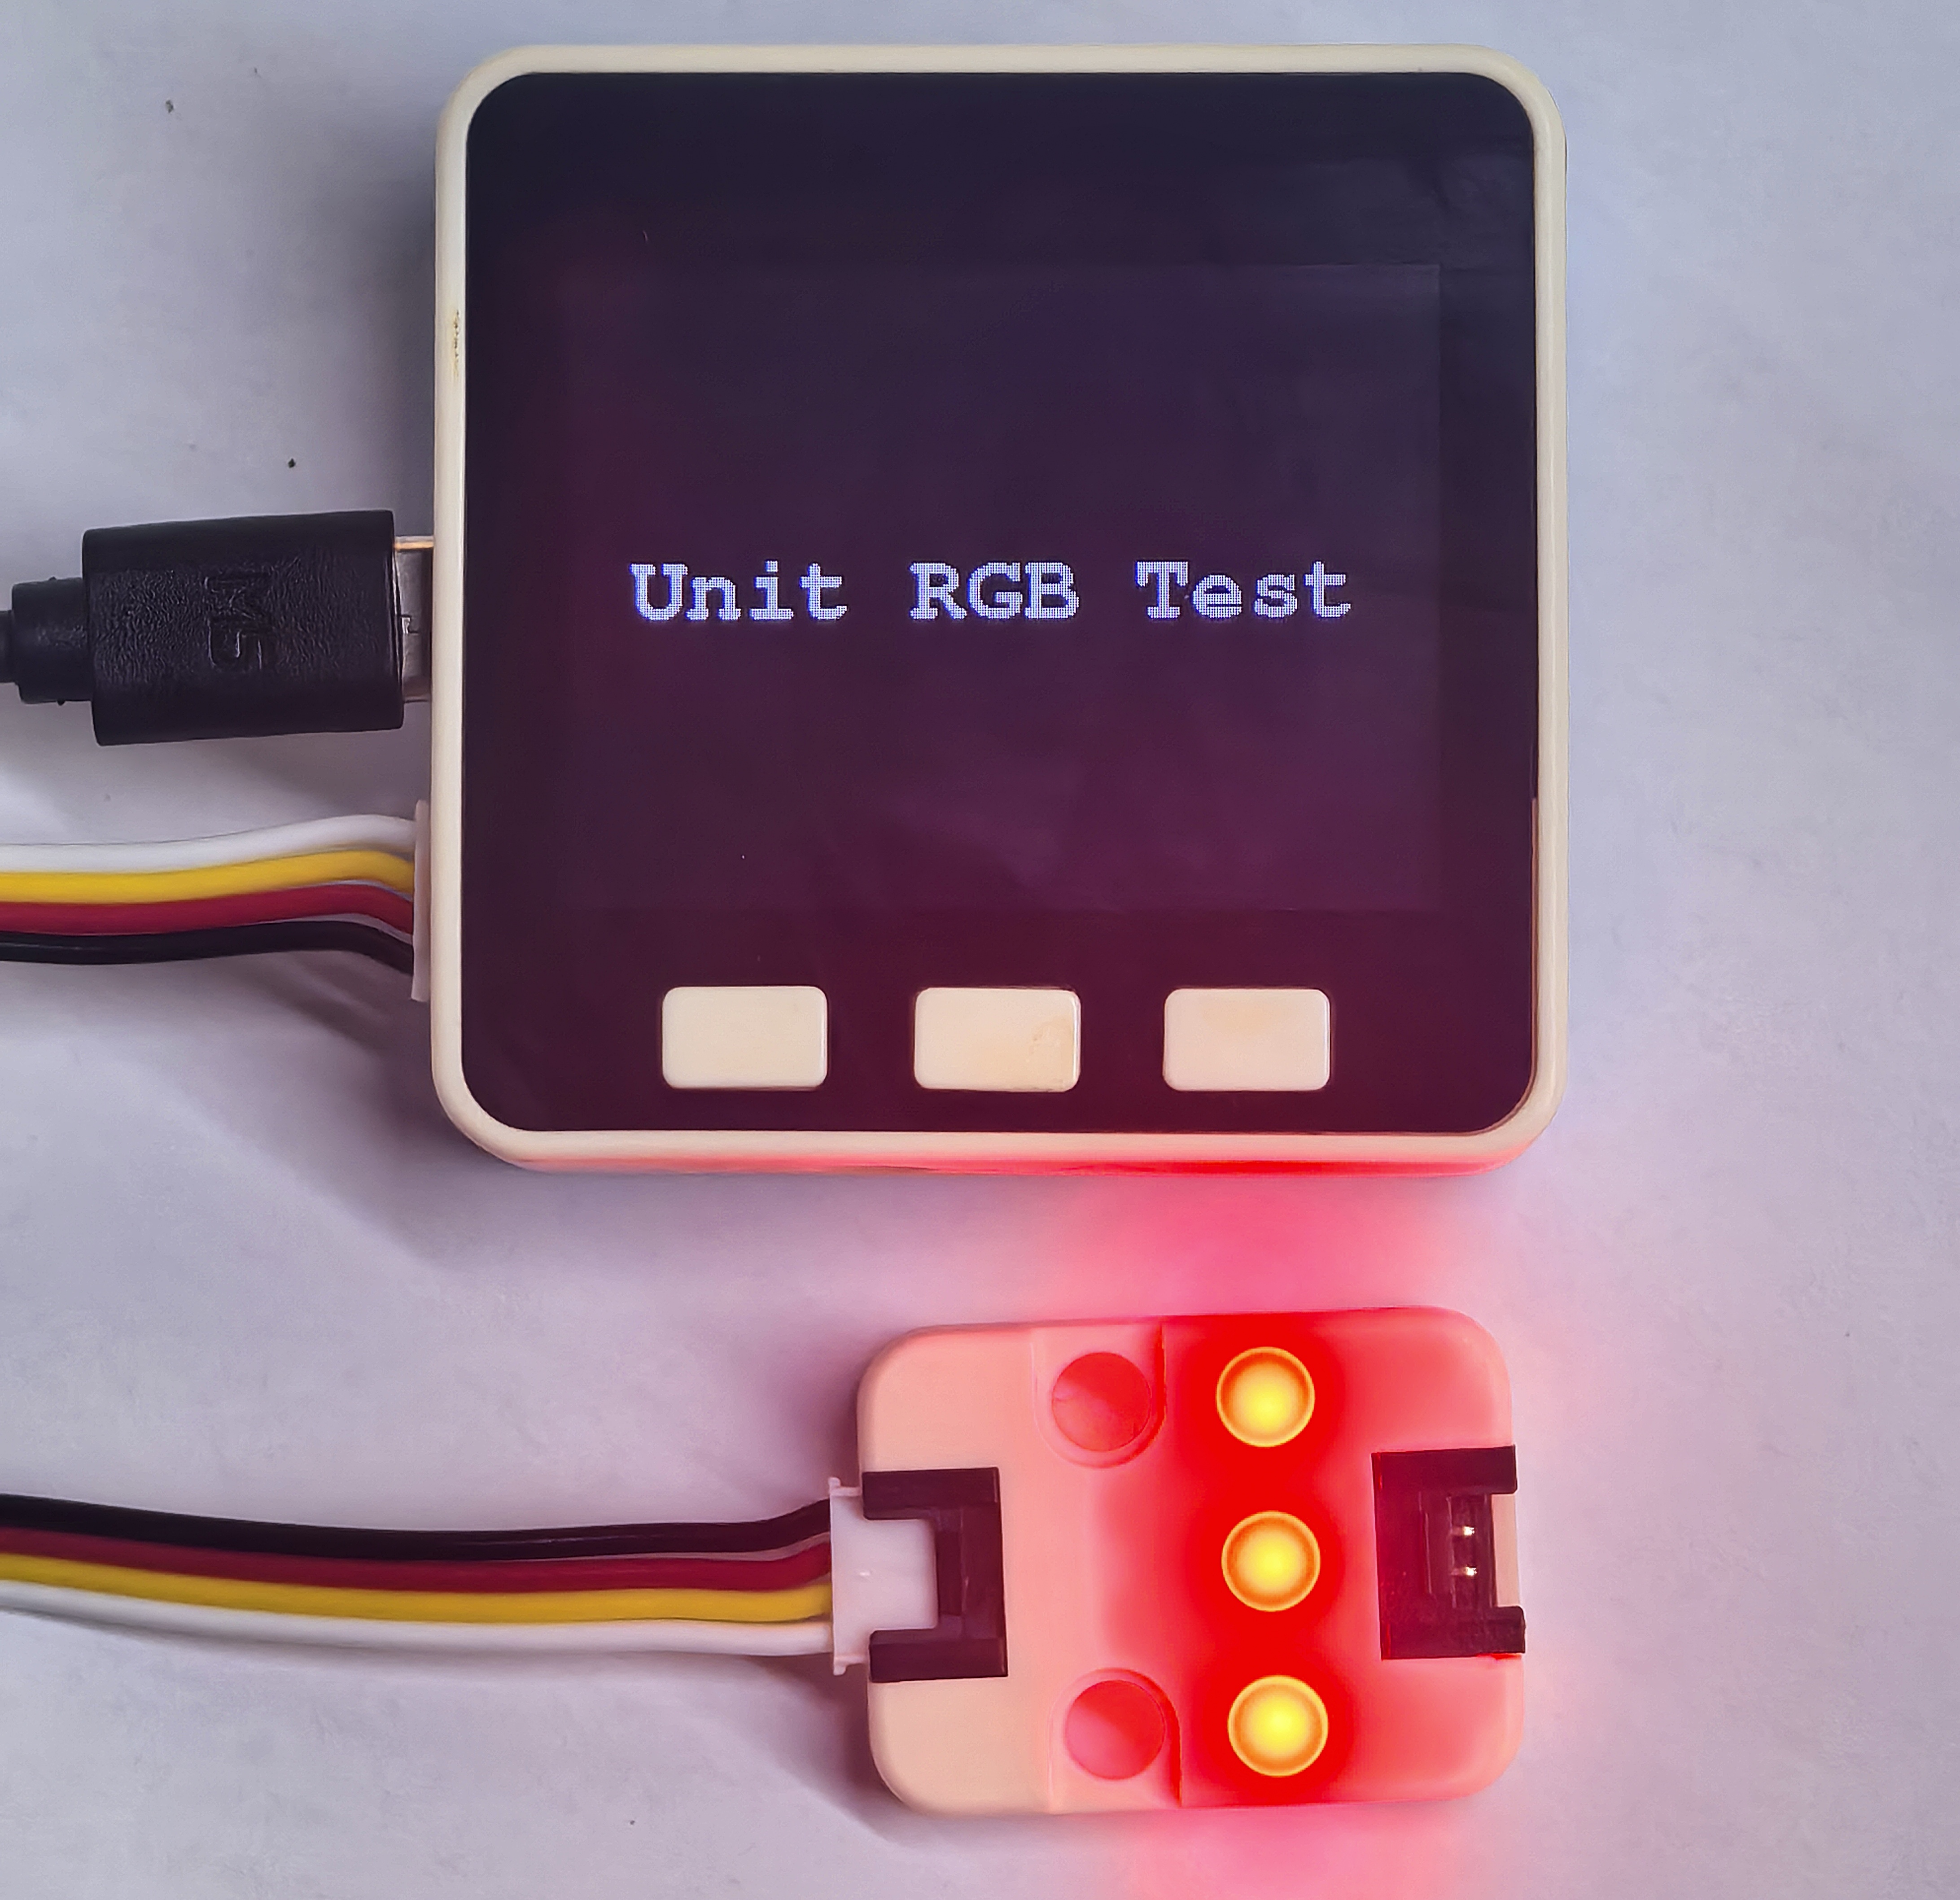
Unit RGB
M5GO 控制 Unit RGB 实现不同灯光案例程序。
说明:
本案例基于Adafruit NeoPixel库实现, 使用前请通过库管理安装Adafruit NeoPixel依赖库。
案例程序
cpp
1 2 3 4 5 6 7 8 9 10 11 12 13 14 15 16 17 18 19 20 21 22 23 24 25 26 27 28 29 30 31 32 33 34 35 36 37 38
#include <M5Unified.h>
#include <Adafruit_NeoPixel.h>

#define LED_PIN    32
#define NUM_LEDS   3

Adafruit_NeoPixel strip(NUM_LEDS, LED_PIN, NEO_GRB + NEO_KHZ800);

void setup() {
  auto cfg = M5.config();
  M5.begin(cfg);
  M5.Display.setTextDatum(middle_center);
  M5.Display.setTextFont(&fonts::Orbitron_Light_24);
  M5.Display.setTextSize(1);
  M5.Display.drawString("RGB LED Test", M5.Display.width() / 2, M5.Display.height() / 2);
  strip.begin();
  strip.show();
}

void loop() {
    //RED
    for(char i = 0; i <= NUM_LEDS; i++)
    {strip.setPixelColor(i, strip.Color(255, 0, 0)); }
    strip.show();
    delay(1000);

    //GREEN
    for(char i = 0; i <= NUM_LEDS; i++)
    {strip.setPixelColor(i, strip.Color(0, 255, 0)); }
    strip.show();
    delay(1000);

    //BLUE
    for(char i = 0; i <= NUM_LEDS; i++)
    {strip.setPixelColor(i, strip.Color(0, 0, 255)); }
    strip.show();
    delay(1000);
} 例程效果如下: