


Arduino 上手教程
2. 设备开发 & 案例程序
3. M5Unified
4. M5GFX
5. 拓展模块
Unit
Atomic
Base
IoT
Unit 4Relay Arduino 使用教程
1. 准备工作
- 环境配置: 参考 Arduino IDE 上手教程 完成 IDE 安装,并根据实际使用的开发板安装对应的板管理,与需要的驱动库。
- 使用到的驱动库:
- 使用到的硬件产品:
2. 注意事项
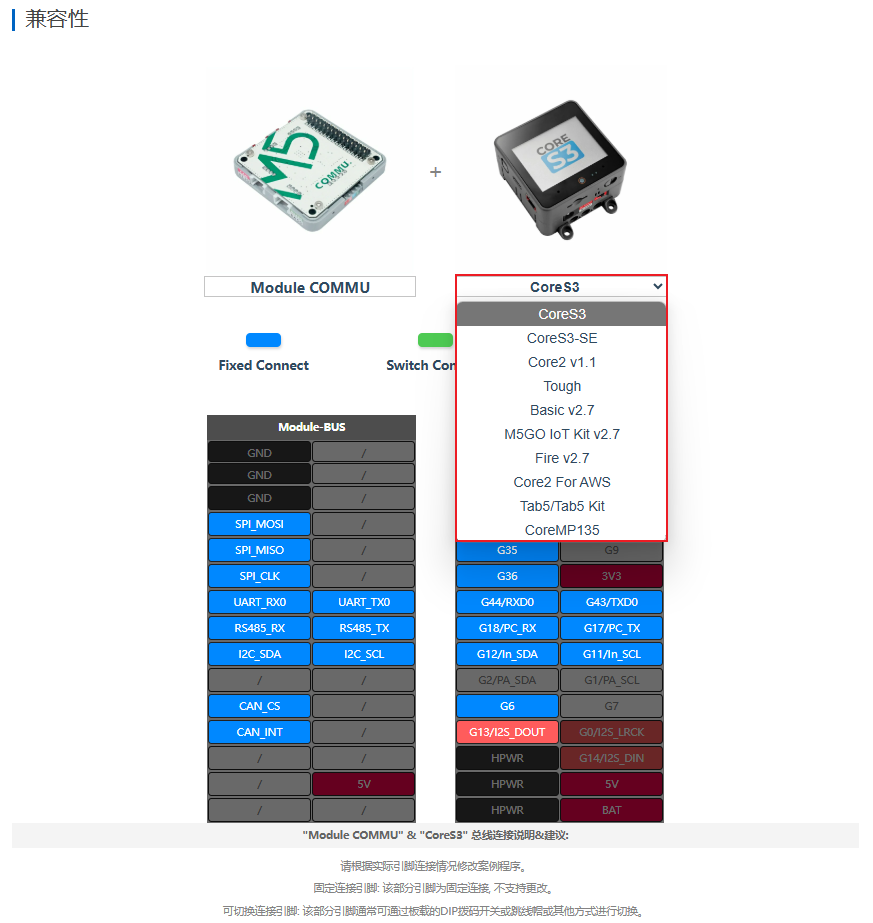
引脚兼容性
由于每款主机的引脚配置不同,为了让用户更方便地使用,M5Stack 官方提供了引脚兼容性表,方便用户查看,请根据实际引脚连接情况修改案例程序。
3. 案例程序
- 本教程中使用的主控设备为 Basic v2.7 ,搭配 Unit 4Relay。本 Relay 模块采用 I2C 的方式通讯,根据实际的电路链接修改程序中的引脚定义,设备连接后对应的引脚为
G21(SDA),G22(SCL)。 #> 注意 | 本模块只能在同步模式下控制继电器,如果在异步模式下对继电器进行控制将无效,只能控制 LED 指示灯。
cpp
1 2 3 4 5 6 7 8 9 10 11 12 13 14 15 16 17 18 19 20 21 22 23 24 25 26 27 28 29 30 31 32 33 34 35 36 37 38 39 40 41 42 43 44 45 46 47 48 49 50 51 52 53 54 55 56 57 58 59 60 61 62 63 64 65 66 67 68 69 70 71 72 73 74 75 76 77 78 79 80 81 82 83 84 85 86 87 88 89 90 91 92 93 94 95 96 97 98 99 100 101 102 103 104 105 106 107 108 109 110 111 112 113 114 115
/*
*******************************************************************************
* Visit for more information: https://docs.m5stack.com/en/unit/4relay
* 获取更多资料请访问: https://docs.m5stack.com/zh_CN/unit/4relay
*
* Product: Unit 4RELAY.
* Date: 2022/7/22
*******************************************************************************
Please connect to port A,Control 4 relays and demonstrate the asynchronous
control relay LED 请连接A端口,控制4继电器,并演示异步控制继电器LED
-------------------------------------------------------------------------------
  RELAY control reg           | 0x10
  -----------------------------------------------------------------------------
  Relay_ctrl_mode_reg[0]      | R/W | System control
                              | 7 | 6 | 5 | 4 | 3 | 2 | 1 |     0     |
                              | R | R | R | R | R | R | R | Sync Mode |
                              | -Sync Mode:0 LED&Relay Async
                              | -Sync Mode:1 LED&Relay Sync
  ---------------------------------------------------------------------------------
  Relay_ctrl_mode_reg[1]      | R/W | Relay & LED control
                              |  7  |  6  |  5  |  4  |  3  |  2  |  1  |  0  |
                              | LED1| LED2| LED3| LED4| RLY1| RLY2| RLY3| RLY4|
-------------------------------------------------------------------------------*/
// Note: The relay can only be controlled in synchronous mode, if the relay is
// controlled in asynchronous mode, it will be invalid.
// 注意:只能在同步模式下控制继电器,如果在异步模式下对继电器进行控制将无效,.

#include <M5Unified.h>
#include "Unit_4RELAY.h"

UNIT_4RELAY relay;

char count_i   = 0;
bool sync_flag = 0, all_flag = 0;

void show_main_ui() {
    M5.Display.fillScreen(WHITE);
    M5.Display.setTextColor(BLACK);
    M5.Display.setFont(&fonts::FreeMonoBold12pt7b);
    M5.Display.println("4-RELAY UNIT");
    M5.Display.println("Relay State:");
    M5.Display.print("Sync Mode: \n");
    M5.Display.print("A:Indep. \nB:Sync/Async \nC:ALL relay \n");
}

void setup() {
    M5.begin();
    M5.Power.begin();
    Serial.begin(115200);

    show_main_ui();

    relay.begin();
    relay.Init(0);  // Async mode at start
}

void loop() {
    M5.update();

    // Press the A key: Independently control a single relay or LED
    if (M5.BtnA.wasPressed()) {
        M5.Display.fillRect(160, 50, 100, 20, WHITE);
        M5.Display.setCursor(160, 50);
        if (count_i < 4) {
            M5.Display.printf("%d ON", count_i + 1);
            if (sync_flag) {
                relay.relayWrite(count_i, 1);
            } else {
                relay.ledWrite(count_i, 1);
            }
        } else {
            M5.Display.printf("%d OFF", (count_i - 3));
            if (sync_flag) {
                relay.relayWrite((count_i - 4), 0);
            } else {
                relay.ledWrite((count_i - 4), 0);
            }
        }
        count_i++;
        if (count_i >= 8) count_i = 0;
    }

    // Press the B key: Switch between synchronous and asynchronous modes
    if (M5.BtnB.wasPressed()) {
        sync_flag = !sync_flag;
        relay.switchMode(sync_flag);
        M5.Display.fillRect(160, 80, 100, 20, WHITE);
        M5.Display.setCursor(160, 80);
        if (!sync_flag) {
            M5.Display.print("Async");
        } else {
            M5.Display.print("Sync");
        }
    }

    // Press the C key: All relays /LED switches
    if (M5.BtnC.wasPressed()) {
        all_flag = !all_flag;
        M5.Display.fillRect(160, 50, 100, 20, WHITE);
        M5.Display.setCursor(160, 50);
        if (all_flag) {
            M5.Display.printf("ALL.ON ");
            if (sync_flag)
                relay.relayAll(1);
            else
                relay.ledAll(1);
        } else {
            M5.Display.printf("ALL.OFF");
            if (sync_flag)
                relay.relayAll(0);
            else
                relay.ledAll(0);
        }
    }
}3. 编译上传
下载模式:不同设备进行程序烧录前需要进入下载模式,不同的主控设备该步骤可能有所不同。详情可参考Arduino IDE上手教程页面底部的设备程序下载教程列表,查看具体的操作方式。
Basic v2.7 长按复位按键 (大约 2 秒) 直到内部绿色 LED 灯亮起,便可松开,此时设备已进入下载模式,等待烧录。(注:gif 为 CoreS3 的示例,Basic v2.7 烧录操作步骤一致)
.gif)
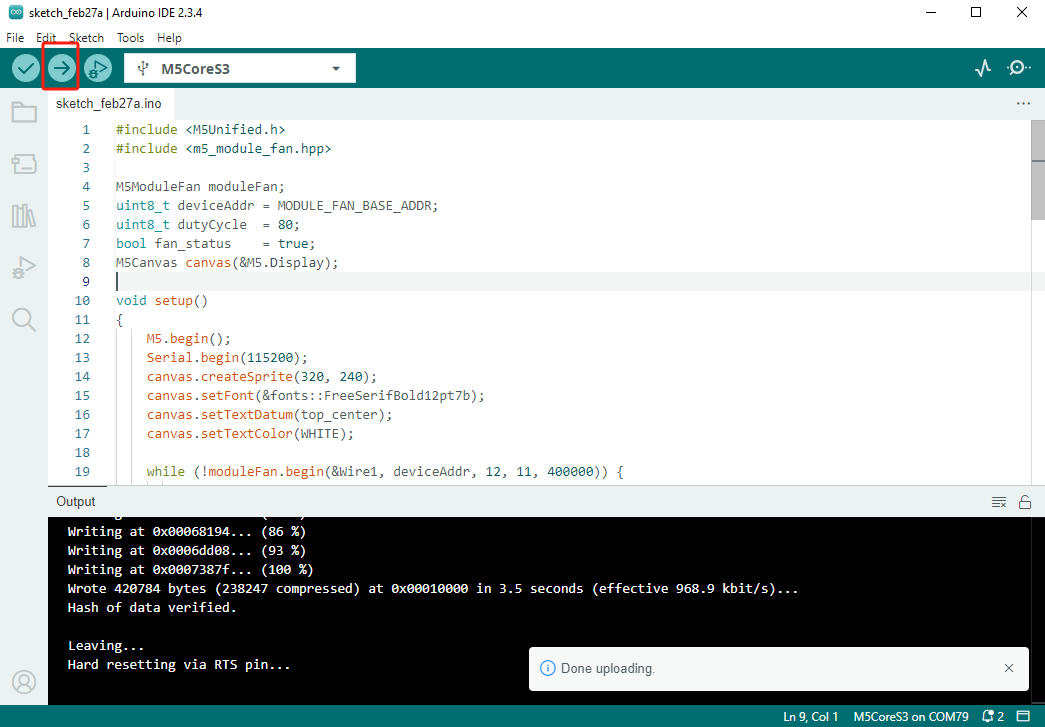
- 选中设备端口,点击 Arduino IDE 左上角编译上传按钮,等待程序完成编译并上传至设备。
4. 运行结果
- 按键 A 为单个继电器控制模式
- 按键 B 可切换指示灯和继电器的同步 / 异步模式
- 按键 C 为全开 / 关模式