Arduino Quick Start
2. Devices & Examples
3. M5Unified
4. M5GFX
5. Extensions
Unit
Atomic
Tab5
IoT
Accessories
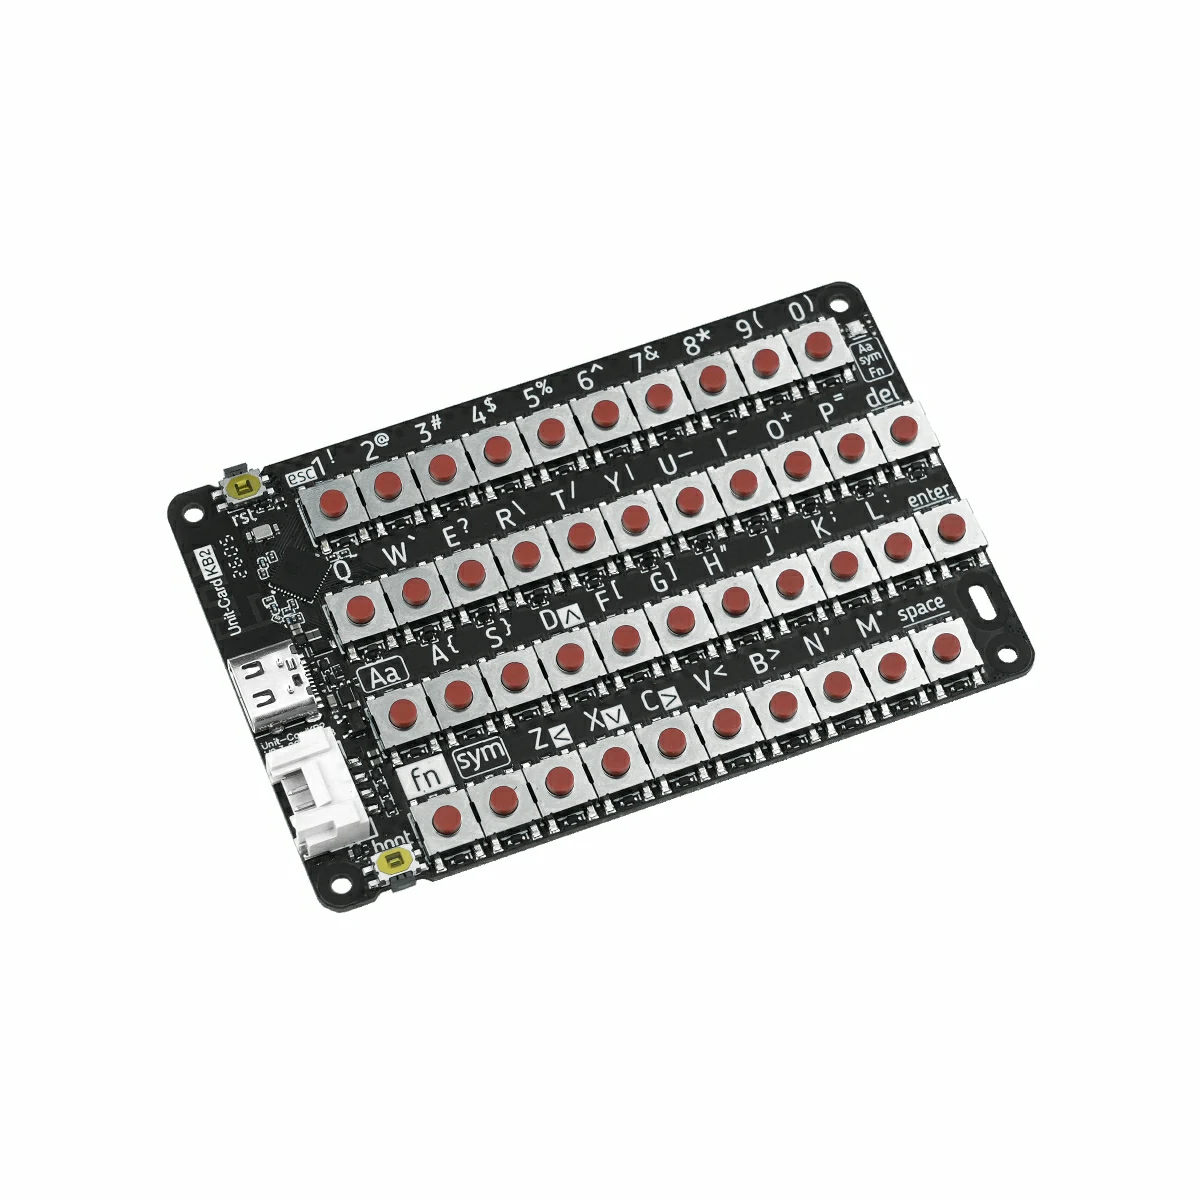
Unit CardKB2 Arduino Tutorial
1. Prerequisites
- Environment Setup: Refer to the Arduino IDE Getting Started Guide to complete the IDE installation, and install the corresponding board manager and driver libraries based on your actual development board.
- Required Libraries:
- Required Hardware:

2. Notes
3. Example Code
Mode Switching
Before use, power on the Unit CardKB2 (via HY2.0-4P or USB Type-C), then use the key combination Fn + Sym + Number Key to switch the communication mode. The selected mode is saved automatically and will persist after the next power-on.
Recommended procedure:
- Power on the Unit CardKB2.
- Use the shortcut key combination to switch to the target mode.
- Upload and run the corresponding example sketch on AtomS3R.
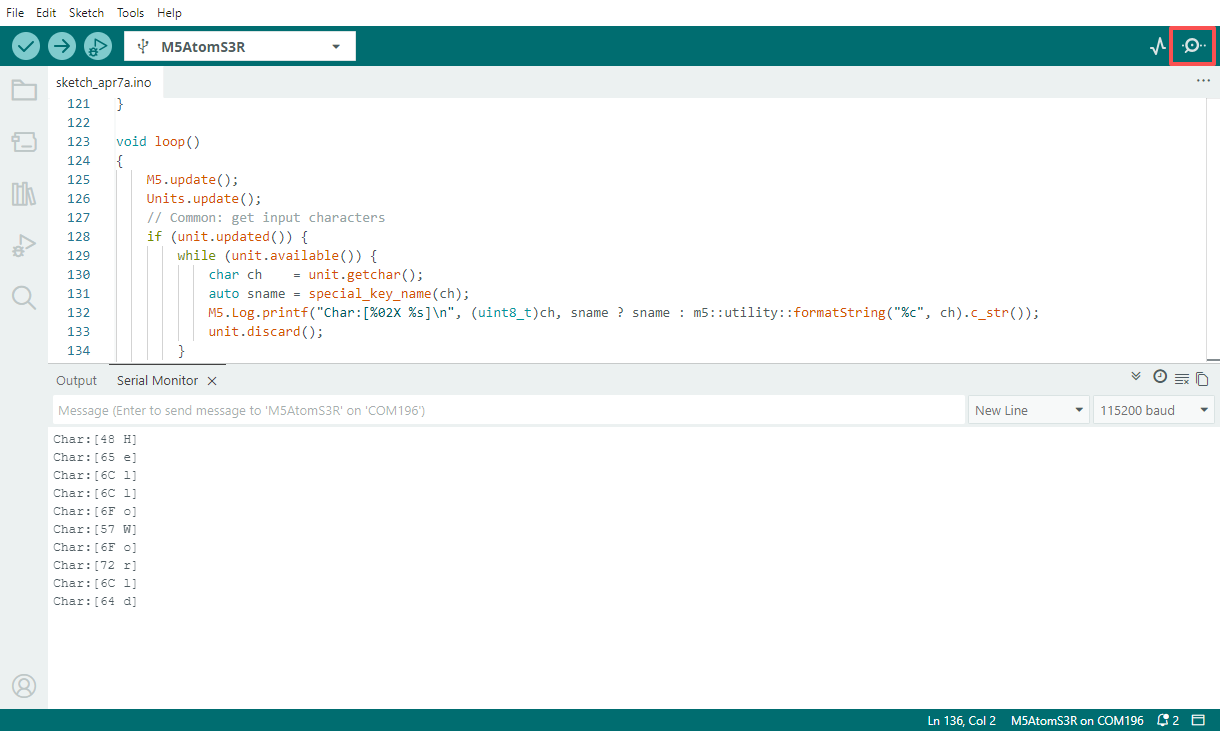
- Open the Serial Monitor to observe the output.
- Fn + Sym + 1: Switch to I2C mode (factory default) — white indicator blinks once
- Fn + Sym + 2: Switch to UART mode — white indicator blinks twice
- Fn + Sym + 3: Switch to ESP-NOW broadcast mode — white indicator blinks three times
- Fn + Sym + 4: Switch to BLE HID mode — white indicator blinks four times
I2C Mode
Before use: Power on the Unit CardKB2, then press Fn + Sym + 1 to switch to I2C mode (factory default).
This example allows AtomS3R to poll and read the current key value via I2C and print the received character to the Serial Monitor.
#include <M5Unified.h>
#include <M5UnitUnified.h>
#include <M5UnitUnifiedKEYBOARD.h>
#include <M5HAL.hpp>
#include <M5Utility.h>
#include <cctype>
#include <string>

#define USING_UNIT_CARDKB2
#define USING_I2C_FOR_CARDKB2

// *************************************************************

namespace {
m5::unit::UnitUnified Units;

const char* special_key_name(const char ch)
{
    switch (ch) {
        case '\b':
            return "BS";
        case '\t':
            return "TAB";
        case '\n':
            return "LF";
        case '\r':
            return "CR";
        case 0x1B:
            return "ESC";
        case 0x7F:
            return "DEL";
        default:
            break;
    }

    using namespace m5::unit::cardkb2;
    switch (ch) {
        case SCHAR_LEFT:
            return "LEFT";
        case SCHAR_UP:
            return "UP";
        case SCHAR_DOWN:
            return "DOWN";
        case SCHAR_RIGHT:
            return "RIGHT";
        default:
            break;
    }
    return nullptr;
}

m5::unit::UnitCardKB2 unit;

// NessoN1: Arduino Wire (I2C_NUM_0) cannot be used for GROVE port.
//   Wire is used by M5Unified In_I2C for internal devices (IOExpander etc.).
//   Wire1 exists but is reserved for HatPort — cannot be used for GROVE.
//   Reconfiguring Wire to GROVE pins breaks In_I2C, causing ESP_ERR_INVALID_STATE in M5.update().
//   Solution: Use SoftwareI2C via M5HAL (bit-banging) for the GROVE port.
// NanoC6: Wire.begin() on GROVE pins conflicts with m5::I2C_Class registered by Ex_I2C.setPort()
//   on the same I2C_NUM_0, causing sporadic NACK errors.
//   Solution: Use M5.Ex_I2C (m5::I2C_Class) directly instead of Arduino Wire.

bool setup_i2c()
{
    auto board = M5.getBoard();
    if (board == m5::board_t::board_ArduinoNessoN1) {
        // NessoN1: GROVE is on port_b (GPIO 5/4), not port_a (which maps to Wire pins 8/10)
        auto pin_num_sda = M5.getPin(m5::pin_name_t::port_b_out);
        auto pin_num_scl = M5.getPin(m5::pin_name_t::port_b_in);
        M5_LOGI("getPin(M5HAL): SDA:%u SCL:%u", pin_num_sda, pin_num_scl);
        m5::hal::bus::I2CBusConfig i2c_cfg;
        i2c_cfg.pin_sda = m5::hal::gpio::getPin(pin_num_sda);
        i2c_cfg.pin_scl = m5::hal::gpio::getPin(pin_num_scl);
        auto i2c_bus    = m5::hal::bus::i2c::getBus(i2c_cfg);
        M5_LOGI("Bus:%d", i2c_bus.has_value());
        return Units.add(unit, i2c_bus ? i2c_bus.value() : nullptr) && Units.begin();
    } else if (board == m5::board_t::board_M5NanoC6) {
        // NanoC6: Use M5.Ex_I2C (m5::I2C_Class, not Arduino Wire)
        M5_LOGI("Using M5.Ex_I2C");
        return Units.add(unit, M5.Ex_I2C) && Units.begin();
    } else {
        auto pin_num_sda = M5.getPin(m5::pin_name_t::port_a_sda);
        auto pin_num_scl = M5.getPin(m5::pin_name_t::port_a_scl);
        M5_LOGI("getPin: SDA:%u SCL:%u", pin_num_sda, pin_num_scl);
        Wire.end();
        Wire.begin(pin_num_sda, pin_num_scl, 100 * 1000U);
        return Units.add(unit, Wire) && Units.begin();
    }
}

bool setup_cardkb2_i2c()
{
    if (!setup_i2c()) {
        return false;
    }
    M5.Log.printf("Firmware:%02X\n", unit.firmwareVersion());
    return true;
}

}  // namespace

using namespace m5::unit::keyboard;

void setup()
{
    M5.begin();
    bool unit_ready{};

    unit_ready = setup_cardkb2_i2c();

    if (!unit_ready) {
        M5_LOGE("Failed to begin");
        M5_LOGE("Check CardKB2 communication mode (Fn+Sym+1:I2C)");
        while (true) {
            m5::utility::delay(10000);
        }
    }
    M5_LOGI("M5UnitUnified has been begun");
    M5_LOGI("%s", Units.debugInfo().c_str());
}

void loop()
{
    M5.update();
    Units.update();
    // Common: get input characters
    if (unit.updated()) {
        while (unit.available()) {
            char ch    = unit.getchar();
            auto sname = special_key_name(ch);
            M5.Log.printf("Char:[%02X %s]\n", (uint8_t)ch, sname ? sname : m5::utility::formatString("%c", ch).c_str());
            unit.discard();
        }
    }
}UART Mode
Before use: Power on the Unit CardKB2, then press Fn + Sym + 2 to switch to UART mode.
This example allows AtomS3R to receive key frames sent by Unit CardKB2 over UART, and outputs the key code, key state, and corresponding character to the Serial Monitor.
#include <M5Unified.h>
#include <M5UnitUnified.h>
#include <M5UnitUnifiedKEYBOARD.h>
#include <M5HAL.hpp>
#include <M5Utility.h>
#include <cctype>
#include <string>

#define USING_UNIT_CARDKB2
#define USING_UART_FOR_CARDKB2

// *************************************************************

namespace {
m5::unit::UnitUnified Units;

const char* special_key_name(const char ch)
{
    switch (ch) {
        case '\b':
            return "BS";
        case '\t':
            return "TAB";
        case '\n':
            return "LF";
        case '\r':
            return "CR";
        case 0x1B:
            return "ESC";
        case 0x7F:
            return "DEL";
        default:
            break;
    }

    using namespace m5::unit::cardkb2;
    switch (ch) {
        case SCHAR_LEFT:
            return "LEFT";
        case SCHAR_UP:
            return "UP";
        case SCHAR_DOWN:
            return "DOWN";
        case SCHAR_RIGHT:
            return "RIGHT";
        default:
            break;
    }
    return nullptr;
}

// #pragma message "Using UnitCardKB2UART (UART)"
m5::unit::UnitCardKB2UART unit;

bool setup_cardkb2_uart()
{
    // UART mode: CardKB2 must be switched to UART mode first (Fn+Sym+2 on the device)
    // Port C primary, Port A fallback (NessoN1: Port B fallback — Port A is Wire pins)
    auto board      = M5.getBoard();
    auto pin_num_rx = M5.getPin(m5::pin_name_t::port_c_rxd);
    auto pin_num_tx = M5.getPin(m5::pin_name_t::port_c_txd);
    if (pin_num_rx < 0 || pin_num_tx < 0) {
        if (board == m5::board_t::board_ArduinoNessoN1) {
            M5_LOGW("PortC is not available, using PortB");
            pin_num_rx = M5.getPin(m5::pin_name_t::port_b_in);
            pin_num_tx = M5.getPin(m5::pin_name_t::port_b_out);
        } else {
            M5_LOGW("PortC is not available, using PortA");
            Wire.end();
            pin_num_rx = M5.getPin(m5::pin_name_t::port_a_pin1);
            pin_num_tx = M5.getPin(m5::pin_name_t::port_a_pin2);
        }
    }
    M5_LOGI("getPin: RX:%d TX:%d", pin_num_rx, pin_num_tx);

#if defined(CONFIG_IDF_TARGET_ESP32C6)
    auto& serial = Serial1;
#elif SOC_UART_NUM > 2
    auto& serial = Serial2;
#elif SOC_UART_NUM > 1
    auto& serial = Serial1;
#else
#error "Not enough Serial"
#endif
    serial.begin(115200, SERIAL_8N1, pin_num_rx, pin_num_tx);
    if (!Units.add(unit, serial) || !Units.begin()) {
        return false;
    }
    M5.Log.printf("Firmware:Unknown (UART mode)\n");
    return true;
}

}  // namespace

using namespace m5::unit::keyboard;

void setup()
{
    M5.begin();
    bool unit_ready{};

    unit_ready = setup_cardkb2_uart();
    M5_LOGI("M5UnitUnified has been begun");
    M5_LOGI("%s", Units.debugInfo().c_str());
}

void loop()
{
    M5.update();
    Units.update();
    // Common: get input characters
    if (unit.updated()) {
        while (unit.available()) {
            char ch    = unit.getchar();
            auto sname = special_key_name(ch);
            M5.Log.printf("Char:[%02X %s]\n", (uint8_t)ch, sname ? sname : m5::utility::formatString("%c", ch).c_str());
            unit.discard();
        }
    }
}ESP-NOW Mode
Before use: Power on the Unit CardKB2, then press Fn + Sym + 3 to switch to ESP-NOW broadcast mode.
This example allows AtomS3R to receive ESP-NOW broadcast key data from Unit CardKB2, validate the frame header, length, and checksum, and output the key press and release states to the Serial Monitor.
#include <esp_now.h>
#include <WiFi.h>

volatile bool packetReady = false;
uint8_t packet[5];
int packetLen = 0;

void OnDataRecv(const uint8_t *mac, const uint8_t *incomingData, int len)
{
    if (len > 5) len = 5;
    memcpy(packet, incomingData, len);
    packetLen   = len;
    packetReady = true;
}

void setup()
{
    Serial.begin(115200);
    WiFi.mode(WIFI_STA);

    if (esp_now_init() != ESP_OK) {
        Serial.println("Error initializing ESP-NOW");
        return;
    }

    esp_now_register_recv_cb(esp_now_recv_cb_t(OnDataRecv));
}

void loop()
{
    if (!packetReady) return;
    packetReady = false;

    Serial.print("Raw: ");
    for (int i = 0; i < packetLen; i++) {
        Serial.printf("%02X ", packet[i]);
    }
    if (packetLen != 5) {
        return;
    }

    uint8_t head     = packet[0];
    uint8_t dataLen  = packet[1];
    uint8_t keyId    = packet[2];
    uint8_t keyState = packet[3];
    uint8_t recvSum  = packet[4];

    if (head != 0xAA) {
        Serial.println("Error: invalid frame head");
        return;
    }

    if (dataLen != 0x03) {
        Serial.println("Error: invalid DATA_LEN");
        return;
    }

    uint8_t calcSum = (dataLen + keyId + keyState) & 0xFF;
    if (calcSum != recvSum) {
        Serial.printf("Error: checksum mismatch recv=%02X calc=%02X\n", recvSum, calcSum);
        return;
    }

    Serial.println();
    if (keyState == 0x01) {
        Serial.printf("Key %d pressed\n", keyId);
    } else if (keyState == 0x02) {
        Serial.printf("Key %d released\n", keyId);
    } else {
        Serial.printf("Error: unknown key state %02X\n", keyState);
    }
}BLE HID Mode
Before use: Power on the Unit CardKB2, then press Fn + Sym + 4 to switch to BLE HID mode.
BLE HID is a standard Bluetooth input device protocol. It can be used not only with the receiver example in this tutorial, but also connected directly to a smartphone, tablet, or PC (with BLE HID support) as a keyboard input device.
This example allows AtomS3R to act as a BLE HID receiver, scan for and connect to the Unit CardKB2, then output both the raw HID report data and the parsed ASCII characters to the Serial Monitor.
#include <NimBLEDevice.h>

static NimBLEUUID kHidSvcUUID((uint16_t)0x1812);
static NimBLEUUID kReportUUID((uint16_t)0x2A4D);

static NimBLEAddress g_addr;
static NimBLEClient* g_client = nullptr;
static bool g_hasTarget = false, g_connected = false,
            g_authReady = false, g_subscribed = false;

// HID keycode → ASCII lookup table
static const char kNormal[] = "\0\0\0\0abcdefghijklmnopqrstuvwxyz1234567890\n\x1b\b\t -=[]\\"
                               "\0;'`,./";
static const char kShifted[] = "\0\0\0\0ABCDEFGHIJKLMNOPQRSTUVWXYZ!@#$%^&*()\n\x1b\b\t _+{}|"
                                "\0:\"~<>?";

static uint8_t hidToAscii(const uint8_t* r, size_t len) {
    if (len == 9 && r[0] == 0x01) { r++; len = 8; }
    if (len < 3) return 0;
    uint8_t kc = r[2];
    if (kc == 0 || kc >= sizeof(kNormal)) return 0;
    return (r[0] & 0x22) ? (uint8_t)kShifted[kc] : (uint8_t)kNormal[kc];
}

static void reportCB(NimBLERemoteCharacteristic*, uint8_t* data, size_t len, bool) {
    Serial.printf("+BLE:RX,%u", (unsigned)len);
    for (size_t i = 0; i < len; i++) Serial.printf(",%02X", data[i]);
    Serial.println();
    uint8_t ch = hidToAscii(data, len);
    if (ch) Serial.printf("+BLE:ASCII,0x%02X,'%c'\n", ch, (ch >= 0x20 && ch < 0x7F) ? ch : '?');
}

struct ClientCB : NimBLEClientCallbacks {
    void onConnect(NimBLEClient* c) override {
        Serial.println("[BLE] Connected");
        g_connected = true; g_authReady = g_subscribed = false;
        int rc; NimBLEDevice::startSecurity(c->getConnHandle(), &rc);
    }
    void onDisconnect(NimBLEClient*, int reason) override {
        Serial.printf("[BLE] Disconnected (%d)\n", reason);
        g_connected = g_authReady = g_subscribed = false;
    }
    void onAuthenticationComplete(NimBLEConnInfo& info) override {
        g_authReady = info.isAuthenticated() || info.isEncrypted();
        Serial.printf("[BLE] Auth: %s\n", g_authReady ? "OK" : "FAIL");
        if (!g_authReady && g_client) g_client->disconnect();
    }
    bool onConnParamsUpdateRequest(NimBLEClient*, const ble_gap_upd_params*) override { return true; }
};

struct AdvCB : NimBLEScanCallbacks {
    void onResult(const NimBLEAdvertisedDevice* d) override {
        if (!d->isAdvertisingService(kHidSvcUUID) || g_hasTarget) return;
        Serial.printf("[BLE] Found: %s\n", d->getAddress().toString().c_str());
        g_addr = d->getAddress(); g_hasTarget = true;
        NimBLEDevice::getScan()->stop();
    }
};

static void startScan() {
    auto* s = NimBLEDevice::getScan();
    s->setScanCallbacks(new AdvCB(), false);
    s->setActiveScan(false); s->setInterval(100); s->setWindow(20); s->setDuplicateFilter(true);
    g_hasTarget = false;
    Serial.println("[BLE] Scanning...");
    s->start(5, false);
}

static bool subscribeReport() {
    auto* svc = g_client ? g_client->getService(kHidSvcUUID) : nullptr;
    auto* chr = svc ? svc->getCharacteristic(kReportUUID) : nullptr;
    if (!chr || (!chr->canNotify() && !chr->canIndicate())) return false;
    if (!chr->subscribe(true, reportCB, true)) return false;
    g_subscribed = true;
    Serial.println("[BLE] Subscribed");
    return true;
}

void setup() {
    Serial.begin(115200); delay(300);
    NimBLEDevice::init("ESP32S3_BLE_Receiver");
    NimBLEDevice::setPower(ESP_PWR_LVL_P9);
    NimBLEDevice::setSecurityAuth(true, false, false);
    NimBLEDevice::setSecurityIOCap(BLE_HS_IO_NO_INPUT_OUTPUT);
    NimBLEDevice::setSecurityInitKey(BLE_SM_PAIR_KEY_DIST_ENC | BLE_SM_PAIR_KEY_DIST_ID);
    NimBLEDevice::setSecurityRespKey(BLE_SM_PAIR_KEY_DIST_ENC | BLE_SM_PAIR_KEY_DIST_ID);
    startScan();
}

void loop() {
    if (!g_connected) {
        if (!g_hasTarget) { startScan(); delay(1000); return; }
        if (!g_client) { g_client = NimBLEDevice::createClient(); g_client->setClientCallbacks(new ClientCB(), true); }
        if (!g_client->connect(g_addr, false)) { delay(1500); startScan(); return; }
    }
    if (g_connected && g_authReady && !g_subscribed) subscribeReport();
    delay(50);
}4. Compile & Upload
- Download Mode: Different devices require entering download mode before flashing firmware, and the procedure may vary depending on the host device. For details, refer to the device firmware download tutorial list at the bottom of the Arduino IDE Getting Started Guide page.
AtomS3R: Hold down the reset button (approximately 2 seconds) until the internal green LED lights up, then release. The device is now in download mode and ready for flashing.

- Select the device port, then click the compile and upload button in the upper-left corner of Arduino IDE. Wait for the sketch to finish compiling and uploading to the device.
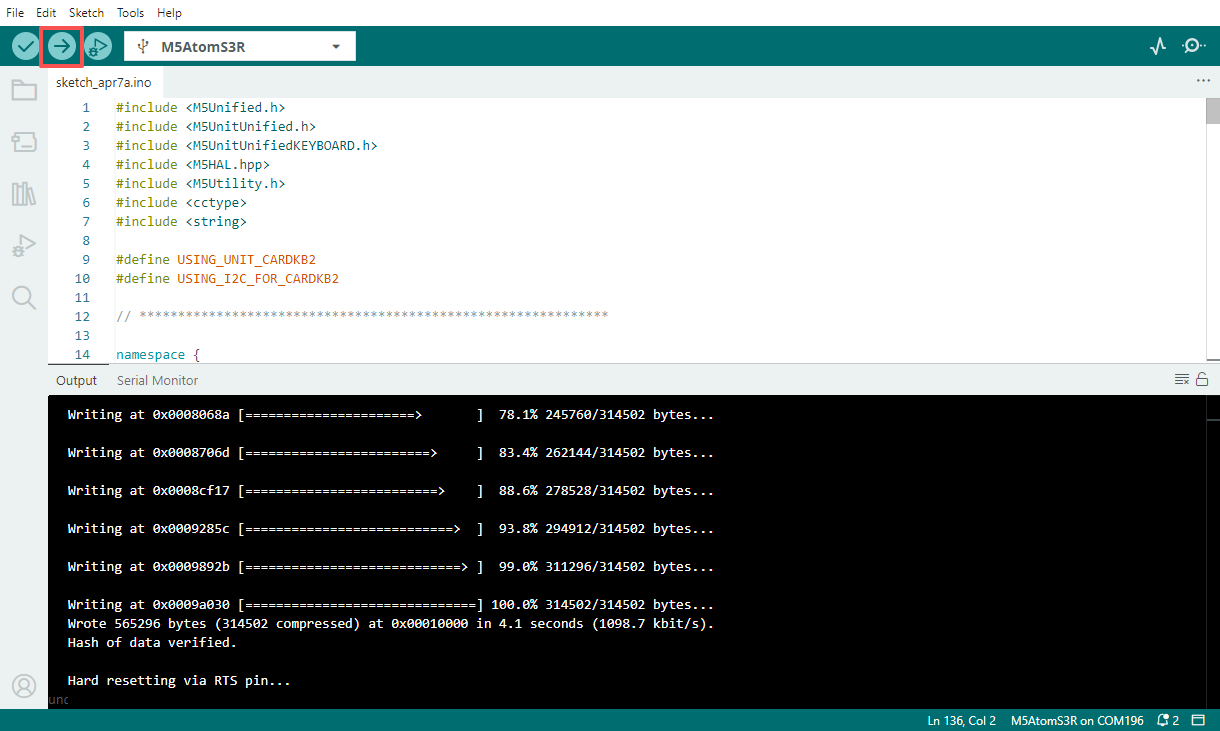
- Open the Serial Monitor, press a key on the keyboard, and observe the log output.