Arduino 上手教程
2. 设备开发 & 案例程序
3. M5Unified
4. M5GFX
5. 拓展模块
Unit
Atomic
Tab5
IoT
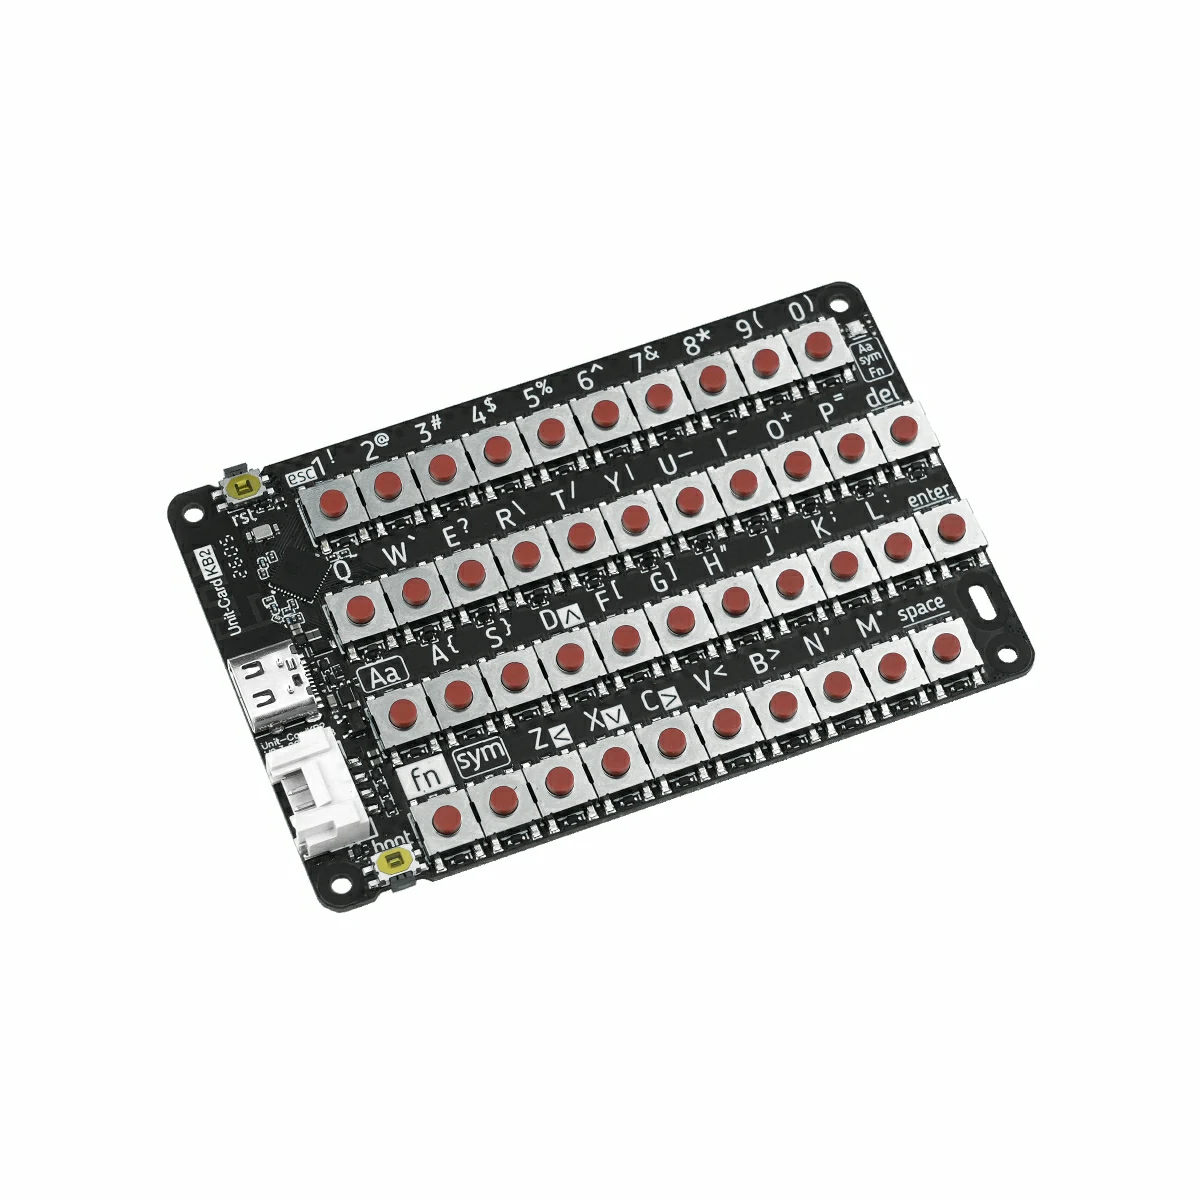
Unit CardKB2 Arduino 使用教程
1.准备工作
1.环境配置:参考Arduino IDE上手教程完成 IDE 安装,并根据实际使用的开发板安装对应的板管理与驱动库。
2.使用到的驱动库:
3.使用到的硬件产品:

2.注意事项
3.案例程序
模式切换
使用前请先给 Unit CardKB2 供电(HY2.0-4P 或 USB Type-C 均可),再通过组合键 Fn + Sym + 数字键 切换通信模式。模式切换后会自动保存,下次上电时保持当前设置。
推荐操作顺序:
- 给 Unit CardKB2 供电。
- 使用快捷键切换到目标模式。
- 在 AtomS3R 上上传并运行对应模式的示例程序。
- 打开串口监视器观察输出结果。
- Fn + Sym + 1:切换至 I2C 模式(出厂默认),白色指示灯闪烁 1 次
- Fn + Sym + 2:切换至 UART 模式,白色指示灯闪烁 2 次
- Fn + Sym + 3:切换至 ESP-NOW 广播模式,白色指示灯闪烁 3 次
- Fn + Sym + 4:切换至 BLE HID 模式,白色指示灯闪烁 4 次
I2C 模式
使用前操作:给 Unit CardKB2 供电后,按 Fn + Sym + 1 切换到 I2C 模式(出厂默认)。
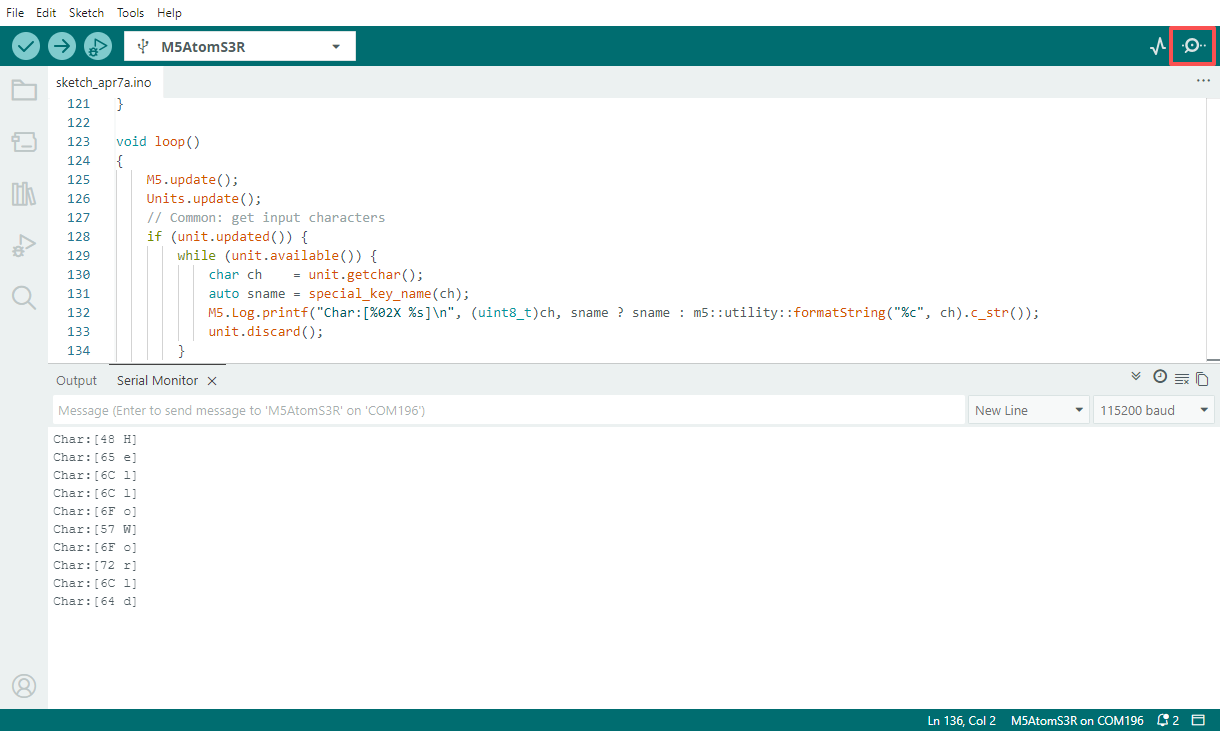
使用该示例可让 AtomS3R 通过 I2C 轮询读取当前键值,并在串口中打印接收到的字符内容。
#include <M5Unified.h>
#include <M5UnitUnified.h>
#include <M5UnitUnifiedKEYBOARD.h>
#include <M5HAL.hpp>
#include <M5Utility.h>
#include <cctype>
#include <string>

#define USING_UNIT_CARDKB2
#define USING_I2C_FOR_CARDKB2

// *************************************************************

namespace {
m5::unit::UnitUnified Units;

const char* special_key_name(const char ch)
{
    switch (ch) {
        case '\b':
            return "BS";
        case '\t':
            return "TAB";
        case '\n':
            return "LF";
        case '\r':
            return "CR";
        case 0x1B:
            return "ESC";
        case 0x7F:
            return "DEL";
        default:
            break;
    }

    using namespace m5::unit::cardkb2;
    switch (ch) {
        case SCHAR_LEFT:
            return "LEFT";
        case SCHAR_UP:
            return "UP";
        case SCHAR_DOWN:
            return "DOWN";
        case SCHAR_RIGHT:
            return "RIGHT";
        default:
            break;
    }
    return nullptr;
}

m5::unit::UnitCardKB2 unit;

// NessoN1: Arduino Wire (I2C_NUM_0) cannot be used for GROVE port.
//   Wire is used by M5Unified In_I2C for internal devices (IOExpander etc.).
//   Wire1 exists but is reserved for HatPort — cannot be used for GROVE.
//   Reconfiguring Wire to GROVE pins breaks In_I2C, causing ESP_ERR_INVALID_STATE in M5.update().
//   Solution: Use SoftwareI2C via M5HAL (bit-banging) for the GROVE port.
// NanoC6: Wire.begin() on GROVE pins conflicts with m5::I2C_Class registered by Ex_I2C.setPort()
//   on the same I2C_NUM_0, causing sporadic NACK errors.
//   Solution: Use M5.Ex_I2C (m5::I2C_Class) directly instead of Arduino Wire.

bool setup_i2c()
{
    auto board = M5.getBoard();
    if (board == m5::board_t::board_ArduinoNessoN1) {
        // NessoN1: GROVE is on port_b (GPIO 5/4), not port_a (which maps to Wire pins 8/10)
        auto pin_num_sda = M5.getPin(m5::pin_name_t::port_b_out);
        auto pin_num_scl = M5.getPin(m5::pin_name_t::port_b_in);
        M5_LOGI("getPin(M5HAL): SDA:%u SCL:%u", pin_num_sda, pin_num_scl);
        m5::hal::bus::I2CBusConfig i2c_cfg;
        i2c_cfg.pin_sda = m5::hal::gpio::getPin(pin_num_sda);
        i2c_cfg.pin_scl = m5::hal::gpio::getPin(pin_num_scl);
        auto i2c_bus    = m5::hal::bus::i2c::getBus(i2c_cfg);
        M5_LOGI("Bus:%d", i2c_bus.has_value());
        return Units.add(unit, i2c_bus ? i2c_bus.value() : nullptr) && Units.begin();
    } else if (board == m5::board_t::board_M5NanoC6) {
        // NanoC6: Use M5.Ex_I2C (m5::I2C_Class, not Arduino Wire)
        M5_LOGI("Using M5.Ex_I2C");
        return Units.add(unit, M5.Ex_I2C) && Units.begin();
    } else {
        auto pin_num_sda = M5.getPin(m5::pin_name_t::port_a_sda);
        auto pin_num_scl = M5.getPin(m5::pin_name_t::port_a_scl);
        M5_LOGI("getPin: SDA:%u SCL:%u", pin_num_sda, pin_num_scl);
        Wire.end();
        Wire.begin(pin_num_sda, pin_num_scl, 100 * 1000U);
        return Units.add(unit, Wire) && Units.begin();
    }
}

bool setup_cardkb2_i2c()
{
    if (!setup_i2c()) {
        return false;
    }
    M5.Log.printf("Firmware:%02X\n", unit.firmwareVersion());
    return true;
}

}  // namespace

using namespace m5::unit::keyboard;

void setup()
{
    M5.begin();
    bool unit_ready{};

    unit_ready = setup_cardkb2_i2c();

    if (!unit_ready) {
        M5_LOGE("Failed to begin");
        M5_LOGE("Check CardKB2 communication mode (Fn+Sym+1:I2C)");
        while (true) {
            m5::utility::delay(10000);
        }
    }
    M5_LOGI("M5UnitUnified has been begun");
    M5_LOGI("%s", Units.debugInfo().c_str());
}

void loop()
{
    M5.update();
    Units.update();
    // Common: get input characters
    if (unit.updated()) {
        while (unit.available()) {
            char ch    = unit.getchar();
            auto sname = special_key_name(ch);
            M5.Log.printf("Char:[%02X %s]\n", (uint8_t)ch, sname ? sname : m5::utility::formatString("%c", ch).c_str());
            unit.discard();
        }
    }
}UART 模式
使用前操作:给 Unit CardKB2 供电后,按 Fn + Sym + 2 切换到 UART 模式。
使用该示例可让 AtomS3R 通过串口接收 Unit CardKB2 发出的按键帧,并将键值、按键状态以及对应字符输出到串口监视器。
#include <M5Unified.h>
#include <M5UnitUnified.h>
#include <M5UnitUnifiedKEYBOARD.h>
#include <M5HAL.hpp>
#include <M5Utility.h>
#include <cctype>
#include <string>

#define USING_UNIT_CARDKB2
#define USING_UART_FOR_CARDKB2

// *************************************************************

namespace {
m5::unit::UnitUnified Units;

const char* special_key_name(const char ch)
{
    switch (ch) {
        case '\b':
            return "BS";
        case '\t':
            return "TAB";
        case '\n':
            return "LF";
        case '\r':
            return "CR";
        case 0x1B:
            return "ESC";
        case 0x7F:
            return "DEL";
        default:
            break;
    }

    using namespace m5::unit::cardkb2;
    switch (ch) {
        case SCHAR_LEFT:
            return "LEFT";
        case SCHAR_UP:
            return "UP";
        case SCHAR_DOWN:
            return "DOWN";
        case SCHAR_RIGHT:
            return "RIGHT";
        default:
            break;
    }
    return nullptr;
}

// #pragma message "Using UnitCardKB2UART (UART)"
m5::unit::UnitCardKB2UART unit;

bool setup_cardkb2_uart()
{
    // UART mode: CardKB2 must be switched to UART mode first (Fn+Sym+2 on the device)
    // Port C primary, Port A fallback (NessoN1: Port B fallback — Port A is Wire pins)
    auto board      = M5.getBoard();
    auto pin_num_rx = M5.getPin(m5::pin_name_t::port_c_rxd);
    auto pin_num_tx = M5.getPin(m5::pin_name_t::port_c_txd);
    if (pin_num_rx < 0 || pin_num_tx < 0) {
        if (board == m5::board_t::board_ArduinoNessoN1) {
            M5_LOGW("PortC is not available, using PortB");
            pin_num_rx = M5.getPin(m5::pin_name_t::port_b_in);
            pin_num_tx = M5.getPin(m5::pin_name_t::port_b_out);
        } else {
            M5_LOGW("PortC is not available, using PortA");
            Wire.end();
            pin_num_rx = M5.getPin(m5::pin_name_t::port_a_pin1);
            pin_num_tx = M5.getPin(m5::pin_name_t::port_a_pin2);
        }
    }
    M5_LOGI("getPin: RX:%d TX:%d", pin_num_rx, pin_num_tx);

#if defined(CONFIG_IDF_TARGET_ESP32C6)
    auto& serial = Serial1;
#elif SOC_UART_NUM > 2
    auto& serial = Serial2;
#elif SOC_UART_NUM > 1
    auto& serial = Serial1;
#else
#error "Not enough Serial"
#endif
    serial.begin(115200, SERIAL_8N1, pin_num_rx, pin_num_tx);
    if (!Units.add(unit, serial) || !Units.begin()) {
        return false;
    }
    M5.Log.printf("Firmware:Unknown (UART mode)\n");
    return true;
}

}  // namespace

using namespace m5::unit::keyboard;

void setup()
{
    M5.begin();
    bool unit_ready{};

    unit_ready = setup_cardkb2_uart();
    M5_LOGI("M5UnitUnified has been begun");
    M5_LOGI("%s", Units.debugInfo().c_str());
}

void loop()
{
    M5.update();
    Units.update();
    // Common: get input characters
    if (unit.updated()) {
        while (unit.available()) {
            char ch    = unit.getchar();
            auto sname = special_key_name(ch);
            M5.Log.printf("Char:[%02X %s]\n", (uint8_t)ch, sname ? sname : m5::utility::formatString("%c", ch).c_str());
            unit.discard();
        }
    }
}ESP-NOW 模式
使用前操作:给 Unit CardKB2 供电后,按 Fn + Sym + 3 切换到 ESP-NOW 广播模式。
使用该示例可让 AtomS3R 接收来自 Unit CardKB2 的 ESP-NOW 广播按键数据,并对数据帧头、长度与校验和进行校验,最终在串口中输出按键按下与释放状态。
#include <esp_now.h>
#include <WiFi.h>

volatile bool packetReady = false;
uint8_t packet[5];
int packetLen = 0;

void OnDataRecv(const uint8_t *mac, const uint8_t *incomingData, int len)
{
    if (len > 5) len = 5;
    memcpy(packet, incomingData, len);
    packetLen   = len;
    packetReady = true;
}

void setup()
{
    Serial.begin(115200);
    WiFi.mode(WIFI_STA);

    if (esp_now_init() != ESP_OK) {
        Serial.println("Error initializing ESP-NOW");
        return;
    }

    esp_now_register_recv_cb(esp_now_recv_cb_t(OnDataRecv));
}

void loop()
{
    if (!packetReady) return;
    packetReady = false;

    Serial.print("Raw: ");
    for (int i = 0; i < packetLen; i++) {
        Serial.printf("%02X ", packet[i]);
    }
    if (packetLen != 5) {
        return;
    }

    uint8_t head     = packet[0];
    uint8_t dataLen  = packet[1];
    uint8_t keyId    = packet[2];
    uint8_t keyState = packet[3];
    uint8_t recvSum  = packet[4];

    if (head != 0xAA) {
        Serial.println("Error: invalid frame head");
        return;
    }

    if (dataLen != 0x03) {
        Serial.println("Error: invalid DATA_LEN");
        return;
    }

    uint8_t calcSum = (dataLen + keyId + keyState) & 0xFF;
    if (calcSum != recvSum) {
        Serial.printf("Error: checksum mismatch recv=%02X calc=%02X\n", recvSum, calcSum);
        return;
    }

    Serial.println();
    if (keyState == 0x01) {
        Serial.printf("Key %d pressed\n", keyId);
    } else if (keyState == 0x02) {
        Serial.printf("Key %d released\n", keyId);
    } else {
        Serial.printf("Error: unknown key state %02X\n", keyState);
    }
}BLE HID 模式
使用前操作:给 Unit CardKB2 供电后,按 Fn + Sym + 4 切换到 BLE HID 模式。
BLE HID 属于标准蓝牙输入设备协议,不仅可与本教程中的接收端示例配合使用,也可直接连接手机、平板或 PC(需支持 BLE HID)作为键盘输入设备。
使用该示例可让 AtomS3R 作为 BLE HID 接收端,扫描并连接 Unit CardKB2,随后在串口中输出键盘上报的原始 HID 数据与解析后的 ASCII 字符。
#include <NimBLEDevice.h>

static NimBLEUUID kHidSvcUUID((uint16_t)0x1812);
static NimBLEUUID kReportUUID((uint16_t)0x2A4D);

static NimBLEAddress g_addr;
static NimBLEClient* g_client = nullptr;
static bool g_hasTarget = false, g_connected = false,
            g_authReady = false, g_subscribed = false;

// HID keycode → ASCII 查找表
static const char kNormal[] = "\0\0\0\0abcdefghijklmnopqrstuvwxyz1234567890\n\x1b\b\t -=[]\\"
                               "\0;'`,./";
static const char kShifted[] = "\0\0\0\0ABCDEFGHIJKLMNOPQRSTUVWXYZ!@#$%^&*()\n\x1b\b\t _+{}|"
                                "\0:\"~<>?";

static uint8_t hidToAscii(const uint8_t* r, size_t len) {
    if (len == 9 && r[0] == 0x01) { r++; len = 8; }
    if (len < 3) return 0;
    uint8_t kc = r[2];
    if (kc == 0 || kc >= sizeof(kNormal)) return 0;
    return (r[0] & 0x22) ? (uint8_t)kShifted[kc] : (uint8_t)kNormal[kc];
}

static void reportCB(NimBLERemoteCharacteristic*, uint8_t* data, size_t len, bool) {
    Serial.printf("+BLE:RX,%u", (unsigned)len);
    for (size_t i = 0; i < len; i++) Serial.printf(",%02X", data[i]);
    Serial.println();
    uint8_t ch = hidToAscii(data, len);
    if (ch) Serial.printf("+BLE:ASCII,0x%02X,'%c'\n", ch, (ch >= 0x20 && ch < 0x7F) ? ch : '?');
}

struct ClientCB : NimBLEClientCallbacks {
    void onConnect(NimBLEClient* c) override {
        Serial.println("[BLE] Connected");
        g_connected = true; g_authReady = g_subscribed = false;
        int rc; NimBLEDevice::startSecurity(c->getConnHandle(), &rc);
    }
    void onDisconnect(NimBLEClient*, int reason) override {
        Serial.printf("[BLE] Disconnected (%d)\n", reason);
        g_connected = g_authReady = g_subscribed = false;
    }
    void onAuthenticationComplete(NimBLEConnInfo& info) override {
        g_authReady = info.isAuthenticated() || info.isEncrypted();
        Serial.printf("[BLE] Auth: %s\n", g_authReady ? "OK" : "FAIL");
        if (!g_authReady && g_client) g_client->disconnect();
    }
    bool onConnParamsUpdateRequest(NimBLEClient*, const ble_gap_upd_params*) override { return true; }
};

struct AdvCB : NimBLEScanCallbacks {
    void onResult(const NimBLEAdvertisedDevice* d) override {
        if (!d->isAdvertisingService(kHidSvcUUID) || g_hasTarget) return;
        Serial.printf("[BLE] Found: %s\n", d->getAddress().toString().c_str());
        g_addr = d->getAddress(); g_hasTarget = true;
        NimBLEDevice::getScan()->stop();
    }
};

static void startScan() {
    auto* s = NimBLEDevice::getScan();
    s->setScanCallbacks(new AdvCB(), false);
    s->setActiveScan(false); s->setInterval(100); s->setWindow(20); s->setDuplicateFilter(true);
    g_hasTarget = false;
    Serial.println("[BLE] Scanning...");
    s->start(5, false);
}

static bool subscribeReport() {
    auto* svc = g_client ? g_client->getService(kHidSvcUUID) : nullptr;
    auto* chr = svc ? svc->getCharacteristic(kReportUUID) : nullptr;
    if (!chr || (!chr->canNotify() && !chr->canIndicate())) return false;
    if (!chr->subscribe(true, reportCB, true)) return false;
    g_subscribed = true;
    Serial.println("[BLE] Subscribed");
    return true;
}

void setup() {
    Serial.begin(115200); delay(300);
    NimBLEDevice::init("ESP32S3_BLE_Receiver");
    NimBLEDevice::setPower(ESP_PWR_LVL_P9);
    NimBLEDevice::setSecurityAuth(true, false, false);
    NimBLEDevice::setSecurityIOCap(BLE_HS_IO_NO_INPUT_OUTPUT);
    NimBLEDevice::setSecurityInitKey(BLE_SM_PAIR_KEY_DIST_ENC | BLE_SM_PAIR_KEY_DIST_ID);
    NimBLEDevice::setSecurityRespKey(BLE_SM_PAIR_KEY_DIST_ENC | BLE_SM_PAIR_KEY_DIST_ID);
    startScan();
}

void loop() {
    if (!g_connected) {
        if (!g_hasTarget) { startScan(); delay(1000); return; }
        if (!g_client) { g_client = NimBLEDevice::createClient(); g_client->setClientCallbacks(new ClientCB(), true); }
        if (!g_client->connect(g_addr, false)) { delay(1500); startScan(); return; }
    }
    if (g_connected && g_authReady && !g_subscribed) subscribeReport();
    delay(50);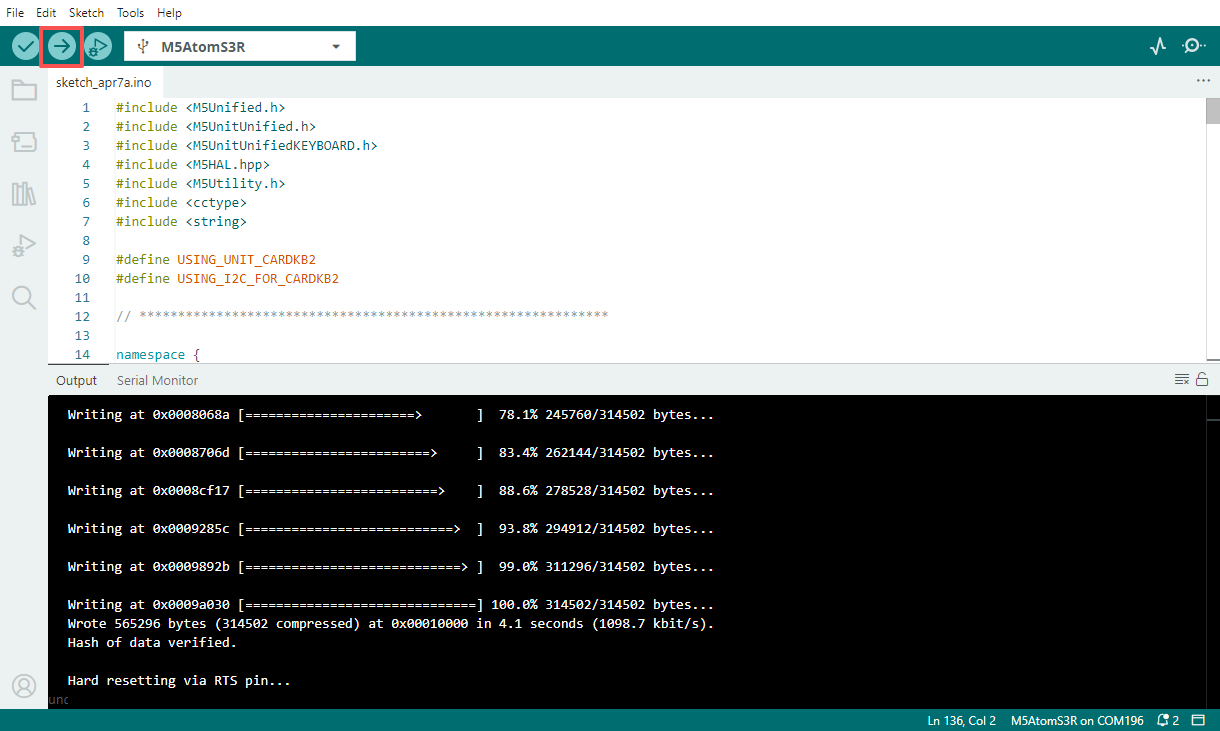
}4.编译上传
1.下载模式:不同设备进行程序烧录前需要进入下载模式,不同的主控设备该步骤可能有所不同。详情可参考Arduino IDE上手教程页面底部的设备程序下载教程列表,查看具体的操作方式。
AtomS3R 长按复位按键(大约 2 秒)直到内部绿色 LED 灯亮起,便可松开,此时设备已进入下载模式,等待烧录。

- 2.选中设备端口,点击 Arduino IDE 左上角编译上传按钮,等待程序完成编译并上传至设备。
- 3.打开串口监视器,单击键盘按键,查看日志输出。