

Arduino 上手教程
2. 设备开发 & 案例程序
3. M5Unified
4. M5GFX
5. 拓展模块
Unit
Atomic
Tab5
IoT
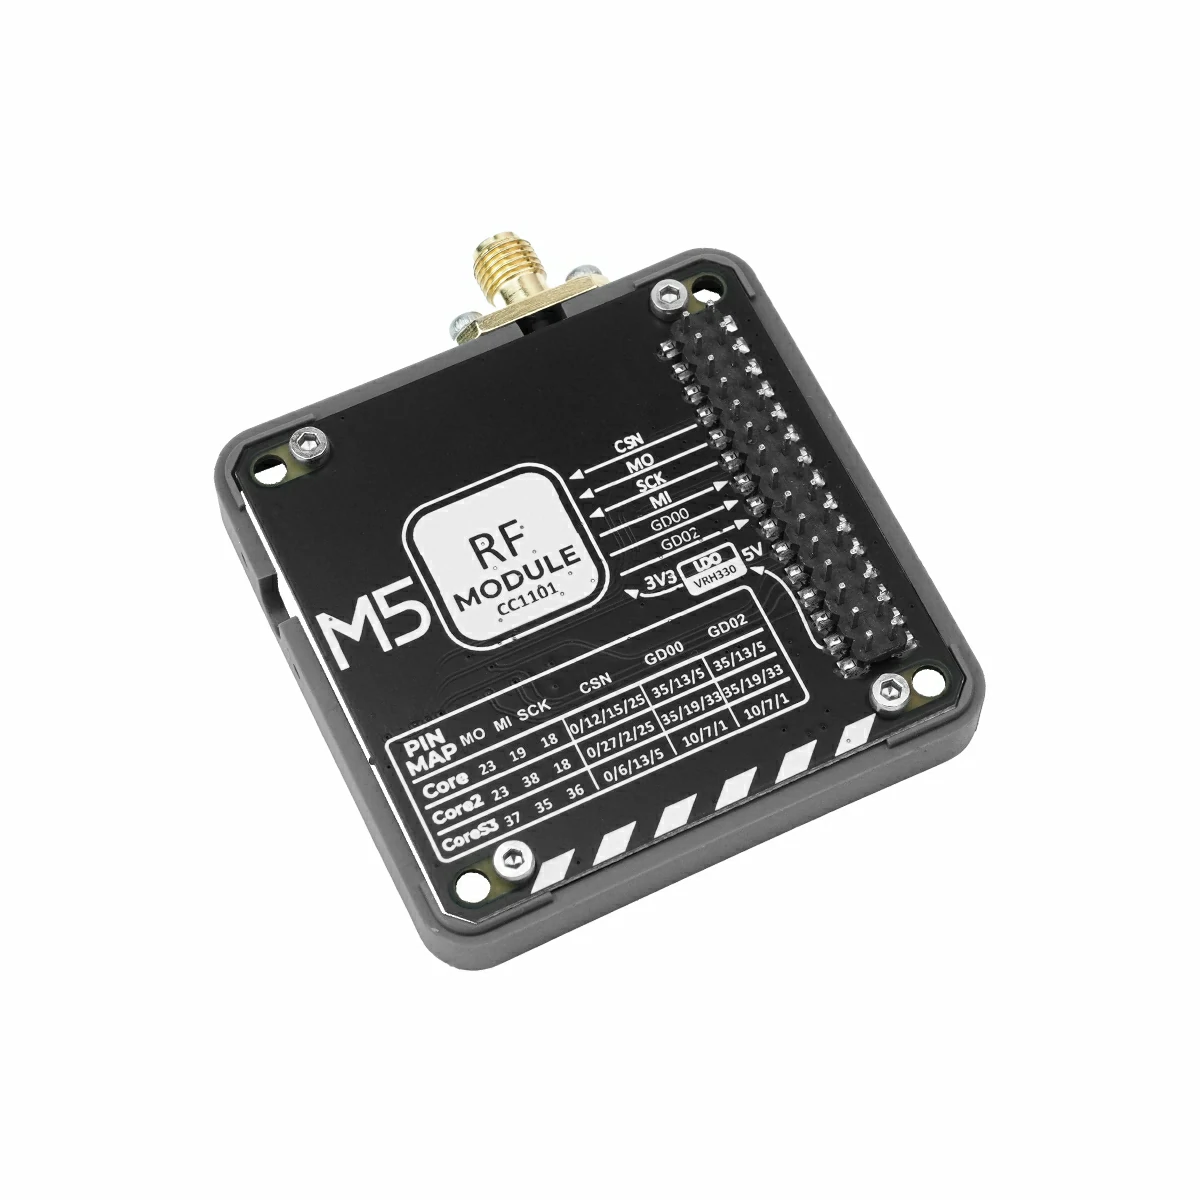
Module CC1101 Arduino 使用教程
1. 准备工作
环境配置: 参考 Arduino IDE 上手教程完成 IDE 安装,并根据实际使用的开发板安装对应的板管理,与需要的驱动库。
使用到的驱动库:
使用到的硬件产品:

2. 注意事项
引脚兼容性
由于每款主机的引脚配置不同,使用前请参考产品文档中的引脚兼容表,并根据实际引脚连接情况修改案例程序。
3. 案例程序
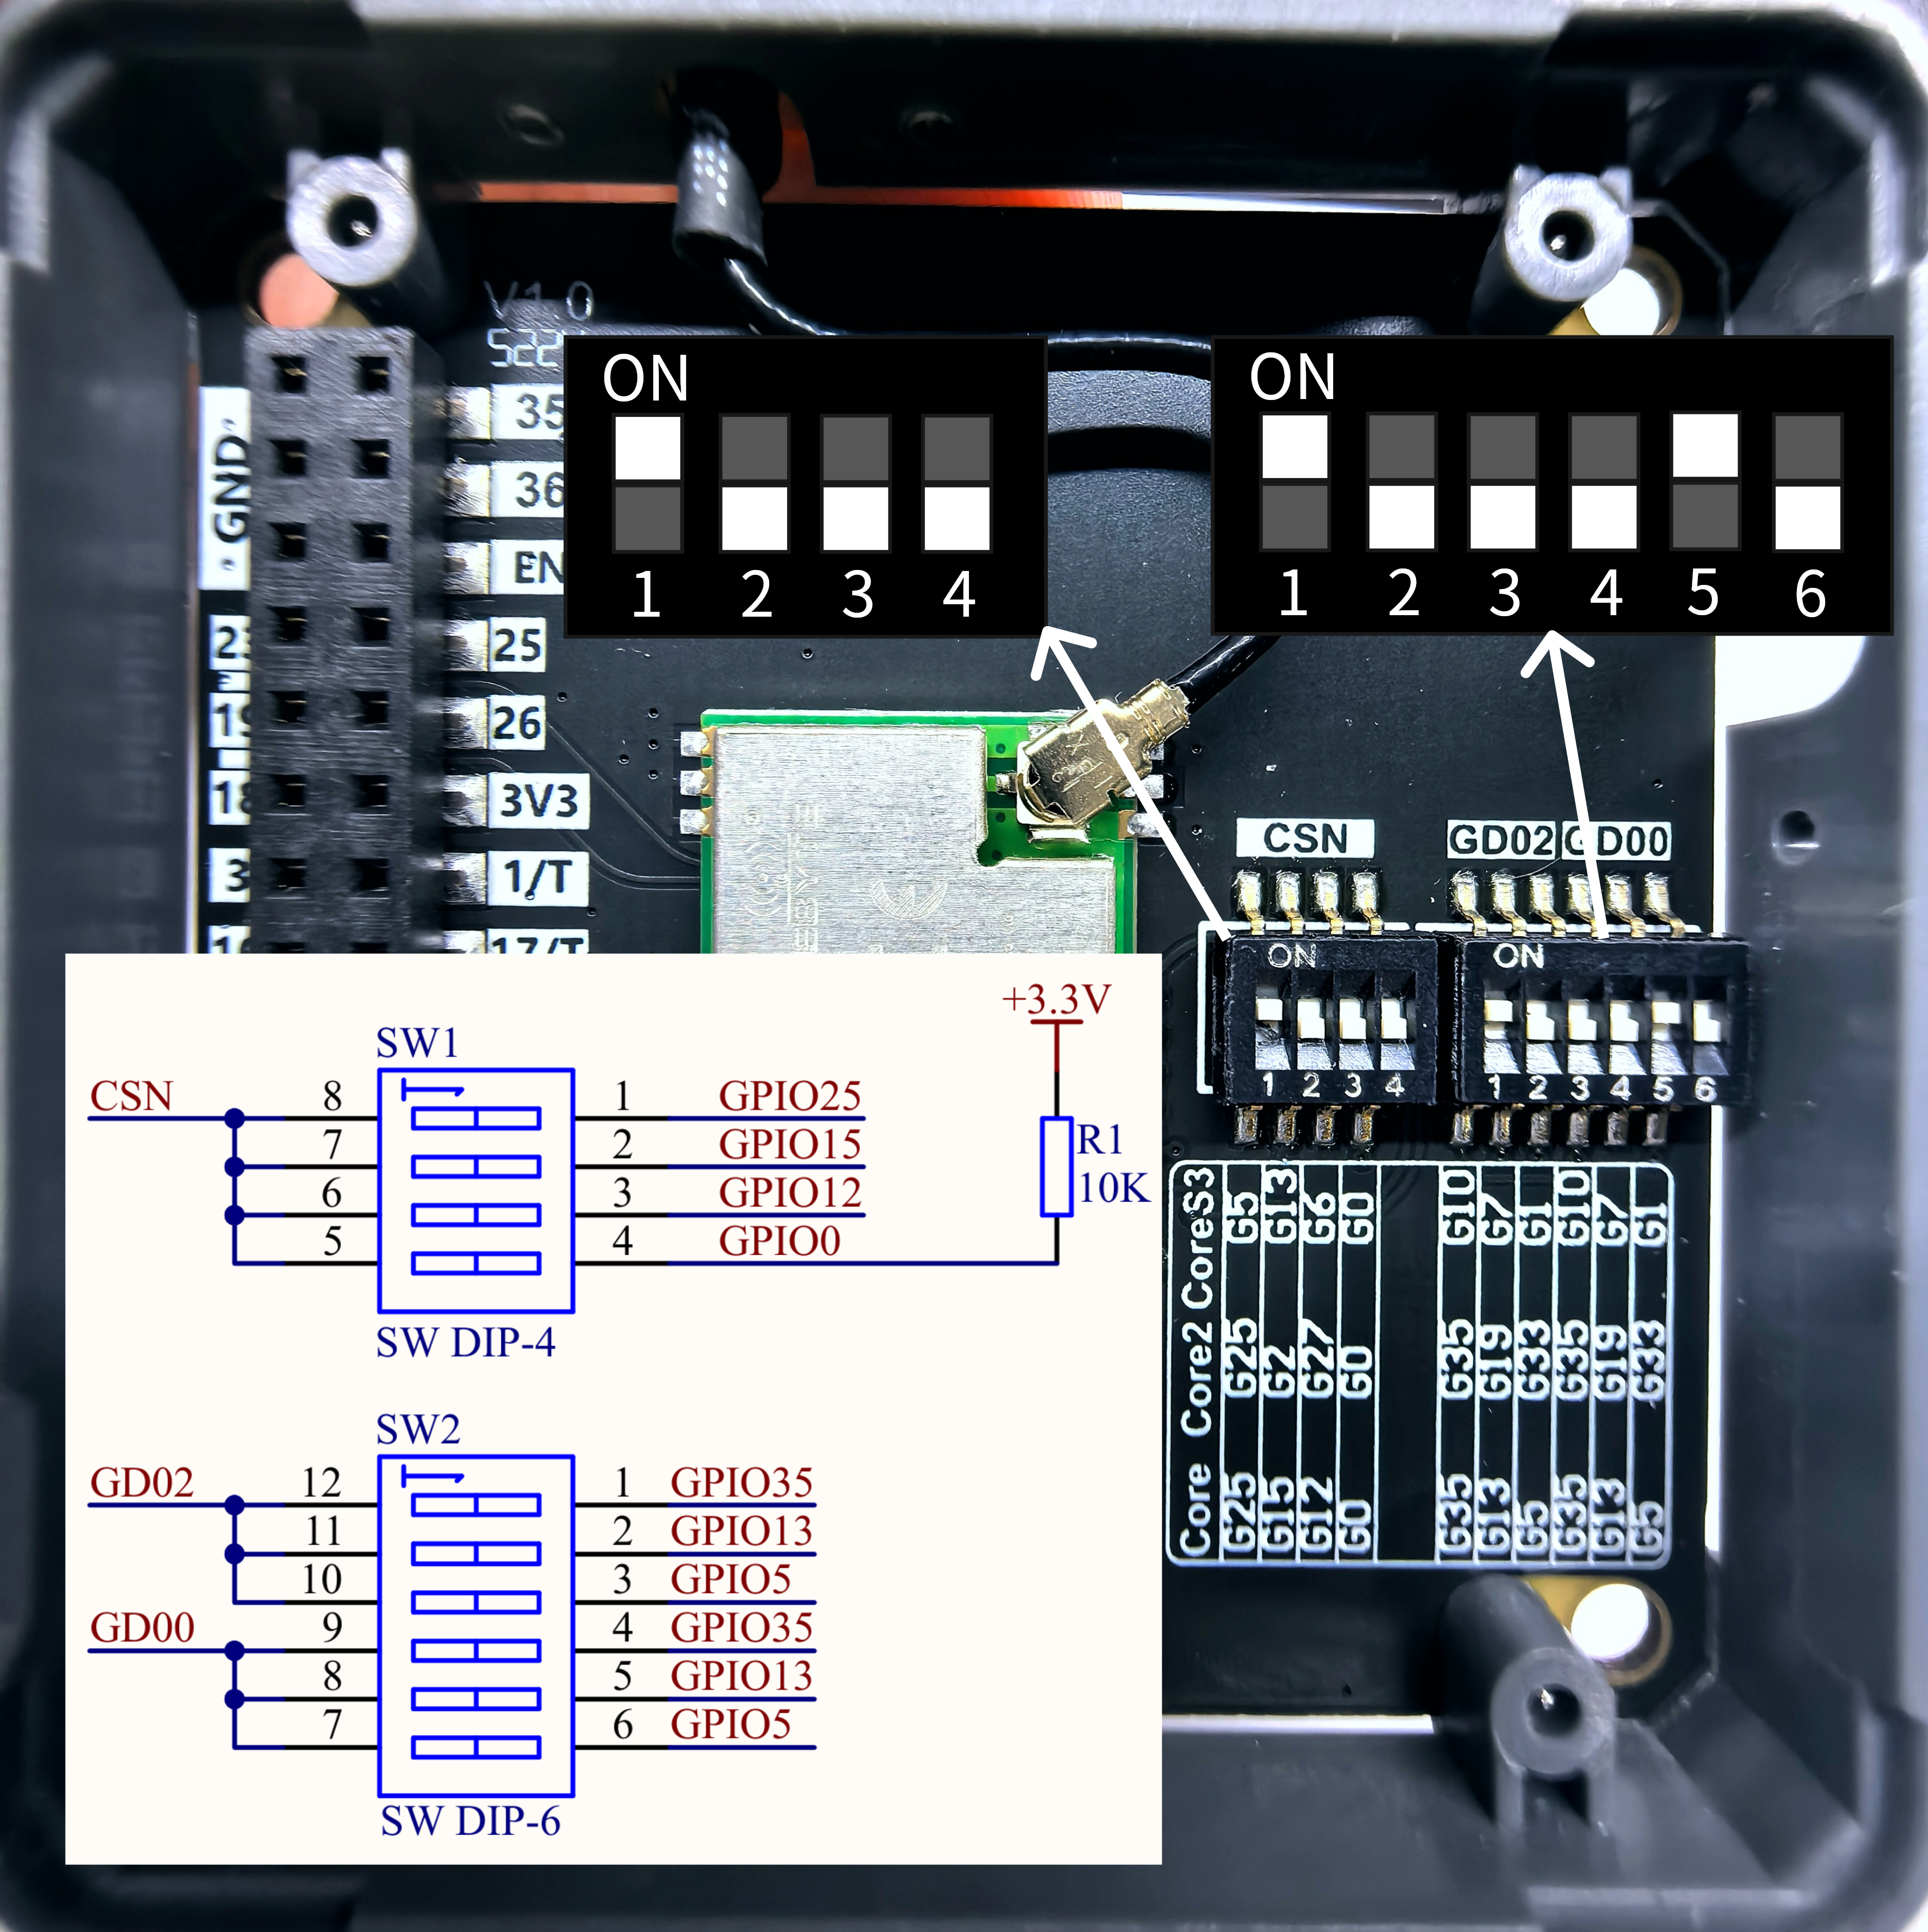
- 本教程中使用的主控设备为 CoreS3,搭配 Module CC1101 实现无线通信。使用前请参考下图,将引脚拨码开关,切换到指定位置。
3.1 引脚拨码开关
Module CC1101 采用 SPI 的方式通讯,请根据实际的电路连接修改程序中的引脚定义,设备连接后对应的 SPI IO 为 G5 (CSN)、G37 (MOSI)、G35 (MISO)、G36 (SCK),中断 IO 为 G7 (GD00)、G10 (GD02),实物如下图所示:
3.2 参数配置
Module CC1101 支持多种参数配置,使用前请参考下方内容进行设置,若需各项参数的含义及其他详细信息请见数据手册,并根据实际需求调整案例程序中的参数设置,确保发送端与接收端参数一致。
频率 (CC1101_FREQ)
本模组支持 855 ~ 925 MHz 频段
比特率 (CC1101_BIT_RATE)
- 计算公式:
比特率 (kbps) = ((256 + DRATE_M) × 2^DRATE_E × f_xosc) / 2^28
DRATE_E:取值范围 0-15,数据速率的指数值
DRATE_M:取值范围 0-255,数据速率的尾数
f_xosc: 晶振频率,本模组为 26 MHz - 比特率取值范围为 0.6 ~ 500 kbps 中的若干近似离散值。
推荐设置为 2.4 kbps (2400 bits/s),更高的比特率可以提高数据传输效率,但会缩短通信距离,且抗干扰能力下降,误码率增加。
频偏 (CC1101_FREQ_OFFSET)
- 计算公式:
频偏 (kHz) = (8 + DEVIATION_M) × 2^DEVIATION_E × (f_xosc / 2^17)
DEVIATION_E: 取值范围 0-7,频偏的指数值
DEVIATION_M: 取值范围 0-7,频偏的尾数
f_xosc: 晶振频率,本模组为 26 MHz - 频偏取值范围为 1.587 ~ 380.8 kHz 中的若干近似离散值。
该数值越大,区分度越高,信号抗干扰能力越强,但同时也会增加带宽占用。
带宽 (CC1101_BW)
- Carson带宽计算公式:
带宽 (kHz) = 2 × 频偏 + 比特率 - 接收滤波器带宽需大于等于信号占用带宽,根据上述公式计算得出的带宽数值必须小于等于所设置的接收滤波器带宽,否则会导致接收不到信号,建议预留 20%-30% 余量。
CC1101 支持设置的接收滤波器带宽只有 16 个:58、68、81、102、116、135、162、203、232、270、325、406、541、650、812 (单位:kHz)。
发送功率 (CC1101_TX_POWER)
- 可选值:-30, -20, -15, -10, 0, 5, 7, 10 (单位:dBm)
- 数值越大,发送功率越高,通信距离越远,但同时也会增加功耗。
注意:
1. 若不能使用稳定电源供电,如使用 CoreS3 电池底座,请设置较低功率值,否则模组将不能正常工作。
2. 此参数对接收端无实际意义,仅用于使软件成功编译。
2. 此参数对接收端无实际意义,仅用于使软件成功编译。
前导码长度 (CC1101_PREAMBLE_LEN)
- 可选值:16、24、32、48、64、96、128、192(单位:bit)
- 前导码用于接收端检测信号的开始,数值越大,抗干扰能力越强,但同时也会增加数据包长度,降低传输效率。
说明
下方代码中只设置了
CSN、GD00、GD02 三个引脚,但实际上 RadioLib 库会根据所使用的主控设备,自动映射剩余的 SPI 引脚 (MOSI、MISO、SCK),即使用 M5Unified 库初始化时根据不同设备默认定义的引脚,CoreS3 上分别为 G37 (MOSI)、G35 (MISO)、G36 (SCK),因此无需手动指定。3.3 发送端
cpp
1 2 3 4 5 6 7 8 9 10 11 12 13 14 15 16 17 18 19 20 21 22 23 24 25 26 27 28 29 30 31 32 33 34 35 36 37 38 39 40 41 42 43 44 45 46 47 48 49 50 51 52 53 54 55 56 57 58 59 60 61 62 63 64 65 66 67 68 69 70 71 72 73 74 75 76 77 78 79 80 81 82 83 84 85 86 87 88 89 90 91 92 93 94 95 96 97 98 99 100 101 102 103 104 105 106 107
#include <M5Unified.h>
#include <RadioLib.h>

#define CC1101_FREQ         868.0f  // carrier frequency in MHz (float). Must match receiver
#define CC1101_BIT_RATE     2.4f    // bit rate in kbps (float). Recommend 2.4 = 2400 bits/s
#define CC1101_FREQ_OFFSET  25.4f   // frequency offset in kHz (float). FSK deviation
#define CC1101_BW           58.0    // receiver filter bandwidth in kHz (float). Must be >= signal occupied BW
#define CC1101_TX_POWER     10      // output power in dBm (must be one of allowed values: -30,-20,-15,-10,0,5,7,10)
#define CC1101_PREAMBLE_LEN 16      // preamble length in bits (supported values: 16--2 Bytes, 24--3 Bytes, 32--4 Bytes, 48--6 Bytes, 64--8 Bytes, 96--12 Bytes, 128--16 Bytes, 192--24 Bytes).

//        CC1101 PIN          CSN,       GD00,    RST(unused),    GD02
CC1101 radio = new Module(GPIO_NUM_5, GPIO_NUM_7, RADIOLIB_NC, GPIO_NUM_10);

// Tracks the result of the last transmission attempt (error code from RadioLib)
int transmissionState = RADIOLIB_ERR_NONE;
// Packet sent flag
volatile bool transmittedFlag = false;

// Special attribute for ESP8266/ESP32 to place ISR in RAM (faster interrupt response)
#if defined(ESP8266) || defined(ESP32)
ICACHE_RAM_ATTR
#endif
// This function is called when a complete packet is transmitted by the module
// IMPORTANT: this function MUST be 'void' type and MUST NOT have any arguments!
void setFlag(void)
{
    // we sent a packet, set the flag
    transmittedFlag = true;
}

void setup() {
    M5.begin();
    Serial.begin(115200);
    M5.Display.setFont(&fonts::FreeMonoBold9pt7b);

    Serial.print(F("[CC1101] Initializing ... "));
    int state = radio.begin(CC1101_FREQ, CC1101_BIT_RATE, CC1101_FREQ_OFFSET, CC1101_BW, CC1101_TX_POWER, CC1101_PREAMBLE_LEN);
    if (state == RADIOLIB_ERR_NONE) {
      Serial.println(F("Init success!"));
    } else {
      Serial.print(F("Init failed, code "));
      Serial.println(state);
      while (true) { delay(10); }
    }

    // Register callback function after sending packet successfully
    radio.setPacketSentAction(setFlag);

    // Send first packet to enable flag
    Serial.print(F("[CC1101] Sending first packet ... "));

    // you can transmit C-string or Arduino string up to
    // 255 characters long
    transmissionState = radio.startTransmit("Transmitter Ready");
    M5.Display.setCursor(5,0);
    M5.Display.printf("Transmitter Ready\n");
}

// Counter to keep track of transmitted packets
int count = 0;

void loop() {
    // check if the previous transmission finished
    if(transmittedFlag) {
        // reset flag
        transmittedFlag = false;

        if (transmissionState == RADIOLIB_ERR_NONE) {
          // packet was successfully sent
          Serial.println(F("Transmission finished!"));
          M5.Display.println("Send sucessfully!");

          // NOTE: when using interrupt-driven transmit method,
          //       it is not possible to automatically measure
          //       transmission data rate using getDataRate()

        } else {
          Serial.print(F("Send failed, code: "));
          Serial.println(transmissionState);
          M5.Display.print("\nSend failed\ncode:");
          M5.Display.println(transmissionState);
        }

        // clean up after transmission is finished
        // this will ensure transmitter is disabled,
        // RF switch is powered down etc.
        radio.finishTransmit();

        // wait a second before transmitting again
        delay(1000);

        Serial.printf("[CC1101] Sending #%d packet ... ", count);
        // you can transmit C-string or Arduino string up to 255 characters long
        String str = "Module CC1101 #" + String(count);
        transmissionState = radio.startTransmit(str);
        M5.Display.clear();
        M5.Display.setCursor(0,5);
        M5.Display.printf("[CC1101]\nSending #%d packet......\n", count++);

        // you can also transmit byte array up to 255 bytes long with limitations https://github.com/jgromes/RadioLib/discussions/1138
        /*
          byte byteArr[] = {0x01, 0x23, 0x45, 0x67,
                            0x89, 0xAB, 0xCD, 0xEF};
          int state = radio.startTransmit(byteArr, 8);
        */
    }
}3.4 接收端
cpp
1 2 3 4 5 6 7 8 9 10 11 12 13 14 15 16 17 18 19 20 21 22 23 24 25 26 27 28 29 30 31 32 33 34 35 36 37 38 39 40 41 42 43 44 45 46 47 48 49 50 51 52 53 54 55 56 57 58 59 60 61 62 63 64 65 66 67 68 69 70 71 72 73 74 75 76 77 78 79 80 81 82 83 84 85 86 87 88 89 90 91 92 93 94 95 96 97 98 99 100 101 102 103 104 105 106 107 108 109 110 111 112 113 114 115 116 117 118 119 120 121 122 123 124
#include <M5Unified.h>
#include <RadioLib.h>

#define CC1101_FREQ         868.0f  // carrier frequency in MHz (float). Must match transmitter
#define CC1101_BIT_RATE     2.4f    // bit rate in kbps (float). Recommend 2.4 = 2400 bits/s
#define CC1101_FREQ_OFFSET  25.4f   // frequency offset in kHz (float). FSK deviation
#define CC1101_BW           58.0    // receiver filter bandwidth in kHz (float). Must beyond signal occupied BW
#define CC1101_TX_POWER     10      // output power in dBm (must be one of allowed values: -30,-20,-15,-10,0,5,7,10)
#define CC1101_PREAMBLE_LEN 16      // preamble length in bits (supported values: 16--2 Bytes, 24--3 Bytes, 32--4 Bytes, 48--6 Bytes, 64--8 Bytes, 96--12 Bytes, 128--16 Bytes, 192--24 Bytes).

M5Canvas canvas(&M5.Lcd);

//        CC1101 PIN          CSN,       GD00,    RST(unused),    GD02
CC1101 radio = new Module(GPIO_NUM_5, GPIO_NUM_7, RADIOLIB_NC, GPIO_NUM_10);

// Packet received flag
volatile bool receivedFlag = false;

// Special attribute for ESP8266/ESP32 to place ISR in RAM (faster interrupt response)
#if defined(ESP8266) || defined(ESP32)
  ICACHE_RAM_ATTR
#endif
// This function is called when a complete packet is received by the module
// IMPORTANT: this function MUST be 'void' type and MUST NOT have any arguments!
void setFlag(void) {
    // we got a packet, set the flag
    receivedFlag = true;
}

void setup() {
    M5.begin();
    Serial.begin(115200);
    canvas.createSprite(320, 240);
    canvas.setFont(&fonts::FreeMonoBold9pt7b);

    Serial.print(F("[CC1101] Initializing ... "));
    int state = radio.begin(CC1101_FREQ, CC1101_BIT_RATE, CC1101_FREQ_OFFSET, CC1101_BW, CC1101_TX_POWER, CC1101_PREAMBLE_LEN);
    if (state == RADIOLIB_ERR_NONE) {
      Serial.println(F("success!"));
    } else {
      Serial.print(F("failed, code "));
      Serial.println(state);
      while (true) { delay(10); }
    }

    // Register callback function after receiving packet successfully
    radio.setPacketReceivedAction(setFlag);

    // Start listening for packets
    Serial.print(F("[CC1101] Starting to listen ... "));
    state = radio.startReceive();
    if (state == RADIOLIB_ERR_NONE) {
      Serial.println(F("success!"));
    } else {
      Serial.print(F("failed, code "));
      Serial.println(state);
      while (true) { delay(10); }
    }

    // if needed, 'listen' mode can be disabled by calling
    // any of the following methods:
    //
    // radio.standby()
    // radio.sleep()
    // radio.transmit();
    // radio.receive();
    // radio.readData();
}

void loop() {
    // check if the flag is set
    if(receivedFlag) {
        // reset flag
        receivedFlag = false;

        // you can read received data as an Arduino String
        String str;
        int length = radio.getPacketLength();
        int state = radio.readData(str, length);

        // you can also read received data as byte array
        /*
          byte byteArr[8];
          int numBytes = radio.getPacketLength();
          int state = radio.readData(byteArr, numBytes);
        */

        if (state == RADIOLIB_ERR_NONE) {
          // Packet was successfully received
          Serial.println(F("[CC1101] Received packet:"));
          canvas.clear();
          canvas.setCursor(0,5);
          canvas.printf("[CC1101]\nReceived packet:\n");

          // Data of the packet
          Serial.print(F("[CC1101] Data:\t\t"));
          Serial.println(str);
          canvas.printf("Data: %s\n", str.c_str());

          // RSSI (Received Signal Strength Indicator)
          Serial.print(F("[CC1101] RSSI:\t\t"));
          Serial.print(radio.getRSSI());
          Serial.println(F(" dBm"));
          canvas.printf("RSSI: %0.2f dBm\n", radio.getRSSI());

          // LQI (Link Quality Indicator), lower is better
          Serial.print(F("[CC1101] LQI:\t\t"));
          Serial.println(radio.getLQI());
          canvas.printf("LQI:  %d\n", radio.getLQI());
          canvas.pushSprite(0, 0);

          radio.finishReceive();

        } else if (state == RADIOLIB_ERR_CRC_MISMATCH) {
          // Packet was received, but is malformed
          Serial.println(F("CRC error!"));
        } else {
          Serial.print(F("failed, code "));
          Serial.println(state);
        }
        // Put module back to listen mode
        radio.startReceive();
    }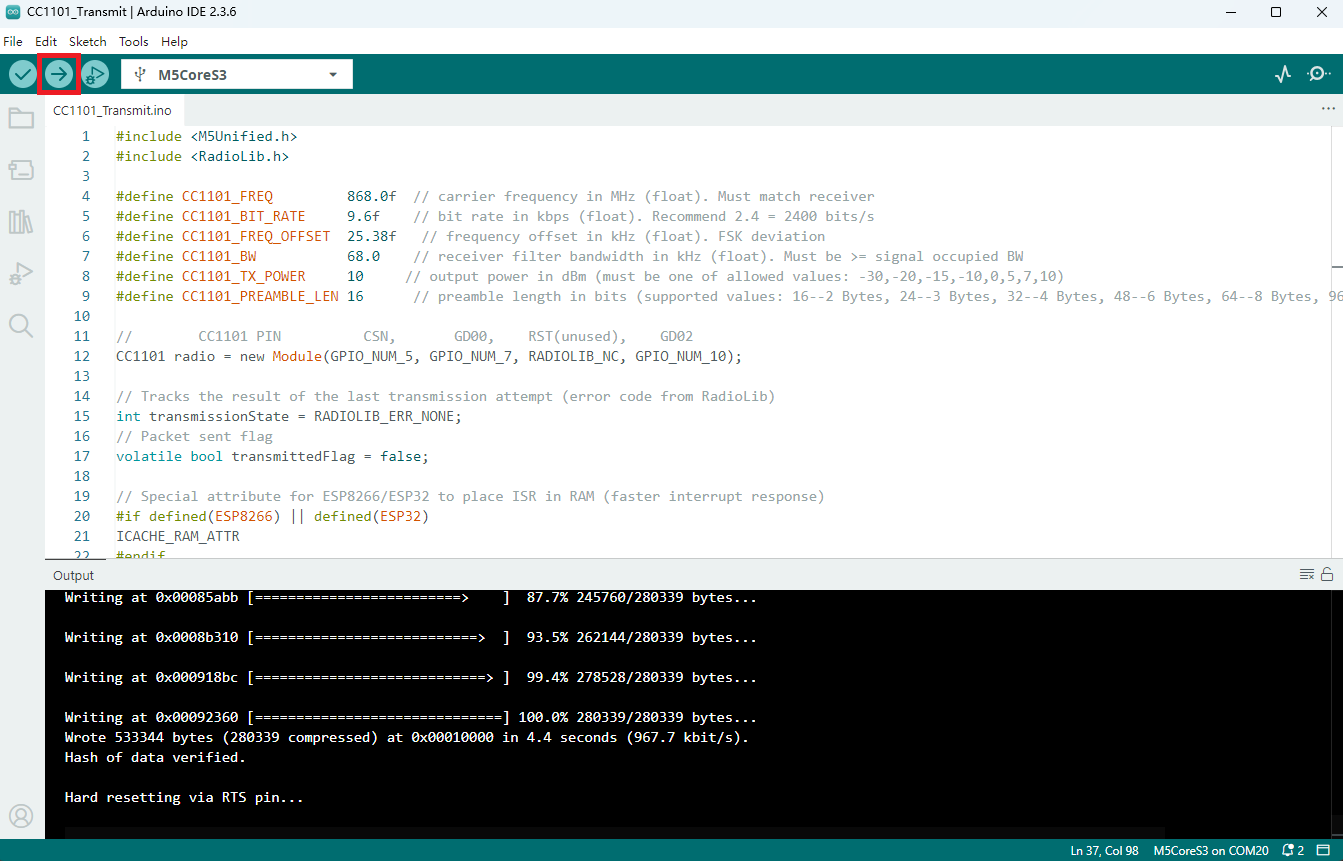
}4. 编译上传
下载模式:不同设备进行程序烧录前需要进入下载模式,不同的主控设备该步骤可能有所不同。详情可参考Arduino IDE上手教程页面底部的设备程序下载教程列表,查看具体的操作方式。
CoreS3 长按复位按键 (大约 2 秒) 直到内部绿色 LED 灯亮起,便可松开,此时设备已进入下载模式,等待烧录。
.gif)
- 选中设备端口,点击 Arduino IDE 左上角编译上传按钮,等待程序完成编译并上传至设备。
5. 信息收发效果展示
上述例程效果为发送端会每秒发送一次包含计数的字符串,接收端会打印接收到的字符串,并显示 RSSI 等信息。
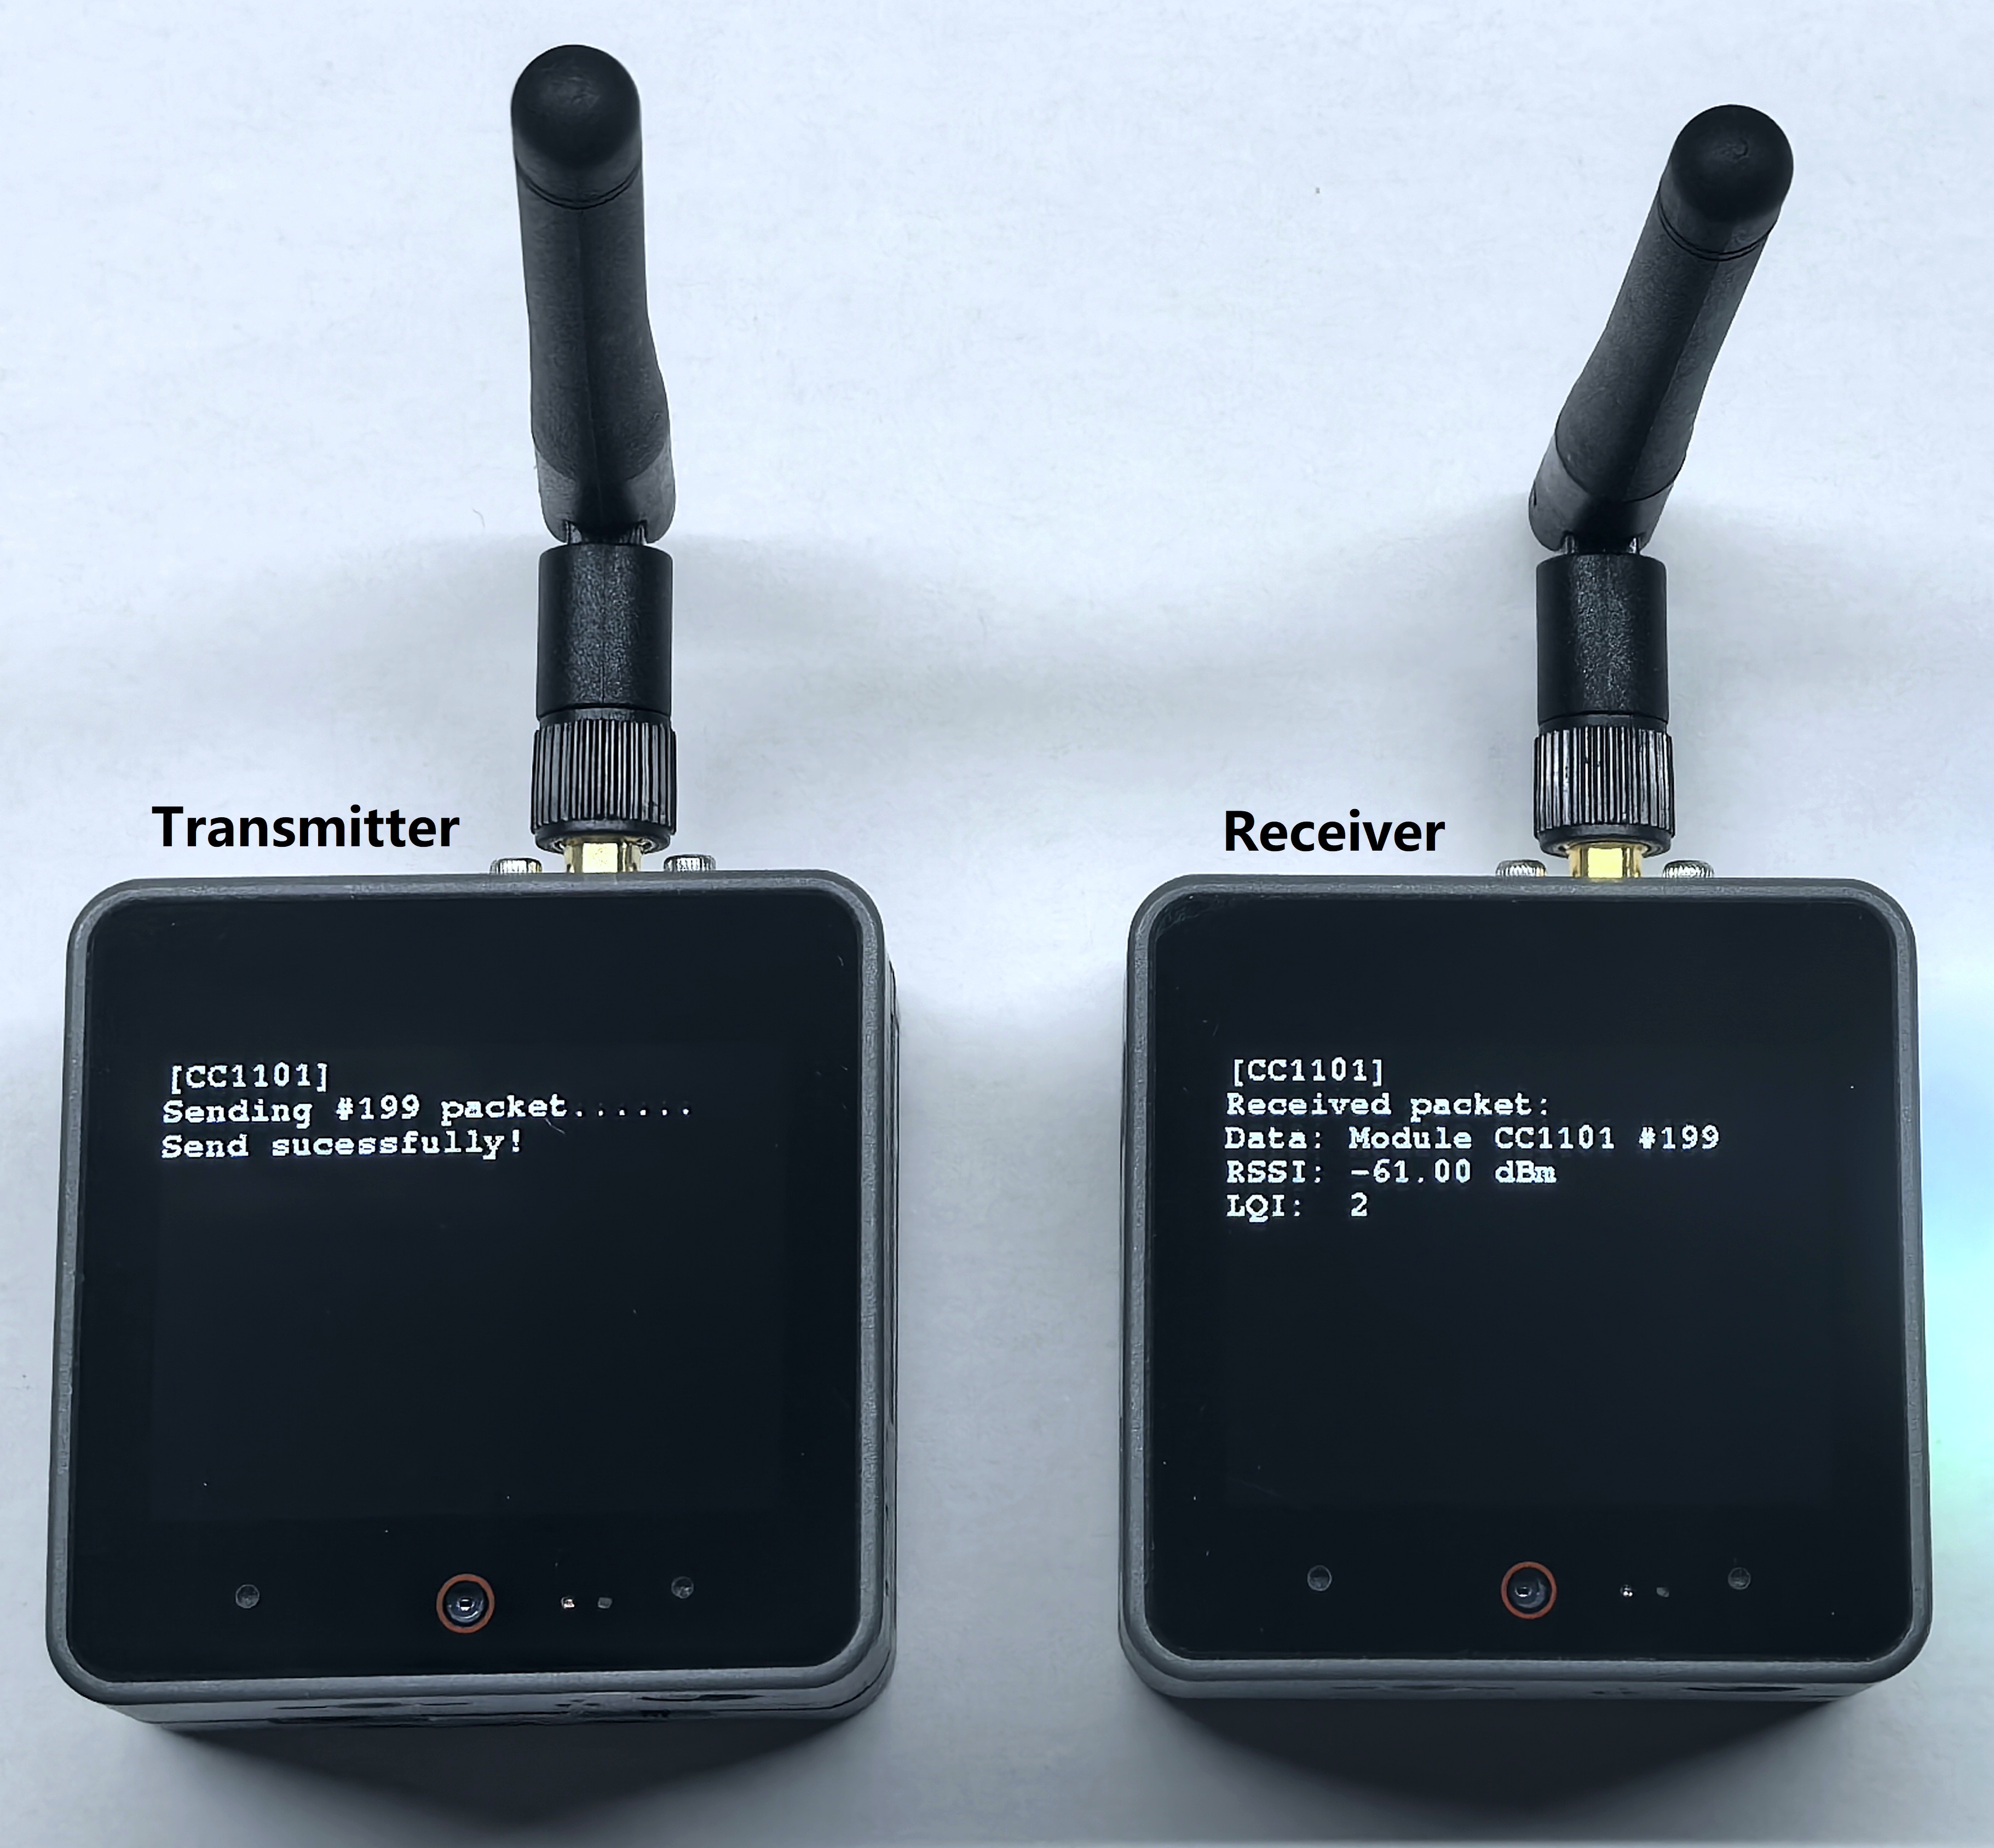
- 发送端串口返回信息:
[CC1101] Sending #199 packet ... Transmission finished!- 接收端串口返回信息:
[CC1101] Received packet:
[CC1101] Data:            Module CC1101 #199
[CC1101] RSSI:            -61.00 dBm
[CC1101] LQI: 2Page Tools