


Arduino 上手教程
2. 设备开发 & 案例程序
3. M5Unified
4. M5GFX
5. 拓展模块
Unit
Atomic
Tab5
IoT
Stamp C6LoRa Arduino 示例程序编译与烧录
1.准备工作
- 1.Arduino IDE安装: 参考Arduino IDE安装教程,完成IDE安装。
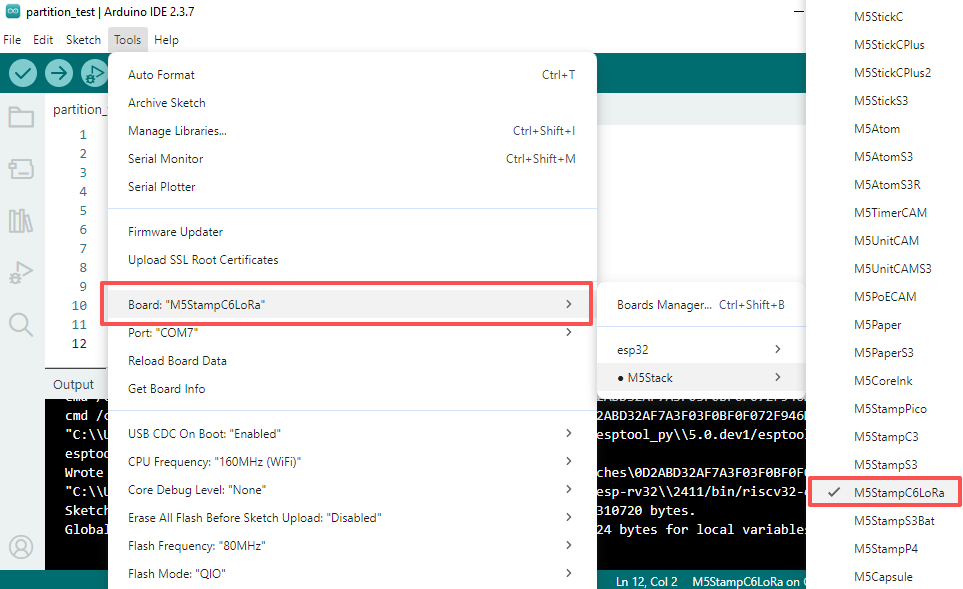
- 2.板管理安装: 参考基本环境搭建教程,完成M5Stack板管理安装并选择开发板
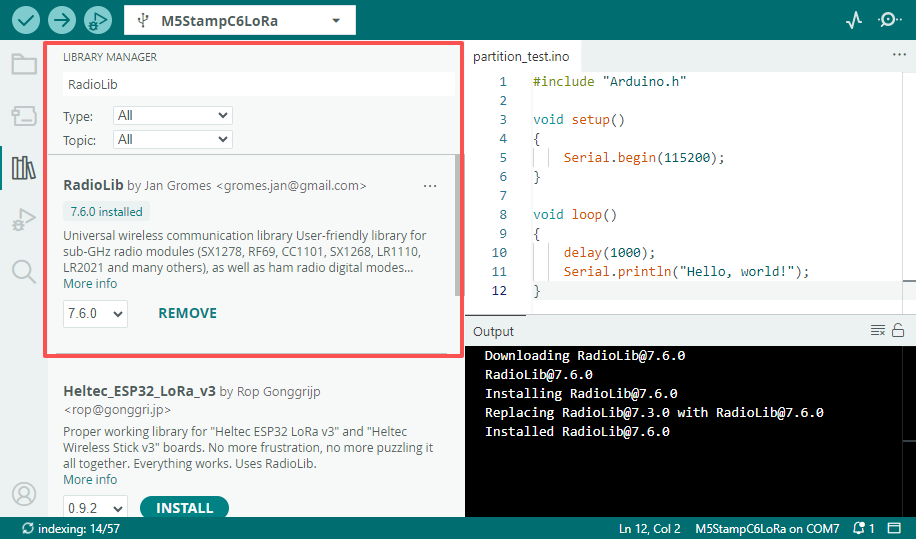
M5StampC6LoRa。 - 3.依赖库安装:参考库管理安装教程,完成最新版
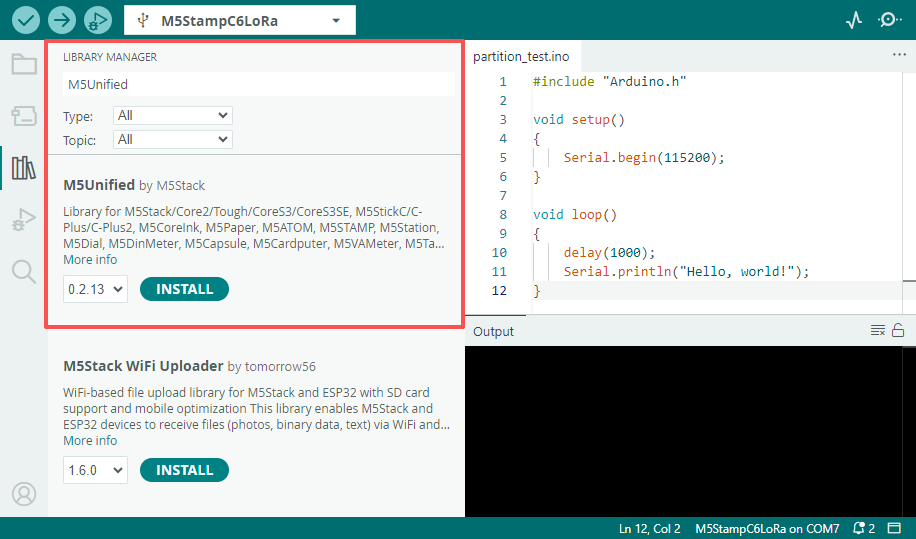
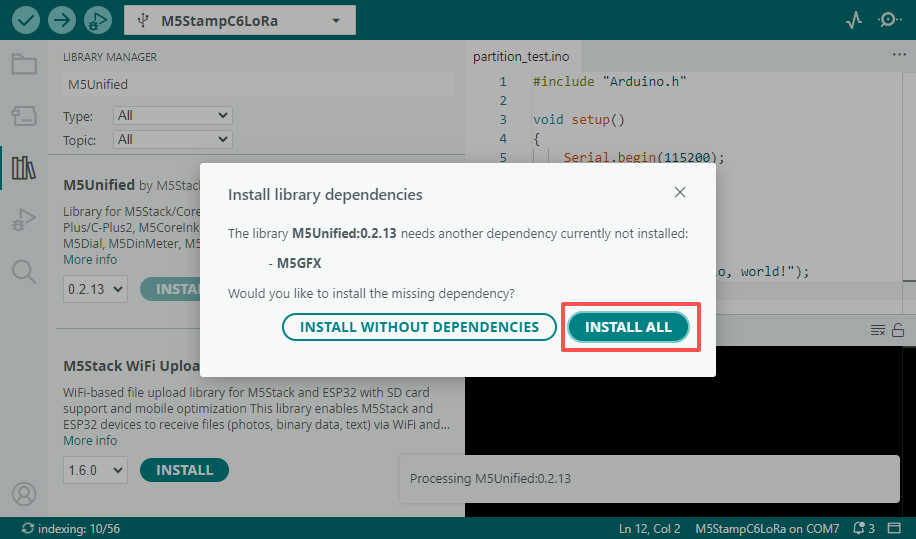
M5Unified、M5GFX、RadioLib驱动库安装,并根据提示安装全部依赖库。
2.烧录方式
Stamp C6LoRa 支持通过 UART 或 USB 接口下载程序,下载前需要控制 Boot 引脚 (GPIO9) 保持低电平,然后复位模组使其进入下载模式。
- 通过 UART 方式下载需搭配 USB-TTL 转接板,下方接线示意图以 ESP32 Downloader 转接板为例连接 Stamp C6LoRa 的 UART 程序下载接口。
- ESP32 Downloader 带自动下载电路,烧录程序运行时将自动控制模组进入下载模式。
- 通过 USB 方式下载,需控制 Boot 引脚保持低电平的状态,通过 RST 引脚复位模组 (低电平->高电平),进入下载模式。
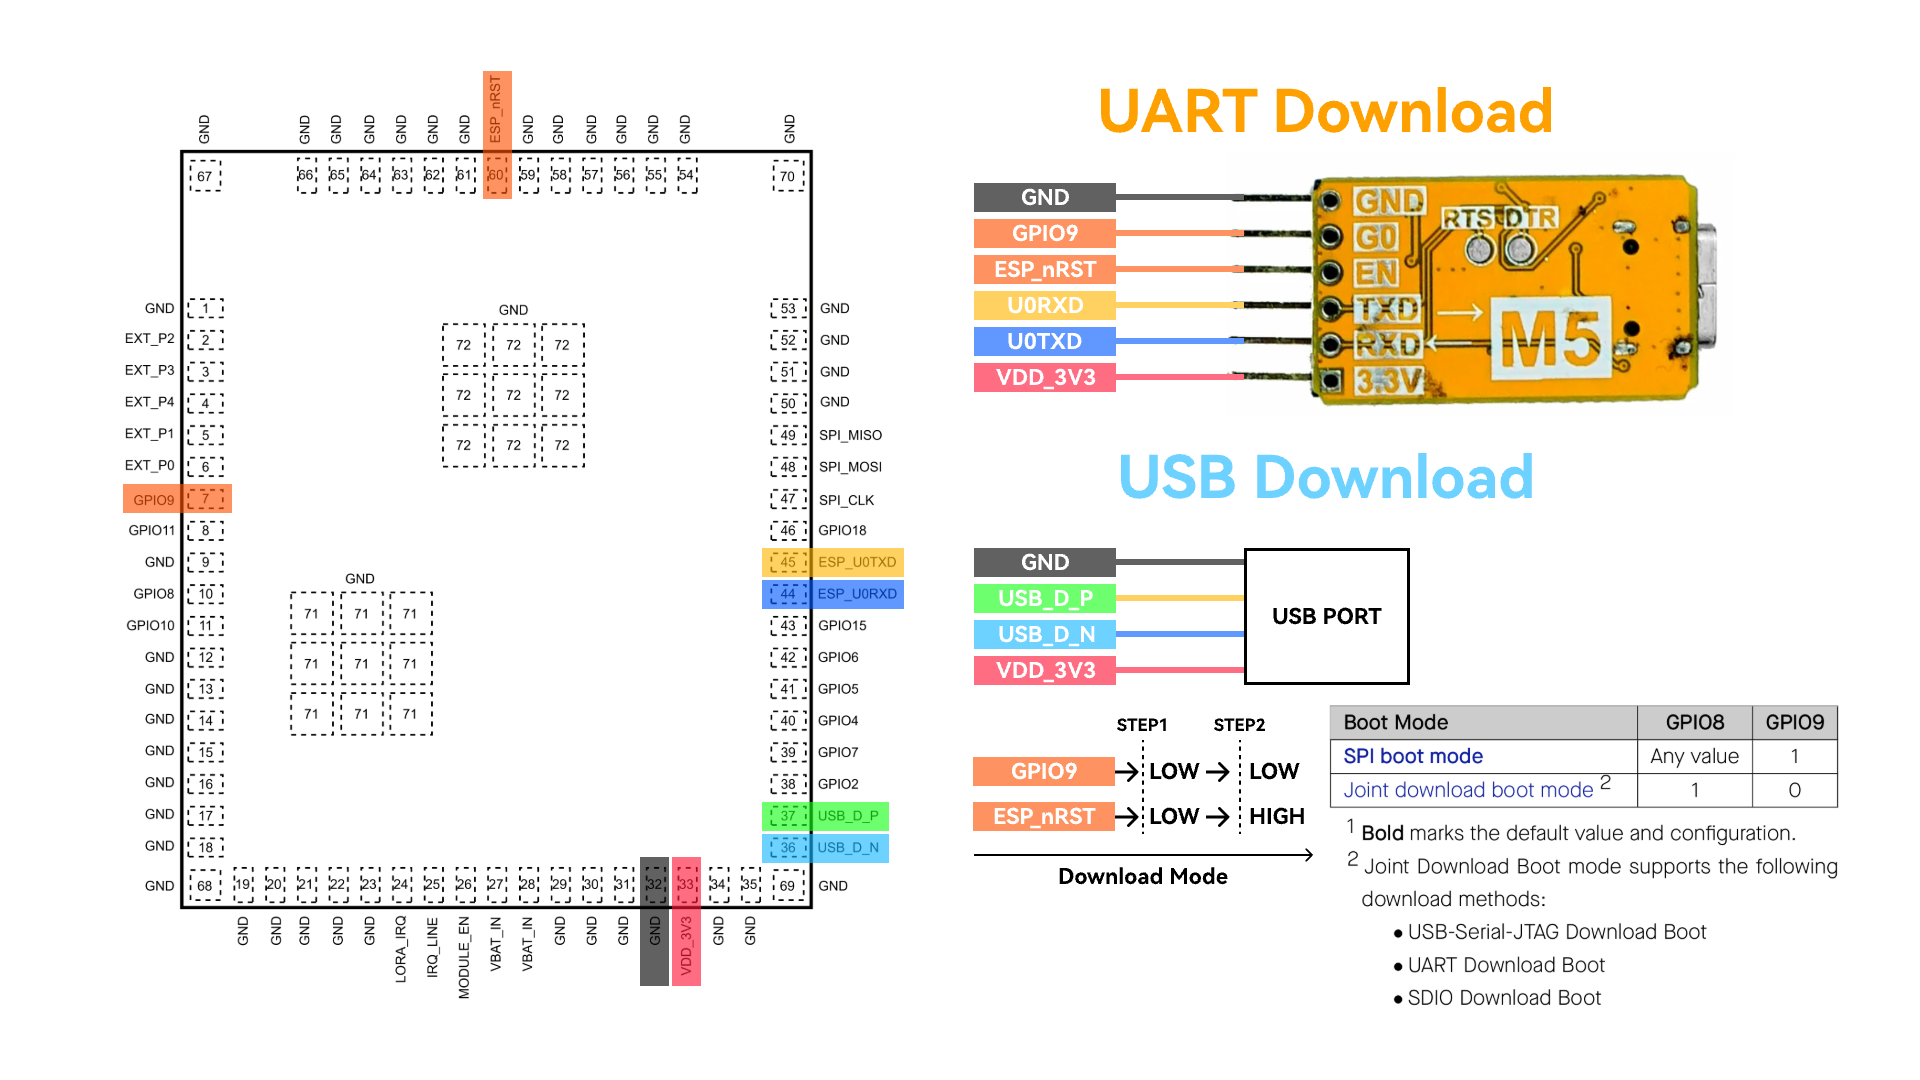
进入下载模式后,可在Arduino IDE中可选中对应设备的端口进行烧录。
3.程序编译&烧录
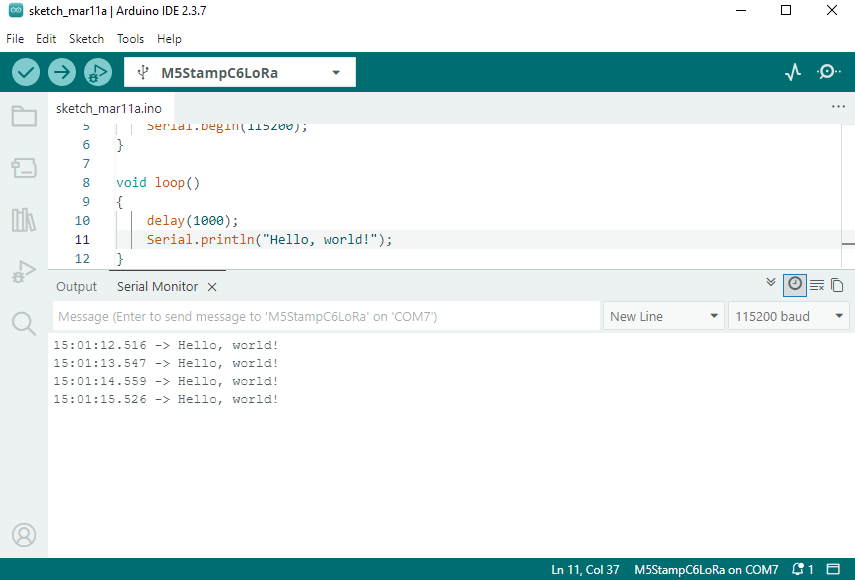
在 Arduino IDE 工作区粘贴下方代码, 点击上传按钮,将自动进行程序编译与烧录。
日志输出
Tools->USB CDC On Boot 选项默认为 Enabled,模组默认日志将输出至 USB 接口,若需要将日志切换输出至 UART0,可将该选项设置为 Disabled
Hello World
cpp
1 2 3 4 5 6 7 8 9 10 11 12
#include "Arduino.h"

void setup()
{
    Serial.begin(115200);
}

void loop()
{
    delay(1000);
    Serial.println("Hello, world!");
}
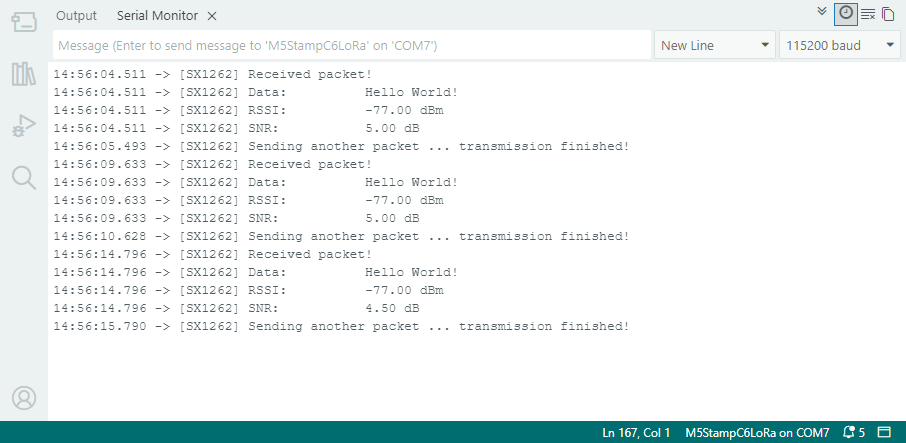
LoRa Ping Pong
以下为 LoRa Ping Pong 测试程序,需使用两组 Stamp C6LoRa 模组, 模组先后间隔上电后,将自动互相进行收发测试:
- 示例程序中 LORA_IRQ 使用 GPIO7 作为中断信号接收引脚,测试时请将模组的 LORA_IRQ 引脚连接至 GPIO7。
- 使用前需连接好 LoRa 天线,避免损坏射频电路。
cpp
1 2 3 4 5 6 7 8 9 10 11 12 13 14 15 16 17 18 19 20 21 22 23 24 25 26 27 28 29 30 31 32 33 34 35 36 37 38 39 40 41 42 43 44 45 46 47 48 49 50 51 52 53 54 55 56 57 58 59 60 61 62 63 64 65 66 67 68 69 70 71 72 73 74 75 76 77 78 79 80 81 82 83 84 85 86 87 88 89 90 91 92 93 94 95 96 97 98 99 100 101 102 103 104 105 106 107 108 109 110 111 112 113 114 115 116 117 118 119 120 121 122 123 124 125 126 127 128 129 130 131 132 133 134 135 136 137 138 139 140 141 142 143 144 145 146 147 148 149 150 151 152 153 154 155 156 157 158 159 160 161 162 163 164 165 166 167 168 169 170
#include <Arduino.h>
#include <SPI.h>
#include <RadioLib.h>
#include <M5Unified.h>
#include "utility/PI4IOE5V6408_Class.hpp"

// Stamp C6LoRa board mapping
#define I2C_SDA_PIN 10
#define I2C_SCL_PIN 8

// SX1262 base pins on Stamp C6LoRa
#define SX1262_MOSI_PIN 21
#define SX1262_MISO_PIN 22
#define SX1262_SCK_PIN  20
#define SX1262_CS_PIN   23
#define SX1262_IRQ_PIN  7
#define SX1262_BUSY_PIN 19

// PI4IOE5V6408 -> SX1262 control lines
#define SX_LNA_EN_PIN 5
#define SX_ANT_SW_PIN 6
#define SX_NRST_PIN   7

// SX1262: CS, IRQ(DIO1), NRST, BUSY
SX1262 radio = new Module(SX1262_CS_PIN, SX1262_IRQ_PIN, RADIOLIB_NC, SX1262_BUSY_PIN);

m5::I2C_Class i2c_bus_0;
// Stamp C6LoRa uses PI4IOE5V6408 at 0x43 to control SX1262 power path
m5::PI4IOE5V6408_Class ioe(0x43, 400000, &i2c_bus_0);

// save transmission state between loops
int transmissionState = RADIOLIB_ERR_NONE;

// flag to indicate transmission/reception state
bool transmitFlag = false;

// flag to indicate that a packet was sent/received
volatile bool operationDone = false;

void setFlag(void)
{
    operationDone = true;
}

static bool initIoExpanderAndRfPath()
{
    if (!i2c_bus_0.begin(I2C_NUM_0, I2C_SDA_PIN, I2C_SCL_PIN)) {
        Serial.println("[I2C] begin failed");
        return false;
    }

    if (!ioe.begin()) {
        Serial.println("[IOE] PI4IOE5V6408 begin failed");
        return false;
    }

    ioe.setHighImpedance(SX_NRST_PIN, false);
    ioe.setHighImpedance(SX_ANT_SW_PIN, false);
    ioe.setHighImpedance(SX_LNA_EN_PIN, false);
    ioe.setDirection(SX_NRST_PIN, true);
    ioe.setDirection(SX_ANT_SW_PIN, true);
    ioe.setDirection(SX_LNA_EN_PIN, true);
    delay(100);

    // SX1262 reset and RF path enable sequence.
    ioe.digitalWrite(SX_NRST_PIN, false);
    delay(100);
    ioe.digitalWrite(SX_NRST_PIN, true);
    ioe.digitalWrite(SX_ANT_SW_PIN, true);
    ioe.digitalWrite(SX_LNA_EN_PIN, true);
    delay(10);

    return true;
}

void setup()
{
    Serial.begin(115200);
    delay(300);
    Serial.println("\n[Stamp C6LoRa] RadioLib ping-pong start");

    SPI.begin(SX1262_SCK_PIN, SX1262_MISO_PIN, SX1262_MOSI_PIN, SX1262_CS_PIN);

    if (!initIoExpanderAndRfPath()) {
        while (true) {
            delay(1000);
        }
    }

    Serial.print("[SX1262] Initializing... ");
    int state = radio.begin(868.0, 125.0, 12, 5, 0x34, 22, 20, 3.0, true);
    if (state != RADIOLIB_ERR_NONE) {
        Serial.print("failed, code: ");
        Serial.println(state);
        while (true) {
            delay(1000);
        }
    }
    Serial.println("ok");

    // One callback handles both TX done and RX done on SX1262 DIO1.
    radio.setDio1Action(setFlag);

    // Send first PING packet.
    Serial.print("[SX1262] Sending first packet... ");
    transmissionState = radio.startTransmit("PING");
    if (transmissionState == RADIOLIB_ERR_NONE) {
        Serial.println("ok");
        transmitFlag = true;
    }
}

void loop()
{
    // check if the previous operation finished
    if (operationDone) {
        // reset flag
        operationDone = false;

        if (transmitFlag) {
            // the previous operation was transmission, listen for response
            // print the result
            if (transmissionState == RADIOLIB_ERR_NONE) {
                // packet was successfully sent
                Serial.println(F("transmission finished!"));

            } else {
                Serial.print(F("failed, code "));
                Serial.println(transmissionState);
            }

            // listen for response
            radio.startReceive();
            transmitFlag = false;

        } else {
            // the previous operation was reception
            // print data and send another packet
            String str;
            int state = radio.readData(str);

            if (state == RADIOLIB_ERR_NONE) {
                // packet was successfully received
                Serial.println(F("[SX1262] Received packet!"));

                // print data of the packet
                Serial.print(F("[SX1262] Data:\t\t"));
                Serial.println(str);

                // print RSSI (Received Signal Strength Indicator)
                Serial.print(F("[SX1262] RSSI:\t\t"));
                Serial.print(radio.getRSSI());
                Serial.println(F(" dBm"));

                // print SNR (Signal-to-Noise Ratio)
                Serial.print(F("[SX1262] SNR:\t\t"));
                Serial.print(radio.getSNR());
                Serial.println(F(" dB"));
            }

            // wait a second before transmitting again
            delay(1000);

            // send another one
            Serial.print(F("[SX1262] Sending another packet ... "));
            transmissionState = radio.startTransmit("Hello World!");
            transmitFlag      = true;
        }
    }
}
4. API
Stamp C6LoRa 使用了RadioLib库作为 LoRa 驱动,更多相关的 API 可以参考下方文档: