Arduino入門
2. デバイス&サンプル
3. M5Unified
4. M5GFX
5. 拡張モジュール&サンプル
Unit
Atomic
Tab5
IoT
アクセサリー
Unit CardKB2 Arduino 使用チュートリアル
1. 事前準備
- 環境構築:Arduino IDE クイックスタートを参照して IDE のインストールを完了し、実際に使用するボードに合わせた対応のボードマネージャとドライバライブラリをインストールしてください。
- 使用するドライバライブラリ:
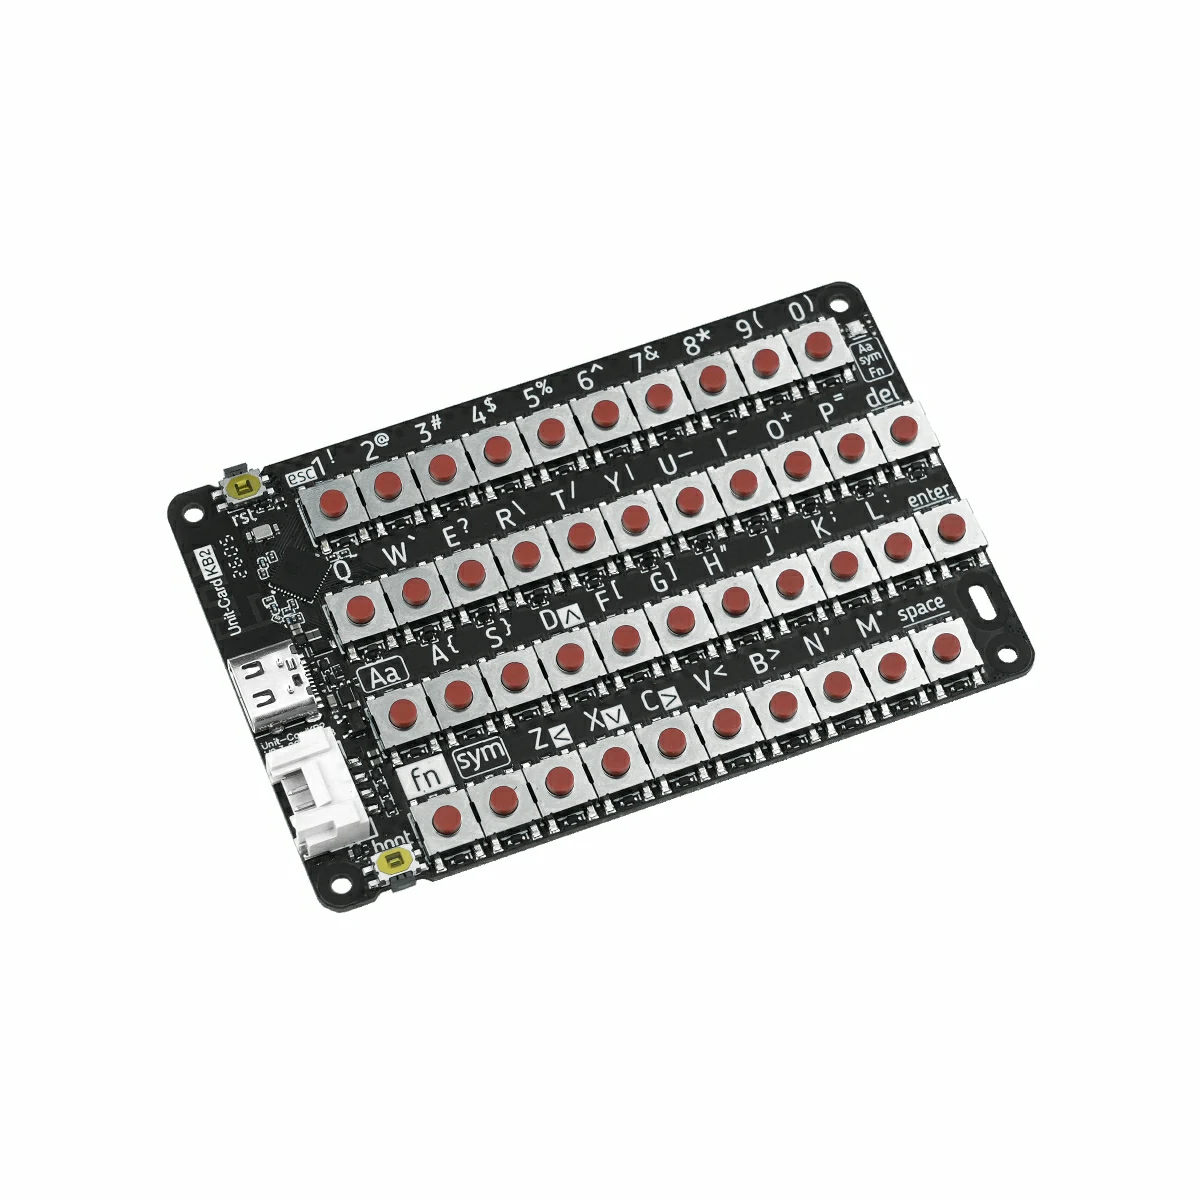
- 使用するハードウェア製品:
2. 注意事項
3. サンプルプログラム
モード切り替え
使用前に Unit CardKB2 に電源を供給(HY2.0-4P または USB Type-C いずれでも可)し、Fn + Sym + 数字キー のショートカットで通信モードを切り替えてください。モード切り替え後は設定が自動保存され、次回起動時にも引き継がれます。
推奨操作手順:
- Unit CardKB2 に電源を供給する。
- ショートカットキーで目的のモードに切り替える。
- AtomS3R に対応モードのサンプルプログラムをアップロードして実行する。
- シリアルモニタを開いて出力結果を確認する。
- Fn + Sym + 1:I2C モードに切り替え(工場出荷時デフォルト)、白色インジケーターが 1 回点滅
- Fn + Sym + 2:UART モードに切り替え、白色インジケーターが 2 回点滅
- Fn + Sym + 3:ESP-NOW ブロードキャストモードに切り替え、白色インジケーターが 3 回点滅
- Fn + Sym + 4:BLE HID モードに切り替え、白色インジケーターが 4 回点滅
I2C モード
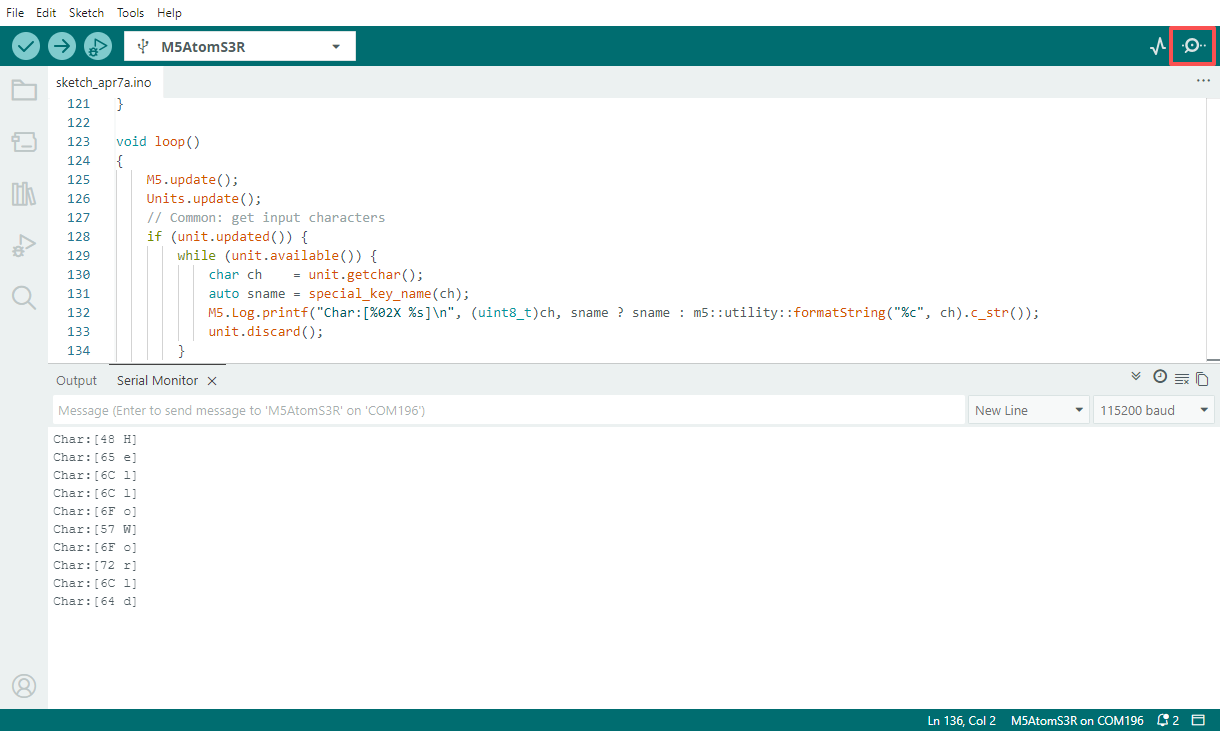
事前操作:Unit CardKB2 に電源を供給後、Fn + Sym + 1 を押して I2C モードに切り替えてください(工場出荷時デフォルト)。
このサンプルを使用すると、AtomS3R が I2C ポーリングで現在のキー値を読み取り、受信した文字内容をシリアルポートに出力します。
#include <M5Unified.h>
#include <M5UnitUnified.h>
#include <M5UnitUnifiedKEYBOARD.h>
#include <M5HAL.hpp>
#include <M5Utility.h>
#include <cctype>
#include <string>

#define USING_UNIT_CARDKB2
#define USING_I2C_FOR_CARDKB2

// *************************************************************

namespace {
m5::unit::UnitUnified Units;

const char* special_key_name(const char ch)
{
    switch (ch) {
        case '\b':
            return "BS";
        case '\t':
            return "TAB";
        case '\n':
            return "LF";
        case '\r':
            return "CR";
        case 0x1B:
            return "ESC";
        case 0x7F:
            return "DEL";
        default:
            break;
    }

    using namespace m5::unit::cardkb2;
    switch (ch) {
        case SCHAR_LEFT:
            return "LEFT";
        case SCHAR_UP:
            return "UP";
        case SCHAR_DOWN:
            return "DOWN";
        case SCHAR_RIGHT:
            return "RIGHT";
        default:
            break;
    }
    return nullptr;
}

m5::unit::UnitCardKB2 unit;

// NessoN1: Arduino Wire (I2C_NUM_0) cannot be used for GROVE port.
//   Wire is used by M5Unified In_I2C for internal devices (IOExpander etc.).
//   Wire1 exists but is reserved for HatPort — cannot be used for GROVE.
//   Reconfiguring Wire to GROVE pins breaks In_I2C, causing ESP_ERR_INVALID_STATE in M5.update().
//   Solution: Use SoftwareI2C via M5HAL (bit-banging) for the GROVE port.
// NanoC6: Wire.begin() on GROVE pins conflicts with m5::I2C_Class registered by Ex_I2C.setPort()
//   on the same I2C_NUM_0, causing sporadic NACK errors.
//   Solution: Use M5.Ex_I2C (m5::I2C_Class) directly instead of Arduino Wire.

bool setup_i2c()
{
    auto board = M5.getBoard();
    if (board == m5::board_t::board_ArduinoNessoN1) {
        // NessoN1: GROVE is on port_b (GPIO 5/4), not port_a (which maps to Wire pins 8/10)
        auto pin_num_sda = M5.getPin(m5::pin_name_t::port_b_out);
        auto pin_num_scl = M5.getPin(m5::pin_name_t::port_b_in);
        M5_LOGI("getPin(M5HAL): SDA:%u SCL:%u", pin_num_sda, pin_num_scl);
        m5::hal::bus::I2CBusConfig i2c_cfg;
        i2c_cfg.pin_sda = m5::hal::gpio::getPin(pin_num_sda);
        i2c_cfg.pin_scl = m5::hal::gpio::getPin(pin_num_scl);
        auto i2c_bus    = m5::hal::bus::i2c::getBus(i2c_cfg);
        M5_LOGI("Bus:%d", i2c_bus.has_value());
        return Units.add(unit, i2c_bus ? i2c_bus.value() : nullptr) && Units.begin();
    } else if (board == m5::board_t::board_M5NanoC6) {
        // NanoC6: Use M5.Ex_I2C (m5::I2C_Class, not Arduino Wire)
        M5_LOGI("Using M5.Ex_I2C");
        return Units.add(unit, M5.Ex_I2C) && Units.begin();
    } else {
        auto pin_num_sda = M5.getPin(m5::pin_name_t::port_a_sda);
        auto pin_num_scl = M5.getPin(m5::pin_name_t::port_a_scl);
        M5_LOGI("getPin: SDA:%u SCL:%u", pin_num_sda, pin_num_scl);
        Wire.end();
        Wire.begin(pin_num_sda, pin_num_scl, 100 * 1000U);
        return Units.add(unit, Wire) && Units.begin();
    }
}

bool setup_cardkb2_i2c()
{
    if (!setup_i2c()) {
        return false;
    }
    M5.Log.printf("Firmware:%02X\n", unit.firmwareVersion());
    return true;
}

}  // namespace

using namespace m5::unit::keyboard;

void setup()
{
    M5.begin();
    bool unit_ready{};

    unit_ready = setup_cardkb2_i2c();

    if (!unit_ready) {
        M5_LOGE("Failed to begin");
        M5_LOGE("Check CardKB2 communication mode (Fn+Sym+1:I2C)");
        while (true) {
            m5::utility::delay(10000);
        }
    }
    M5_LOGI("M5UnitUnified has been begun");
    M5_LOGI("%s", Units.debugInfo().c_str());
}

void loop()
{
    M5.update();
    Units.update();
    // Common: get input characters
    if (unit.updated()) {
        while (unit.available()) {
            char ch    = unit.getchar();
            auto sname = special_key_name(ch);
            M5.Log.printf("Char:[%02X %s]\n", (uint8_t)ch, sname ? sname : m5::utility::formatString("%c", ch).c_str());
            unit.discard();
        }
    }
}UART モード
事前操作:Unit CardKB2 に電源を供給後、Fn + Sym + 2 を押して UART モードに切り替えてください。
このサンプルを使用すると、AtomS3R がシリアルポート経由で Unit CardKB2 から送信されるキーフレームを受信し、キー値・キー状態および対応する文字をシリアルモニタに出力します。
#include <M5Unified.h>
#include <M5UnitUnified.h>
#include <M5UnitUnifiedKEYBOARD.h>
#include <M5HAL.hpp>
#include <M5Utility.h>
#include <cctype>
#include <string>

#define USING_UNIT_CARDKB2
#define USING_UART_FOR_CARDKB2

// *************************************************************

namespace {
m5::unit::UnitUnified Units;

const char* special_key_name(const char ch)
{
    switch (ch) {
        case '\b':
            return "BS";
        case '\t':
            return "TAB";
        case '\n':
            return "LF";
        case '\r':
            return "CR";
        case 0x1B:
            return "ESC";
        case 0x7F:
            return "DEL";
        default:
            break;
    }

    using namespace m5::unit::cardkb2;
    switch (ch) {
        case SCHAR_LEFT:
            return "LEFT";
        case SCHAR_UP:
            return "UP";
        case SCHAR_DOWN:
            return "DOWN";
        case SCHAR_RIGHT:
            return "RIGHT";
        default:
            break;
    }
    return nullptr;
}

// #pragma message "Using UnitCardKB2UART (UART)"
m5::unit::UnitCardKB2UART unit;

bool setup_cardkb2_uart()
{
    // UART mode: CardKB2 must be switched to UART mode first (Fn+Sym+2 on the device)
    // Port C primary, Port A fallback (NessoN1: Port B fallback — Port A is Wire pins)
    auto board      = M5.getBoard();
    auto pin_num_rx = M5.getPin(m5::pin_name_t::port_c_rxd);
    auto pin_num_tx = M5.getPin(m5::pin_name_t::port_c_txd);
    if (pin_num_rx < 0 || pin_num_tx < 0) {
        if (board == m5::board_t::board_ArduinoNessoN1) {
            M5_LOGW("PortC is not available, using PortB");
            pin_num_rx = M5.getPin(m5::pin_name_t::port_b_in);
            pin_num_tx = M5.getPin(m5::pin_name_t::port_b_out);
        } else {
            M5_LOGW("PortC is not available, using PortA");
            Wire.end();
            pin_num_rx = M5.getPin(m5::pin_name_t::port_a_pin1);
            pin_num_tx = M5.getPin(m5::pin_name_t::port_a_pin2);
        }
    }
    M5_LOGI("getPin: RX:%d TX:%d", pin_num_rx, pin_num_tx);

#if defined(CONFIG_IDF_TARGET_ESP32C6)
    auto& serial = Serial1;
#elif SOC_UART_NUM > 2
    auto& serial = Serial2;
#elif SOC_UART_NUM > 1
    auto& serial = Serial1;
#else
#error "Not enough Serial"
#endif
    serial.begin(115200, SERIAL_8N1, pin_num_rx, pin_num_tx);
    if (!Units.add(unit, serial) || !Units.begin()) {
        return false;
    }
    M5.Log.printf("Firmware:Unknown (UART mode)\n");
    return true;
}

}  // namespace

using namespace m5::unit::keyboard;

void setup()
{
    M5.begin();
    bool unit_ready{};

    unit_ready = setup_cardkb2_uart();
    M5_LOGI("M5UnitUnified has been begun");
    M5_LOGI("%s", Units.debugInfo().c_str());
}

void loop()
{
    M5.update();
    Units.update();
    // Common: get input characters
    if (unit.updated()) {
        while (unit.available()) {
            char ch    = unit.getchar();
            auto sname = special_key_name(ch);
            M5.Log.printf("Char:[%02X %s]\n", (uint8_t)ch, sname ? sname : m5::utility::formatString("%c", ch).c_str());
            unit.discard();
        }
    }
}ESP-NOW モード
事前操作:Unit CardKB2 に電源を供給後、Fn + Sym + 3 を押して ESP-NOW ブロードキャストモードに切り替えてください。
このサンプルを使用すると、AtomS3R が Unit CardKB2 からの ESP-NOW ブロードキャストキーデータを受信し、フレームヘッダ・データ長・チェックサムを検証したうえで、キーの押下・解放状態をシリアルポートに出力します。
#include <esp_now.h>
#include <WiFi.h>

volatile bool packetReady = false;
uint8_t packet[5];
int packetLen = 0;

void OnDataRecv(const uint8_t *mac, const uint8_t *incomingData, int len)
{
    if (len > 5) len = 5;
    memcpy(packet, incomingData, len);
    packetLen   = len;
    packetReady = true;
}

void setup()
{
    Serial.begin(115200);
    WiFi.mode(WIFI_STA);

    if (esp_now_init() != ESP_OK) {
        Serial.println("Error initializing ESP-NOW");
        return;
    }

    esp_now_register_recv_cb(esp_now_recv_cb_t(OnDataRecv));
}

void loop()
{
    if (!packetReady) return;
    packetReady = false;

    Serial.print("Raw: ");
    for (int i = 0; i < packetLen; i++) {
        Serial.printf("%02X ", packet[i]);
    }
    if (packetLen != 5) {
        return;
    }

    uint8_t head     = packet[0];
    uint8_t dataLen  = packet[1];
    uint8_t keyId    = packet[2];
    uint8_t keyState = packet[3];
    uint8_t recvSum  = packet[4];

    if (head != 0xAA) {
        Serial.println("Error: invalid frame head");
        return;
    }

    if (dataLen != 0x03) {
        Serial.println("Error: invalid DATA_LEN");
        return;
    }

    uint8_t calcSum = (dataLen + keyId + keyState) & 0xFF;
    if (calcSum != recvSum) {
        Serial.printf("Error: checksum mismatch recv=%02X calc=%02X\n", recvSum, calcSum);
        return;
    }

    Serial.println();
    if (keyState == 0x01) {
        Serial.printf("Key %d pressed\n", keyId);
    } else if (keyState == 0x02) {
        Serial.printf("Key %d released\n", keyId);
    } else {
        Serial.printf("Error: unknown key state %02X\n", keyState);
    }
}BLE HID モード
事前操作:Unit CardKB2 に電源を供給後、Fn + Sym + 4 を押して BLE HID モードに切り替えてください。
BLE HID は標準的な Bluetooth 入力デバイスプロトコルであり、本チュートリアルの受信側サンプルと組み合わせて使用できるほか、BLE HID に対応したスマートフォン・タブレット・PC にキーボードとして直接接続することも可能です。
このサンプルを使用すると、AtomS3R が BLE HID 受信端として Unit CardKB2 をスキャン・接続し、キーボードから送信された生の HID データと解析後の ASCII 文字をシリアルポートに出力します。
#include <NimBLEDevice.h>

static NimBLEUUID kHidSvcUUID((uint16_t)0x1812);
static NimBLEUUID kReportUUID((uint16_t)0x2A4D);

static NimBLEAddress g_addr;
static NimBLEClient* g_client = nullptr;
static bool g_hasTarget = false, g_connected = false,
            g_authReady = false, g_subscribed = false;

// HID keycode → ASCII 変換テーブル
static const char kNormal[] = "\0\0\0\0abcdefghijklmnopqrstuvwxyz1234567890\n\x1b\b\t -=[]\\"
                               "\0;'`,./";
static const char kShifted[] = "\0\0\0\0ABCDEFGHIJKLMNOPQRSTUVWXYZ!@#$%^&*()\n\x1b\b\t _+{}|"
                                "\0:\"~<>?";

static uint8_t hidToAscii(const uint8_t* r, size_t len) {
    if (len == 9 && r[0] == 0x01) { r++; len = 8; }
    if (len < 3) return 0;
    uint8_t kc = r[2];
    if (kc == 0 || kc >= sizeof(kNormal)) return 0;
    return (r[0] & 0x22) ? (uint8_t)kShifted[kc] : (uint8_t)kNormal[kc];
}

static void reportCB(NimBLERemoteCharacteristic*, uint8_t* data, size_t len, bool) {
    Serial.printf("+BLE:RX,%u", (unsigned)len);
    for (size_t i = 0; i < len; i++) Serial.printf(",%02X", data[i]);
    Serial.println();
    uint8_t ch = hidToAscii(data, len);
    if (ch) Serial.printf("+BLE:ASCII,0x%02X,'%c'\n", ch, (ch >= 0x20 && ch < 0x7F) ? ch : '?');
}

struct ClientCB : NimBLEClientCallbacks {
    void onConnect(NimBLEClient* c) override {
        Serial.println("[BLE] Connected");
        g_connected = true; g_authReady = g_subscribed = false;
        int rc; NimBLEDevice::startSecurity(c->getConnHandle(), &rc);
    }
    void onDisconnect(NimBLEClient*, int reason) override {
        Serial.printf("[BLE] Disconnected (%d)\n", reason);
        g_connected = g_authReady = g_subscribed = false;
    }
    void onAuthenticationComplete(NimBLEConnInfo& info) override {
        g_authReady = info.isAuthenticated() || info.isEncrypted();
        Serial.printf("[BLE] Auth: %s\n", g_authReady ? "OK" : "FAIL");
        if (!g_authReady && g_client) g_client->disconnect();
    }
    bool onConnParamsUpdateRequest(NimBLEClient*, const ble_gap_upd_params*) override { return true; }
};

struct AdvCB : NimBLEScanCallbacks {
    void onResult(const NimBLEAdvertisedDevice* d) override {
        if (!d->isAdvertisingService(kHidSvcUUID) || g_hasTarget) return;
        Serial.printf("[BLE] Found: %s\n", d->getAddress().toString().c_str());
        g_addr = d->getAddress(); g_hasTarget = true;
        NimBLEDevice::getScan()->stop();
    }
};

static void startScan() {
    auto* s = NimBLEDevice::getScan();
    s->setScanCallbacks(new AdvCB(), false);
    s->setActiveScan(false); s->setInterval(100); s->setWindow(20); s->setDuplicateFilter(true);
    g_hasTarget = false;
    Serial.println("[BLE] Scanning...");
    s->start(5, false);
}

static bool subscribeReport() {
    auto* svc = g_client ? g_client->getService(kHidSvcUUID) : nullptr;
    auto* chr = svc ? svc->getCharacteristic(kReportUUID) : nullptr;
    if (!chr || (!chr->canNotify() && !chr->canIndicate())) return false;
    if (!chr->subscribe(true, reportCB, true)) return false;
    g_subscribed = true;
    Serial.println("[BLE] Subscribed");
    return true;
}

void setup() {
    Serial.begin(115200); delay(300);
    NimBLEDevice::init("ESP32S3_BLE_Receiver");
    NimBLEDevice::setPower(ESP_PWR_LVL_P9);
    NimBLEDevice::setSecurityAuth(true, false, false);
    NimBLEDevice::setSecurityIOCap(BLE_HS_IO_NO_INPUT_OUTPUT);
    NimBLEDevice::setSecurityInitKey(BLE_SM_PAIR_KEY_DIST_ENC | BLE_SM_PAIR_KEY_DIST_ID);
    NimBLEDevice::setSecurityRespKey(BLE_SM_PAIR_KEY_DIST_ENC | BLE_SM_PAIR_KEY_DIST_ID);
    startScan();
}

void loop() {
    if (!g_connected) {
        if (!g_hasTarget) { startScan(); delay(1000); return; }
        if (!g_client) { g_client = NimBLEDevice::createClient(); g_client->setClientCallbacks(new ClientCB(), true); }
        if (!g_client->connect(g_addr, false)) { delay(1500); startScan(); return; }
    }
    if (g_connected && g_authReady && !g_subscribed) subscribeReport();
    delay(50);
}4. コンパイルとアップロード
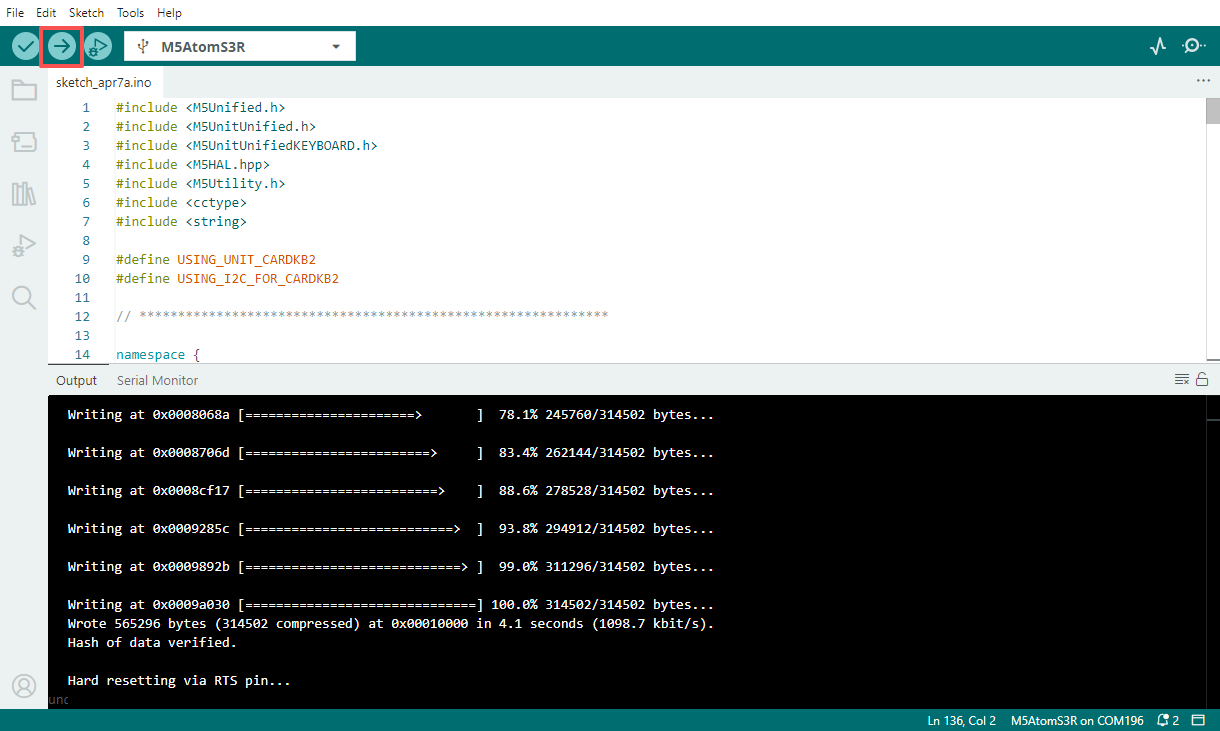
- ダウンロードモード:デバイスにプログラムを書き込む前にダウンロードモードに入る必要があります。主制御デバイスによって操作手順が異なる場合があります。詳細はArduino IDE クイックスタートページ下部のデバイス別プログラム書き込み手順一覧をご参照ください。
AtomS3R はリセットボタンを長押し(約 2 秒)して内部の緑色 LED が点灯したら離してください。この状態でデバイスがダウンロードモードに入り、書き込みが可能になります。

- デバイスのポートを選択し、Arduino IDE 左上のコンパイル・アップロードボタンをクリックして、プログラムのコンパイルとデバイスへの書き込みが完了するまで待ちます。
- シリアルモニタを開き、キーボードのキーを押してログ出力を確認してください。