Arduino入門
2. デバイス&サンプル
3. M5Unified
4. M5GFX
5. 拡張モジュール&サンプル
Unit
Module
Atomic
Tab5
IoT
アクセサリー
Module LoRaWAN-EU868 Arduino チュートリアル
1. 準備作業
1. 環境構築: Arduino IDE 入門チュートリアル を参考に IDE のインストールを完了し、使用する開発ボードに応じて対応するボードマネージャーと必要なドライバライブラリをインストールしてください。
2. 使用するライブラリ:
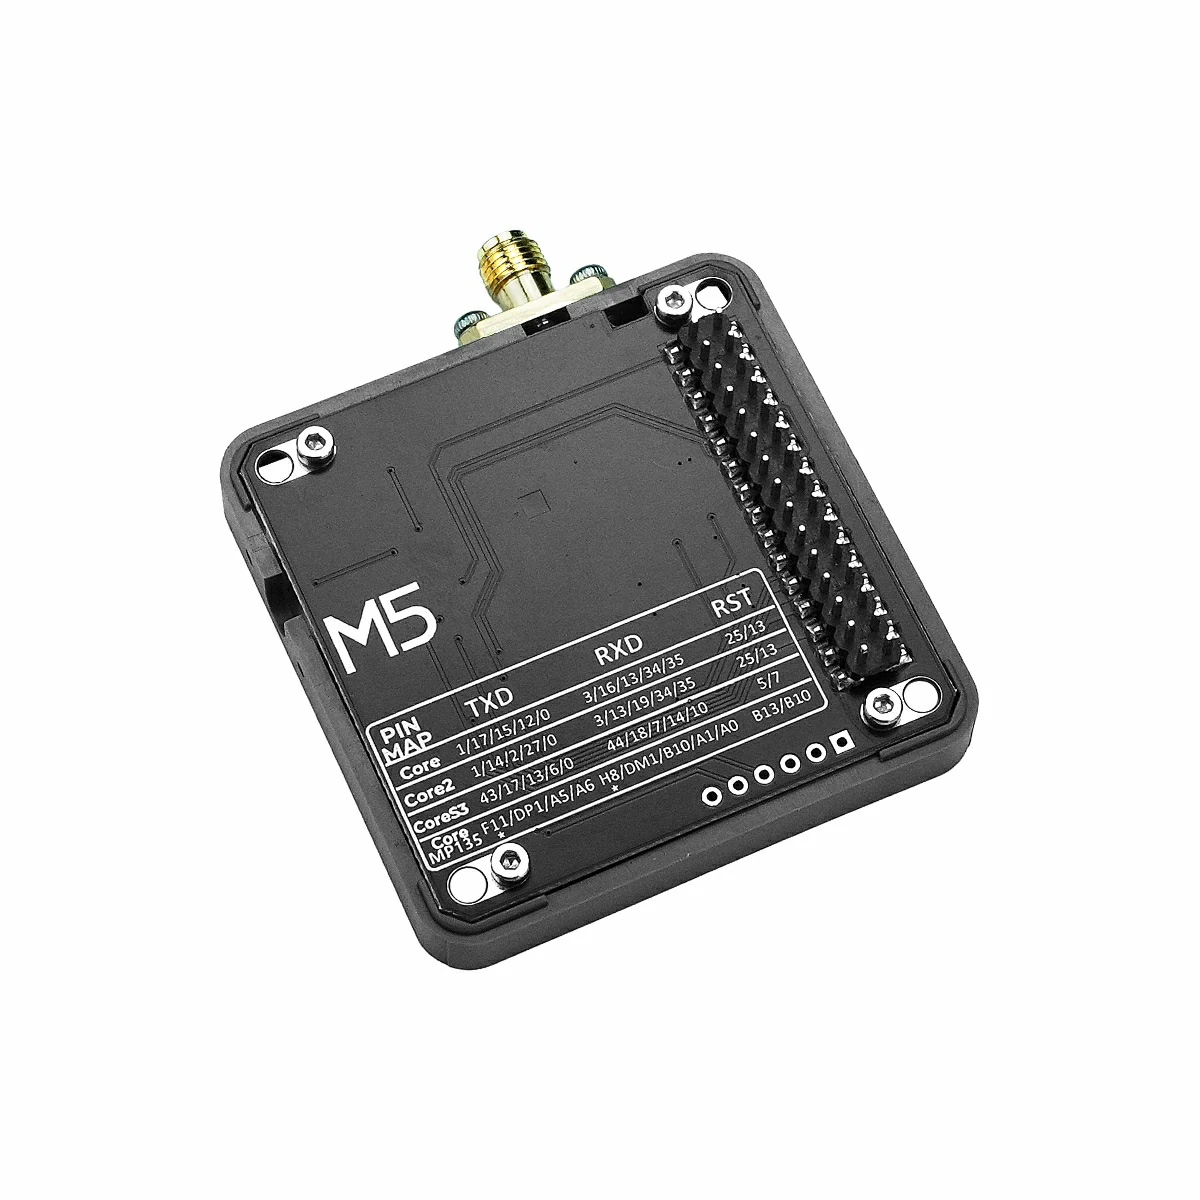
3. 使用するハードウェア製品:

2. 注意事項
3. ピン用 DIP スイッチ
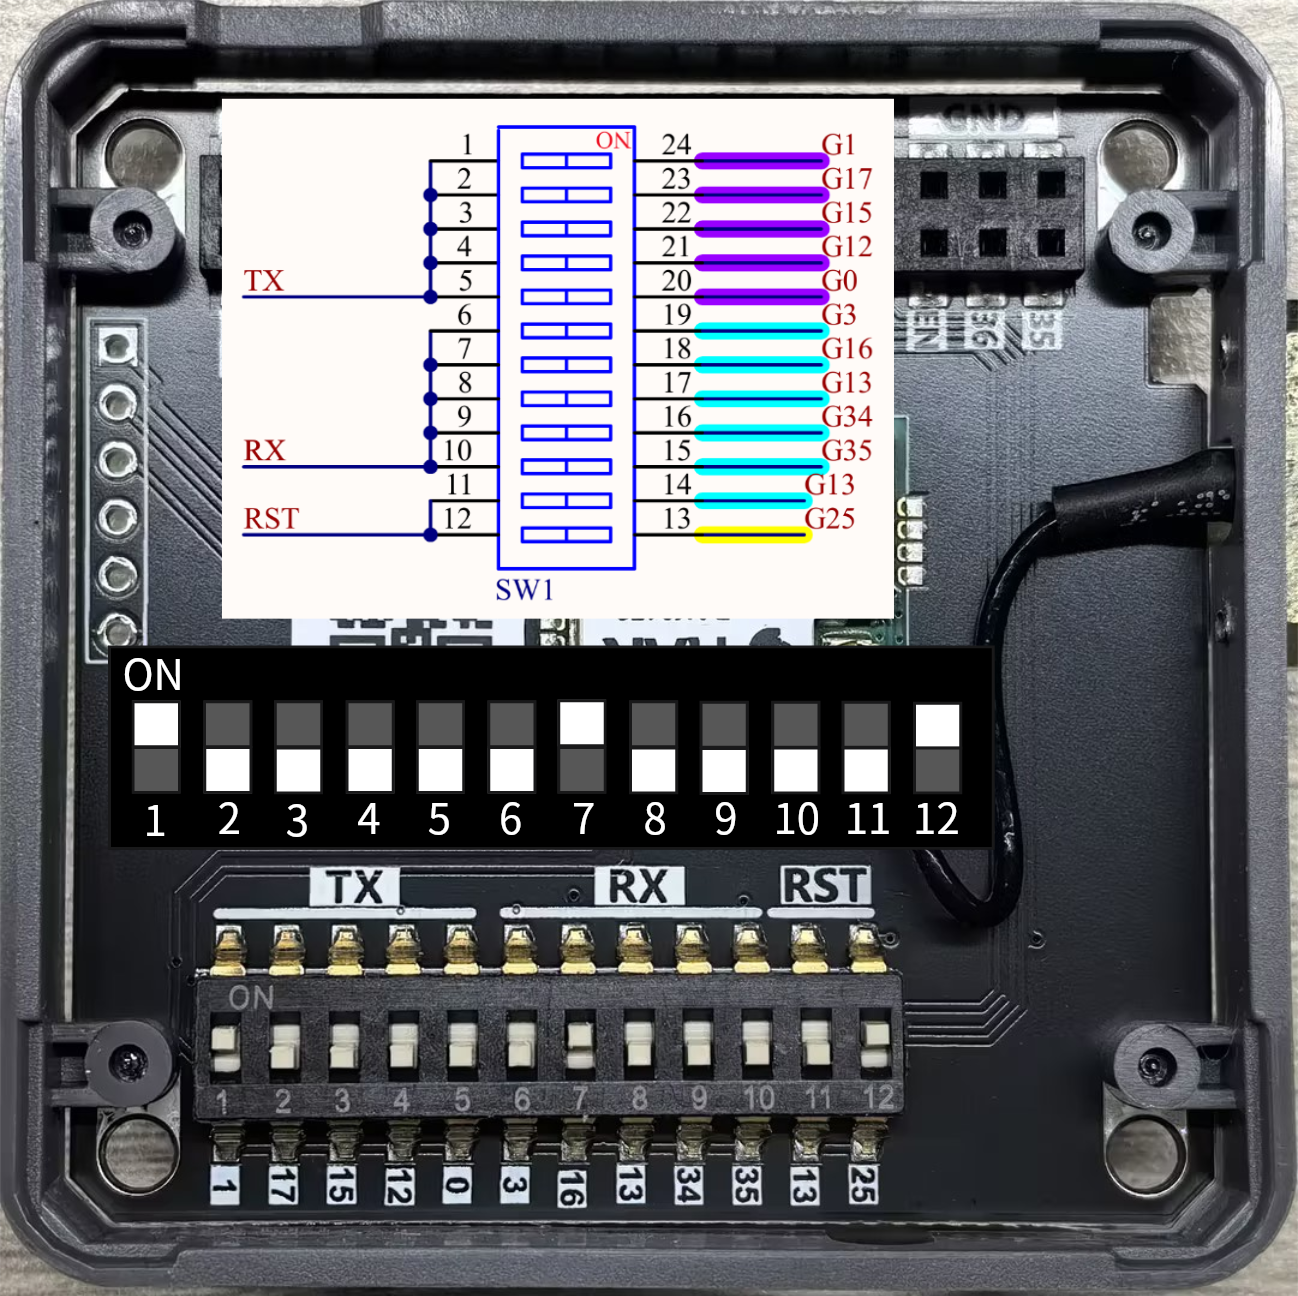
- 本チュートリアルでは CoreS3 をメインコントローラーとして使用し、Module LoRaWAN-EU868 と組み合わせて無線通信を実装します。通信方法はシリアル通信で、使用するピンは
G18 (RX)、G43 (TX)、G5 (RST)です。使用前に、下図を参考にピン用 DIP スイッチを指定の位置に切り替えてください。
4. LoRa P2P
#include <M5Unified.h>
#include "rak3172_p2p.hpp"

#define LORA_CONFIG_PRLEN 8
#define LORA_CONFIG_PWR   22
#define LORA_FREQ         868E6  // 868E6 equals to 868*10^6, which is the frequency 868M(Hz)
#define LORA_CR           0      // (4/5=0, 4/6=1, 4/7=2, 4/8=3)
#define LORA_SF           7      // (6, 7, 8, 9, 10, 11, 12)
#define LORA_BW           500    // (125, 250, 500)

#define LORA_RX 18
#define LORA_TX 43

RAK3172P2P lora;

void LoRaLoopTask(void* arg) {
    while (1) {
        lora.update();
        vTaskDelay(5);
    }
}

void setup() {
    M5.begin();
    pinMode(LORA_RST, OUTPUT);
    digitalWrite(LORA_RST, LOW);
    delay(100);
    digitalWrite(LORA_RST, HIGH);
    Serial.begin(115200);
    M5.Display.setFont(&fonts::FreeMonoBold9pt7b);
    Serial.println("LoRa Init...");
    M5.Display.setCursor(5,0);
    M5.Display.printf("LoRa Init...\n");
    while (!lora.init(&Serial2, LORA_RX, LORA_TX, RAK3172_BPS_115200)) {
        delay(1000);
    }

    lora.setMode(P2P_RX_MODE, 0);
    if (lora.config(LORA_FREQ, LORA_SF, LORA_BW, LORA_CR, LORA_CONFIG_PRLEN, LORA_CONFIG_PWR)) {
        Serial.println("LoRa config success");
        M5.Display.printf("LoRa config success\n");
    } else {
        Serial.println("LoRa config failed");
        M5.Display.printf("LoRa config failed\n");
    }
    lora.setMode(P2P_TX_RX_MODE);
    xTaskCreate(LoRaLoopTask, "LoRaLoopTask", 1024 * 10, NULL, 2, NULL);
    M5.Display.setCursor(0, 40);
    M5.Display.printf("Touch screen to send \"Hello!\"\n");
}

void loop() {
    M5.update();
    if (M5.Touch.getCount() && M5.Touch.getDetail(0).wasClicked()) {
        M5.Display.fillRect(0, 0, 320, 70, TFT_BLACK);
        if (lora.print("Hello!")) {
        Serial.println("Send Hello! success");
        M5.Display.setCursor(0,0);
        M5.Display.printf("Send Hello! success\n");
        }
        M5.Display.setCursor(0, 40);
        M5.Display.printf("Touch screen to send \"Hello!\"\n");
    }

    if (lora.available()) {
        std::vector<p2p_frame_t> frames = lora.read();
        M5.Display.fillRect(0, 100, 320, 140, TFT_BLACK);
        M5.Display.setCursor(0, 100);
        M5.Display.printf("Received:\n");
        for (int i = 0; i < frames.size(); i++) {
        Serial.print(" RSSI: ");
        Serial.print(frames[i].rssi);
        M5.Display.printf("RSSI: %d\n", frames[i].rssi);
        Serial.print(" SNR: ");
        Serial.print(frames[i].snr);
        M5.Display.printf("SNR: %d\n", frames[i].snr);
        Serial.print(" LEN: ");
        Serial.print(frames[i].len);
        M5.Display.printf("LEN: %d\n", frames[i].len);
        Serial.print(" Payload: ");
        M5.Display.printf("Payload: ");
        for (uint8_t j = 0; j < frames[i].len; j++) {
            Serial.printf("%02X", frames[i].payload[j]);
            M5.Display.printf("%c", frames[i].payload[j]);
        }
        Serial.println();
        M5.Display.println();
        }
        lora.flush();
    }
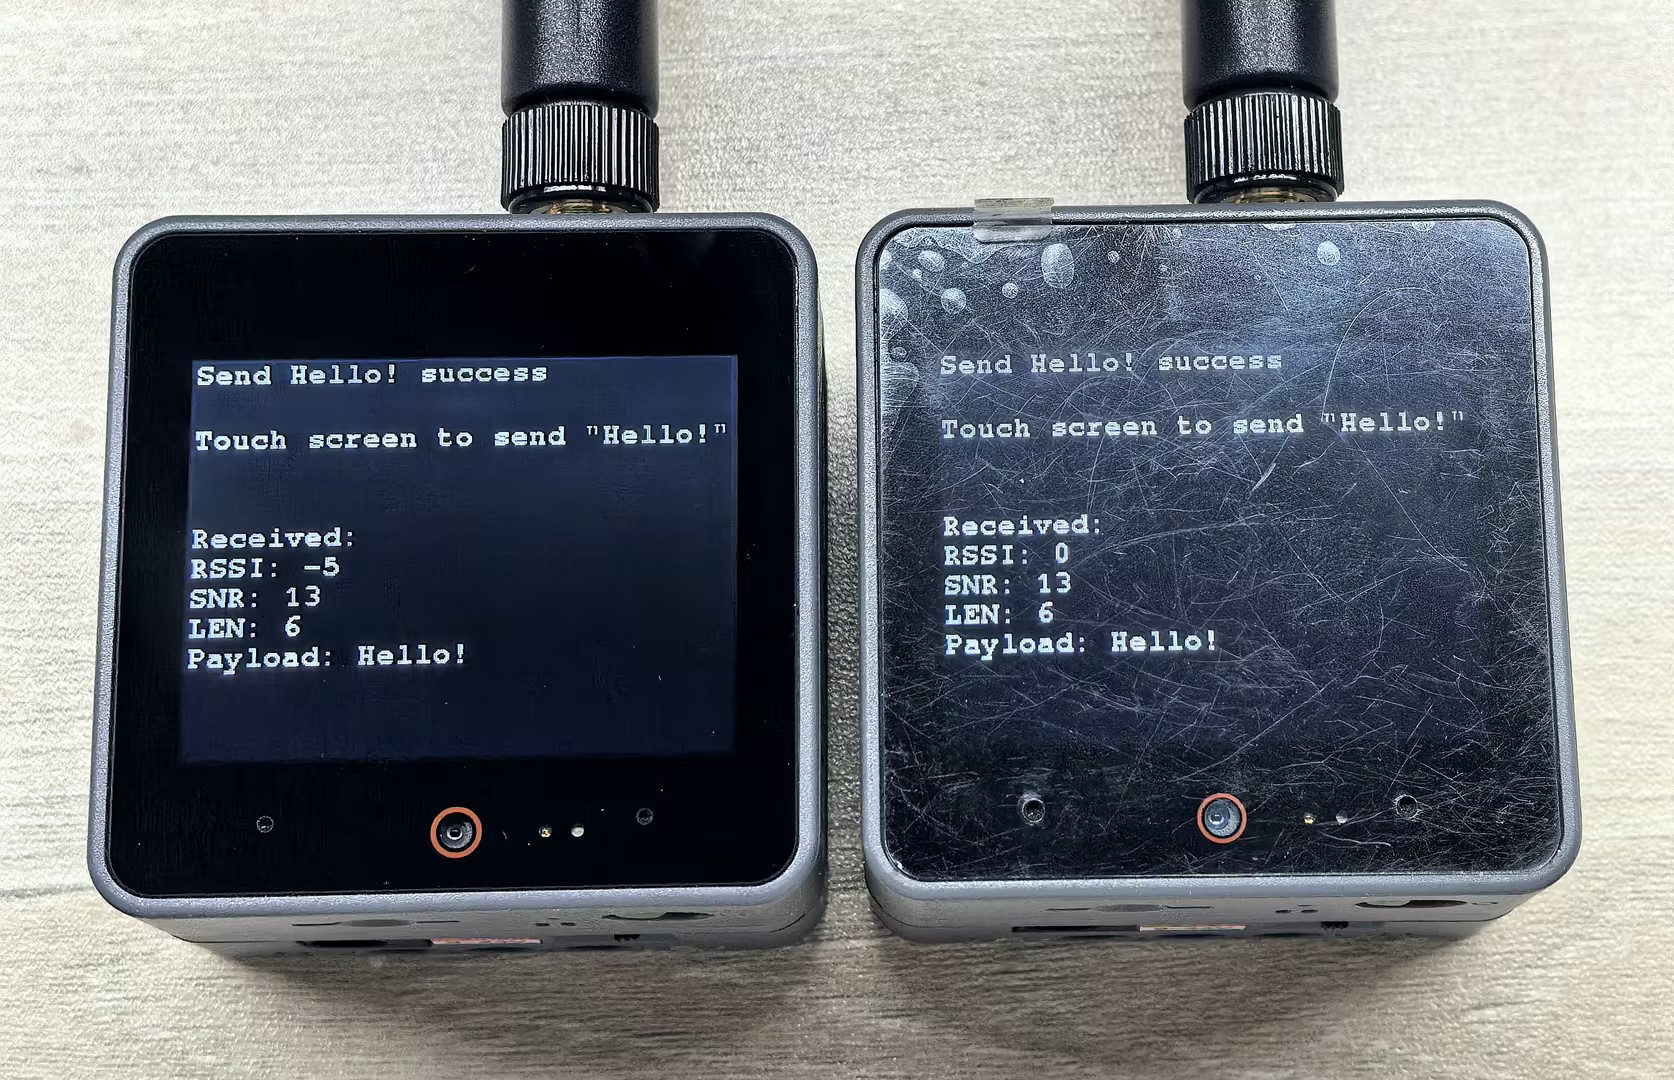
} サンプルコードを書き込んだ後、シリアルモニターで出力ログを確認できます。CoreS3 画面をタッチしてデータを送信すると、デバイスはデータを受信して画面に表示します。
5. LoRaWAN
LoRaWAN 通信モードでは、デバイスは LoRaWAN ゲートウェイに接続してデータ交換を実現する必要があります。周波数ホッピング技術の利点により、この接続方法は、より多くの LoRa デバイスノードを同時に管理でき、データセキュリティを提供します。使用前に、現在の地域にパブリック LoRaWAN ゲートウェイが存在することを確認してください。パブリックゲートウェイがない場合は、独自のゲートウェイを構築して接続を実現することもできます。
5.1 通信キー
1. TTN - デバイス作成チュートリアル を参考に、使用しているデバイスの周波数帯に基づいてノードを作成し、対応するキー情報を取得してください。これらのキーには、DevEUI、AppEUI(JoinEUI)、AppKey などが含まれます。異なるネットワークアクセスモード(OTAA / ABP)は異なるキー内容を使用します。これらのキーは、デバイスが LoRaWAN ネットワークにアクセスするための
必須情報です。2. 設定中に、以下の関連情報に基づいて対応する設定とデバイスタイプ(ClassA ~ C)を設定できます。LoRaWAN の説明とデバイス設定情報の詳細については、TTN - LoRaWAN Docs を参照してください。
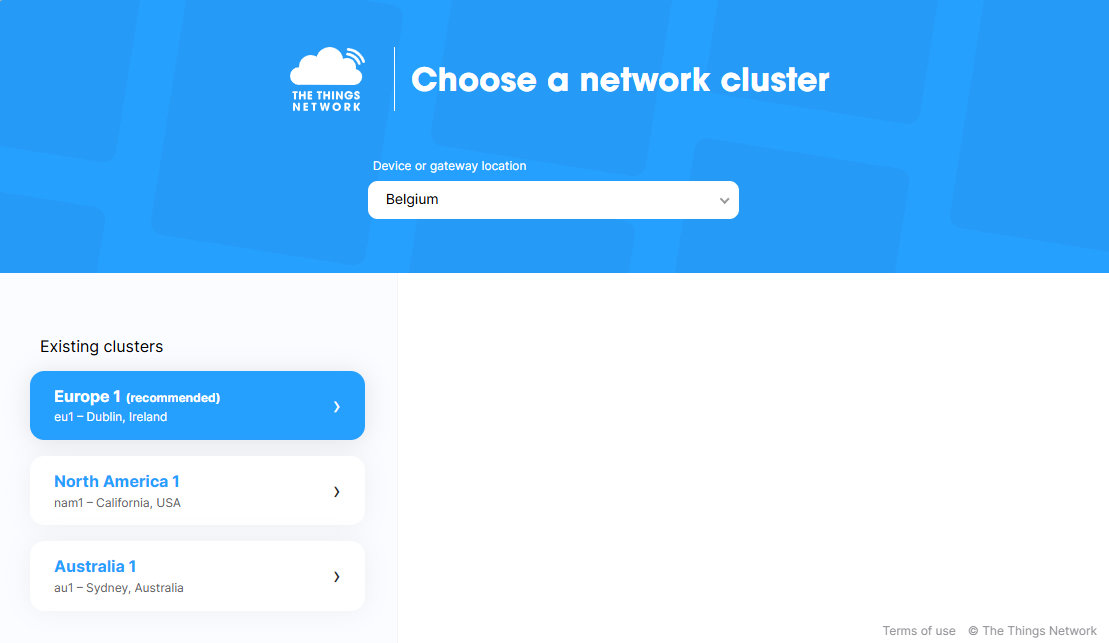
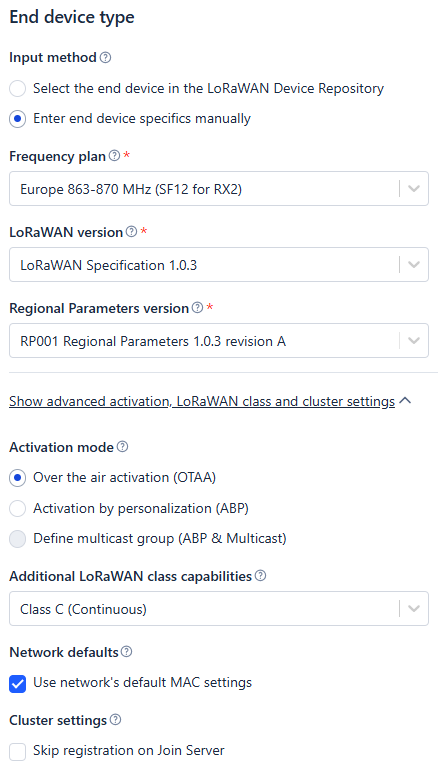
- 3. TTN または他の LoRaWAN サーバーから取得したデバイスキー情報をサンプルプログラムに入力し、サンプルをコンパイルしてデバイスに書き込みます。
5.2 OTAA
#include <M5Unified.h>
#include "rak3172_lorawan.hpp"

#define APPEUI "****************"  // Application EUI (JoinEUI)
#define DEVEUI "****************"  // Device EUI
#define APPKEY "********************************"  // Application Key

#define LORA_RX 18
#define LORA_TX 43
#define LORA_RST 5

RAK3172LoRaWAN lorawan;
bool isJoin = false;

void joinCallback(bool status)
{
    isJoin = status;
    if (status) {
        Serial.println("[LoRaWAN] Join network successful!");
        M5.Display.printf("Join network successful!\nTouch screen to send\n");
        Serial.println("Device EUI: " + String(DEVEUI));
        lorawan.send("Device connected");
    } else {
        Serial.println("[LoRaWAN] Join network failed!");
    }
}

void sendCallback()
{
    Serial.println("[LoRaWAN] Uplink confirmed by server");
}

void errorCallback(char* error)
{
    Serial.print("[LoRaWAN] Error: ");
    Serial.println(error);
}

void LoRaWANLoopTask(void* arg)
{
    while (1) {
        lorawan.update();
        vTaskDelay(5);
    }
}

void setup()
{
    M5.begin();
    pinMode(LORA_RST, OUTPUT);
    digitalWrite(LORA_RST, LOW);
    delay(100);
    digitalWrite(LORA_RST, HIGH);
    Serial.begin(115200);
    M5.Display.setFont(&fonts::FreeMonoBold9pt7b);
    Serial.println("[Init] Initialize LoRaWAN module...");
    M5.Display.setCursor(0,0);
    M5.Display.printf("Initialize LoRaWAN module...\n");
    while (!lorawan.init(&Serial2, LORA_RX, LORA_TX, RAK3172_BPS_115200)) {
        Serial.println("[Init] Failed to initialize module, retrying...");
        delay(1000);
    }
    Serial.println("Device Init OK");
    Serial.println("[Config] Set band to EU868...");
    M5.Display.printf("Device Init OK\nSet band to EU868...\n");
    // get or set the channel mask to close or open the channel (only for US915, AU915, CN470)
    while (!lorawan.setBAND(EU868)) {
        Serial.println(" failed, retrying...");
        delay(1000);
    }
    Serial.println("[Config] Set OTAA parameters...");
    M5.Display.printf("Set OTAA parameters...\n");
    while (!lorawan.setOTAA(DEVEUI, APPEUI, APPKEY)) {
        Serial.println(" failed, retrying...");
        delay(1000);
    }
    Serial.println("[Config] Set device mode to CLASS_C...");
    M5.Display.printf("Set device mode to CLASS_C...\n");
    while (!lorawan.setMode(CLASS_C)) {
        Serial.println(" failed, retrying...");
        delay(1000);
    }
    Serial.println("[Config] Set data rate to DR4...");
    M5.Display.printf("Set data rate to DR4...\n");
    while (!lorawan.setDR(4)) {
        Serial.println(" failed, retrying...");
        delay(1000);
    }
    Serial.println("[Config] Set Link check...");
    M5.Display.printf("Set Link check...\n");
    while (!lorawan.setLinkCheck(ALLWAYS_LINKCHECK)) {
        delay(1000);
    }

    lorawan.onSend(sendCallback);
    lorawan.onJoin(joinCallback);
    lorawan.onError(errorCallback);
    lorawan.flush();
    xTaskCreate(LoRaWANLoopTask, "LoRaWANLoopTask", 1024 * 10, NULL, 5, NULL);

    Serial.println("[Info] Attempting to join the network...");
    if (lorawan.join(true, false, 10, 10)) {
        Serial.println("Start Join...");
    } else {
        Serial.println("Join Fail");
    }
}

void loop()
{
    M5.update();
    if (M5.Touch.getCount() && M5.Touch.getDetail(0).wasClicked()) {
        if (isJoin) {
            String data = "UPlink LoRaWAN Frame: " + String(millis());
            if (lorawan.send(data)) {
                Serial.println("Send Successful");
                M5.Display.printf("Send Successful\n");
            } else {
                Serial.println("Send fail");
            }
        } else {
            Serial.println("LoRaWAN not joined");
        }
    }
    if (lorawan.available()) {
        std::vector<lorawan_frame_t> frames = lorawan.read();
        M5.Display.clear();
        M5.Display.setCursor(0, 0);
        M5.Display.printf("Received:\n");
        for (int i = 0; i < frames.size(); i++) {
            Serial.print("RSSI: ");
            Serial.println(frames[i].rssi);
            M5.Display.printf("RSSI: %d\n", frames[i].rssi);
            Serial.print("SNR: ");
            Serial.println(frames[i].snr);
            M5.Display.printf("SNR: %d\n", frames[i].snr);
            Serial.print("LEN: ");
            Serial.println(frames[i].len);
            M5.Display.printf("LEN: %d\n", frames[i].len);
            Serial.print("PORT: ");
            Serial.println(frames[i].port);
            M5.Display.printf("PORT: %d\n", frames[i].port);
            Serial.print("UNITCAST: ");
            Serial.println(frames[i].unicast);
            M5.Display.printf("UNITCAST: %d\n", frames[i].unicast);
            Serial.print("Payload: ");
            M5.Display.printf("Payload: ");
            for (uint8_t j = 0; j < frames[i].len; j++) {
                Serial.printf("%02X", frames[i].payload[j]);
                M5.Display.printf("%c", frames[i].payload[j]);
            }
            Serial.println();
            M5.Display.println();
        }
        lorawan.flush();
    }
    if (Serial.available()) {             // If the serial port reads data.
        String ch = Serial.readString();  // Copy the data read from the serial port
        lorawan.sendCommand(ch);
    }
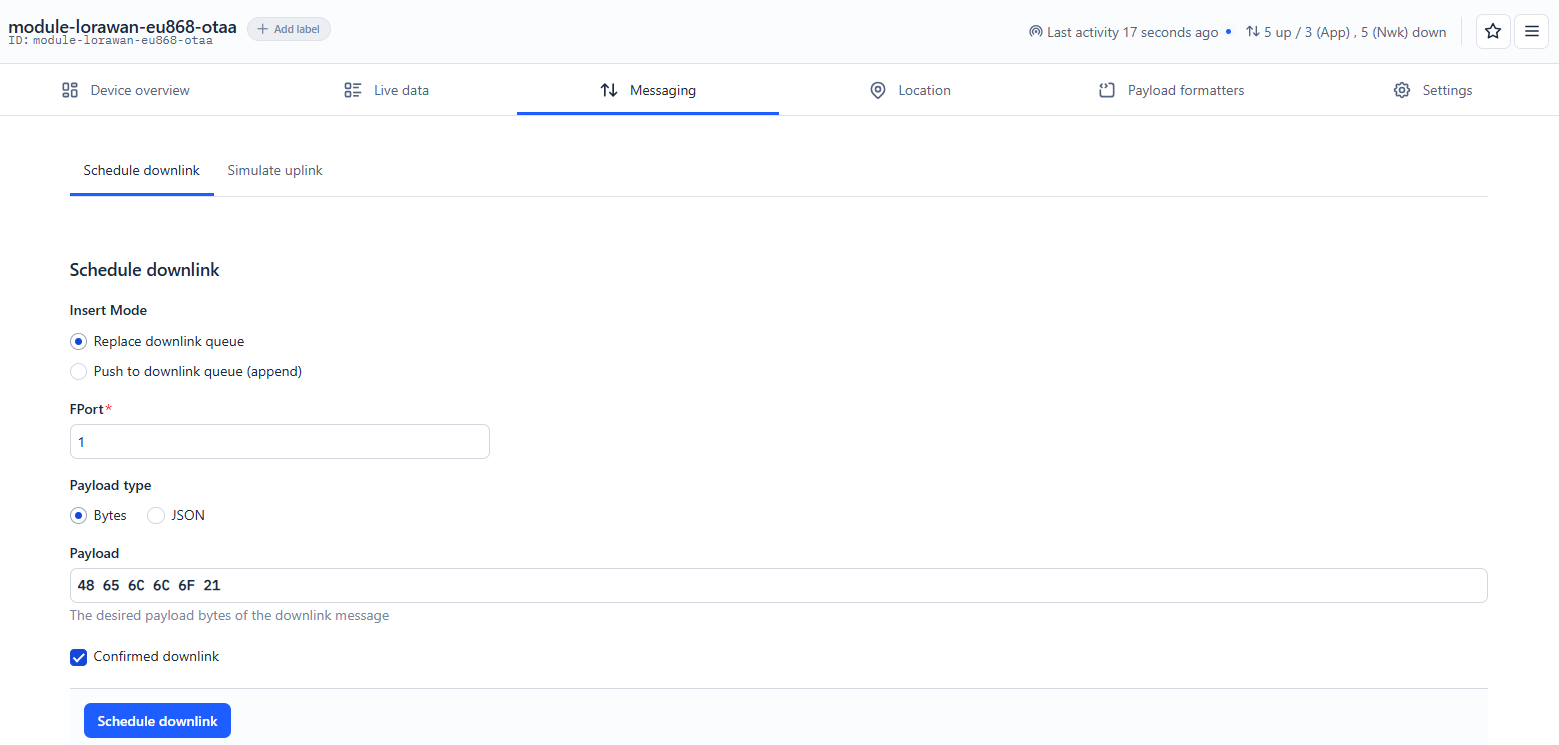
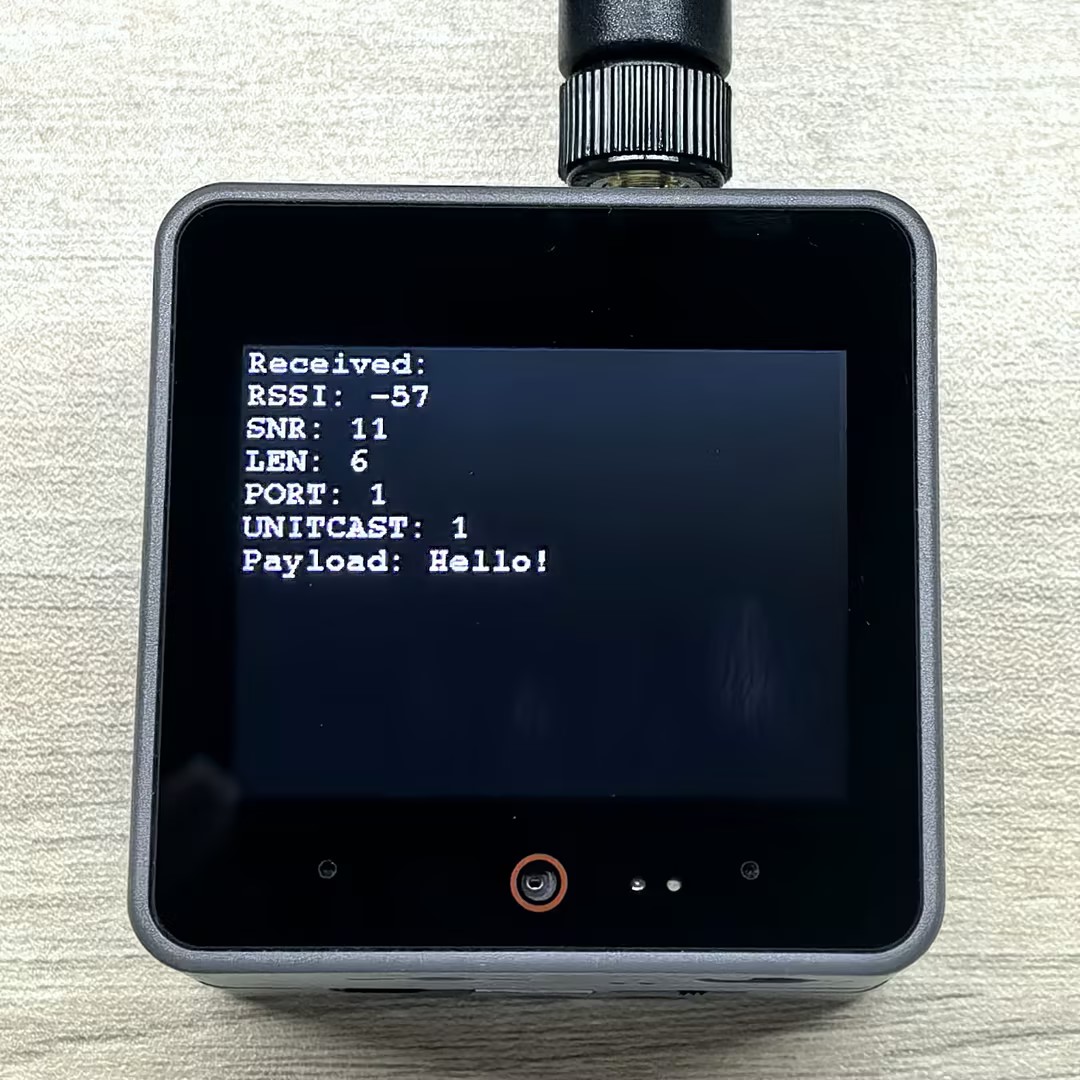
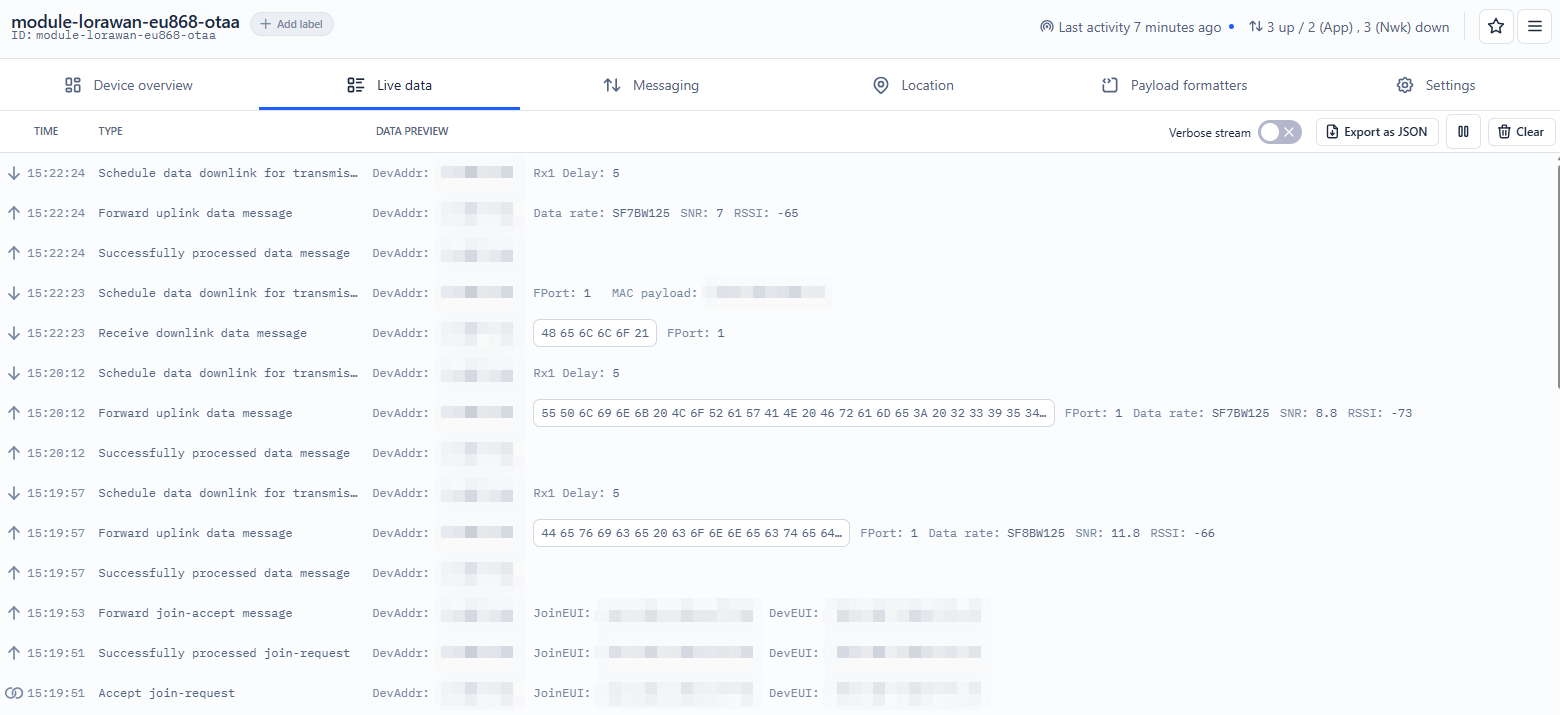
}上記のサンプルを正常に書き込んだ後、CoreS3 画面をタッチしてデータを送信します。デバイスは LoRaWAN ネットワークに接続してデータを送信します。TTN コンソールの Messaging で、Playload フィールドに 48 65 6C 6C 6F 21(16進数文字列、ASCII 文字列 "Hello!" を表す)を入力し、Schedule downlink ボタンをクリックします。デバイスはデータを受信して画面に表示します。
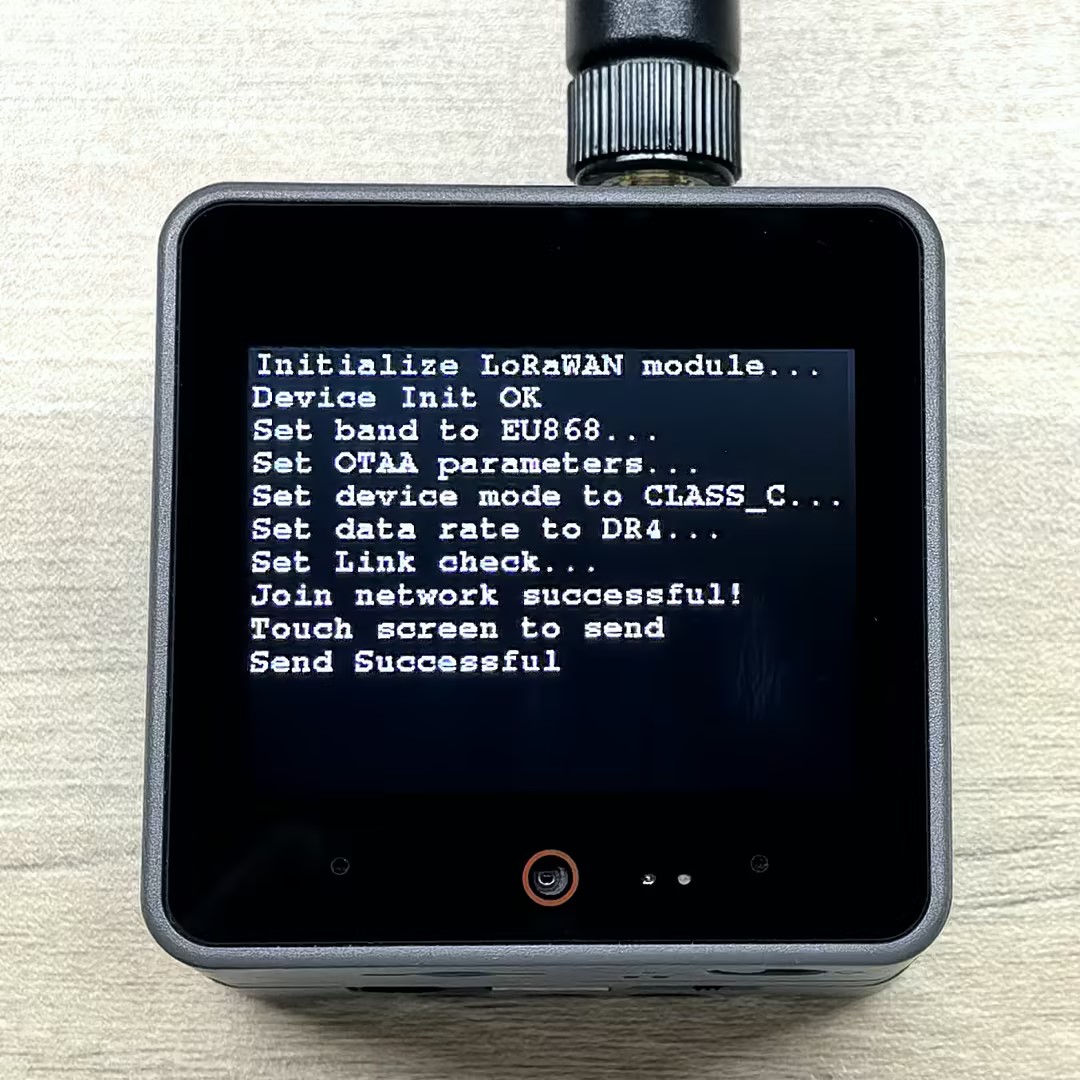
- シリアルモニター出力例:
[Init] Initializing LoRaWAN module...
Device Init OK
[Config] Setting band to EU868...
[Config] Setting OTAA parameters...
[Config] Setting device mode to CLASS_C...
[Config] Setting data rate to DR4...
[Config] Setting Link check...
[Info] Attempting to join the network...
Start Join...
[LoRaWAN] Join network successful!
Device EUI: XXXXXXXXXXXXXXXX
Send Successful
RSSI: -57
SNR: 11
LEN: 6
PORT: 1
UNITCAST: 1
Payload: 48656C6C6F21- CoreS3 画面表示例:
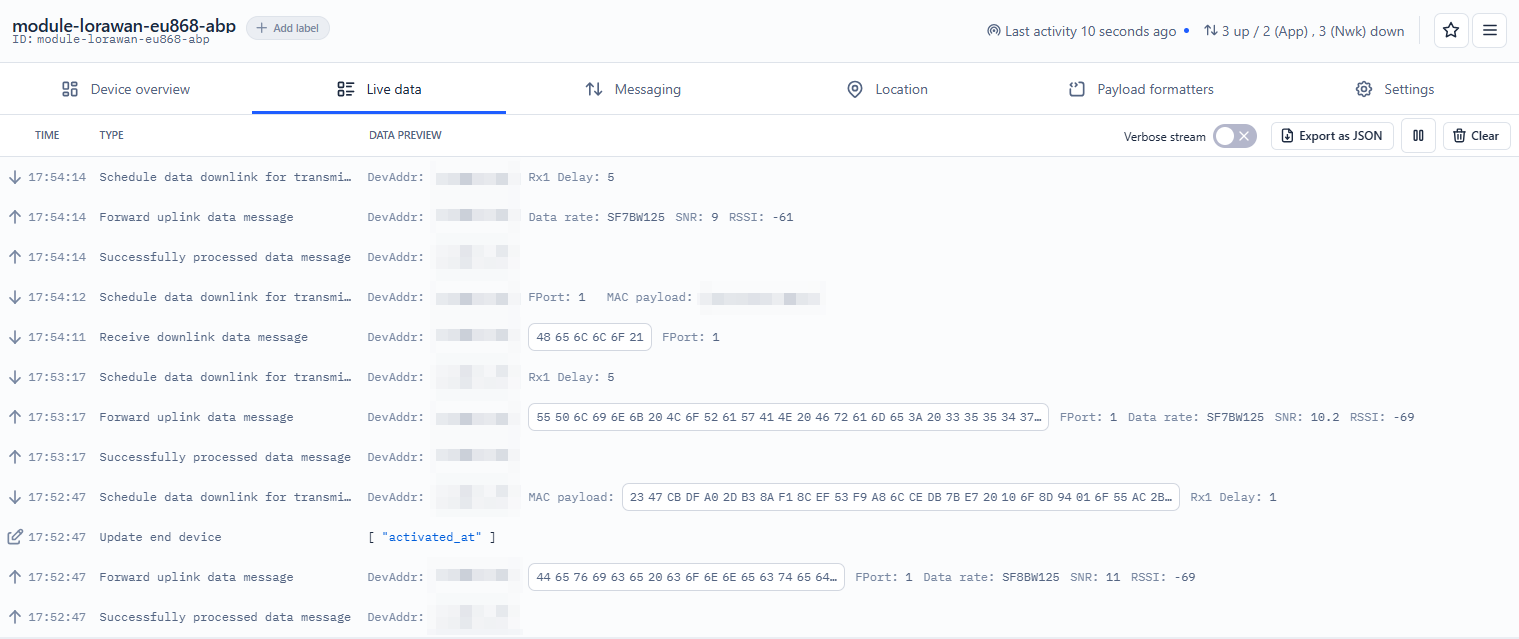
- TTN コンソールログ表示例:
5.3 ABP
Settings で、Network layer の Custom MAC settings を見つけ、Resets frame counters オプション(下図参照)をチェックして、TTN がデバイスの再起動後にフレームカウンタをリセットできるようにし、上記の問題を回避してください。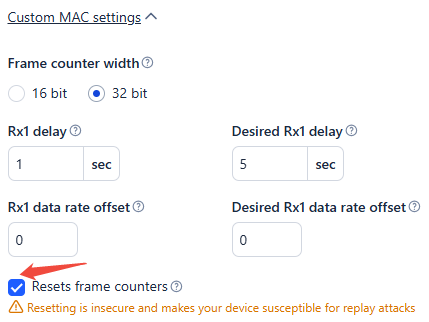
#include <M5Unified.h>
#include "rak3172_lorawan.hpp"

#define DEVADDR "260B8AF9"             // Device Address
#define NWKSKEY "E87AA07838189048FF31AD51BB9843D1"  // Network Session Key
#define APPSKEY "7D887F47B374962E0A83C4BD2E11D2E8"  // Application Session Key

#define LORA_RX 18
#define LORA_TX 43
#define LORA_RST 5

RAK3172LoRaWAN lorawan;

void errorCallback(char* error)
{
    Serial.print("[LoRaWAN] Error: ");
    Serial.println(error);
}

void LoRaWANLoopTask(void* arg)
{
    while (1) {
        lorawan.update();
        vTaskDelay(5);
    }
}

void setup()
{
    M5.begin();
    pinMode(LORA_RST, OUTPUT);
    digitalWrite(LORA_RST, LOW);
    delay(100);
    digitalWrite(LORA_RST, HIGH);
    Serial.begin(115200);
    M5.Display.setFont(&fonts::FreeMonoBold9pt7b);
    Serial.println("[Init] Initialize LoRaWAN module...");
    M5.Display.printf("Initialize LoRaWAN module...\n");
    while (!lorawan.init(&Serial2, LORA_RX, LORA_TX, RAK3172_BPS_115200)) {
        Serial.println("[Init] Failed to initialize module, retrying...");
        delay(1000);
    }
    Serial.println("Device Init OK");
    Serial.println("[Config] Set band to EU868...");
    M5.Display.printf("Device Init OK\nSet band to EU868...\n");
    // get or set the channel mask to close or open the channel (only for US915, AU915, CN470)
    while (!lorawan.setBAND(EU868)) {
        Serial.println(" failed, retrying...");
        delay(1000);
    }
    Serial.println("[Config] Set ABP parameters...");
    M5.Display.printf("Set ABP parameters...\n");
    while (!lorawan.setABP(DEVADDR, NWKSKEY, APPSKEY)) {
        Serial.println(" failed, retrying...");
        delay(1000);
    }
    Serial.println("[Config] Set device mode to CLASS_C...");
    M5.Display.printf("Set device mode to CLASS_C...\n");
    while (!lorawan.setMode(CLASS_C)) {
        Serial.println(" failed, retrying...");
        delay(1000);
    }
    Serial.println("[Config] Set data rate to DR4...");
    M5.Display.printf("Set data rate to DR4...\n");
    while (!lorawan.setDR(4)) {
        Serial.println(" failed, retrying...");
        delay(1000);
    }
    Serial.println("[Config] Set Link check...");
    M5.Display.printf("Set Link check...\n");
    while (!lorawan.setLinkCheck(ALLWAYS_LINKCHECK)) {
        delay(1000);
    }
    delay(2000);
    Serial.println("[Config] Link successful!");
    M5.Display.printf("Link successful!\nTouch screen to send\n");
    lorawan.send("Device connected");

    lorawan.onError(errorCallback);
    lorawan.flush();
    xTaskCreate(LoRaWANLoopTask, "LoRaWANLoopTask", 1024 * 10, NULL, 5, NULL);
}

void loop()
{
    M5.update();
    if (M5.Touch.getCount() && M5.Touch.getDetail(0).wasClicked()) {
        String data = "UPlink LoRaWAN Frame: " + String(millis());
        if (lorawan.send(data)) {
            Serial.println("Send Successful");
            M5.Display.printf("Send Successful\n");
        } else {
            Serial.println("Send fail");
        }
    }

    if (lorawan.available()) {
        std::vector<lorawan_frame_t> frames = lorawan.read();
        M5.Display.clear();
        M5.Display.setCursor(0, 0);
        M5.Display.printf("Received:\n");
        for (int i = 0; i < frames.size(); i++) {
            Serial.print("RSSI: ");
            Serial.println(frames[i].rssi);
            M5.Display.printf("RSSI: %d\n", frames[i].rssi);
            Serial.print("SNR: ");
            Serial.println(frames[i].snr);
            M5.Display.printf("SNR: %d\n", frames[i].snr);
            Serial.print("LEN: ");
            Serial.println(frames[i].len);
            M5.Display.printf("LEN: %d\n", frames[i].len);
            Serial.print("PORT: ");
            Serial.println(frames[i].port);
            M5.Display.printf("PORT: %d\n", frames[i].port);
            Serial.print("UNITCAST: ");
            Serial.println(frames[i].unicast);
            M5.Display.printf("UNITCAST: %d\n", frames[i].unicast);
            Serial.print("Payload: ");
            M5.Display.printf("Payload: ");
            for (uint8_t j = 0; j < frames[i].len; j++) {
                Serial.printf("%02X", frames[i].payload[j]);
                M5.Display.printf("%c", frames[i].payload[j]);
            }
            Serial.println();
            M5.Display.println();
        }
        lorawan.flush();
    }
    if (Serial.available()) {             // If the serial port reads data.
        String ch = Serial.readString();  // Copy the data read from the serial port
        lorawan.sendCommand(ch);
    }
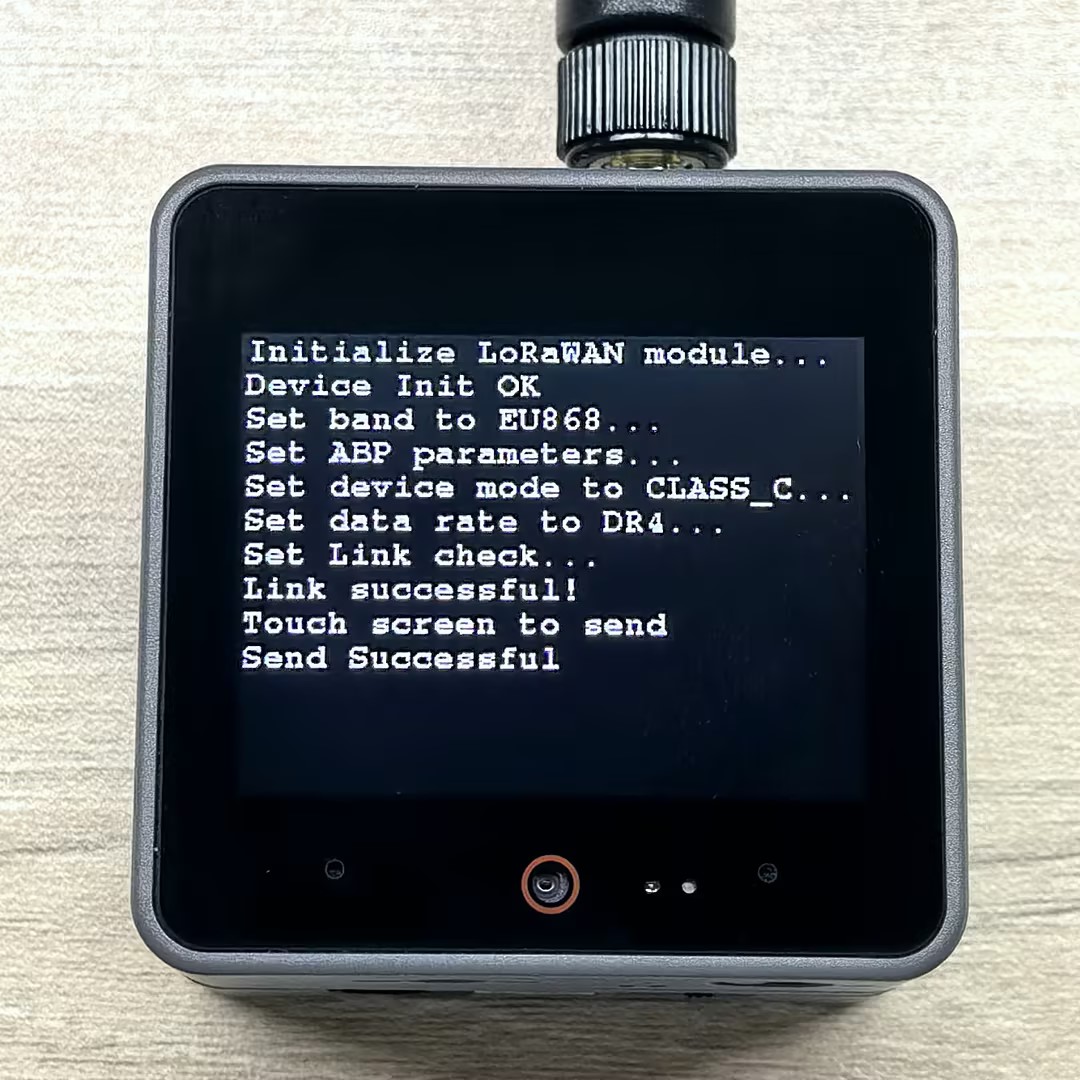
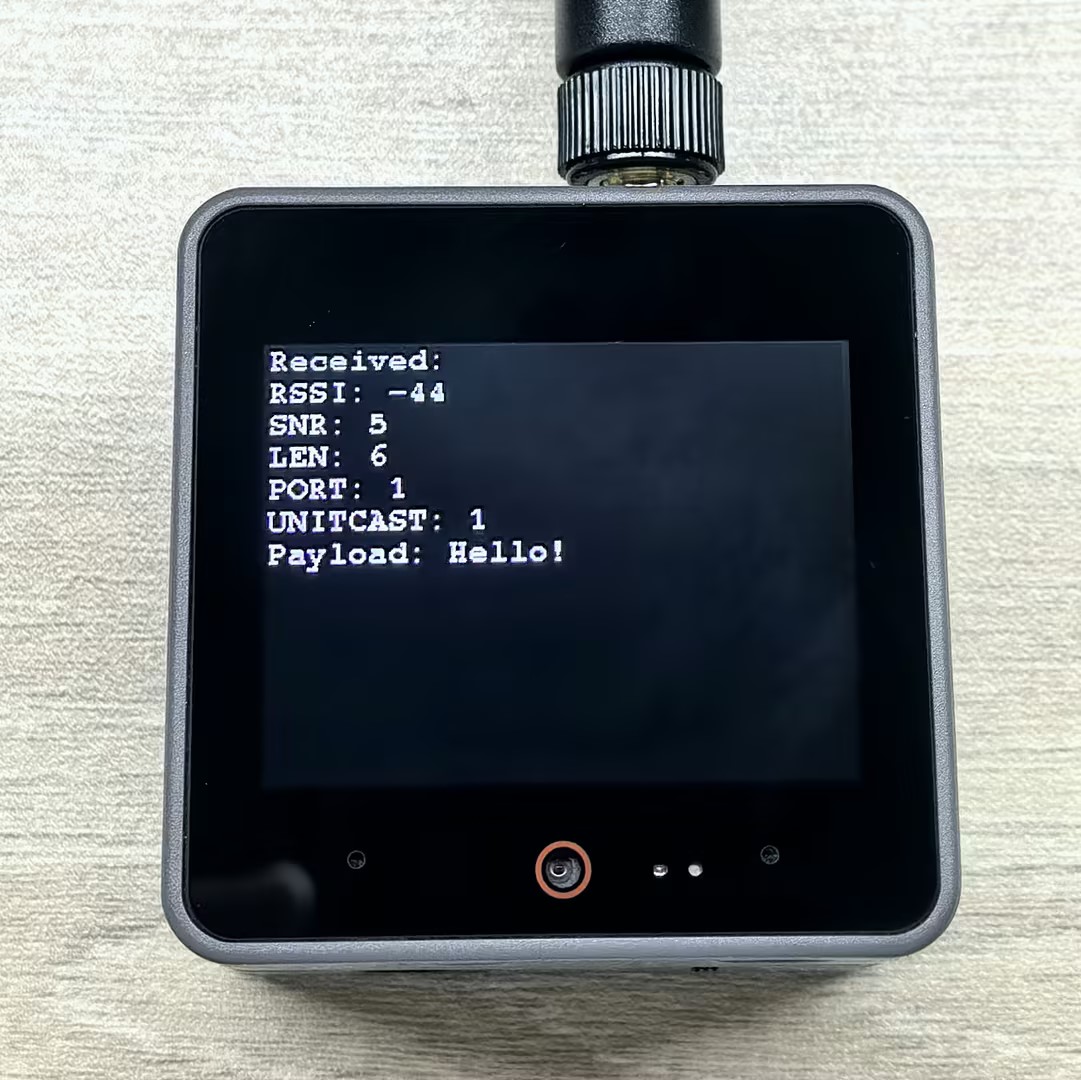
}上記のサンプルを正常に書き込んだ後、OTAA と同様に、CoreS3 画面をタッチしてデータを送信します。デバイスは LoRaWAN ネットワークに接続してデータを送信します。TTN コンソールの Messaging で、Playload フィールドに 48 65 6C 6C 6F 21(16進数文字列、ASCII 文字列 "Hello!" を表す)を入力し、Schedule downlink ボタンをクリックします。デバイスはデータを受信して画面に表示します。
- シリアルモニター出力例:
[Init] Initialize LoRaWAN module...
Device Init OK
[Config] Set band to EU868...
[Config] Set ABP parameters...
[Config] Set device mode to CLASS_C...
[Config] Set data rate to DR4...
[Config] Set Link check...
[Config] Link successful!
Send Successful
RSSI: -44
SNR: 5
LEN: 6
PORT: 1
UNITCAST: 1
Payload: 48656C6C6F21- CoreS3 画面表示例:
- TTN コンソールログ表示例: